
GPU Gems 3
GPU Gems 3 is now available for free online!
The CD content, including demos and content, is available on the web and for download.
You can also subscribe to our Developer News Feed to get notifications of new material on the site.
Chapter 27. Motion Blur as a Post-Processing Effect
Gilberto Rosado
Rainbow Studios
27.1 Introduction
One of the best ways to simulate speed in a video game is to use motion blur. Motion blur can be one of the most important effects to add to games, especially racing games, because it increases realism and a sense of speed. Motion blur also helps smooth out a game's appearance, especially for games that render at 30 frames per second or less. However, adding support for motion blur to an existing engine can be challenging because most motion blur techniques require the scene to be rendered in a separate pass in order to generate a per-pixel velocity buffer. Such a multipass approach can be limiting: Many applications cannot afford to send the scene through the entire graphics pipeline more than once and still manage to reach the application's target frame rate.
Other ways to generate a per-pixel velocity map include using multiple render targets and outputting the velocity information to one of the render targets. A major disadvantage of this strategy is that it requires modifying all the scene's shaders to add code that will calculate velocity and output it to the second render target. Another disadvantage is that rendering to multiple render targets may decrease performance on some platforms. Additionally, some platforms have limited rendering memory and require a tiling mechanism in order to use multiple render targets on frame buffers that are 1280x720 or larger.
In this chapter, we introduce a technique that uses the depth buffer as a texture input to a pixel shader program in order to generate the scene's velocity map. The pixel shader program computes the world-space positions for each pixel by using the depth value—which is stored in the depth buffer—in conjunction with the current frame's view-projection matrix. Once we determine the world-space position at that pixel, we can transform it by using the previous frame's view-projection matrix. Then we can compute the difference in the viewport position between the current frame and the previous frame in order to generate the per-pixel velocity values. A motion blur effect can then be achieved by using this velocity vector as a direction to gather multiple samples across the frame buffer, averaging them out along the way to generate a blur.
The benefit of our technique is that it can be performed as a post-processing step. This ability allows it to be easily integrated into existing engines targeting hardware that allows sampling from a depth buffer as a texture.
Figures 27-1 and 27-2 show how different a scene can look with and without motion blur. Notice how Figure 27-1 gives a strong illusion of motion.
)
Figure 27-1 A Scene with Motion Blur
)
Figure 27-2 A Scene Without Motion Blur
27.2 Extracting Object Positions from the Depth Buffer
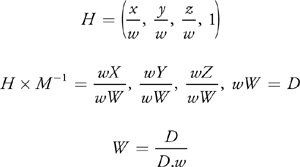
When an object is rendered and its depth values are written to the depth buffer, the values stored in the depth buffer are the interpolated z coordinates of the triangle divided by the interpolated w coordinates of the triangle after the three vertices of the triangles are transformed by the world-view-projection matrices. Using the depth buffer as a texture, we can extract the world-space positions of the objects that were rendered to the depth buffer by transforming the viewport position at that pixel by the inverse of the current view-projection matrix and then multiplying the result by the w component. We define the viewport position as the position of the pixel in viewport space—that is, the x and y components are in the range of -1 to 1 with the origin (0, 0) at the center of the screen; the depth stored at the depth buffer for that pixel becomes the z component, and the w component is set to 1.
We can show how this is achieved by defining the viewport-space position at a given pixel as H. Let M be the world-view-projection matrix and W be the world-space position at that pixel.
The HLSL/Cg code in Listing 27-1 uses the previous equations in a full-screen post-processing pixel shader to compute the world-space position of the objects rendered at a given pixel, using the depth buffer and the inverse of the current view-projection matrix.
Example 27-1. Shader Code That Extracts the Per-Pixel World-Space Positions of the Objects That Were Rendered to the Depth Buffer
// Get the depth buffer value at this pixel.
float zOverW = tex2D(
    depthTexture,
    texCoord); // H is the viewport position at this pixel in the range -1 to 1.
float4 H = float4(texCoord.x * 2 - 1, (1 - texCoord.y) * 2 - 1, zOverW,
                  1); // Transform by the view-projection inverse.
float4 D = mul(
    H, g_ViewProjectionInverseMatrix); // Divide by w to get the world position.
float4 worldPos = D / D.w;
Once we determine the world-space position, we can transform it by using the previous frame's view-projection matrix and take the difference in screen position to compute the pixel's velocity, as shown in Listing 27-2.
Example 27-2. Shader Code That Computes the Per-Pixel Velocity Vectors That Determine the Direction to Blur the Image
// Current viewport position
float4 currentPos =
    H; // Use the world position, and transform by the previous view-
// projection matrix.
float4 previousPos =
    mul(worldPos,
        g_previousViewProjectionMatrix); // Convert to nonhomogeneous points
// [-1,1] by dividing by w. previousPos
// /= previousPos.w; // Use this
// frame's position and last frame's to
// compute the pixel
// velocity.
float2 velocity = (currentPos - previousPos) / 2.f;
The method for acquiring the depth buffer for use as a texture varies from platform to platform and depends on the graphics API used. Some details on how to access the depth buffer as a texture are discussed in Gilham 2006. If the target hardware does not support sampling from depth buffers as textures, a depth texture may be generated by using multiple render targets and then outputting depth to a separate render target or outputting the depth value to the color buffer's alpha channel.
27.3 Performing the Motion Blur
Once we have the pixel velocities, we can sample along that direction in the color buffer, accumulating the color values to achieve the motion-blurred value, as shown in Listing 27-3.
Example 27-3. Shader Code That Uses the Velocity Vector at the Current Pixel to Sample the Color Buffer Multiple Times to Achieve the Motion Blur Effect
// Get the initial color at this pixel.
float4 color = tex2D(sceneSampler, texCoord);
texCoord += velocity;
for (int i = 1; i < g_numSamples; ++i, texCoord += velocity)
{
  // Sample the color buffer along the velocity vector.
  float4 currentColor = tex2D(sceneSampler, texCoord);
  // Add the current color to our color sum.
  color += currentColor;
} // Average all of the samples to get the final blur color.
float4 finalColor = color / numSamples;
We can see this technique in action in Figure 27-3. Notice how the terrain near the viewer is a lot blurrier than the terrain in the distance.
)
Figure 27-3 A Terrain with Our Full-Screen Motion Blur Effect
27.4 Handling Dynamic Objects
This technique works perfectly for static objects because it only takes into account the movement of the camera. However, if more accuracy is needed to record the velocity of dynamic objects in the scene, we can generate a separate velocity texture.
To generate a velocity texture for rigid dynamic objects, transform the object by using the current frame's view-projection matrix and the last frame's view-projection matrix, and then compute the difference in viewport positions the same way as for the post-processing pass. This velocity should be computed per-pixel by passing both transformed positions into the pixel shader and computing the velocity there. This technique is described in the DirectX 9 SDK's motion blur sample (Microsoft 2006).
27.5 Masking Off Objects
Depending on the application, you might want to mask off certain parts of the scene so that they do not receive motion blur. For example, in a racing game, you might want to keep all the race cars crisp and detailed, rather than blurry. An easy way to achieve this is to render a mask to a separate texture or to the alpha channel of the color buffer and use this mask to determine what pixels should be blurred.
27.6 Additional Work
This technique for calculating the world-space position of objects in the scene based on the scene's depth buffer is very useful. We can use this technique to implement other graphics effects: Depth of field is an effect that fits nicely into this technique, as described in Gilham 2006, and scene fog can also be implemented as a post-processing step by using the depth buffer.
27.7 Conclusion
In this chapter, we discussed a method for retrieving the world-space position of objects by using the depth value stored in the depth buffer, and we showed how that information can be used as a basis for implementing motion blur in a game engine. Implementing motion blur as mostly a post-processing effect allows it to be easily integrated into an existing rendering engine while offering better performance than traditional multipass solutions.
27.8 References
Gilham, David. 2006. "Real-Time Depth-of-Field Implemented with a Post-Processing Only Technique." In Shader X5, edited by Wolfgang Engel, pp. 163–175. Charles River Media.
Microsoft Corporation. 2006. "DirectX 9.0 Programmer's Reference."
- Contributors
- Foreword
- Part I: Geometry
-
- Chapter 1. Generating Complex Procedural Terrains Using the GPU
- Chapter 2. Animated Crowd Rendering
- Chapter 3. DirectX 10 Blend Shapes: Breaking the Limits
- Chapter 4. Next-Generation SpeedTree Rendering
- Chapter 5. Generic Adaptive Mesh Refinement
- Chapter 6. GPU-Generated Procedural Wind Animations for Trees
- Chapter 7. Point-Based Visualization of Metaballs on a GPU
- Part II: Light and Shadows
-
- Chapter 8. Summed-Area Variance Shadow Maps
- Chapter 9. Interactive Cinematic Relighting with Global Illumination
- Chapter 10. Parallel-Split Shadow Maps on Programmable GPUs
- Chapter 11. Efficient and Robust Shadow Volumes Using Hierarchical Occlusion Culling and Geometry Shaders
- Chapter 12. High-Quality Ambient Occlusion
- Chapter 13. Volumetric Light Scattering as a Post-Process
- Part III: Rendering
-
- Chapter 14. Advanced Techniques for Realistic Real-Time Skin Rendering
- Chapter 15. Playable Universal Capture
- Chapter 16. Vegetation Procedural Animation and Shading in Crysis
- Chapter 17. Robust Multiple Specular Reflections and Refractions
- Chapter 18. Relaxed Cone Stepping for Relief Mapping
- Chapter 19. Deferred Shading in Tabula Rasa
- Chapter 20. GPU-Based Importance Sampling
- Part IV: Image Effects
-
- Chapter 21. True Impostors
- Chapter 22. Baking Normal Maps on the GPU
- Chapter 23. High-Speed, Off-Screen Particles
- Chapter 24. The Importance of Being Linear
- Chapter 25. Rendering Vector Art on the GPU
- Chapter 26. Object Detection by Color: Using the GPU for Real-Time Video Image Processing
- Chapter 27. Motion Blur as a Post-Processing Effect
- Chapter 28. Practical Post-Process Depth of Field
- Part V: Physics Simulation
-
- Chapter 29. Real-Time Rigid Body Simulation on GPUs
- Chapter 30. Real-Time Simulation and Rendering of 3D Fluids
- Chapter 31. Fast N-Body Simulation with CUDA
- Chapter 32. Broad-Phase Collision Detection with CUDA
- Chapter 33. LCP Algorithms for Collision Detection Using CUDA
- Chapter 34. Signed Distance Fields Using Single-Pass GPU Scan Conversion of Tetrahedra
- Chapter 35. Fast Virus Signature Matching on the GPU
- Part VI: GPU Computing
-
- Chapter 36. AES Encryption and Decryption on the GPU
- Chapter 37. Efficient Random Number Generation and Application Using CUDA
- Chapter 38. Imaging Earth's Subsurface Using CUDA
- Chapter 39. Parallel Prefix Sum (Scan) with CUDA
- Chapter 40. Incremental Computation of the Gaussian
- Chapter 41. Using the Geometry Shader for Compact and Variable-Length GPU Feedback
- Preface