
There is a growing need among CUDA applications to manage memory as quickly and as efficiently as possible. Before CUDA 10.2, the number of options available to developers has been limited to the malloc-like abstractions that CUDA provides.
CUDA 10.2 introduces a new set of API functions for virtual memory management that enable you to build more efficient dynamic data structures and have better control of GPU memory usage in applications. In this post, we explain how to use the new API functions and go over some real-world application use cases.
There are plenty of applications where it’s just hard to guess how big your initial allocation should be. You need a larger allocation but you can’t afford the performance and development cost of pointer-chasing through a specialized dynamic data structure from the GPU.
What you really want is to grow the allocation as you need more memory, yet maintain the contiguous address range that you always had. If you have ever used libc’s realloc function or C++’s std::vector, you have probably run into this yourself.
Growing allocations
Look at the following simple C++ class that describes a vector that can grow:
class Vector {
private:
  void *d_p;
  size_t alloc_sz, reserve_sz;
public:
  Vector() : d_p(NULL), alloc_sz(0), reserve_sz(0) {}
  // Reserves some extra space in order to speed up grow()
  CUresult reserve(size_t new_sz);
  // Actually commits num bytes of additional memory
  CUresult grow(size_t new_sz);
  // Frees up all the associated resources.
  ~Vector();
};
Before CUDA 10.2, the only way to implement this concept in CUDA was to either use cudaMalloc, cudaFree, and cudaMemcpy, or to use cudaMallocManaged and cudaPrefetchAsync to commit the memory as you need it.
CUresult Vector::reserve(size_t new_sz) {  if (new_sz > reserve_sz) {
    void *new_ptr = nullptr;
#ifndef USE_MANAGED_MEMORY
    cudaMalloc(&new_ptr, new_sz);
#else
    cudaMallocManaged(&new_ptr, new_sz);
#endif
    cudaMemcpy(new_ptr, d_p, alloc_sz);
    cudaFree(d_p);
    d_p = new_ptr;
    reserve_sz = new_sz;
  }
}
CUresult Vector::grow(size_t new_sz) {
  Vector::reserve(alloc_sz + new_sz);
#ifdef USE_MANAGED_MEMORY
  cudaPrefetchAsync(d_p + alloc_sz, num, dev);
#endif
  alloc_sz += new_sz;
}

Vector::~Vector() {
  if (d_p) cudaFree(d_p);
}
While the implementation is fairly straightforward, there are a number of performance implications.
- The
cudaMallocfunction allocates more than what it needs to grow the allocation. To grow, you need to keep the old allocation and allocate a new allocation with enough room for the old allocation and the extra space, which significantly reduces how much you can grow. If the device only has 2 GiB of memory and you already have a 1 GiB vector, you can’t grow it any larger, as you would need 1 GiB plus how much you need to grow. Effectively, you can’t grow a vector that is larger than half of the GPU memory. - Each allocation must be mapped to all peer contexts, even if it is never used in those peer contexts.
- The
cudaMemcpycall adds latency to the growing request and uses precious memory bandwidth to duplicate data. This bandwidth could be better spent elsewhere. - The
cudaFreecall waits for all pending work on the current context (and all the peer contexts as well) before proceeding.
Using managed memory solves some of these issues, as you’ll see later in this post. Unfortunately using managed memory adds some compatibility issues that may not make it suitable for all applications.
- On-demand page migration isn’t available on all platforms (most notably on Windows and Tegra mobile platforms). Using
cudaMallocManagedto reserve a VA and then commit it later as needed isn’t an option on these platforms. cudaMallocManagedmemory cannot be used with CUDA interprocess communication (cudaIpc*) functions. To communicate with other processes, you must copy the data tocudaMallocmemory that is shareable, effectively duplicating the data to get around this limitation.cudaMallocManagedmemory cannot be used with graphics interop functions. You must copy the data to a registered graphics resource before using this data in a graphics API like DirectX, OpenGL, or Vulkan.
The new CUDA virtual memory management functions are low-level driver functions that allow you to implement different allocation use cases without many of the downsides mentioned earlier.
The need to support a variety of use cases makes low-level virtual memory allocation quite different from high-level functions like cudaMalloc. Instead of a single function, there are four primary functions that you’ll work with, which we describe in more detail in later sections:
cuMemCreate: Creates a physical memory handle.cuMemAddressReserve: Reserves a virtual address range.cuMemMap: Maps a physical memory handle to a virtual address range.cuMemSetAccess: Sets the memory access rights for each device to the allocation.
These functions can be used simultaneously with the runtime functions like cudaMalloc and cudaMallocManaged, but they require loading these entry points directly from the driver. For more information about how to interface with driver functions like these, see the samples included in this post or the various samples distributed with the CUDA Toolkit.
Here’s how these new virtual memory management functions work.
Allocating physical memory
First, you need physical memory to operate on, for which you make use of the new function cuMemCreate. This function takes the handle CUmemGenericAllocationHandle that describes the properties of the memory to allocate, like where is this memory physically located or what kind of shareable handles should be available. For now, the only supported type of memory is pinned device memory on the current device but there are more properties to come in future CUDA releases.
Next, you need the size. Unlike cuMemAlloc, cuMemCreate only accepts sizes that are aligned to the granularity appropriate for the memory described by the handle. Use cuMemGetAllocationGranularity to get this granularity and use it to pad the requested size.
Now, you have all the information that you need to create a physical allocation, as the following code example shows:
size_t granularity = 0;
CUmemGenericAllocationHandle allocHandle;
CUmemAllocationProp prop = {};
prop.type = CU_MEM_ALLOCATION_TYPE_PINNED;
prop.location.type = CU_MEM_LOCATION_TYPE_DEVICE;
prop.location.id = currentDev;
cuMemGetAllocationGranularity(&granularity, &prop,
                                         CU_MEM_ALLOC_GRANULARITY_MINIMUM);
padded_size = ROUND_UP(size, granularity);
cuMemCreate(&allocHandle, padded_size, &prop, 0);
You can use the allocation handle to map the allocated memory so that it’s accessible to the rest of CUDA, as described in the next section. You can also export this allocation handle to something that can be used for inter-process communication, or even graphics interop. We come back to these use cases in later sections.
Mapping memory
To map an allocation with the new CUDA virtual memory management functions, you must first request a virtual address (VA) range from CUDA. This is similar to how VirtualAlloc or mmap work. With CUDA, use cuMemAddressReserve to get a suitable address.
Next, map the physical handle to the address retrieved using cuMemMap.
/* Reserve a virtual address range */
cuMemAddressReserve(&ptr, padded_size, 0, 0, 0);
/* Map the virtual address range
 * to the physical allocation */
cuMemMap(ptr, padded_size, 0, allocHandle, 0);
You continue to use the padded size calculated earlier. Currently, CUDA does not support mapping part of a physical allocation, so the sizes need to match. This may change in the future.
While you could try to access the address from the device now, it would generate a device fault as if you accessed invalid memory. This is because a newly mapped allocation is always mapped as CU_MEM_ACCESS_FLAGS_PROT_NONE for all devices, meaning any access to this VA range from any device is invalid and triggers an error. The reason for this is to make the mapping operations of this memory scalable. We come back to this in the Use case: Scalable peer mappings section later in the post.
To enable access to this memory mapping, you then initialize the access description structure and call cuMemSetAccess, as shown in the following code example:
CUmemAccessDesc accessDesc = {};accessDesc.location.type = CU_MEM_LOCATION_TYPE_DEVICE;
accessDesc.location.id = currentDev;
accessDesc.flags = CU_MEM_ACCESS_FLAGS_PROT_READWRITE;
cuMemSetAccess(ptr, size, &accessDesc, 1);
Now, you can access any address in the range [ptr, ptr+size] from the current device without a problem.
Freeing memory
Of course, all the functions described so far have corresponding free functions. To unmap a mapped VA range, call cuMemUnmap on the entire VA range, which reverts the VA range back to the state it was in just after cuMemAddressReserve. When you are done with the VA range, cuMemAddressFree returns it to CUDA to use for other things.
Finally, cuMemRelease invalidates the handle and, if there are no mapped references left, releases the backing store of memory back to the operating system. The following code example shows what that looks like:
cuMemUnmap(ptr, size);
cuMemRelease(allocHandle);
cuMemAddressFree(ptr, size);
While we don’t go into too much detail about these functions here, you can look at the CUDA samples as well as the examples referenced in this post to see how they all work together.
Putting it together
The earlier sections in this post went through an alternative implementation of cudaMalloc using the CUDA virtual memory management functions. These functions are much more verbose and require more upfront knowledge of how the application uses the allocation. We show you the benefits of this extra verbosity later in this post.
Go back to the Vector example. With the CUDA virtual memory management functions, you can commit memory to regions of a virtual address space, much like you can with cudaPrefetchAsync and cudaMallocManaged. Additionally, if you run out of reserved space, you don’t need to issue a cudaMemcpy call, and you don’t need to allocate any more memory than the original request. Just remap the allocations that you already have to their new address.
First, you need a VA range to map into, which was covered earlier. Often you already have a VA and you just want to append to that VA to grow it. The cuMemAddressReserve function accepts a fixedAddr parameter that lets you hint at a VA starting address that you want. If CUDA cannot use this VA for whatever reason, it ignores the hint and tries to fulfill the request otherwise. This makes it useful for the Vector class:
CUresult Vector::reserve(size_t new_sz) {
// ...
// Try to reserve at the end of old_ptr
status = cuMemAddressReserve(&new_ptr, (aligned_sz - reserve_sz),
                                               0ULL, old_ptr + reserve_sz, 0ULL);

if ((status != CUDA_SUCCESS) ||
     (new_ptr != (old_ptr + reserve_sz))) {
  // Nope, something went wrong. You couldn't get the address you wanted,
  // so fall back to the slow path.
  if (new_ptr != 0ULL) {
    // Don’t leak new_ptr if you got one.
    (void)cuMemAddressFree(new_ptr, (aligned_sz - reserve_sz));
  }
  // Now reserve the new, bigger VA range.
  status = cuMemAddressReserve(&new_ptr, aligned_sz,
                                                 0ULL, 0ULL, 0ULL);
  // You have a new address range reserved, so remap.
  // ...
}
Now that you have a VA range, time to create the chunk that you need, map it, and provide access rights to it. Stash information for use later, like the handle and the size of the allocation.
CUresult Vector::grow(size_t new_sz) {
// …
// Pad the size to the correct granularity
padded_sz = ROUND_UP(new_sz - alloc_sz, chunk_sz);
// Create the chunk that you need
cuMemCreate(&handle, padded_sz, &prop, 0);
// Map it at the end of ptr
cuMemMap(ptr + alloc_sz, padded_sz, 0ULL, handle, 0ULL);
// Set the access
cuMemSetAccess(ptr + alloc_sz, padded_sz, &accessDesc, 1ULL);
// Keep track of the metadata (for later)
handles.push_back(handle);
handle_sizes.push_back(padded_sz);
}
There is a case where you might not be able to reserve a contiguous VA right after your current VA range. Maybe it is taken by another allocation. You can fall back to a slower path of freeing and remapping the virtual addresses to a new, larger address range. Go back to Vector::reserve and implement this fallback path.
Because the handles and sizes are stashed away in allocation order, you can just unmap the old VA range, then map each handle into the larger VA range at their correct offset. The following code example shows what this looks like:
CUresult Vector::reserve(size_t new_sz) {
// ...
// You have a new address range reserved, so remap.
CUdeviceptr ptr = new_ptr;
cuMemUnmap(d_p, alloc_sz);

// And remap them to the new VA range, enabling their access
for (size_t i = 0ULL; i < handles.size(); i++) {
    const size_t hdl_sz = handle_sizes[i];
    cuMemMap(ptr, hdl_sz, 0ULL, handles[i], 0ULL);
    ptr += hdl_sz;
}
cuMemSetAccess(new_ptr, new_sz, &accessDesc, 1ULL);
// Free up our previous VA range
for (size_t i = 0ULL; i < va_ranges.size(); i++) {
    cuMemAddressFree(va_ranges[i].start, va_ranges[i].sz);
}
And there you have it, a working implementation of a growing vector class with the new CUDA virtual memory management functions.
Performance results
Figure 2 shows the time it takes to successively double the size of the vector, with the X-axis being the final committed memory size of the vector.
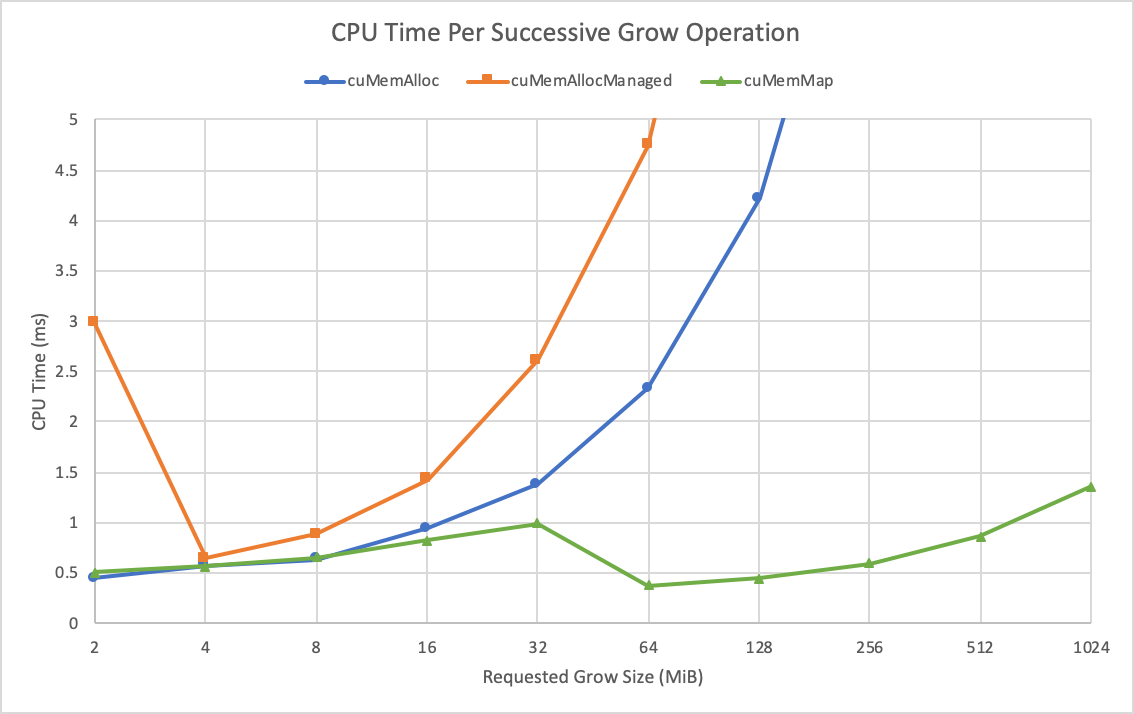
As you can see, not pre-reserving your VA range scales harshly for cuMemAlloc and cuMemAllocManaged. As you double the size of the array, you have to do a lot of these memcpy calls to reallocate the VA range to a larger one. The cuMemMap function avoids memory copies and is clearly more efficient.
For an additional metric, remove the reserve part of these algorithms from the measured time. This can be done by first calling Vector::reserve with the maximum amount of memory you’re going to need; in this case, it’s 1 GiB. Figure 3 shows the time for doubling the size of the vector, assuming that you reserve 1 GiB before running the benchmark.
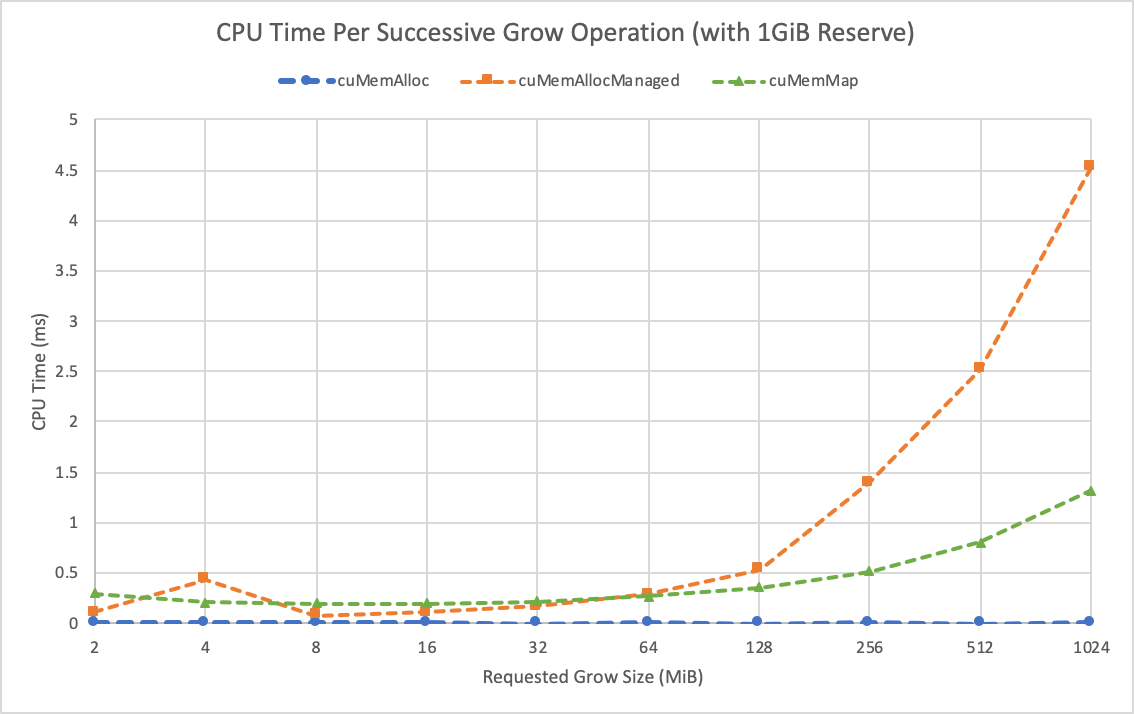
Figure 4 estimates the total memory usage for each method, as you grow the vector.
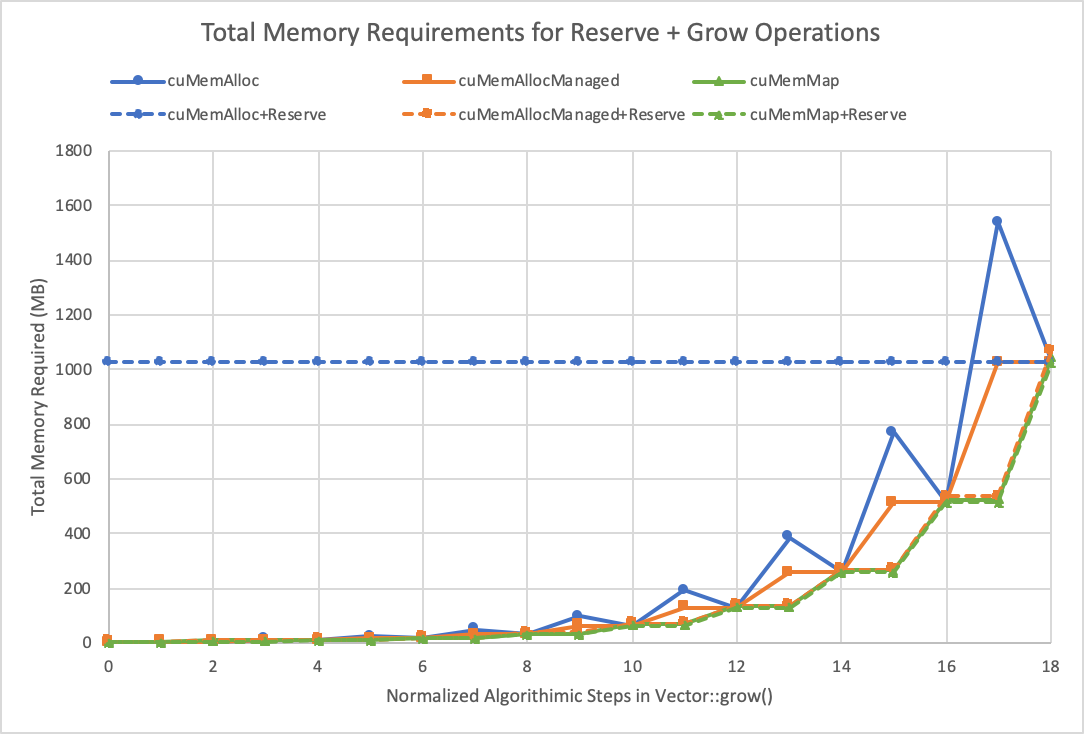
Now you start to see the benefits of using the CUDA virtual memory management functions. While the standard cuMemAlloc (cudaMalloc) path with the reservation is easily the fastest, it’s also the most memory hungry overall: it commits all the memory that it reserved, even if it doesn’t need it. The spikes in memory usage in the cuMemAlloc without reservation method are the additional allocation that you need to grow. The spike grows exponentially with the amount that you need to grow by.
On the other hand, with the cuMemAllocManaged version with pre-reservation, the application allocates the 1 GiB that it needs in reserve. It then calls cuMemPrefetchAsync and synchronizes as the vector needs to grow. Without the reserve, the application allocates a larger buffer and performs a copy as it does in the cudaMalloc implementation, but this allocation is not paged in until it has been touched.
Because only part of the allocation is touched (the part that is being copied to), only the previous allocation’s size is needed. Then the old buffer is freed and the untouched part is prefetched, ensuring that you never require more than the previous size of the buffer. That said, this method does release a dirty allocation back to the OS and you end up with a clean allocation after prefetching the untouched part of the array.
The CUDA virtual memory management functions keep a close pace with cuMemAllocManaged, but there is some jitter on whether you can append to the VA range and thus fall back to the slow path described earlier. Even then, this slow path is still much faster than the other implementations.
When you use cuMemAddressReserve to reserve the entire VA range upfront and just allocate new chunks and map them in as you grow, you see that you closely match cuMemAllocManaged+Reserve, and even scale better after 64-MiB resizes.
As you never allocate more memory than you need at any point, even the slow remap case is always under budget for the allocation, just like cuMemAllocManaged. The difference between these two methods is that a copy to a new buffer isn’t needed, therefore delaying the need to commit memory until the “prefetch” or chunk create time.
See what kind of performance benefits you can get by running vector_example code yourself.
Application use case: Join operation in OLAP
One of the important use cases for the growing allocator can be found in data analytics. The most compute-intensive operation in database applications is the join operation. For more information about the join algorithm and its applications, see the How to Get the Most out of GPU Accelerated Database Operators GTC 2018 talk.
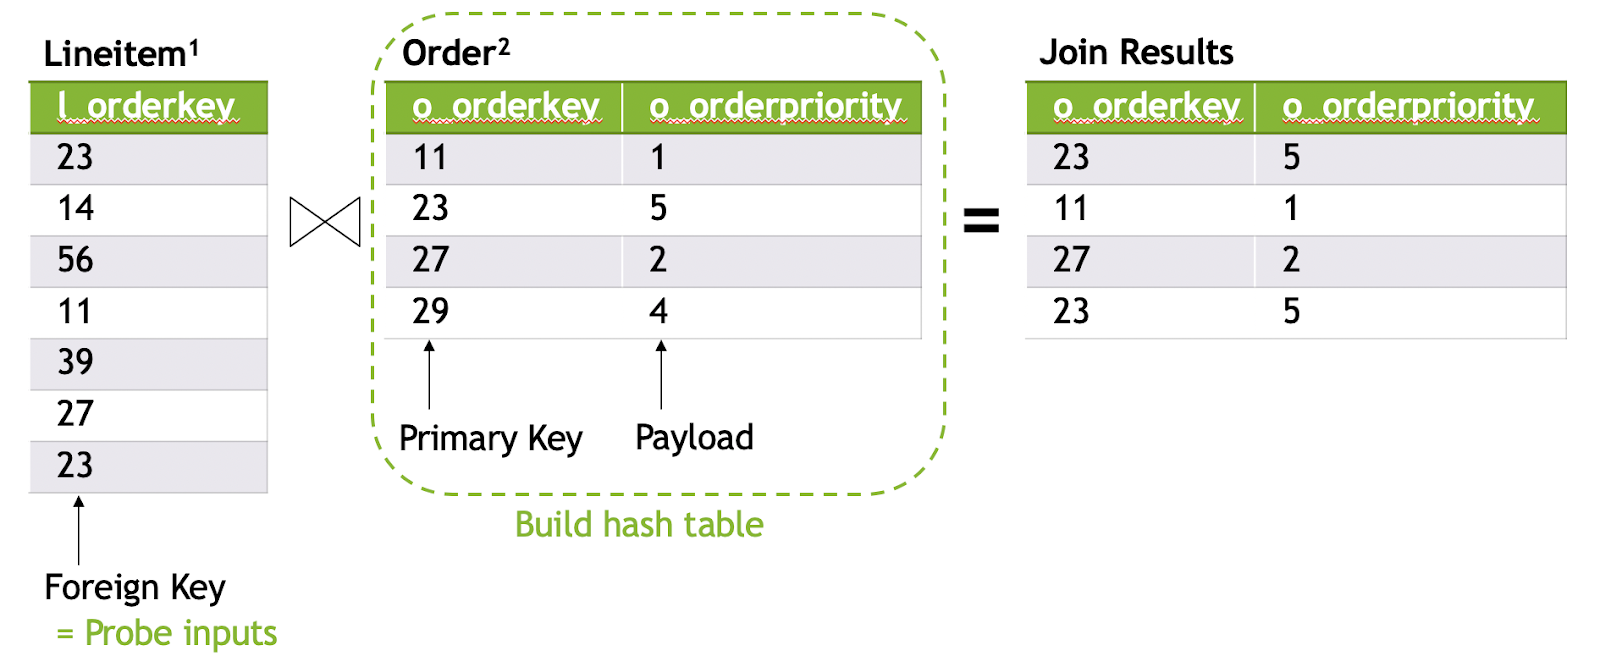
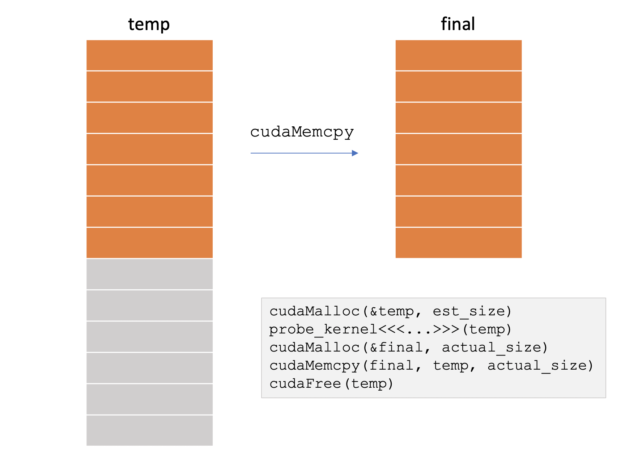
In short, a hash-based join of two tables consists of two phases: building a hash table for keys from the right table (order) and probing the hash table by scanning the left table (lineitem), as Figure 5 shows.
The output size of a join is data-dependent and not known in advance. Typically, an output size estimator is implemented to provide the output buffer to the probing kernel. However, an estimate is never 100% accurate, so you end up allocating more memory than needed. How can you pass the unused physical memory back to the driver? With cudaMalloc, that would require allocating a new buffer, copying data from the old buffer, and freeing the old buffer, similar to the growing allocations example discussed earlier, as Figure 6 shows.
Here is the corresponding code in the RAPIDS cuDF 0.13 join implementation:
rmm::device_vector<size_type> left_indices;
rmm::device_vector<size_type> right_indices;
...
  left_indices.resize(estimated_size);
  right_indices.resize(estimated_size);
  ...
  probe_hash_table<<<...>>>(...);
  ...
  join_size = write_index.value();
  ...
left_indices.resize(join_size);
right_indices.resize(join_size);
The GPU memory allocation/free and the memory copy overhead are hidden in the rmm::device_vector class. The problem with the current implementation is that you must provide twice as much GPU memory available for the output buffers, and you can easily run out of memory during the resize operation. This is exactly what the proposed Vector class from the previous section can solve.
The rmm::device_vector class can be improved using the CUDA virtual memory management functions as discussed previously, which would allow you to support larger join outputs, and increase performance by getting rid of the copy. NVIDIA is considering adding this to the RAPIDS Memory Manager library.
Use case: Avoiding device synchronization on cudaFree
Using cudaFree today has an unintended side effect that applications have come to rely on: synchronization. When calling cudaFree, any in-flight work on the device is completed and the CPU thread calling the function is blocked until all this work is completed. This has some programming model advantages and disadvantages, but the flexibility to opt out of this behavior was never really available to applications until now.
With the CUDA virtual memory management functions, you can’t assume that prior work synchronizes during a call to cuMemUnmap or cuMemSetAccess. However, these functions may synchronize anyway on some platform configurations, such as systems with Maxwell or older GPU architectures.
Example
The following example shows the effect of this synchronization using cudaMalloc and cudaFree. Here, N independent threads all launch work on separate, non-blocking streams. In an ideal world, you should observe N concurrent spinKernel launches on the GPU, and few gaps in each stream. Intuitively, introducing a thread 0 that allocates and frees its own memory concurrently should not have any effect:
__global__ void spinKernel();

// thread 1..N
while (keep_going) {
  spinKernel<<<1,1, stream[i]>>>();
}

// thread 0
for (size_t i = 0; i < 100; i++) {
  cudaMalloc(&x, 1);
  cudaFree(x);
}
Figure 7 shows the Visual Profiler timeline for this test.
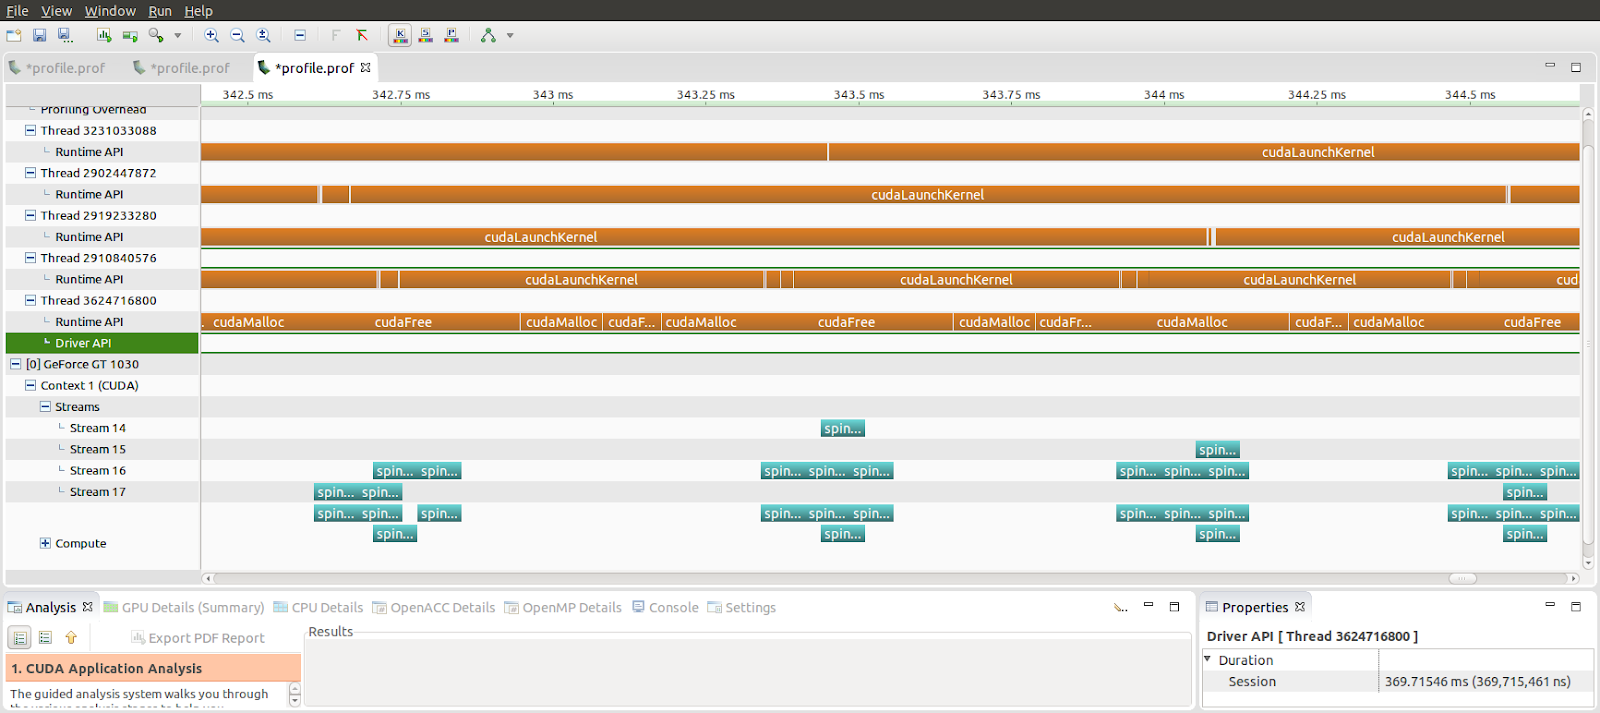
There are gaps between the kernels (in real blue in figure 7) and cudaFree (in the last row of brown) returns only when the previous pending work completes. The application is losing a lot of throughput due to an unrelated thread doing unrelated operations.
Optimizing
With the new virtual memory management functions, you can now release the allocation back to the driver and to the operating system without paying the cost of synchronizing all outstanding work. To see how this is done, see the sync_main.cu example. Figure 8 shows the resulting Visual Profiler timeline.
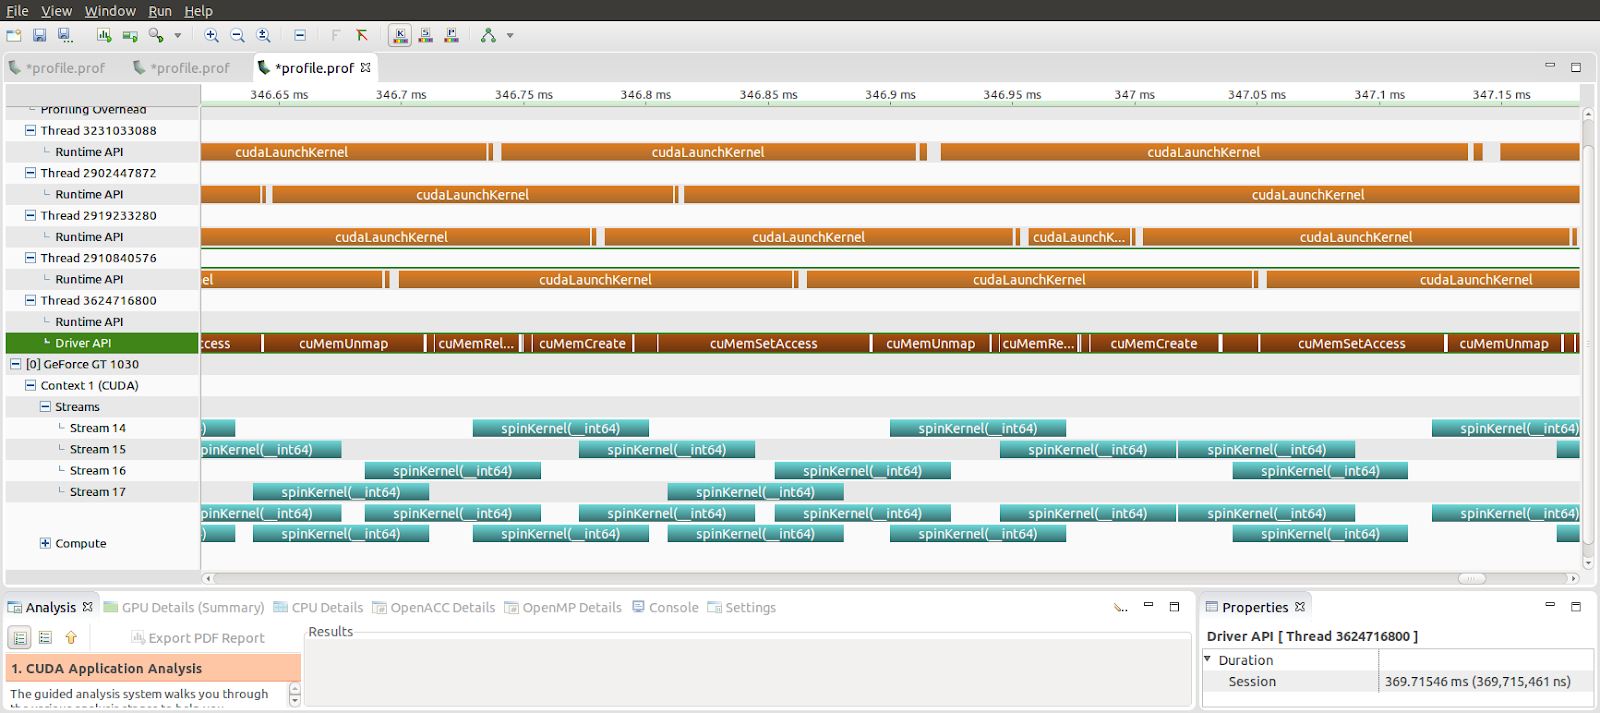
There is an increased amount of overlap throughout all the CUDA virtual memory management calls. Compared to the previous version, there aren’t any places where there isn’t something running on the GPU while you’re modifying the memory layout of the device.
You can also see this synchronization effect with cudaFree when enabling peer-to-peer access using cudaEnablePeerAccess in a multi-GPU platform. In this case, you end up synchronizing all the peer-mapped devices on each cudaFree call, even if the allocation was only used by a single device. With the new CUDA virtual memory management functions, this is no longer an issue.
Use case: Scalable peer mappings
The cudaEnablePeerAccess function is used to enable peer device access to allocations, but at the time of the call, it forces all prior cudaMalloc allocations to be mapped to the target peer device enabled. In addition, cudaEnablePeerAccess forces all future cudaMalloc allocations to also be mapped to the target peer device, as well as the source device.
For easier development, the automatic peer mappings can be quite desirable as it eliminates needing to track the mapping state of an allocation for each device and avoid having to debug invalid device address access issues that you might run into.
Unfortunately, the ease of use that cudaEnablePeerAccess gives can come at a performance cost that is non-obvious from reading the source code directly. Typical cudaMalloc calls have a runtime complexity of O(lg(N)), where N is the number of prior allocations. This is primarily due to internal bookkeeping.
Meanwhile, the run-time complexity of the cudaEnablePeerAccess API is roughly O(N * lg(N)) where N is the number of allocations made on the source device that need to be mapped to the destination device. Often this is called for each device pair to enable full bidirectional peer access, being a total O(D * D * N * lg(N)), where D is the number of devices. Also, as mentioned earlier, cudaMalloc must now map its allocations to all devices with peer access enabled. This means that the runtime complexity now scales as O(D * lg(N)).
Many applications usually only need to communicate using a few allocations, meaning that not all allocations must necessarily be mapped to all the devices. But you pay the cost of these additional mappings when you just need a few.
Here’s where the new CUDA virtual memory management functions can help. The cuMemSetAccess function allows you to target specific allocations to peer map to a specific set of devices. While this still scales with the number of devices that access it, the common case of just one device remains O(lg(N)). In addition, you don’t need cudaEnablePeerAccess any more, leaving cudaMalloc calls fast and paying the cost of the additional mappings only where needed.
To see how multi-GPU handling works in practice, see the sample.
Other notable use cases
Here are some other use cases to consider:
- Operating system native interprocess communication
- Export to graphics
Operating system native interprocess communication
The new CUDA virtual memory management functions do not support the legacy cuIpc* functions with their memory. Instead, they expose a new mechanism for interprocess communication that works better with each supported platform. This new mechanism is based on manipulating system–specific handles. On Windows, these are of type HANDLE or D3DKMT_HANDLE, while on Linux-based platforms, these are file descriptors.
To get one of these operating system–specific handles, the new function cuMemExportToShareableHandle is introduced. The appropriate request handle types must be passed to cuMemCreate. By default, memory is not exportable, so shareable handles are not available with the default properties.
After exporting the allocation to an OS-specific handle, you can transfer the handle to another process in the usual way: Linux can use Unix-domain sockets and Windows can use DuplicateHandle. The other process may then use cuMemImportFromShareableHandle and get back a CUmemGenericAllocationHandle value that the rest of the CUDA virtual memory management functions can work with.
The CUDA sample memMapIpcDrv shows how this works in practice. This sample works on all Linux and Windows platforms that support the CUDA virtual memory management functions.
Export to graphics
There are some cases where you’d like your CUDA application to work in a completely headless mode without any graphics involved. Other times, as in the case of large physics-based simulations, you have to visualize the results in some way.
Before CUDA 10.2, the applications and libraries had to know ahead of time that they wanted to export memory for graphics, and what graphics library they needed to use or bind to. Then, they had to implement code for that graphics library to allocate the memory and import it into CUDA to use.
Alternatively, they could ask the application to issue a memcpy call to a temporary buffer that was already registered with the graphics library that the application needed. However, as mentioned earlier, memcpy adds a lot of latency and wastes memory bandwidth.
Following the same code paths referenced for interprocess communication, you can also use the OS-specific shareable handle with other user mode drivers, like Vulkan or OpenGL. This enables you to allocate memory with the CUDA virtual memory management functions and import this memory to all graphics libraries that can support the OS-specific handle.
While we don’t have a sample that exposes this specific capability yet, you can look at the following Vulkan and OpenGL extensions and piece it together with the memMapIpcDrv sample from earlier:
Conclusion
CUDA 10.2 introduced the new CUDA virtual memory management functions. These new functions enable many new use cases and performance optimizations that applications using CUDA can take advantage of. We described some of these use cases in this post, but we’re interested to hear what you can do with this new feature.
Look at some of the CUDA samples released with the CUDA 10.2 toolkit, or check out the full code samples referenced in this post.
Try these out and let us know what you think!
