In the past several months, many of us have grown accustomed to seeing our doctors over a video call. It’s certainly convenient, but after the call ends, those important pieces of advice from your doctor start to slip away. What was that new medication I needed to take? Were there any side effects to watch out for?
Conversational AI can help in building an application to transcribe speech as well as highlight important phrases from that transcript. NVIDIA Riva is an SDK that reduces your time in building and deploying state-of-the-art deep learning models that can be used for these tasks.
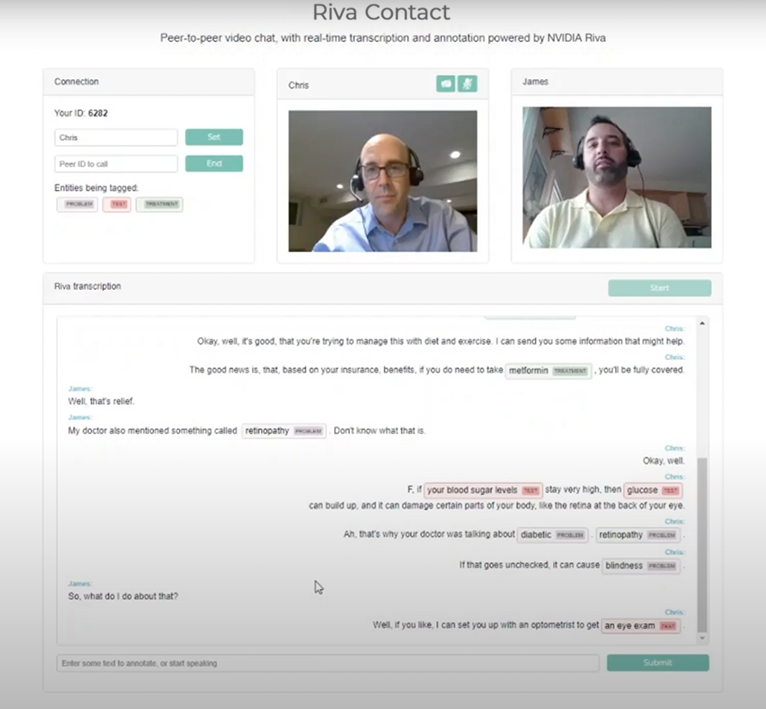
In this post, we show you how to build a web app that can transcribe speech from a live video chat and tag key phrases in the transcript. The video chat uses PeerJS, an open-source, peer-to-peer chat framework based on WebRTC. For live transcription, you use automatic speech recognition (ASR) from Riva. Tagging the key phrases in the transcript uses named entity recognition (NER), also from Riva. We also show you how to train an NER model using data from the medical domain. Though we do include code examples, we omit some technical details in the interest of clarity, so we encourage you to take a look at the Riva Samples Docker container.
The starting point for this app is a simple peer-to-peer, video call web app. It contains the following resources:
- One HTML page
- One client JavaScript file
- One server JavaScript file, to host the assets and set up the peer-to-peer connection
We kept the tutorial to a bare minimum, so keep in mind that a real application should be significantly more complex. It would include things like identity and session management, alerts, analytics, and more robust network handling.
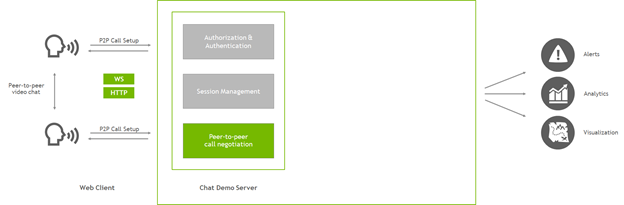
In this post, we focus on how to add ASR and NLP capabilities to the web app and skip some details about the app structure. To summarize the app, it’s a simple server, implemented in Node.js, that uses Express to host web assets, and PeerJS to help clients connect to each other in a peer-to-peer, WebRTC video chat. On the client, the browser loads the web page, then talks to the server to help set up a connection with a peer. After that peer connection is established, the two clients communicate directly with each other. Video is no longer routed through the server.
At this point, users can load the webpage, contact another user, and have a live video chat.
Adding ASR and NLP
NVIDIA Riva is an SDK to quickly deploy high-performance, conversational AI services. The Riva quick start resources offer an easy-to-follow guide to deployment to the Riva inference server. After downloading the resources to your server, this comes down to a few basic steps:
- Configure the deployment in
config.sh. - Download, optimize, and prepare the models by running
riva_init.sh. - Launch the Riva skills server, with
riva_start.sh.
After the server is launched, it creates several gRPC endpoints to help the app communicate with Riva. To ensure everything is working correctly, try launching the client container from the server where you’ve set up Riva. Call riva_start_client.sh, then check out the example clients, explore the notebooks, and get a sense for what Riva offers.
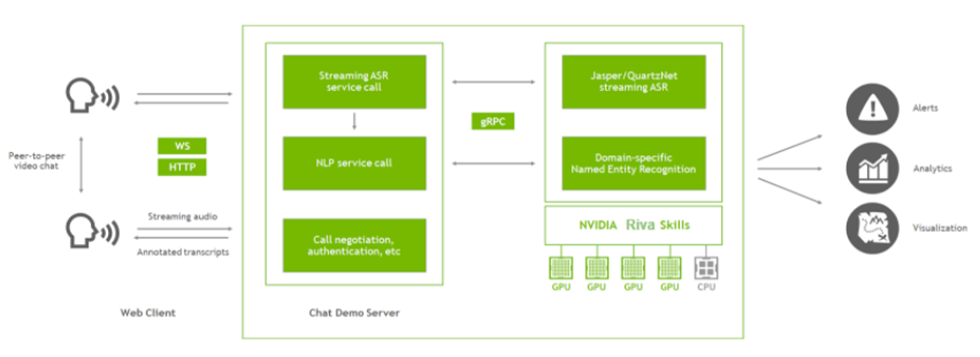
Figure 3 shows the main components of the app, now that you’ve added Riva. The chat demo server (Node.js app) still sets up the video call, and now it also communicates with the Riva server.
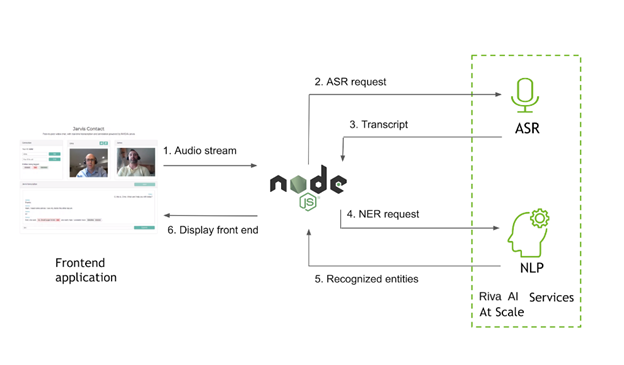
In the app, you use Riva for two features: to get a streaming transcript of the conversation and to tag key phrases (named entities) in that transcript. To do this, extract an audio stream from the client and pass that audio to the Node.js server. The server calls Riva, using gRPC, to get transcripts and named entities, and passes the results back to the client. The client can then render the transcripts in the browser and pass the transcripts over the peer-to-peer connection so that both users can see the whole conversation.
Getting audio from the web client
At the client, you can get access to an audio stream by tapping into the local WebRTC stream that is being sent to the peer for the video chat. In the client JavaScript file, initialize the Riva connection with the server when the user chooses Start. You are sending audio data over a socket connection, so first make sure that the socket is active:
socket = socketio.on('connect', function() {
    console.log('Connected to speech server');
});
WebRTC audio works with the concept of a processing graph. To do some work with audio in the browser, do the following:
- Connect to an audio source, in this case from the local video-chat stream.
- Create a processing node to do some work with that audio.
- Connect that new node back to the original destination, where the audio was going originally, before you got involved.
Every time that you get a full buffer of audio coming into the new processing node, resample it using a web worker and send the resampled buffer over the socket connection to the server. Set up the audio source connection and initialize the resampler:
audio_context = new AudioContext();
sampleRate = audio_context.sampleRate;
let audioInput = audio_context.createMediaStreamSource(localStream);
let bufferSize = 4096;
let recorder = audio_context.createScriptProcessor(bufferSize, 1, 1);
let worker = new Worker(resampleWorker);
worker.postMessage({
    command: 'init',
    config: {
        sampleRate: sampleRate,
        outputSampleRate: 16000
    }
});
The browser fires an event every time the buffer fills up, so tell the processor node what to do with it. Resample it using the worker thread and then pass it to the server using the socket connection:
recorder.onaudioprocess =  function(audioProcessingEvent) {
    let inputBuffer = audioProcessingEvent.inputBuffer;
    worker.postMessage({
        command: 'convert',
        // You only need the first channel
        buffer: inputBuffer.getChannelData(0)
    });
    worker.onmessage = function(msg) {
        if (msg.data.command == 'newBuffer') {
            socket.emit('audio_in', msg.data.resampled.buffer);
        }
    };
};
It isn’t completely necessary to resample audio before sending it to Riva. Riva can do its own resampling. However, doing it in the browser both reduces bandwidth requirements and simplifies some of the differences from one recording source to another. Now, you can connect the new processor node into the audio graph, both the source audio and the destination:
audioInput.connect(recorder);
recorder.connect(audio_context.destination);
At this point, the app can pull audio from the user’s microphone, resample the stream, and send the resampled audio to the server using a socket. Next, we show you how to use this audio on the server.
Routing the audio to Riva
The main server script, implemented in Node.js, uses an Express server and Socket.IO to handle the incoming connections. When the socket first connects, set up the Riva connection.
io.on('connect', (socket) => {
    console.log('Client connected from %s', socket.handshake.address);
    // Initialize Riva
    socket.handshake.session.asr = new ASRPipe();
    socket.handshake.session.asr.setupASR();
    socket.handshake.session.asr.mainASR(function(result){
        var nlpResult;
        if (result.transcript == undefined) {
            return;
        }
        // Final transcripts also get sent to NLP before returning
        if (result.is_final) {
            nlp.getRivaNer(result.transcript)
            .then(function(nerResult) {
                result.annotations = nerResult;
                socket.emit('transcript', result);
            }, function(error) {
                result.annotations = {err: error};
                socket.emit('transcript', result);
            });
        } else {
            socket.emit('transcript', result);
        }
    });
});
There are a few things happening here. You create a new ASRPipe and attach it to the socket’s handshake.session object so that you have a separate Riva stream associated with each client connection. Do some basic Riva setup with setupASR, then start the ASR listening loop.
The ASR listening loop is asynchronous. You periodically send it batches of audio data, and it periodically sends results through a callback function. The callback is the function that you pass to mainASR. In streaming mode, Riva can send back two kinds of results: an interim hypothesis, which tends to change as more audio comes in (giving more context), and a final transcript. Transcripts tend to come back as “final” whenever there is a short pause in the audio, like when the speaker takes a breath. You send both kinds of results back to the client, but when you do get finalized results, you also send those transcripts to the NLP service for NER. Either way, pass results back to the client over the same socket connection, using a transcript event.
With Socket.IO, you set up listeners for specific events. One of those events was mentioned earlier: the audio_in event that fires whenever the client sends a bundle of audio data. At the server end, add a listener to the same io.on('connect') scope used to initialize Riva.
socket.on('audio_in', (data) => {
    socket.handshake.session.asr.recognizeStream.write({audio_content: data});
});
This part is simple because it doesn’t need to do much. Having set up the Riva stream when you connected the socket, all you have to do with new audio content is pass it on.
Sending speech recognition requests
Now look at the gRPC interface itself, starting with ASR. When connecting to a gRPC service using Node.js, there are three main steps:
- Import the Riva API using protocol buffers.
- Write convenience functions around the API.
- Mediate data between the client and the Riva functions.
In the asr.js module, where you define the ASRPipe class called earlier, first import the Riva API:
const jAudio = require('./protos/src/riva_proto/audio_pb');
var asrProto = 'src/riva_proto/riva_asr.proto';
var protoOptions = {
    keepCase: true,
    longs: String,
    enums: String,
    defaults: true,
    oneofs: true,
    includeDirs: [protoRoot]
};
var asrPkgDef = protoLoader.loadSync(asrProto, protoOptions);
var jAsr = grpc.loadPackageDefinition(asrPkgDef).nvidia.riva.asr;
Then, define the ASRPipe class along with the setup function called earlier:
class ASRPipe {
    setupASR() {
        // the Riva ASR client
        this.asrClient = new jAsr.RivaSpeechRecognition(process.env.RIVA_API_URL, grpc.credentials.createInsecure());
        this.firstRequest = {
            streaming_config: {
                config: {
                    encoding: jAudio.AudioEncoding.LINEAR_PCM,
                    sample_rate_hertz: 16000,
                    language_code: ‘en-US’,
                    max_alternatives: 1,
                    enable_automatic_punctuation: true
                },
                interim_results: true
            }
        };
    }
}
Here, you create a Riva ASR client and define some configuration parameters, which get sent as the first request to the stream when it’s open. In the same class definition, specify the mainASR function to set up the actual ASR stream:
async mainASR(transcription_cb) {
    this.recognizeStream = this.asrClient.streamingRecognize()
    .on('data', function(data){
        if (data.results == undefined || data.results[0] == undefined) {
            return;
        }
        // transcription_cb is the result-handling callback
        transcription_cb({
            transcript: data.results[0].alternatives[0].transcript,
            is_final: data.results[0].is_final
        });
    })
    .on('error', (error) => {
        console.log('Error via streamingRecognize callback');
        console.log(error);
    })
    .on('end', () => {
        console.log('StreamingRecognize end');
    });
    // First request to the stream is the configuration
    this.recognizeStream.write(this.firstRequest);
}
The streamingRecognize function is asynchronous. The data event is triggered whenever Riva has results to send, so repackage those results and send them to the callback function from earlier.
Sending NER requests
Calling the Riva NER service is more straightforward. Load the NLP API as before, then call a ClassifyTokens function with each line of text to process. Each request sends the text along with the Riva-deployed model to use. Do some post-processing if needed, in a function called computeSpans, then hand off the results.
function getRivaNer(text) {
    var entities;
    req = { text: , model: {model_name: process.env.RIVA_NER_MODEL} };
    return new Promise(function(resolve, reject) {
        nlpClient.ClassifyTokens(req, function(err, resp_ner) {
            if (err) {
                reject(err);
            } else {
                entities = computeSpans(text, resp_ner.results[0].results);
                resolve({ner: entities});
            }
        });
    });
};
At this point, you’re finished with the gRPC calls to Riva. You can capture audio at the client, send it in a streaming connection to Riva to get transcripts, and tag named entities in the text. Every time that Riva sends back results, pass them on to the user’s web client over a socket with a transcript event. Now, complete the circuit by handling these results back in the browser.
Rendering the results in the browser
Now that you have transcripts with annotations coming back to the web client, display them in the browser. Recall that all the client-server communication is happening over a Socket.IO connection, so set up a listener for the transcript event that carries the results.
socket.on('transcript', function(result) {
    document.getElementById('input_field').value = result.transcript;
    if (result.is_final) {
        // Erase input field
        $('#input_field').val('');
        showAnnotatedTranscript(username, result.annotations, result.transcript);
        // Send the transcript to the peer to render
        if (peerConn != undefined && callActive) {
            peerConn.send({from: username, type: 'transcript', annotations: result.annotations, text: result.transcript});
        }
    }
});
The input_field element is a handy place in the web UI to show interim transcripts, which get updated in real time as you speak. In the full app, you use the same field to send text-only requests. When the transcripts are marked as final, show them in a separate box and send a copy of the transcript to the other person on the call, so that you can see both sides of the conversation.
Rendering the transcript itself is standard HTML and CSS. To make your life easier, use the excellent displaCy-ENT to mark named entities in line with the text.
Fine-tune a model for medical NER
By default, Riva offers an NER model that handles entities like Location, Person, Organization, and Time. This is great for many apps, like understanding news articles and building chatbots. Earlier, we discussed how conversational AI might help a telemedicine app. Here’s how you might train an NER model for Rivato tag medical entities.
Training models from scratch is generally a time-intensive process. Instead of starting from a fresh new model, you could use an existing trained model and fine-tune it on custom data. The NVIDIA TAO Toolkit is a Python-based AI toolkit specifically designed to reduce the time required for fine-tuning and customizing pretrained models with your data.
Because medical data can be highly sensitive, it’s not always easy to find online. One excellent NER dataset comes from the 2010 i2b2/VA challenge, which contains de-identified physician notes tagged for Problems (like diseases or symptoms), Treatments (including medications), and Tests. You can apply for access to the dataset, which is a standard competitive benchmark used in the medical NLP community.
NER data is usually provided in some form of IOB tagging, where each token in the text is labelled as either Beginning an entity, Inside an entity (not the first word), or Outside. For medical text, it often looks something like the following:
Text:
DISCHARGE DIAGNOSES :
Coronary artery disease , status post coronary artery bypass graft .
Labels:
O O O
B-problem I-problem I-problem O O O B-treatment I-treatment I-treatment I-treatment O
This is the data to use as input for the TAO toolkit. For more information about using the toolkit to train an NER model, see the training notebook in the TAO-Riva NER Collection. In this case, you start with a pretrained language model checkpoint, bert-base-uncased, and tune it for the NER task using the preprocessed i2b2 data.
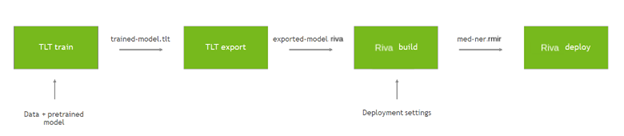
Training and deploying a custom model requires a few steps. Starting with the pretrained checkpoint, you fine-tune the model in the TAO toolkit with the data. Export the model, again with the toolkit, into an optimized form for Riva. Providing some basic deployment settings to Riva, build an intermediate form that bundles the configuration. Then, deploy that package to create a running Riva server. For more information, see NVIDIA Riva Speech Skills.
The following command fine-tunes the pretrained model on your custom data using the TAO Toolkit:
!tlt  token_classification train \
      -e $SPECS_DIR/train.yaml \      # Specification file
      -g 1 \
      -k $KEY \
      -r $RESULTS_DIR/medical_ner \
      data_dir={destination_mount}/data/i2b2 \
      model.label_ids={destination_mount}/data/i2b2/label_ids.csv \
      trainer.max_epochs=10
After this is complete, the TAO Toolkit saves the model in a file called trained-model.tlt. The next step is to export this model to a .riva format that Riva can use for deployment:
!tlt  token_classification export \
      -e $SPECS_DIR/export.yaml \      # Specification file
      -g 1 \
      -m $RESULTS_DIR/medical_ner/checkpoints/trained-model.tlt \
      -k $KEY \
      -r $RESULTS_DIR/medical_ner \
      export_format=RIVA
The model is now exported as exported-model.riva, which you can use in Riva.
Using the Riva ServiceMaker Docker image, build and deploy the new model.
docker pull nvcr.io/riva/riva-speech:1.0.0b1-rc5-servicemaker
docker run --gpus all -it --rm
      -v $RESULTS_DIR/medical_ner:/servicemaker-dev
      -v $RIVA_REPO_DIR:/data
      --entrypoint="/bin/bash"
      nvcr.io/ea-riva-stage/riva-service-maker:1.0.0b1-rc5
riva-build token_classification
      --IOB=true
      /data/med-ner.jmir
      /servicemaker-dev/exported-model.riva
riva-deploy /data/med-ner.jmir /data/models -f
The --IOB flag tells Riva to interpret the model output as an IOB-tagged NER model, which simplifies the model output. $RIVA_REPO_DIR is the location of the Riva repository, created when you ran riva_init.sh from the quick start scripts. That repository contains a models subdirectory with all of the deployed models, including the default general-domain NER. When you call riva-deploy, Riva inserts the new NER model into that location.
With this new NER model in place, you can now get medical-domain tagging in the app, appearing in real time through the conversation.

Deploy to production
Riva is designed to be highly scalable, and apps developed using the Riva SDK can be deployed either on the cloud or in an on-premises Kubernetes cluster. Riva provides a sample Helm chart that can be used to get started:
Install Kubernetes, Helm 3.0, and the NVIDIA GPU Operator for Kubernetes on your cluster. Next, download the Riva AI services Helm chart from NGC.
export NGC_API_KEY=<your_api_key>
helm fetch https://helm.ngc.nvidia.com/ea-riva/charts/riva-api-0.1-ea.tgz --username='$oauthtoken' --password=<YOUR API KEY>
After untarring the compressed folder, find the files required for deployment under /riva-api.
riva-api
├── Chart.yaml
├── templates
│   ├── deployment.yaml
│   ├── _helpers.tpl
│   └── service.yaml
└── values.yaml
The Chart.yaml file contains information about the Helm deployment, like name, version, and so on. To change the deployment configuration, look at the values.yaml file and change the configuration as required:
replicaCount: Number of Riva service replicas.speechServices [asr | nlp | tts]: Three Boolean parameters to enable speech services.ngcModelConfigs: Model configurations to download from NGC.service: Load-balancing service to deploy in production.
The Kubernetes deployment file that reads values from the values.yaml file is in the templates folder. The Riva sample deployment on the Kubernetes cluster performs the following operations:
- Find the GPU nodes and pull the Riva Speech Docker container with pretrained models.
- Mount Docker volumes containing model directories.
- Pull, set up, and run Triton Inference Server.
- Open ports for inbound inference requests and the outbound response.
- Set up the Prometheus service for pulling the GPU and inference metrics.
Finally, to deploy the Riva server, run the following command:
helm install riva_server riva-api
Alternatively, use the --set option to install without modifying the values.yaml file. Make sure to set the NGC_API_KEY, ngcCredentials.email, and model_key_string values appropriately. By default, the model_key_string option is set to tlt_encode.
helm install riva-api --set ngcCredentials.password=`echo -n $NGC_API_KEY | base64 -w0` --set ngcCredentials.email=your_email@your_domain.com --set modelRepoGenerator.modelDeployKey=`echo -n model_key_string | base64 -w0`

> NAME: riva-api
LAST DEPLOYED: Thu Jan 28 12:05:36 2021
NAMESPACE: default
STATUS: deployed
REVISION: 1
TEST SUITE: None
Check the logs to see whether the Riva server is deployed without any errors:
kubectl get pods
kubectl logs <pod name>
To make inference requests to the Riva server, you must get the IP address of the load balancer:
kubectl get services
> NAME         TYPE           CLUSTER-IP       EXTERNAL-IP                                                              PORT(S)                                                                        AGE
riva-api   LoadBalancer   10.100.194.170   ac51c23e62d094aa68ac2adb98edb7eb-798330929.us-east-2.elb.amazonaws.com   8000:30034/TCP,8001:31749/TCP,8002:30708/TCP,50051:30513/TCP,60051:31739/TCP   2m19s
kubernetes   ClusterIP      10.100.0.1       <none>                                                                   443/TCP                                                                        123m
The EXTERNAL-IP value can then be used in env.txt as the external endpoint:
RIVA_API_URL= <external-IP>
In an ideal microservices deployment architecture, the sample web app should also be included in the Helm deployment. However, for this post, leave the Node.js app out of the cluster environment. Use the cluster IP address from the previous command in the sample app and test the Riva ASR and NLP capabilities at scale.
Conclusion
It’s difficult to build a highly performant and scalable conversational AI app that is customized for your use case. In this post, we discussed how you can easily add audio transcription and named entity recognition capabilities to an existing app using NVIDIA Riva. We also went over how you can customize the app using TAO Toolkit and how to use a Helm chart for deploying the application at scale. You can get started by downloading Riva today.
