
Sign up for the latest Speech AI news from NVIDIA.
Conversational AI is a set of technologies enabling human-like interactions between humans and devices based on the most natural interfaces for us: speech and natural language. Systems based on conversational AI can understand commands by recognizing speech and text, translating on-the-fly between different languages, understanding our intents, and responding in a way that mimics human conversation.
Building conversational AI systems and applications is hard. Tailoring even a single component to the needs of your enterprise for your data center deployment is even harder. Deployment for a domain-specific application typically requires several cycles of re-training, fine-tuning, and deploying the model until it satisfies the requirements.
To address those issues, this post covers three key products:
- NVIDIA TAO Toolkit to facilitate the training and fine-tuning of conversational AI models.
- NVIDIA Riva eases the deployment and inference of the resulting models.
- NVIDIA NGC collections have pretrained conversational AI models that can serve as a starting point for further fine-tuning or deployment.
Thanks to the tight integration of those products, you can compress an 80-hour training, fine-tuning, and deployment cycle down to 8 hours. In this post, we focus on TAO Toolkit, showing you how it supports various transfer learning scenarios and how it integrates with Riva for deploying conversational AI models and running real-time inference.
Introduction to conversational AI
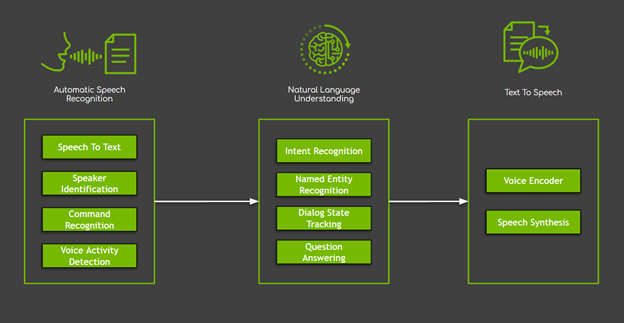
In conversational AI systems, there are several components, roughly classified into three main domains (Figure 1):
- Automatic speech recognition (ASR) encapsulates all tasks starting with the user’s voice as input. Of these tasks, speech to text, responsible for producing the transcripts of spoken words and sentences, is the most used.
- Natural language processing (NLP) is responsible for text processing, including extracting, understanding, and processing semantic information. NLP encapsulates many tasks, starting from simple tasks like named entity recognition to complex tasks like dialog state tracking, question answering, and machine translation.
- Text to speech (TTS) transforms the system’s response in the form of text to a phonetic transcription that you can hear.
While these tasks can be implemented in various ways, novel methods fueled by deep neural networks have presented the best results, overcoming the limitations of most machine learning and rule-based solutions. However, this progress comes with a price: models based on neural networks are data-hungry.
One of the most common solutions to overcome data scarcity is to use a technique called transfer learning. Transfer learning enables adaptation (fine-tuning) of an existing neural network to a new one, which requires significantly less domain-specific data. In most cases, fine-tuning takes significantly less time (a reduction by x10 factor is common), saving time and resources. Finally, this technique is especially attractive for conversational AI systems due to the lack of high-quality, large-scale, public datasets.
TAO Toolkit 3.0 overview
TAO Toolkit is a Python toolkit for taking purpose-built, pretrained neural models and customizing them with your own data. The goal of the toolkit is to make optimized, state-of-the-art, pretrained models easily retrainable on custom enterprise data.
The most important differentiator of TAO Toolkit is that it follows the zero-coding paradigm and comes with a set of ready-to-use Python scripts and configuration specifications with default parameter values that enable you to kick-start training and fine-tuning. This lowers the bar and enables users without a deep understanding of models, expertise in deep learning, or beginning coding skills to be able to train new models and fine-tune the pretrained ones. With the new TAO Toolkit 3.0 release, the toolkit makes a significant turn and starts supporting the most useful conversational AI models.
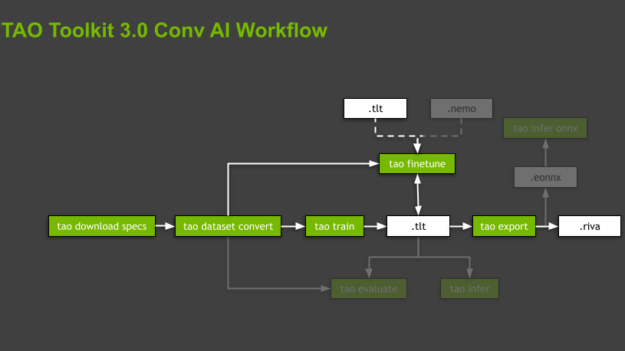
TAO Toolkit abstracts the software dependencies by executing all the operations inside dedicated, prebuilt Docker containers. The scripts are organized in a hierarchy, following the domains and domain-specific tasks associated with the supported models. For each model, the toolkit guides you by imposing the order of commands to execute, from data preparation and training and fine-tuning models to their export for inference. Those commands are subtasks, where the whole organization is called a workflow (Figure 2).
TAO Toolkit provides several useful scripts per workflow. In this post, we focus on the highlighted subtasks and only briefly mention the remaining ones.
Building a conversational AI model using TAO Toolkit 3.0
The TAO Toolkit is available as a Python package that can be installed using pip from NVIDIA PyPI (Private Python Package). The entry point is the TAO Toolkit Launcher and it uses Docker containers. Make sure that the following prerequisites are available:
- Install docker-ce by following the official instructions. Afterwards, follow the post-installation steps to make sure that Docker can be run without admin rights (that is, without sudo).
- Install nvidia-container-toolkit by following the instructions.
- Log in to the NGC Docker registry.
$ docker login nvcr.io
Authenticating with existing credentials…
..
Login Succeeded
We recommend using a new Python virtual environment to manage TAO Toolkit installation independently of other packages in your system.
# Install a virtual environment and activate it.
$ virtualenv -p python3 tao-env
$ source tao-env/bin/activate
Finally, install the TAO Toolkit wheel using the NVIDIA Python Package Index:
# Install the NVIDIA Python Package Index.
$ pip install nvidia-pyindex

# Install the TAO Toolkit wheel.
$ pip install nvidia-tao
You’re all set to use the TAO Toolkit. After installation, activate the TAO Toolkit Launcher that provides a set of standardized commands in the format tao <task> <subtask> <parameters>. To see the usage of different options that are supported, run tao --help. For more information, see TAO Toolkit Launcher User Guide.
$ tao --help
usage: tao [-h]

{info,list,stop,augment,classification,detectnet_v2,dssd,emotionnet,faster_rcnn,fpenet,gazenet,gesturenet,heartratenet,intent_slot_classification,lprnet,mask_rcnn,punctuation_and_capitalization,question_answering,retinanet,speech_to_text,ssd,text_classification,tao-converter,token_classification,unet,yolo_v3,yolo_v4}
Map directories
TAO Toolkit runs a Docker container in the background to execute the scripts associated with different commands. This container is hidden behind the TAO Toolkit Launcher, so you don’t need to worry about it. The only requirement is to specify beforehand separate directories where the data, specification files, and results are to be stored. You should also mount a .cache directory where the toolkit can store downloaded, pretrained checkpoints. This prevents the scripts from downloading the same files over and over every time new training or fine-tuning is run.
These directories can be set and made visible to the Docker container using the command line arguments or they can be configured in the ~/.tao_mounts.json file. For more information, see Running the launcher.
The following code example is a configuration file. The source value represents the directory in your machine, and destination is where it is mapped in the Docker container.
# Content of the file ~/.tao_mounts.json:
{
   "Mounts":[
       {
           "source": "~/tao/data",
           "destination": "/data"
       },
       {
           "source": "~/tao/specs",
           "destination": "/specs"
       },
       {
           "source": "~/tao/results",
           "destination": "/results"
       },
       {
           "source": "~/.cache",
           "destination": "/root/.cache"
       }
   ],
   "DockerOptions":{
         "shm_size": "16G",
         "ulimits": {
            "memlock": -1,
            "stack": 67108864
      }
   }
}
Build a text classification model using transfer learning
Here’s an example task from the NLP domain: text classification of BERT-based models. Text classification is a general task of assigning tags or categories to text according to its content.
In the following section, you focus on two different applications of text classification:
- Sentiment analysis—The categories indicate the positive or negative sentiment of the input paragraph.
- Domain classification—The categories are different conversation domains.
There are two different ways that you can use transfer learning using TAO Toolkit 3.0 for the NLP domain.
Download the experiment specification files
After the TAO Toolkit Launcher is initialized, you can start calling commands associated with one or the other workflow. All those commands are calling scripts that require a plethora of parameters, such as the dataset parameters, model parameters, and optimizer and training hyperparameters. Part of what makes TAO Toolkit so easy to use is that most of those parameters are hidden away in the form of experiment specification files (spec files).
You can write those spec files from scratch or start from the default files that can be downloaded for each task or workflow by running tao <task> download_specs <args>. You can even individually override each or all those parameters through the launcher. For more information about the parameterization of every script or subtask for every task, see Text Classification.
To jumpstart, download the default spec files for the text classification task:
# Here, -r and -o specify the results and the output directories, respectively.
# These directories are from the perspective of the Docker container.
$ tao text_classification download_specs \
        -r /results/nlp/text_classification/download_specs/ \
        -o /specs/nlp/text_classification/
# Verify that the specs are present on your machine:
$ ls ~/tao/specs/nlp/text_classification/
dataset_convert.yaml  export.yaml    infer_onnx.yaml  train.yaml
evaluate.yaml       finetune.yaml  infer.yaml
Note the -o argument indicating the folder where the default specification files are to be downloaded and -r argument that instructs the script where to save the logs. Make sure the -o argument points to an empty folder.
Train a sentiment analysis model using a pretrained encoder
For the sentiment analysis example, use the publicly available Stanford Sentiment Treebank (SST-2) dataset. It contains 215,154 phrases with sentiment labels in the parse trees of 11,855 sentences from movie reviews. The model can be trained either on fine-grained (5-way) or binary (positive/negative) classification tasks and performances are evaluated based on accuracy. The SST-2 format consists of a .tsv file for each dataset split, that is, train, dev, and test data. Each entry has a space-separated sentence, followed by a tab and a label.
Download the data
Download the SST-2.zip archive and unzip it into a directory on your host machine where you intend to store your data and where it can be mounted to TAO Toolkit Docker. In this example, it is the /data folder in the home folder:
# Download the archive.
$ wget https://dl.fbaipublicfiles.com/glue/data/SST-2.zip

# Unzip the archive.
$ unzip SST-2.zip -d ~/tao/data
Prepare the data
The first step for training or fine-tuning a model is to prepare data. TAO Toolkit supports this step with dedicated dataset conversion scripts (tao <task> dataset_convert <args>) that preprocess the input data into a format required by training, fine-tuning, evaluation, or inference.
For the text classification task, the TAO Toolkit dataset_conversion script supports two publicly available datasets, SST-2 and IMDB datasets. For this post, use SST-2:
$ tao text_classification dataset_convert \
       -e /specs/nlp/text_classification/dataset_convert.yaml \
       -r /results/nlp/text_classification/dataset_convert \
       dataset_name=sst2 \
       source_data_dir=/data/SST-2 \
       target_data_dir=/data/sst2
Note the required -e option responsible for feeding the configuration spec file to the script and the -r option that instructs the script where to save the log files. All the paths refer to the directories mounted in the Docker container.
After the dataset is converted to the right format, the next step in the workflow is to start training (tao <task> train <args>) or fine-tuning (tao <task> finetune <args>).
Train a model with a pretrained encoder
From the point of view of the architecture, all NLP models supported in TAO Toolkit fall into the general category of encoder-decoder models, with encoder being one of the variations of BERT (Bidirectional Encoder Representations from Transformers) and a non-regressive decoder. For more information about NLP models and BERT-based architectures, see later in this post.
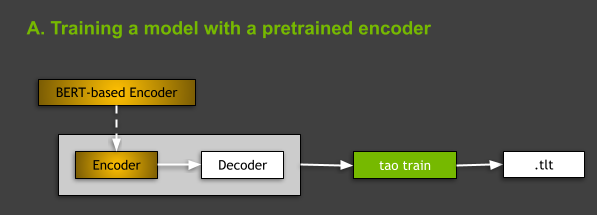
When training NLP models in TAO Toolkit, you have two options: train from scratch or train a model with a BERT-based encoder pretrained on some generic NLP tasks. In this post, we focus on the latter case (Figure 3). You can do it by indicating in your spec file the name of the pretrained BERT-based encoder in the language_model subsection of model:
# Content of the ~/tao/specs/nlp/text_classification/train.yaml
...
model:
...
  language_model:
    pretrained_model_name: bert-base-uncased
...
This is the default setting when you download the spec files for the text classification task. For more information, see Required Arguments for Training.
To train the model, you must run the tao text_classification train <args> command:
-e: Path to the fine-tuning spec file.-r: Path to the folder where the output logs and model are saved.-g: Number of GPUs to use.-k: User-specified encryption key to use while saving or loading the model.-r: Used for specifying the directory where results are saved.- Any overrides to the parameters from the spec file.
For more information, see Model Training. As you see in the rest of this post, these arguments are shared by the majority of TAO Toolkit subtasks across all workflows.
$ tao text_classification train \
       -e /specs/nlp/text_classification/train.yaml \
       -r /results/nlp/text_classification/train \
       -g 1  \
       -k $KEY \
       training_ds.file_path=/data/sst2/train.tsv \
       validation_ds.file_path=/data/sst2/dev.tsv \
       training_ds.num_samples=500 \
       validation_ds.num_samples=500 \
       trainer.max_epochs=3
As a result of a successful training, the script creates a new trained-model.tao file, containing model configuration, trained model weights, and some additional artifacts such as output vocabulary that must be distributed along. This command assumed the presence of the KEY environment variable:
# Key that is used for encryption of your TAO Toolkit model.
$ KEY = "<your encryption key>"
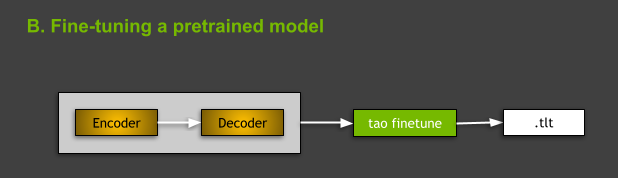
Fine-tuning a domain classification model
TAO Toolkit also supports a different use case: fine-tuning the pretrained model downloaded from NGC. In the following sections, we show you how to fine-tune a domain classifier.
Download the pretrained model from NGC
TAO Toolkit provides several assets on NGC. Download the pretrained model from the NGC TAO Toolkit Text Classification model card. For ease of use, download it to the /results folder:
# Download text classification model pretrained on the Misty chatbot domain dataset.
$ wget --content-disposition https://api.ngc.nvidia.com/v2/models/nvidia/tao/domainclassification_english_bert/versions/trainable_v1.0/zip -O domainclassification_english_bert_trainable_v1.0.zip
# Unzip the archive.
$ unzip domainclassification_english_bert_trainable_v1.0.zip
# Move the model file to the mounted result folder.
$ mv domainclassification_english_bert.tlt ~/tao/results/
Fine-tune the pretrained model
For fine-tuning a text classification model in TAO Toolkit, use the tao text_classification finetune <args> command. From the command’s point of view, the main difference between training and fine-tuning lies in the presence of the pretrained model -m argument required for fine-tuning, where -m is the path to the pretrained model file.
In this example, you must convert the dataset to the format that is acceptable for training and fine-tuning. For more information, see Data Format. Similar to training, you also manually override paths to files containing fine-tuning and validation data, assuming the folder with data used in fine-tuning is ~/tao/data/my_domain_classification/). Take as input the nlp-tc-trained-model.tao file downloaded in the previous step.
$ KEY="tlt_encode" tao text_classification finetune \
       -e /specs/nlp/text_classification/finetune.yaml \
       -r /results/nlp/text_classification/finetune \
       -m /results/domainclassification_english_bert.tlt \
       -g 1  \
       -k $KEY \
       finetuning_ds.file_path=/data/my_domain_classification/train.tsv \
       validation_ds.file_path=/data/my_domain_classification/dev.tsv
The encryption key for this public NGC model is tlt_encode.
Evaluate performance
The goal of the evaluate subtask is to measure the performance of a given model on the test split. Run tao <task> evaluate <args>:
$ tao text_classification evaluate \
    -e /specs/nlp/text_classification/evaluate.yaml \
    -r /results/nlp/text_classification/evaluate \
    -m /results/nlp/text_classification/train/checkpoints/trained-model.tao \
    -g 1 \
    -k $KEY \
    test_ds.file_path=/data/sst2/test.tsv \
    test_ds.batch_size=32
Run inference
Aside from the evaluate subtask, TAO Toolkit also empowers you with the tao <task> infer <args> subtask, useful for testing whether the model behaves as expected and probes its outputs for the provided raw input samples (.wav files for the speech_to_text task, raw text or sentences for the question_answering task, and so on). In this case, running infer shows whether the model can properly classify the sentiment of the input sentences:
# For inference:
$ tao text_classification infer \
    -e /specs/nlp/text_classification/infer.yaml \
    -r /results/nlp/text_classification/infer \
    -m /results/nlp/text_classification/train/checkpoints/trained.tao \
    -g 1 \
    -k $KEY
Export the model
Finally, when you decide that the model behaves correctly, you can export it for deployment using the tao <task> export <args> command:
# For export to Riva:
$ tao text_classification export \
    -e /specs/nlp/text_classification/export.yaml \
    -r /results/nlp/text_classification/export \
    -m /results/nlp/text_classification/train/checkpoints/trained.tao \
    -k $KEY
By default, this results in the creation of the exported-model.riva file in the /results/nlp/text_classification/export folder. The export subtask also enables exporting the models to ONNX (Open Neural Network Exchange) format (.eonnx). You must manually set the export_format=ONNX parameter. When that’s done, you can also test the behavior of the exported ONNX model by running the tao <task> infer_onnx <args> command. Still, this is optional and not currently required from the point of view of deployment to Riva and Riva-based inference.
For more information about all TAO Toolkit commands, see the TAO Toolkit v3.0 User Guide. We also briefly discuss other supported conversational AI tasks later in this post.
Deploying a conversational AI model as a real-time service in Riva
NVIDIA Riva is a GPU-accelerated SDK for building speech AI services using GPUs. The Riva SDK includes pretrained models, tools, and optimized end-to-end services for ASR, NLP, and TTS tasks. Use Riva to deploy your models as services optimized for inference on GPUs. To take the full advantage of the computational power of GPUs, Riva uses NVIDIA Triton Inference Server to serve neural networks and runs the inference using NVIDIA TensorRT. The resulting real-time services can run in 150 ms compared to the 25 seconds required on CPU-only platforms.
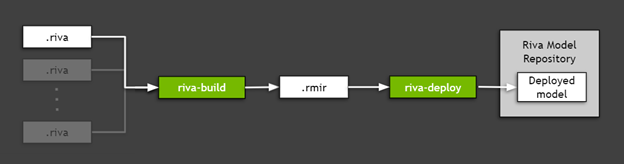
To deploy a TAO Toolkit model exported to Riva (the .riva file created in the previous section), use Riva ServiceMaker, a utility that combines all the necessary assets (model graphs, model weights, model configurations, vocabularies used in inference, and so on) and deploys them onto the target environment. Figure 5 shows that Riva ServiceMaker is broken into two main components: riva-build and riva-deploy.
Install the Riva prerequisites
First, set some environment variables to use later. In this example, you use the sentiment analysis model previously trained and exported with TAO Toolkit, so you must set the paths accordingly.
# Location of Riva Quick Start.
RIVA_QUICK_START=nvidia/riva/riva_quickstart:1.6.0-beta

# Location Riva ServiceMaker Docker image.
RIVA_SM_CONTAINER=nvcr.io/nvidia/riva/riva-speech:1.6.0-beta-servicemaker

# Directory where the .riva model exported from TAO Toolkit is stored.
EXP_MODEL_LOC=/results/nlp/text_classification/export

# Name of the .riva file.
EXP_MODEL_NAME=exported-model.riva

# Riva Model Repository folder where the *.rmir and other required assets are stored.
RIVA_REPO_DIR=/data/

# In the following, you reuse the $KEY variable used in TAO Toolkit.
In this example, you use the /data folder as the Riva Model Repository value, as this name is used by default by Riva Quick Start scripts. This folder used to store the model ensemble, along with all the assets required to run the inference server.
Next, install the Riva Quick Start scripts. The simplest path leads through the NGC registry. Install the NGC CLI and run the following command:
# Download Riva Quick Start:
$ ngc registry resource download-version $RIVA_QUICK_START
Finally, pull the Riva ServiceMaker Docker image:
# Get the ServiceMaker Docker container
$ docker pull $RIVA_SM_CONTAINER
You are ready for the model deployment.
Run Riva-build
riva-build is responsible for the combination of one or more exported models (.riva files) into a single file containing an intermediate format called Riva model intermediate representation (.rmir). This file contains a deployment-agnostic specification of the whole end-to-end pipeline, along with all the assets required for the final deployment and inference. To run the riva-build command inside of the Riva ServiceMaker Docker image, run the following command:
# Run the riva-build to generate an .rmir ensemble.
$ docker run --gpus all --rm -v $EXP_MODEL_LOC:$EXP_MODEL_LOC -v $RIVA_REPO_DIR:/data --entrypoint="/bin/bash" $RIVA_SM_CONTAINER -- \
  riva-build text_classification -f /data/rmir/tc-model.rmir:$KEY \
  $EXP_MODEL_LOC/$EXP_MODEL_NAME:$KEY
Run Riva-deploy
The riva-deploy deployment tool takes as input the .rmir file and creates an ensemble configuration specifying the pipeline for the execution.
In this case, you use scripts coming with the Riva Quick Start, which runs the deployment for you. For more information about how to call riva-deploy manually, see Riva Deploy.
Start the Riva server using Quick Start
You have two options to deploy your model in Riva. In this case, set up a local workstation using the Riva Quick Start pulled earlier from NGC. In the folder created from the pull, find the config.sh file. The following code example uses an additional variable, $RIVA_DIR, to indicate this folder. Edit the config.sh file and apply the following changes:
# Enable NLP service only.
service_enabled_asr=false                           ## MAKE CHANGES HERE
service_enabled_nlp=true                            ## MAKE CHANGES HERE
service_enabled_tts=false                           ## MAKE CHANGES HERE

# ...

# Specify the encryption key to use to deploy models.
MODEL_DEPLOY_KEY=<key you have used>                ## MAKE CHANGES HERE

# ...

# Indicate that you want to use .rmir generated previously.
use_existing_rmirs=true                             ## MAKE CHANGES HERE

# ...

# Set Riva Model Repository path to folder with your model.
riva_model_loc=/data                              ## MAKE CHANGES HERE
Those changes instruct Quick Start scripts to automatically execute riva-deploy for you and run the Riva inference server:
# Ensure that you have permissions to execute these scripts.
$ cd $RIVA_DIR
$ chmod +x ./riva_init.sh && chmod +x ./riva_start.sh

# Initialize Riva model repo with your custom RMIR.
$ riva_init.sh

# Start the Riva server and load your custom model.
$ riva_start.sh
Implement the client application
After the Riva server is up and running with your models, you can send inference requests querying the server. To send gRPC requests, install the Riva client Python API bindings. This API comes as a pip .whl with the Riva Quick Start.
# Install Riva client API bindings.
$ cd $RIVA_DIR && pip install riva_api-1.0.0b1-py3-none-any.whl
Now, write a client using the bindings:
 import grpc
 import argparse
 import os
 import riva_api.riva_nlp_pb2 as rnlp
 import riva_api.riva_nlp_pb2_grpc as rnlp_srv


 class BertTextClassifyClient(object):
     def __init__(self, grpc_server, model_name):
         # generate the correct model based on precision and whether or not ensemble is used
         print("Using model: {}".format(model_name))

         self.model_name = model_name
         self.channel = grpc.insecure_channel(grpc_server)
         self.riva_nlp = rnlp_srv.RivaLanguageUnderstandingStub(self.channel)

         self.has_bos_eos = False

     # use the text_classification network to return top-1 classes for intents/sequences
     def postprocess_labels_server(self, ct_response):
         results = []

         for i in range(0, len(ct_response.results)):
             intent_str = ct_response.results[i].labels[0].class_name
             intent_conf = ct_response.results[i].labels[0].score

             results.append((intent_str, intent_conf))

         return results

     # accept a list of strings, return a list of tuples ('intent', scores)
     def run(self, input_strings):
         if isinstance(input_strings, str):
             # user probably passed a single string instead of a list/iterable
             input_strings = [input_strings]

         # get intent of the query
         request = rnlp.TextClassRequest()
         request.model.model_name = self.model_name
         for q in input_strings:
             request.text.append(q)
         ct_response = self.riva_nlp.ClassifyText(request)

         return self.postprocess_labels_server(ct_response)


 def run_text_classify(server, model, query):
     print("Client app to test text classification on Riva")
     client = BertTextClassifyClient(server, model_name=model)
     result = client.run(query)
     print(result)
Run the client
Now, you are ready to run the client:
# Run the function.
 run_text_classify(server="localhost:50051", model="<Enter Model Name>", query="How is the weather tomorrow?")
After running the command, you receive the following results:
Client app to test text classification on Riva
Using model: riva_text_classification
[('negative', 0.5620560050010681)]
That’s it! You have just learned how to use TAO Toolkit to train a model, deploy it to Riva, run the Riva inference server, and use the Riva API to write a simple client. Congratulations!
Other conversational AI tasks and models supported in TAO Toolkit 3.0
The presented text classification task is just one of the tasks supported in the current TAO Toolkit 3.0 release. This release supports tasks from two domains in the conversational AI space: ASR and NLP. The main reason for skipping TTS in this release is that we find training of the state-of-the-art TTS models difficult. It requires user expertise and domain knowledge. They are not ready for a zero-coding paradigm.
Automatic speech recognition domain
Automatic speech recognition (ASR) is the task of extracting meaningful information from audible speech inputs. Exemplary tasks from this domain include giving voice commands to an interactive virtual assistant, converting audio to subtitles on movies and video chats, and transcribing customer interactions into text for archiving at call centers.
Currently, TAO Toolkit 3.0 supports a single task from the ASR domain, namely speech to text (STT) (tao speech_to_text <subtask> <args>), responsible for transcribing the speech. The outputs of models can serve different purposes. With additional logic, the output of STT can be used in voice commands.
TAO Toolkit users have three models available, all convolutional neural acoustic models:
- The Jasper architecture was designed to facilitate fast GPU inference, by allowing whole subblocks to be fused into a single GPU kernel. This is important for meeting the strict real-time requirements of STT during inference.
- QuartzNet is a Jasper-like network that uses separable convolutions and larger filter sizes. It has a comparable accuracy to Jasper while having much fewer parameters.
- Citrinet is a version of QuartzNet that uses 1D time-channel separable convolutions combined with subword encoding and squeeze-and-excitation. The resulting architecture significantly reduces the gap between non-autoregressive and sequence-to-sequence and transducer models.
Natural language processing domain
Natural language processing (NLP) is another pillar of conversational AI applications. Tasks in this domain include classifying text, understanding the intent in language, recognizing key words or entities, adding automatic punctuation and capitalization, and answering questions given a context.
TAO Toolkit 3.0 supports five diverse tasks or models from the NLP domain:
- Joint intent & slot classification
(tao intent_slot_classification <subtask> <args>)is a task of classifying an intent and detecting all relevant slots (entities) for this intent in a query. For example, in the query, “What is the weather in Santa Clara tomorrow morning?”, you would like to classify the query as a “weather” intent, detect “Santa Clara” as a location slot, and detect “tomorrow morning” as a date_time slot. Intent and slot names are usually task-specific and defined as labels in the training data. This is a fundamental step executed in any task-driven conversational AI assistant. - Joint punctuation & capitalization
(tao punctuation_and_capitalization <subtask> <args>)For every word in the input sentence or paragraph, the model must predict the punctuation mark that should follow the word and whether the word should be capitalized. - Question answering
(tao question_answering <subtask> <args>)Given a question and a context both in natural language, the model must predict the span within the context with a start and end position that indicates the answer to the question. - Text classification
(tao text_classification <subtask> <args>)is an elementary yet useful NLP task that can be adapted to many applications, such as sentiment analysis, domain classification, language identification, and topic classification. For example, in sentiment analysis, the following input, “The performance was incredible!” has a positive sentiment, while “It’s neither as romantic nor as thrilling as it should be.” has a negative sentiment. - Token classification
(tao token_classification <subtask> <args>)is a task where each entity in the input token (such as a word) is given a corresponding label in the output. Named entity recognition (NER) is one application of the token classification task, with the goal of detecting and classifying key information (entities) in text. For example, in a sentence, “Mary lives in Santa Clara and works at NVIDIA.”, the model should detect that “Mary” is a person, “Santa Clara” is a location and “NVIDIA” is a company.
All NLP models supported in TAO Toolkit incorporate BERT as their backbone encoder. BERT uses an attention-based architecture called Transformer to learn contextual word embeddings, denoting relations between words in text. The main innovation of BERT lies in the pretraining step, where the model is trained on two unsupervised prediction tasks using a large text corpus. Training on these unsupervised tasks produces a generic language model, which can then be quickly fine-tuned to achieve state-of-the-art performance on various NLP tasks.
Conclusion
You might reasonably ask, “To whom does TAO Toolkit best cater?” The key demographic behind the current shape of the toolkit is users who already have the base architecture of the model and are trying to customize and fine-tune it to fit a particular use case in their pipeline.
With predefined specification files, detailed documentation, build-in encryption, out-of-the box integration with the inference-oriented Riva , and a set of pretrained models on NGC, TAO Toolkit aims at speeding up the whole development-deployment process, up to 10x. We believe that TAO Toolkit could be a one-stop shop for anything around transfer learning and conversational AI.
For more information, see the following resources:
