
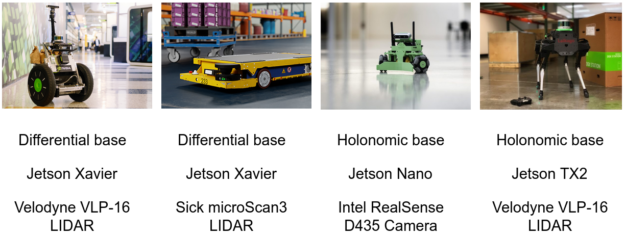
The modular and easy-to-use navigation stack of the NVIDIA Isaac SDK continues to accelerate the development of various mobile robots. Isaac SDK 2020.1 includes support for quadruped robots and adds to the other robot platforms supported in the SDK, such as differential wheel bases and holonomic wheel bases (Figure 1).
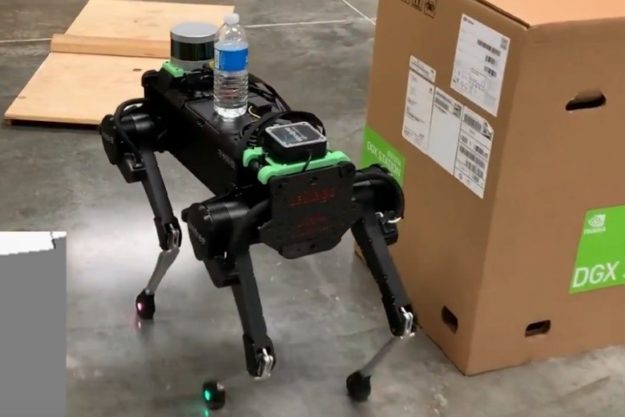
Laikago, a quadruped robot by Unitree Robotics, is the newest member of the mobile robot portfolio. Laikago is powered by NVIDIA Jetson TX2 and features a low-level controller for balancing and walking that allows remote controlled locomotion. This post explains how you can grant autonomous navigation to Laikago, even if you’ve never used the Isaac SDK before.
Out of the box, Laikago lacks any sensor that can perceive the surroundings. By default, the robot is not capable of localization or obstacle avoidance. To obtain 3D information about the environment, we installed a Velodyne VLP-16 LIDAR on Laikago for this project. You can download 3D-printable mesh files used for mounting the LIDAR, which are based on the CAD Model of Laikago. We also installed a DC-DC converter to decrease the 19V output from Laikago and meet the voltage range of the LIDAR. A USB to Ethernet adapter connects the LIDAR to the NVIDIA Jetson.
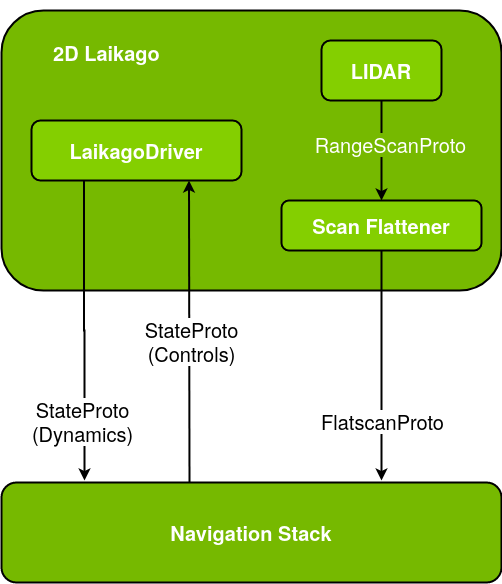
Isaac SDK 2020.1 features a driver for Laikago, which has been implemented as part of this project to communicate with the motors of Laikago. The driver codelet has a simple interface: It receives messages of type messages::HolonomicBaseControls that contain forward, sideward, and angular speed values and then forwards them to the Laikago robot. In return, LaikagoDriver reads the current speed and acceleration information from Laikago to transmit messages of type messages::HolonomicBaseDynamics.
// The desired motion of Laikago of type messages::HolonomicBaseControls
ISAAC_PROTO_RX(StateProto, base_command);

// The state of Laikago of type messages::HolonomicBaseDynamics
ISAAC_PROTO_TX(StateProto, base_state);
LaikagoDriver provides parameters for limiting the linear and angular speed, which can be configured through JSON before running the application or through Sight at run time.
// Maximum linear speed robot is allowed to travel with
ISAAC_PARAM(double, speed_limit_linear, 0.6);


// Maximum angular speed robot is allowed to rotate with
ISAAC_PARAM(double, speed_limit_angular, 0.8);
When the hardware and the driver are ready, it’s time to create the autonomous navigation application illustrated in Figure 3, where the only codelet that is specific to the Laikago robot is LaikagoDriver. Every other subgraph (such as a navigation stack), component (such as Lidar), and edge (such as NVIDIA Carter) are also used by other robots in similar applications.
The navigation stack requires two inputs:
- FlatscanProto provides 2D information about the surroundings of the robot, which is obtained by flattening the 3D data of the VLP-16 LIDAR.
- The LaikagoDriver provides information about the current state of the robot. In return, the navigation stack tells LaikagoDriver the optimal velocity values for safe and autonomous navigation.
The autonomous navigation application in Figure 3 corresponds to the following code example from packages/laikago/apps/laikago_navigate.app.json. In particular, the “edges” section of the code is represented with the three arrows between the navigation subgraph and 2D Laikago subgraph. The navigation stack is configured for Laikago by expressing the shape of the robot so as to safely avoid obstacles.
{
  "graph": {
    "nodes": [
      {
        "name": "2d_laikago",
        "subgraph": "packages/laikago/apps/2d_laikago.subgraph.json"
      },
      {
        "name": "navigation",
        "subgraph": "packages/navigation/apps/holonomic_base_navigation.subgraph.json"
      },
      ...
    ],
    "edges": [
      {
        "source": "navigation.subgraph/interface/command",
        "target": "2d_laikago.subgraph/interface/base_command"
      },
      {
        "source": "2d_laikago.subgraph/interface/flatscan",
        "target": "navigation.subgraph/interface/flatscan"
      },
      {
        "source": "2d_laikago.subgraph/interface/base_state",
        "target": "navigation.subgraph/interface/state"
      },
      ...
    ]
  },
  "config": {
    "navigation.shared_robot_model": {
      "SphericalRobotShapeComponent": {
        "circles": [
          { "center": [0.0 ,0.0], "radius": 0.3},
          { "center": [0.3 ,0.0], "radius": 0.3},
          { "center": [-0.3 ,0.0], "radius": 0.3},
          { "center": [-0.5 ,0.0], "radius": 0.3}
        ]
      }
    }
  },   ...
}
Isaac SDK 2020.1 includes the driver and the application described earlier, along with the NVIDIA Isaac SDK documentation. Make sure that Jetpack 4.3 is used in Jetson TX2.
Navigate Laikago autonomously
- Upgrade the hardware with a Velodyne VLP-16 LIDAR as described earlier.
- (Optional) Connect a gamepad over Bluetooth to the TX2 on Laikago. This allows you remote control of the robot when desired. For more information, see the Joystick topic in the Isaac SDK documentation.
- To deploy the application, run the following command on Isaac SDK 2020.1:
bob@desktop:~/isaac$ ./engine/build/deploy.sh -p //packages/laikago/apps:laikago_navigate-pkg -h-d jetpack43 --remote_user laikago
- To run the application, connect using SSH to the TX2 on Laikago:
laikago@tx2:~/deploy/bob/laikago_navigate-pkg$ ./packages/laikago/apps/laikago_navigate --more <map_json>
In the command, <map_json> is the map-specific JSON file, similar to apps/assets/maps/virtual_tutorial.json.
- To monitor the robot, its localization, and various other information through Sight, open <TX2_IP_address>:3000 in a browser.
- If the Map View window has an interactive marker for “pose_as_goal”, move to the next step. Otherwise, do the following:
- In the Map View window, right-click and choose Settings, Select marker, and “pose_as_goal”.
- Choose Add marker, Update.
- To see the new marker, you may need to zoom in on the map.
- Drag the “pose_as_goal” marker to a new location on the map.
- Press and hold the manual_button of the gamepad and use move_axes and rotate_axes to remote control the robot manually. Press and hold the autonomous_button for autonomous navigation to the target. For more information, see the isaac.navigation.RobotRemoteControl section of the Component API Overview topic.
This project shows how easy it is to use the Isaac SDK and enable new features on a robot. The Isaac SDK platform also provides various GPU-accelerated perception algorithms, , deep neural networks, manipulation packages for robot arms, and simulation capabilities for sim-to-real transfer. Download and try the Isaac SDK today!
