

In the past few years, voice-based interaction has become a feature of many industrial products. Voice platforms like Amazon Alexa, Google Home, Xiaomi Xiaz, Yandex Alice, and other in-home voice assistants provide easy-to-install, smart home technologies to even the least technologically savvy consumers.
The fast adoption and rising performance of voice platforms drive interest in smart homes. Home assistants can understand voice commands, whether for answering a question, playing music, or turning on the lights. To talk naturally to people, assistants should use a combination of AI technologies:
- Automatic speech recognition (ASR) is a voice processing component which converts spoken language into textual representation.
- Natural language understanding (NLU) translates user queries from natural language into a formal semantic representation. This representation is then used by the system to select the next action and generate a response. Usually, NLU requires completion of a variety of tasks, such as text normalization, morphological analysis, semantic analysis, ranking and named entity recognition.
- Text-to-speech (TTS) takes the response in a text format and produces its voice representation.
A lot of out-of-the-box home assistants are available on the market. There are also open-source projects, like Home Assistant. To have cutting edge conversational AI technology at your fingertips, you should try DeepPavlov, now available as an optimized container on NVIDIA NGC.
Dialogue systems with DeepPavlov
The open-source DeepPavlov library is a great choice for building dialogue systems. It comes with a set of predefined components for solving NLP-related problems and a framework to build a modular pipeline that allows you to seamlessly train and test machine learning (ML) models. The library supports the Linux and Windows platforms, Python 3.6, and Python 3.7.
The core DeepPavlov technology for NLU is powered by a declarative approach to defining sequences of model execution in config files. This allows you to track dependencies and automatically download missing components.
Components for developing voice assistants based on DeepPavlov
Unless you use hosted, out-of-the-box solutions, the development of voice assistants comes with a whole set of challenges that go beyond NLU and dialogue management. To have a complete system, you must add automatic speech recognition and text-to-speech synthesis components to the NLU core.
Speech recognition and synthesis
The DeepPavlov ASR and TTS components are based on pre-built modules from the NVIDIA NeMo (v0.10.0) toolkit. In the latest release of DeepPavlov, we implemented three speech processing pipelines:
- asr defines a minimal pipeline for English speech recognition using the QuartzNet15x5En pretrained model. It captures speech data as batches of paths to audio files or batches of binary I/O objects and returns batches of transcribed texts.
- tts defines a minimal pipeline for English speech synthesis using Tacotron2 and WaveGlow pretrained models. Tacotron2 produces spectrograms from text, while WaveGlow generates audio from those spectrograms. The tts pipeline takes two batches as inputs, a batch of texts, and a batch of paths to save audio files.
- asr_tts defines a full speech-to-speech loop that transcribes speech and re-sounds it. Unlike asr and tts, this pipeline allows you to run a REST web service that receives speech from another process and sends back speech as a response. asr_tts uses the same pretrained models as asr and tts.
Installation
You can install DeepPavlov and pretrained models from the asr and tts configs by running the following commands:
      pip install deeppavlov==0.11.0
      python -m deeppavlov install asr_tts
      python -m deeppavlov download asr_tts
To test pipelines, you need a single channel, 16 Khz audio recording in WAV file format. You can record it by yourself or download a speech sample from an open-source LibriSpeech dataset.
ASR pipeline
If you already have a single-channel WAV file, then four lines of code is enough to transcribe the audio:
from deeppavlov import build_model, configs

model = build_model(configs.nemo.asr)
text_batch = model(['/path/to/your/wav/file'])

print(text_batch[0])
To capture live speech, use the sounddevice library. Make sure that all necessary packages are installed and try the following script to record your speech and transcribe it with the asr pipeline:
from io import BytesIO

import sounddevice as sd
from scipy.io.wavfile import write

from deeppavlov import build_model, configs

sr = 16000
duration = 3

print('Recording...')
myrecording = sd.rec(duration*sr, samplerate=sr, channels=1)
sd.wait()
print('done')

out = BytesIO()
write(out, sr, myrecording)

model = build_model(configs.nemo.asr)
text_batch = model([out])

print(text_batch[0])
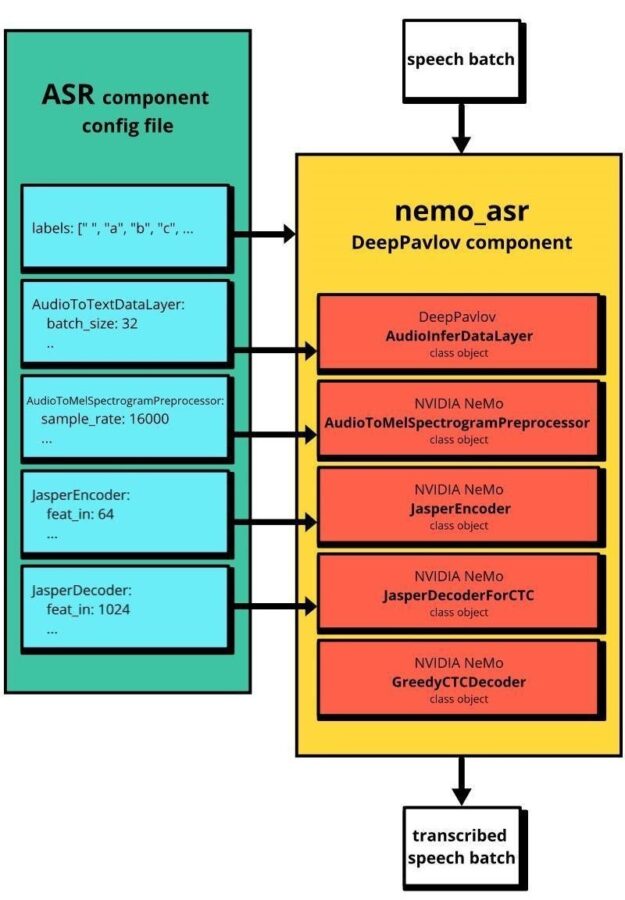
To improve the speech recognition model, train or fine-tune it with your dataset using NeMo. If you change the architecture of the trained model, then you should modify the module’s configuration file. The path to this file is passed to the nemo_asr component as the value of the nemo_params_path argument.
For more information about the modules that make up the nemo_asr component, see Speech recognition. Figure 1 shows how the NeMo ASR and DeepPavlov nemo_asr pipelines are related.
TTS
Just three lines of code are enough to generate speech from text using the tts pipeline through the tts config file:
from deeppavlov import build_model, configs

model = build_model(configs.nemo.tts)
filepath_batch = model(['Hello world'], ['/path/to/save/the/file.wav'])

print(f'Generated speech has successfully saved at {filepath_batch[0]}')
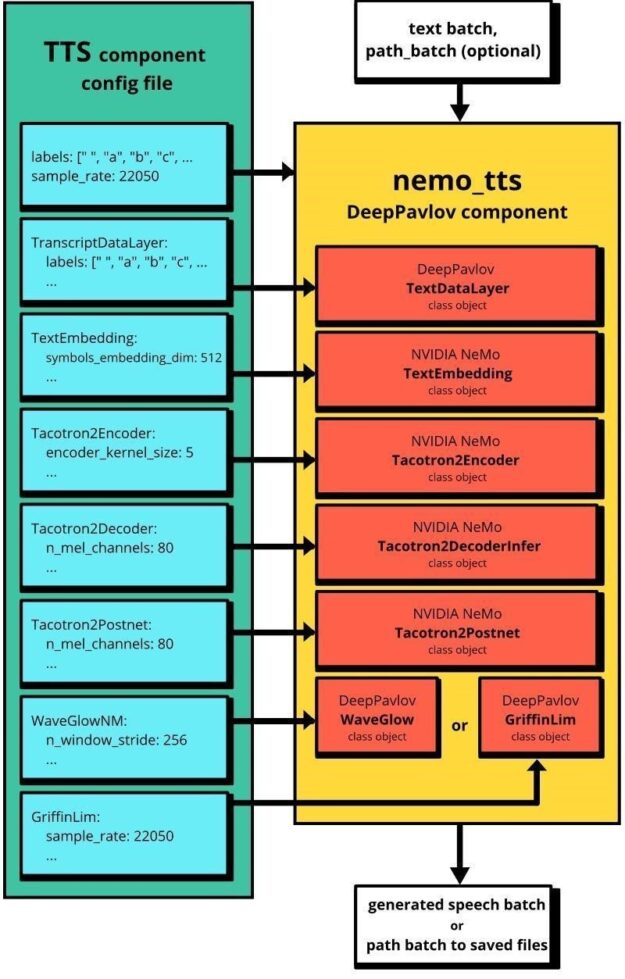
If you remove the filepath argument from the config file, the model returns a Bytes I/O object with generated speech instead of the path where the file was saved. Similar to the nemo_asr example earlier, you can train your checkpoint for the nemo_tts component using NVIDIA NeMo.
The default duration of the generated audio for nemo_tts is 11.6 seconds. For a longer duration, increase the value of the max_decoder_steps parameter from the Tacotron2Decoder section of the nemo_tts configuration file. Figure 2 shows the relation between NeMo and the nemo_tts pipeline.
GPU vs. CPU
GPU infrastructure is critical for speech-processing applications. We benchmarked DeepPavlov asr/tts pipelines on Xeon i7 CPU and NVIDIA V100 GPU. When speech is converted to text CPU inference time scales poorly from 70 ms to 290 ms when the length of utterances varies between 37 and 367 characters. GPU inference time stays almost the same at 80ms. A more dramatic difference is observed for TTS. It takes more than 20X longer to generate a speech signal from a sentence on Xeon i7 CPU compared to the NVIDIA V100 GPU.
Speech to speech using REST API
We just showed you how to generate and transcribe speech with DeepPavlov on a local machine. But how to build production-like, client-server architecture? The asr_tts pipeline makes it possible to solve this task by running a service for encoding binary data from audio files using 64 ASCII characters. Figure 3 shows the client-server solution with asr_tts pipeline.
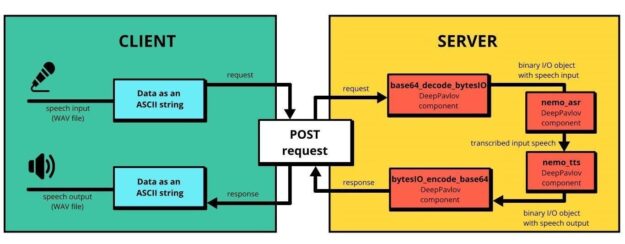
Encoding audio files with ASCII characters allows you to embed audio data into DeepPavlov pipelines along with text data-keeping flexibility. For real-world applications, you can easily change the way that you encode audio.
DeepPavlov has default support for running pipelines as services. To start the server with the asr_tts pipeline, use the following command:
python -m deeppavlov riseapi asr_tts
The server runs on port 5000. To use another port, add -p <port_number_to_use> at the end of the command prompt.
After receiving the message “Application startup complete”, you can send the speech to be recognized to the server and have it re-sounded using the following code example. Change 127.0.0.1 to your server address.
from base64 import encodebytes, decodebytes

from requests import post

with open('/path/to/wav/file/with/speech', 'rb') as fin:
    input_speech = fin.read()

input_ascii = encodebytes(input_speech).decode('ascii')

resp = post('http://127.0.0.1:5000/model', json={"speech_in_encoded": [input_ascii]})
text, generated_speech_ascii = resp.json()[0]
generated_speech = decodebytes(generated_speech_ascii.encode())

with open('/path/where/to/save/generated/wav/file', 'wb') as fout:
    fout.write(generated_speech)

print(f'Speech transcriptions is: {text}')

To add some NLU capabilities, in the asr_tts config file, insert the DeepPavlov models of interest between the nemo_asr and nemo_tts components.
Build a simple voice assistant: A smart light!
Now, create the simplest application that turns a device on and off—for example, a light bulb—using the commands of a user. This example demonstrates only a general approach to integration with speech recognition and speech generation without the implementation of specific on or off functionality. Again, this example has a client-server architecture.
Server
First, create a new DeepPavlov config file called my_tts.json with a nemo_tts component. The following code example returns a Bytes I/O object instead of writing to a file:
{
 "chainer": {
   "in": ["text"],
   "pipe": [
     {
       "class_name": "nemo_tts",
       "nemo_params_path": "{TTS_PATH}/tacotron2_waveglow.yaml",
       "load_path": "{TTS_PATH}",
       "in": ["text"],
       "out": ["saved_path"]
     }
   ],
   "out": ["saved_path"]
 },
 "metadata": {
   "variables": {
     "NEMO_PATH": "~/.deeppavlov/models/nemo",
     "TTS_PATH": "{NEMO_PATH}/tacotron2_waveglow"
   },
   "requirements": [
     "{DEEPPAVLOV_PATH}/requirements/pytorch.txt",
     "{DEEPPAVLOV_PATH}/requirements/nemo-asr.txt",
     "{DEEPPAVLOV_PATH}/requirements/nemo-tts.txt"
   ],
   "download": [
     {
       "url": "http://files.deeppavlov.ai/deeppavlov_data/nemo/tacotron2_waveglow.tar.gz",
       "subdir": "{NEMO_PATH}"
     }
   ]
 }
}
This config differs from asr only by the absence of the filepath argument.
Install the python-multipart module that FastAPI needs for receiving the uploaded files:
pip install python-multipart
Finally, run the following script to start a server:
from io import BytesIO

import uvicorn
from deeppavlov import build_model, configs
from fastapi import FastAPI, File
from starlette.responses import StreamingResponse

app = FastAPI(__file__)

asr = build_model(configs.nemo.asr)
tts = build_model('my_tts.json')

@app.post("/light")
def interact(file: bytes = File(...)):
    input_text = asr([BytesIO(file)])[0]
    response_text = "Can't understand your command. Please repeat."
    if input_text == 'turn on':
        response_text = 'Turned on the light'
    elif input_text == 'turn off':
        response_text = 'Turned off the light'
    speech_response = tts([response_text])[0]
    return StreamingResponse(speech_response, media_type='audio/wav')

uvicorn.run(app)
Along with changing the value of the response_text variable, you could add a specific implementation of commands to control the device. DeepPavlov has a wide range of components that can be easily added to the pipeline. For example, you can add an automatic spelling correction of transcribed speech or intention classification.
Client
The following script records commands from a microphone, send them to the server, and plays the server response:
from io import BytesIO

import sounddevice as sd
from requests import post
from scipy.io.wavfile import write, read

sr = 16000
duration = 3

print('Recording command...')
myrecording = sd.rec(duration*sr, samplerate=sr, channels=1)
sd.wait()
print('done')

command = BytesIO()
write(command, sr, myrecording)
response = post('http://127.0.0.1:8000/light', files={'file': command})
samplerate, data = read(BytesIO(response.content))

sd.play(data, samplerate)
sd.wait()
To simplify the system setup, we prerecorded two commands (turn on, turn off). You can send a command without a microphone by running the following script:
from io import BytesIO

import sounddevice as sd
from requests import post
from scipy.io.wavfile import read

with open('turn_on.wav', 'rb') as command:
    response = post('http://127.0.0.1:8000/light', files={'file': command})
samplerate, data = read(BytesIO(response.content))

sd.play(data, samplerate)
sd.wait()
Conclusion
In this post, we showed how you can use DeepPavlov voice tools on local machines and build asr and tts pipelines. We also showed how you can implement a client-server architecture and control a device through voice commands.
We hope this is helpful and that you’re eager to try out DeepPavlov to build voice-based AI assistants. Read more about us in the official DeepPavlov blog. Feel free to test models with our interactive Text QA demo. DeepPavlov is available as a container on NVIDIA NGC. And don’t forget the dedicated forum, where any questions concerning the framework and the models are welcome. Stay tuned!
