
In response to popular demand, Microsoft announced a new feature of the Windows Subsystem for Linux 2 (WSL 2)—GPU acceleration—at the Build conference in May 2020. This feature opens the gate for many compute applications, professional tools, and workloads currently available only on Linux, but which can now run on Windows as-is and benefit from GPU acceleration.
Most importantly, NVIDIA CUDA acceleration is now coming to WSL. In this post, we discuss what you can expect from CUDA in the Public Preview for WSL 2.
What is WSL?
WSL is a Windows 10 feature that enables you to run native Linux command-line tools directly on Windows, without requiring the complexity of a dual-boot environment. Internally, WSL is a containerized environment that is tightly integrated with the Microsoft Windows operating system. This allows it to run Linux applications alongside traditional Windows desktop and modern store apps.
WSL is primarily a tool for developers. If you are working on a compute workload inside Linux containers, you can develop and test the workload locally on your Windows PC using the same native Linux tools with which you are familiar. Typically, those applications required a lot of hacking, third-party frameworks, and libraries to get them to work on Windows systems. This all changes with WSL 2, which brings full Linux kernel support to the Windows world.
With the WSL 2 and GPU Paravirtualization (GPU-PV) technology, Microsoft is adding another spin to the Linux support on Windows by allowing you to run compute workloads targeting GPU hardware. Later in this post, we cover WSL 2 and how GPU is added there in more detail.
For more information, see DirectX is coming to the Windows Subsystem for Linux and the WSL2-Linux-Kernel/driver/gpu directory in GitHub.
CUDA in WSL
To take advantage of the GPU in WSL 2, the target system must have a GPU driver installed that supports the Microsoft WDDM model. These drivers are provided by GPU hardware vendors such as NVIDIA.
CUDA enables you to program NVIDIA GPUs. It has been supported in the WDDM model in Windows graphics for decades. The new Microsoft WSL 2 container delivers GPU acceleration, which CUDA can leverage to enable you to run CUDA workloads inside of WSL. For more information, see the CUDA on WSL User Guide.
Support for CUDA in WSL is included with the NVIDIA display driver targeting the WDDM 2.9 model. You only have to install the drivers on the Windows host. The CUDA user mode driver in WSL (libcuda.so) is automatically mapped inside the container and added to the loader search path there.
The NVIDIA driver development team added support for the WDDM model and GPU-PV to the CUDA driver, to be able to run it on Linux on Windows. It is still a preview driver and will not be released until the official GPU support in WSL in Windows 10 is released. For more information about the release, see CUDA WSL 2 Download.
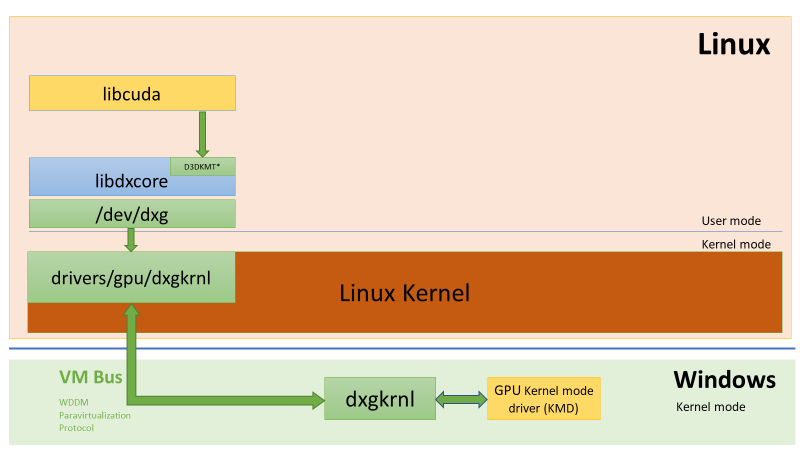
Figure 2 shows a simple diagram of how the CUDA driver is plugged into the new WDDM model within the Linux guest.

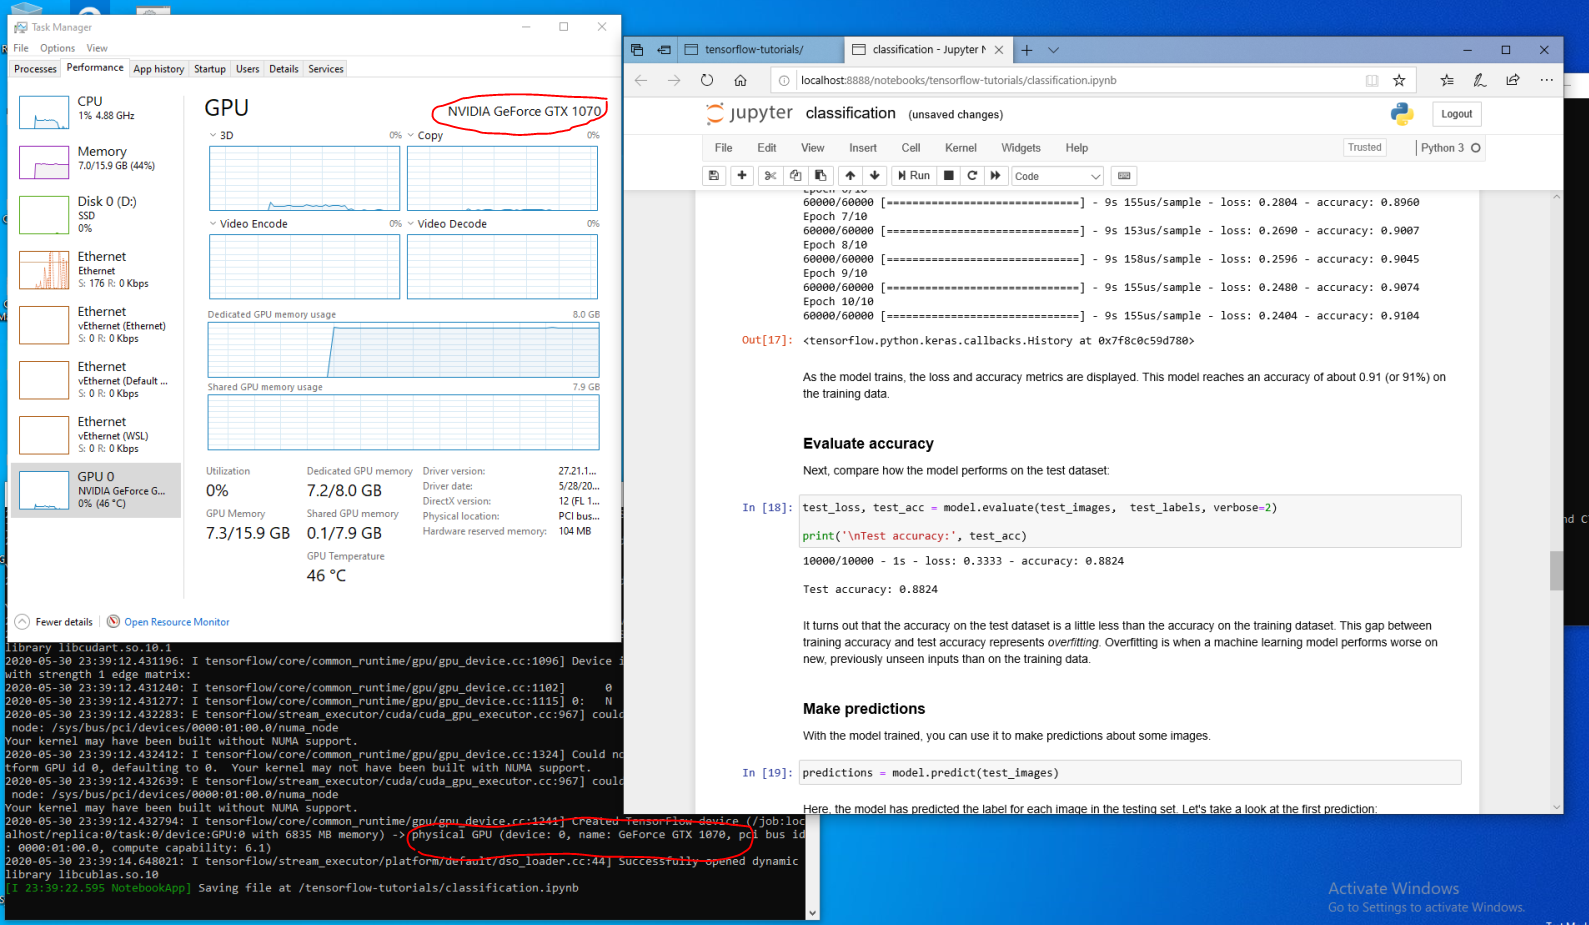
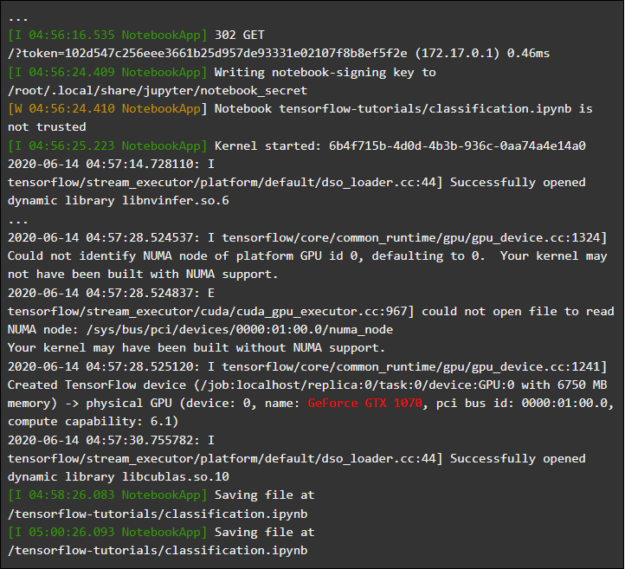
If you are a developer who installed the WSL distro on the latest Windows build from the Microsoft Windows Insider Program’s Fast Ring (Build 20149 or higher) and set the container to run in WSL 2 mode, and if you are an inspired owner of an NVIDIA GPU in your PC, you can try the driver and run your workloads in WSL 2. All you have to do is to install the driver on your Windows host OS and then open the WSL container. CUDA will be there and working with CUDA apps without any extra effort. Figure 3 shows the screenshot of running the CUDA TensorFlow workload in the WSL 2 container.
GPU in WSL opens a gate for a variety of CUDA compute applications that currently only run in native Linux environments.
NVIDIA is still actively working on this project and making adjustments. Among other things, we are working on bringing APIs that used to be specific to Linux to the WDDM layer so that more and more applications can work on WSL out of the box.
Another point of focus is performance. As mentioned before, WSL 2 GPU support heavily leverages GPU-PV, which can affect small GPU workloads without any pipelining. Right now, we are reducing as much of this overhead as possible.
NVML
NVML is not included in the initial driver package and there are some concerns about this. To address it, we are planning to bring NVML to WSL, along with other libraries.
We started by bringing the core CUDA driver up to let you try most of your existing workloads in this early preview. We realize that some containers and applications leverage NVML to query GPU information even before loading CUDA. This is why we have put NVML on WSL among our top priorities. Stay tuned for more updates on this topic.
GPU containers in WSL
In addition to DirectX and CUDA support, NVIDIA is also adding support for the NVIDIA Container Toolkit (previously nvidia-docker2) within WSL 2. Containerized GPU workloads that data scientists prepared to run under Linux on on-premises hardware, or execute in the cloud, can now run as-is inside WSL 2 on Windows PCs.
There is no need for a specific WSL package. The NVIDIA runtime library (libnvidia-container) can dynamically detect libdxcore and use it when it is run in a WSL 2 environment with GPU acceleration. This happens automatically after Docker and NVIDIA Container Toolkit packages are installed, just like on Linux, allowing GPU-accelerated containers to run out of the box.
We do recommend getting the latest version of the Docker tools (19.03 or later) to take advantage of the added support for the --gpus option. To enable WSL 2 support, follow the README steps on the GitHub repo for your Linux distribution and install the latest version available.
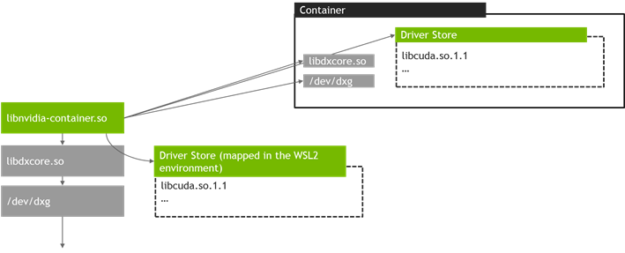
So how does it work? All the WSL 2 specific work is handled by the libnvidia-container library. This library is now able to detect, at runtime, the presence of libdxcore.so and uses it to detect all the GPUs exposed to this interface.
If these GPUs need to be used in the container, the location of the driver store, a folder that contains all driver libraries for both the Windows host and WSL 2, is queried using libdxcore.so. It is up to libnvidia-container.so to set the container up so that the driver store is mapped correctly and does the setup for the core libraries supported by WSL 2 GPU, as shown in Figure 4.
Also, this deviates from the logic used outside of WSL. This is completely abstracted by libnvidia-container.so and should be as transparent as possible for the end user. One of the limitations of this early version is the lack of GPU selection in a multi-GPU environment: all GPUs are always visible in the container.
Here’s what you can run within the WSL container: any NVIDIA Linux container with which you are currently familiar. NVIDIA supports most existing Linux tools and workflows used by professionals. Download a favorite container workload from NVIDIA NGC and give it a try.
In the next section, we describe how to run TensorFlow and n-body containers within WSL 2 with the workloads accelerated by NVIDIA GPUs.
Running the N-body container
Install Docker using the Docker installation script:
user@PCName:/mnt/c$ curl https://get.docker.com | shInstall the NVIDIA Container Toolkit. WSL 2 support is available starting with nvidia-docker2 v2.3 and the underlying runtime library libnvidia-container 1.2.0-rc.1.
Set up the stable and experimental repositories and the GPG key. The changes to the runtime to support WSL 2 are available in the experimental repository.
user@PCName:/mnt/c$ distribution=$(. /etc/os-release;echo $ID$VERSION_ID)

user@PCName:/mnt/c$ curl -s -L https://nvidia.github.io/nvidia-docker/gpgkey | sudo apt-key add -

user@PCName:/mnt/c$ curl -s -L https://nvidia.github.io/nvidia-docker/$distribution/nvidia-docker.list | sudo tee /etc/apt/sources.list.d/nvidia-docker.list

user@PCName:/mnt/c$ curl -s -L https://nvidia.github.io/libnvidia-container/experimental/$distribution/libnvidia-container-experimental.list | sudo tee /etc/apt/sources.list.d/libnvidia-container-experimental.list
Install the NVIDIA runtime packages and their dependencies:
user@PCName:/mnt/c$ sudo apt-get update
user@PCName:/mnt/c$ sudo apt-get install -y nvidia-docker2
Open the WSL container and start the Docker daemon there. You should see the dockerd service output.
user@PCName:/mnt/c$ sudo dockerd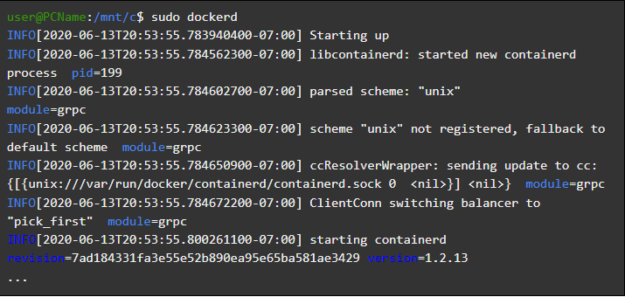
In another WSL container window, download and start the N-body simulation container. Make sure that the user has sufficient permissions to download the container. You may need to run the following command in sudo. GPU is highlighted in the output.
user@PCName:/mnt/c$ docker run --gpus all nvcr.io/nvidia/k8s/cuda-sample:nbody nbody -gpu -benchmark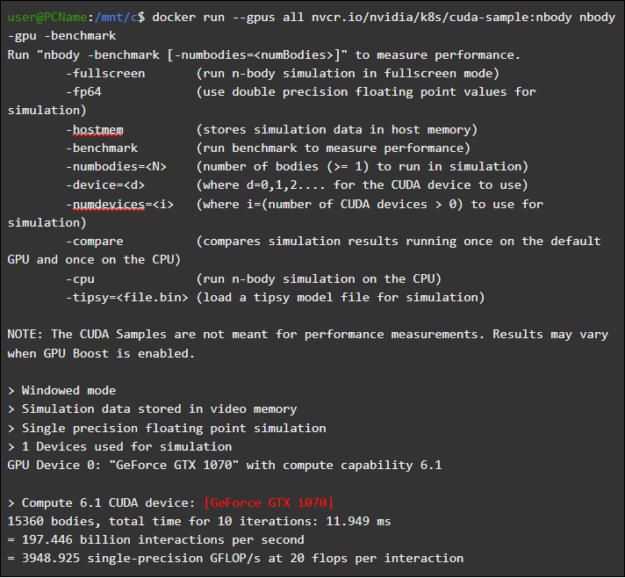
Running the TensorFlow container
Try another popular container: TensorFlow in Docker in WSL 2.
Download a TensorFlow Docker image. To avoid Docker connection issues, the command is run in sudo.
user@PCName:/mnt/c$ docker pull tensorflow/tensorflow:latest-gpu-py3Save a slightly modified version of Lesson 15 – Using GPU from TensorFlow Tutorials on your host’s drive C, which is mapped in the WSL 2 container as /mnt/c by default.
user@PCName:/mnt/c$ vi ./matmul.py
import sys
import numpy as np
import tensorflow as tf
from datetime import datetime

device_name = sys.argv[1]  # Choose device from cmd line. Options: gpu or cpu
shape = (int(sys.argv[2]), int(sys.argv[2]))
if device_name == "gpu":
    device_name = "/gpu:0"
else:
    device_name = "/cpu:0"

tf.compat.v1.disable_eager_execution()
with tf.device(device_name):
    random_matrix = tf.random.uniform(shape=shape, minval=0, maxval=1)
    dot_operation = tf.matmul(random_matrix, tf.transpose(random_matrix))
    sum_operation = tf.reduce_sum(dot_operation)


startTime = datetime.now()
with tf.compat.v1.Session(config=tf.compat.v1.ConfigProto(log_device_placement=True)) as session:
        result = session.run(sum_operation)
        print(result)

# Print the results
print("Shape:", shape, "Device:", device_name)
print("Time taken:", datetime.now() - startTime)
The results of running this script, launched from the mounted drive C, on a GPU and a CPU are shown below. For simplicity, the output is reduced.
user@PCName:/mnt/c$ docker run --runtime=nvidia --rm -ti -v "${PWD}:/mnt/c" tensorflow/tensorflow:latest-gpu-jupyter python /mnt/c/matmul.py gpu 20000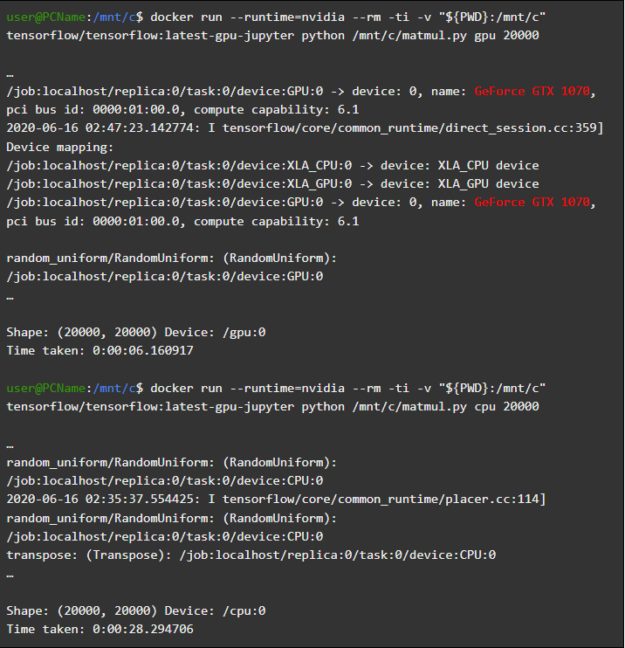
There is a significant speedup when GPU is used within the WSL 2 container for the earlier compute scenario.
Here’s another demo to see the work accelerated by the GPU: the Jupyter notebook tutorial. When the container is launched, you should see the link to the notebook server printed.
user@PCName:/mnt/c$ docker run -it --gpus all -p 8888:8888 tensorflow/tensorflow:latest-gpu-py3-jupyter 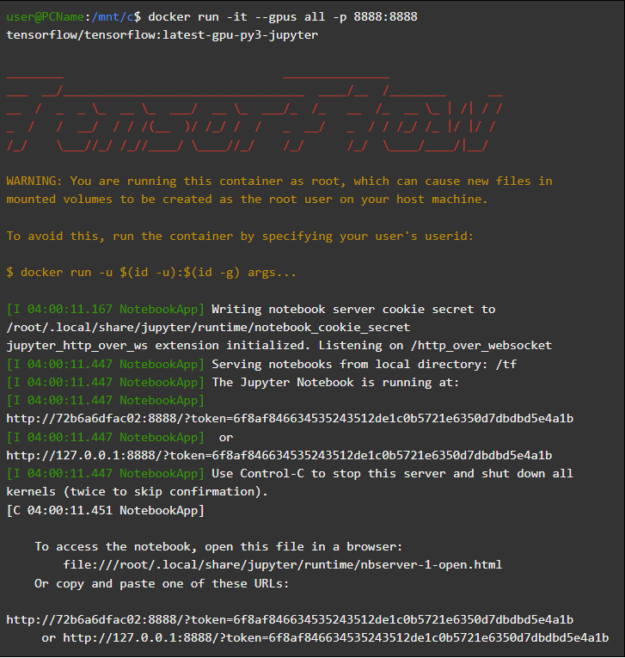
Now you should be able to run the demo samples on the Jupyter notebook. Be careful to use localhost from the Microsoft Edge browser instead of 127.0.0.1 when connecting to the notebook.
Navigate to tensorflow-tutorials and run the classification.ipynb notebook.
To see the work accelerated by the GPU of your Windows PC, navigate to the Cell menu, choose Run All, and check the log in the Jupyter notebook’s WSL 2 container.
This demo and some other demos in this container highlight the current overhead issues with the virtualization layer on small submissions, also mentioned earlier. The submissions associated with these toy models results in a GPU runtime shorter than the synchronization overhead itself. In these extreme small model cases on WSL 2, the CPU time might be better than the GPU time. This is currently being optimized and should be limited to a small, non-pipelined workload.
WSL overview
To understand how GPU is added to WSL 2, we now discuss what Linux on Windows is and how the hardware is exposed to the container.
Microsoft introduced WSL at the Build conference in 2016. It quickly gained momentum and became a popular tool among Linux developers who wanted to run Windows applications like Office alongside Linux development tools and target workloads.
WSL 1 allowed the running of unmodified Linux binaries. However, it still used a Linux kernel emulation layer, which was implemented as a subsystem within the NT kernel. This subsystem handled the calls from Linux applications by forwarding them to corresponding Windows 10 functionality.
WSL 1 was a useful tool but it was not compatible with all Linux applications as it required the emulation of potentially every Linux syscall. In general, the filesystem accesses were also slow, which resulted in unacceptable performance for some real-world applications.
With that in mind, Microsoft decided to go another route and introduced WSL 2, a new version of the WSL. The WSL 2 container runs full Linux distribution in a virtualized environment while still leveraging the full benefits of the Windows 10 new container system.
While it uses the Hyper-V services of Windows 10, WSL 2 is still not a traditional VM but rather a lightweight utility VM. That utility manages virtual address–backed memory, allowing the WSL 2 container to dynamically allocate memory from the host Windows system.
Some of the main goals for WSL 2 were to increase file system performance and to support full system call compatibility. It also has a better overall Windows host system integration. It allows shortcuts from the Windows shell into the Linux system running inside the container as well as the access to the host file system automatically mounted to selected directories of the container file system.
WSL 2 was enabled as a preview feature of the Windows Insider Program and has been released as the most recent Windows 10 update, version 2004.
There are more improvements made to WSL 2 containers in the latest Windows version, from network stacks to underlying storage VHD. Describing all the details would go beyond the scope of this post. For more information about some of those new interesting and exciting features of WSL 2 containers, see Comparing WSL 2 and WSL 1.
WSL 2 Linux kernel
The Linux kernel in WSL 2 is built by Microsoft from the latest stable branch, based on the source available at kernel.org. This kernel has been specially tuned for WSL 2, optimized for size and performance to provide a Linux experience on Windows. The kernel is serviced by Windows Update, which means you get the latest security fixes and kernel improvements without needing to manage it yourselves.
Microsoft supports a few distros of Linux in WSL. Following the rules of the open source community, the WSL 2 kernel source code with required modifications to allow system integration with the Windows 10 host is public and available on the WSL2-Linux-Kernel GitHub repo.
GPU in WSL
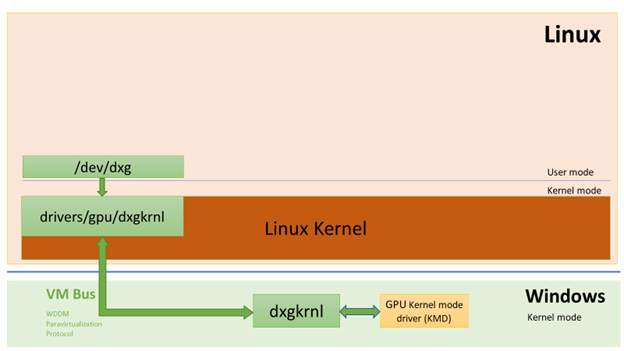
Microsoft developers are bringing real GPU hardware support into the WSL 2 containers through the GPU-PV technology, where the OS graphics kernel (dxgkrnl) marshals calls from user-mode components running inside the guest VM to the kernel mode driver that lives on the host.
Microsoft developed this technology as a feature of their WDDM graphics driver model several Windows releases ago with the help of independent hardware vendors (IHVs) . The NVIDIA graphics driver has supported GPU-PV since the early days of the feature preview in Windows Insider Program for the Windows OS. All currently supported NVIDIA GPUs can be exposed to the Windows OS running inside a Hyper-V VM guest.
For WSL 2 to be able to leverage the power of GPU-PV, Microsoft had to implement the foundation of their graphics framework within the Linux guest: the WDDM model with the GPU-PV protocol. The new Microsoft driver sits behind support for the WDDM model on Linux, called dxgkrnl. It is also available as a source code project in the WSL2-Linux-Kernel GitHub repo.
The dxgkrnl driver is expected to bring support for GPU acceleration to WSL 2 containers with the WDDM 2.9 version. Microsoft explains that dxgkrnl is a Linux GPU driver based on the GPU-PV protocol and doesn’t share anything else in common with its similarly named Windows counterpart.
For the time being, you can download the preview version of NVIDIA WDDM 2.9 driver. Over the next few months, the NVIDIA WDDM 2.9 driver will be distributed from the WIP version of Windows Update, which makes manually downloading and installing the driver unnecessary.
GPU-PV in a nutshell
The dxgkrnl driver exposes the new /dev/dxg device to user mode in Linux guest. The D3DKMT kernel service layer, which has been available on Windows, is also being ported to Linux as a part of the dxcore library. It communicates with the dxgkrnl using a set of private IOCTL calls.
The guest Linux version of dxgkrnl connects to the dxg kernel on the Windows host using multiple VM bus channels. The dxg kernel on the host treats Linux process submissions the same way as the process submissions from native Windows apps running in the WDDM model. It sends them to KMD (an IHV-specific kernel mode driver), which prepares them and submits them to the hardware GPU. Figure 10 shows a simplified diagram of such a communication channel.
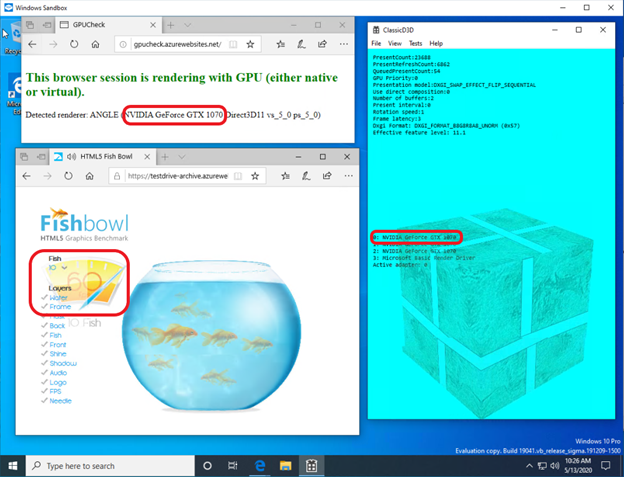
NVIDIA drivers have supported Windows 10 GPU-PV with Windows guests for many releases. NVIDIA GPUs can be used to accelerate compute and graphics within all end-user Windows 10 applications that use the Microsoft virtualization layer and add vGPU using the GPU-PV feature:
Figure 11 shows an example of running a sample DirectX app within the Windows Sandbox container on a NVIDIA GeForce GTX 1070 GPU.
User mode support
To enable graphics in WSL, the Windows graphics team also ported a user mode component to Linux: dxcore.
The dxcore library provides an API function to enumerate the graphics adapters in the system that are WDDM-compliant. It is intended to be the cross-platform, low-level replacement for the DXGI adapter enumeration both in Windows and Linux. It also abstracts access to the dxgkrnl services (IOCTLs on Linux and GDI calls on Windows) with the D3DKMT layer API, which is used by CUDA and other user mode components that rely on WDDM model support in WSL.
According to Microsoft, the dxcore (libdxcore.so) library will be available on both Windows and Linux. NVIDIA plans to add support for DirectX 12 and CUDA APIs to the driver, targeting the new WSL feature of the WDDM 2.9 model. Both API libraries will link to the dxcore so that they can instruct the dxg kernel to marshal their requests to the KMD on the host.
Try it today
If you want to use your Windows PC to do real ML and AI development from the comfort of the Linux environment, support for CUDA in WSL brings you an exciting opportunity. WSL is where Docker CUDA containers have proved to be one of the most popular compute environments among data scientists.
- Join the Microsoft Windows Insider program to get access to the WSL 2 preview with GPU acceleration enabled.
- Download the latest NVIDIA driver, install it, and try running CUDA-containerized workloads within WSL 2.
Learn more about CUDA on WSL, and share your comments, feedback, and ideas on our community forum.
