With the introduction of Intel Thunderbolt 3 in laptops, you can now use an external GPU (eGPU) enclosure to use a dedicated GPU for gaming, production, and data science. A Thunderbolt 3 eGPU setup consists of
- A discrete GPU
- An enclosure to house it in
- A power supply
- A Thunderbolt 3 connection to the laptop
Most enclosures provide all of these, so all you need to use them is a laptop with Thunderbolt 3.
Because I value the portability of a thin and light laptop but want the raw horsepower of a dedicated GPU to get serious work done, eGPUs allow me to get the best of both worlds. With a single Thunderbolt 3 cable, I can connect my laptop to a powerful, dedicated GPU; multiple monitors; and peripherals.
Choosing your hardware
The performance of an eGPU solution depends largely on the performance of the GPU, performance of the CPU, and connection bandwidth between the two.
Making sure that your laptop supports Thunderbolt 3
Thunderbolt 3 is a hardware interface that works over USB-C and supports up to four PCI Express (PCIe) lanes between the host CPU and devices such as GPUs, which gives you a theoretical maximum:
4 x 8Gbps (the bandwidth of a single PCIe Gen3 lane) = 32 Gbps
Laptop manufacturers can design laptops with fewer than four lanes though, so you should consult the laptop manufacturer to find out how many PCIe lanes are available using Thunderbolt 3 on your machine. The folks over at eGPU.io maintain a list of the best laptops for eGPU applications.
eGPUs are supported on Windows and Linux. This post focuses on eGPUs on Ubuntu Linux. The laptop that I’m using is the Lenovo ThinkPad X1 Yoga(4th Gen) running Ubuntu 20.04 LTS, but this post has been tested to work on Ubuntu 18.04 LTS as well.
Choosing an enclosure
While enclosures vary in features, size, power delivery, and cost, the folks at eGPU.io also maintain a list of Thunderbolt 3 enclosures with a succinct description of their features to help you make your decision. My enclosure of choice is the Sonnet eGFX Breakaway Box(350W).
Choosing a GPU
Your choice of GPU depends on your use case and choice of enclosure. Some considerations are power consumption, card size, GPU memory, and clock speed. My GPU of choice is the RTX 2080 Super.

Setting up Ubuntu to use NVIDIA eGPU
This post assumes that you are going to be using Ubuntu 18.04 LTS/20.04 LTS.
Installing CUDA and the NVIDIA drivers
Install Ubuntu with the eGPU connected and reboot.
Update the system to the latest kernel:
$ sudo apt-get update
$ sudo apt-get dist-upgrade
Make sure that the NVIDIA GPU is detected by the system and a suitable driver is loaded:
$ lspci | grep -i “nvidia”
$ lsmod | grep -i “nvidia”
The existing driver is most likely Nouveau, an open-source driver for NVIDIA GPUs. Because Nouveau doesn’t support eGPU setups, install the NVIDIA CUDA and NVIDIA drivers instead. You must also stop the kernel from loading Nouveau.
Get the latest version of the NVIDIA CUDA Toolkit for your distribution. For Ubuntu 20.04, this toolkit is available from the standard repository:
$ sudo apt-get install nvidia-cuda-toolkit
Offloading Xorg to the eGPU
After installing the NVIDIA proprietary driver, make sure that gdm3 (the graphical login manager) for Ubuntu 18.04/20.04 doesn’t use Wayland by commenting out #WaylandEnable=false in /etc/gdm3/custom.conf:
# GDM configuration storage
#
# See /usr/share/gdm/gdm.schemas for a list of available options.
[daemon]
# Uncomment the line below to force the login screen to use Xorg
WaylandEnable=false
Afterwards, boot into runlevel 3 by appending 3 to GRUB_CMDLINE_LINUX_DEFAULT in /etc/default/grub:
#If you change this file, run 'update-grub' afterwards to update
# /boot/grub/grub.cfg.
# For full documentation of the options in this file, see:
#   info -f grub -n 'Simple configuration'

GRUB_DEFAULT=0
GRUB_TIMEOUT_STYLE=hidden
GRUB_TIMEOUT=0
GRUB_DISTRIBUTOR=`lsb_release -i -s 2> /dev/null || echo Debian`
GRUB_CMDLINE_LINUX_DEFAULT="quiet splash"
GRUB_CMDLINE_LINUX=""
Lastly, update grub and restart:
$ sudo update-grub
$ sudo shutdown --reboot
Reboot into runlevel 3 and check whether the NVIDIA proprietary driver is loaded:
$ nvidia-smi
Edit /usr/share/X11/xorg.conf.d/10-nvidia.conf to add an additional option in OutputClass to allow the NVIDIA X driver to accelerate X instead of it being driven by the integrated GPU:
Section "OutputClass"
   Identifier "nvidia"
   MatchDriver "nvidia-drm"
   Driver "nvidia"
   Option "AllowExternalGpus" "True"
   Option "AllowEmptyInitialConfiguration"
   ModulePath "/usr/lib/x86_64-linux-gnu/nvidia/xorg"
EndSection
Revert /etc/default/grub to the default by removing “3” from GRUB_CMDLINE_LINUX_DEFAULT and update grub:
$ sudo update-grub
Reboot and check to make sure that your X session is accelerated by the NVIDIA GPU by looking at the output of $nvidia-smi.
$ nvidia-smi output
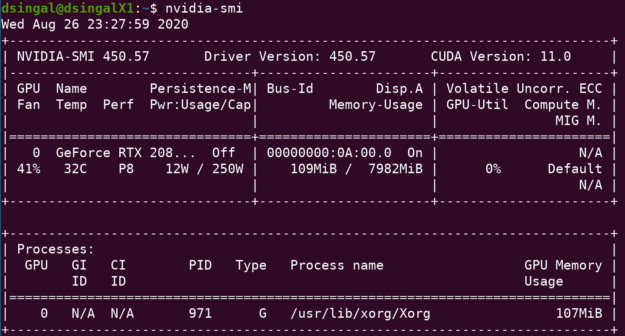
The results should display the utilization of at least one GPU, the one in your eGPU enclosure. There may be other GPUs displayed, depending on how many NVIDIA GPUs your system has. If you see the process /usr/lib/xorg/Xorg, it means that your X session is now being accelerated by the NVIDIA GPU.
Using NGC containers
Containers provide an easy way to set up your development environment. Spanning AI, data science, and HPC, the container registry on NGC features an extensive range of GPU-accelerated software for NVIDIA GPUs. NGC hosts containers for the top AI and data science software, tuned, tested, and optimized by NVIDIA, as well as fully tested containers for HPC applications and data analytics
Now that you have the NVIDIA driver installed, you can install nvidia-docker and pull down NVIDIA GPU-optimized containers from NGC for a variety of tasks:
- CUDA for GPGPU
- Isaac Sim for robotics simulation
- NeMo for conversational AI
- DeepStream for intelligent video analytics
- Parabricks for DNA sequencing
- And many more containers in the fields of AI, data science, and HPC
For more information about how to use NGC containers, see the NGC Getting Started Guide.
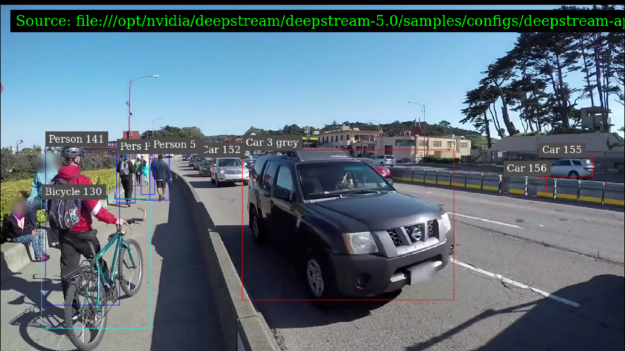
Here is an example, running DeepStream using an image from NGC:
dsingal@dsingalX1NV:~$ sudo docker pull nvcr.io/nvidia/deepstream:5.0-20.07-triton
dsingal@dsingalX1NV:~$ xhost +
dsingal@dsingalX1NV:~$ docker run --gpus all -it --rm -v /tmp/.X11-unix:/tmp/.X11-unix -e DISPLAY=$DISPLAY -w /opt/nvidia/deepstream/deepstream-5.0 nvcr.io/nvidia/deepstream:5.0-dp-20.04-triton
root@dsingalX1NV:/opt/nvidia/deepstream/deepstream-5.0# deepstream-app -c ./samples/configs/deepstream-app/source4_1080p_dec_infer-resnet_tracker_sgie_tiled_display_int8.txt
Conclusion
Now that you have set up your eGPU, you can leverage the massively parallel compute available to you by doing things like Accelerating Text to Speech using NVIDIA Riva, Building Deep Recommender Systems with NVIDIA Merlin, Building IVA Applications with NVIDIA DeepStream, and many more.
Make sure to join the NVIDIA Developer Program to get access to tutorials, training, and developer technical events and accelerate your applications using the latest NVIDIA SDKs and tools.
