假设您正在进行一个机器学习( ML )项目,并且已经找到了您的冠军模型。接下来会发生什么?对许多人来说,项目就此结束,他们的模型被隔离在 Jupyter 笔记本中。其他人会主动将笔记本转换为脚本,以获得某种生产级代码。
这两个端点都限制了项目的可访问性,需要了解 GitHub 和 Bitbucket 等托管源代码的站点。一个更好的解决方案是将您的项目转换为一个可以部署在内部服务器上的前端原型。
虽然原型可能不是生产标准,但它是公司用来为利益相关者提供建议解决方案洞察力的有效技术。这样,公司就可以收集反馈,并在未来开发更好的迭代。
要开发原型,您需要:
- 用户交互的前端
- 可以处理请求的后端
然而,这两个需求都需要花费大量的时间来构建。在本教程中,您将学习如何使用 Streamlit 为前端和 FastAPI 为微服务快速构建自己的机器学习 web 应用程序,从而简化流程。在 Building a Machine Learning Microservice with FastAPI 中了解有关微服务的更多信息。
您可以使用 kurtispykes/car-evaluation-project GitHub 存储库中的代码尝试本教程中的应用程序。
Streamlit 和 FastAPI 概述
Streamlit 是一个开源应用程序框架,旨在简化为机器学习和数据科学构建 web 应用程序的过程。近年来,它在应用 ML 社区中获得了很大的吸引力。 Streamlit 成立于 2018 年,是前谷歌工程师在部署机器学习模型和仪表盘时遇到的挑战所带来的挫折。
使用 Streamlit 框架,数据科学家和机器学习实践者可以在几个小时内构建自己的预测分析 web 应用程序。不需要依赖前端工程师或 HTML 、 CSS 或 Javascript 知识,因为这一切都是用 Python 完成的。
FastAPI 在 Python 开发商中也迅速崛起。这是一个现代的网络框架,也于 2018 年首次发布,旨在弥补 Flask 几乎所有失败的领域。切换到 FastAPI 的一个好处是学习曲线不是很陡,特别是如果你已经知道 Flask 。有了 FastAPI ,您可以期待完整的文档、短的开发时间、简单的测试和轻松的部署。这使得在 Python 中开发 RESTful API 成为可能。
通过结合这两个框架的强大功能,您可以在不到一天的时间内开发一个激动人心的机器学习应用程序,与您的朋友、同事和利益相关者共享。
构建全栈机器学习应用程序
以下步骤指导您使用 FastAPI 和 Streamlit 构建简单的分类模型。该模型根据以下六个输入特征评估汽车是否可以接受:
buying: 购车成本maint:维护成本doors:门的数量persons:承载能力(人数)lug_boot: The size of the luggage bootsafety:估计的安全性
您可以从 UCI machine learning repository 下载完整的 Car Evaluation 数据集。
完成所有数据分析、培训冠军模型并打包机器学习模型后,下一步是创建两个专用服务: 1 ) FastAPI 后端和 2 ) Streamlit 前端。然后,这两个服务可以部署在两个 Docker 容器中,并使用 Docker Compose 进行编排。
每个服务都需要自己的 Dockerfile 来组装 Docker 映像。定义和共享两个容器应用程序还需要 Docker Compose YAML 文件。以下步骤贯穿于每个服务的开发。
用户界面
在car_evaluation_streamlit包中,使用 Streamlit 在app.py文件中创建一个简单的用户界面。以下代码包括:
- UI 的标题
- 项目简介
- 用户将使用六个交互元素输入有关汽车的信息
- API 返回的类值
- 一个提交按钮,单击该按钮时,将把从用户收集的所有数据作为 post 请求发送到机器学习 API 服务,然后显示模型的响应
import requests

import streamlit as st

# Define the title
st.title("Car evaluation web application")
st.write(
    "The model evaluates a cars acceptability based on the inputs below.\
    Pass the appropriate details about your car using the questions below to discover if your car is acceptable."
)

# Input 1
buying = st.radio(
    "What are your thoughts on the car's buying price?",
    ("vhigh", "high", "med", "low")
)

# Input 2
maint = st.radio(
    "What are your thoughts on the price of maintenance for the car?",
    ("vhigh", "high", "med", "low")
)

# Input 3
doors = st.select_slider(
    "How many doors does the car have?",
    options=["2", "3", "4", "5more"]
)

# Input 4
persons = st.select_slider(
    "How many passengers can the car carry?",
    options=["2", "4", "more"]
)

# Input 5
lug_boot = st.select_slider(
    "What is the size of the luggage boot?",
    options=["small", "med", "big"]
)

# Input 6
safety = st.select_slider(
    "What estimated level of safety does the car provide?",
    options=["low", "med", "high"]
)

# Class values to be returned by the model
class_values = {
    0: "unacceptable",
    1: "acceptable",
    2: "good",
    3: "very good"
    }

# When 'Submit' is selected
if st.button("Submit"):

    # Inputs to ML model
    inputs = {
        "inputs": [
            {
                "buying": buying,
                "maint": maint,
                "doors": doors,
                "persons": persons,
                "lug_boot": lug_boot,
                "safety": safety
            }
        ]
        }

    # Posting inputs to ML API
    response = requests.post(f"http://host.docker.internal:8001/api/v1/predict/", json=inputs, verify=False)
    json_response = response.json()

    prediction = class_values[json_response.get("predictions")[0]]

    st.subheader(f"This car is **{prediction}!**")
此服务所需的唯一框架是 Streamlit 。在requirements.txt文件中,注意创建 Docker 映像时要安装的 Streamlit 版本。
streamlit>=1.12.0, <1.13.0现在,添加 Dockerfile 以创建此服务的 docker 映像:
FROM python:3.9.4

WORKDIR /opt/car_evaluation_streamlit

ADD ./car_evaluation_streamlit /opt/car_evaluation_streamlit
RUN pip install --upgrade pip
RUN pip install -r /opt/car_evaluation_streamlit/requirements.txt

EXPOSE 8501

CMD ["streamlit", "run", "app.py"]
每个命令创建一个层,每个层都是一个图像。
REST API
Representational State Transfer Application Programming Interfaces ( REST API )是一种使两个应用程序能够相互通信的软件架构。从技术上讲, REST API 将被请求资源的状态传输给客户端。在这种情况下,请求的资源将是机器学习模型的预测。
使用 FastAPI 构建的 API 可以在car_evaluation_api包中找到。找到用于运行应用程序的app/main.py文件。有关如何开发 API 的更多信息,请参阅 Building a Machine Learning microservice with FastAPI 。
from typing import Any

from fastapi import APIRouter, FastAPI, Request
from fastapi.middleware.cors import CORSMiddleware
from fastapi.responses import HTMLResponse
from loguru import logger

from app.api import api_router
from app.config import settings, setup_app_logging

# setup logging as early as possible
setup_app_logging(config=settings)


app = FastAPI(
    title=settings.PROJECT_NAME, openapi_url=f"{settings.API_V1_STR}/openapi.json"
)

root_router = APIRouter()


@root_router.get("/")
def index(request: Request) -> Any:
    """Basic HTML response."""
    body = (
        "<html>"
        "<body style='padding: 10px;'>"
        "<h1>Welcome to the API</h1>"
        "<div>"
        "Check the docs: <a href='/docs'>here</a>"
        "</div>"
        "</body>"
        "</html>"
    )

    return HTMLResponse(content=body)


app.include_router(api_router, prefix=settings.API_V1_STR)
app.include_router(root_router)

# Set all CORS enabled origins
if settings.BACKEND_CORS_ORIGINS:
    app.add_middleware(
        CORSMiddleware,
        allow_origins=[str(origin) for origin in settings.BACKEND_CORS_ORIGINS],
        allow_credentials=True,
        allow_methods=["*"],
        allow_headers=["*"],
    )


if __name__ == "__main__":
    # Use this for debugging purposes only
    logger.warning("Running in development mode. Do not run like this in production.")
    import uvicorn

    uvicorn.run(app, host="localhost", port=8001, log_level="debug")
上面的代码定义了服务器,它包括三个端点:
"/":用于定义返回 HTML 响应的主体的端点"/health":返回模型健康响应模式的端点"/predict":用于服务于训练模型预测的端点
您可能在上面的代码中只能看到"/"端点:这是因为"/health"和"/predict"端点是从 API 模块导入并添加到应用程序路由器的。
接下来,将 API 服务的依赖项保存在requirements.txt文件中:
--extra-index-url="https://repo.fury.io/kurtispykes/"
car-evaluation-model==1.0.0

uvicorn>=0.18.2, <0.19.0
fastapi>=0.79.0, <1.0.0
python-multipart>=0.0.5, <0.1.0
pydantic>=1.9.1, <1.10.0
typing_extensions>=3.10.0, <3.11.0
loguru>=0.6.0, <0.7.0
注意: pip 中添加了一个额外的索引来安装 Gemrafre 的打包模型。
接下来,将 Dockerfile 添加到car_evalutation_api包中。
FROM python:3.9.4

# Create the user that will run the app
RUN adduser --disabled-password --gecos '' ml-api-user

WORKDIR /opt/car_evaluation_api

ARG PIP_EXTRA_INDEX_URL

# Install requirements, including from Gemfury
ADD ./car_evaluation_api /opt/car_evaluation_api
RUN pip install --upgrade pip
RUN pip install -r /opt/car_evaluation_api/requirements.txt

RUN chmod +x /opt/car_evaluation_api/run.sh
RUN chown -R ml-api-user:ml-api-user ./

USER ml-api-user

EXPOSE 8001

CMD ["bash", "./run.sh"]
这两个服务都已经创建,以及为每个服务构建容器的说明。
下一步是将容器连接在一起,以便开始使用机器学习应用程序。继续之前,请确保已安装 Docker 和 Docker Compose 。如有必要,请参考 Docker Compose installation guide 。
连接 Docker 容器
要将容器连接在一起,请在 packages/ directory.
Docker Compose 文件的内容如下:
version: '3'

services:
  car_evaluation_streamlit:
    build:
        dockerfile: car_evaluation_streamlit\Dockerfile
    ports:
      - 8501:8501
    depends_on:
      - car_evaluation_api

  car_evaluation_api:
    build:
        dockerfile: car_evaluation_api\Dockerfile
    ports:
      - 8001:8001
该文件定义了要使用的 Docker Compose 版本,定义了要连接在一起的两个服务、要公开的端口以及到各自 Dockerfiles 的路径。请注意,car_evaluation_streamlit服务通知 Docker Compose 它依赖于car_evaluation_api服务。
要测试应用程序,请从命令提示符(docker-compose.yml文件的位置)导航到项目根目录。然后运行以下命令来构建图像并启动两个容器:
docker-compose up -d --build构建图像可能需要一两分钟。构建 Docker 映像后,您可以导航到 http://localhost:8501 以使用该应用程序。
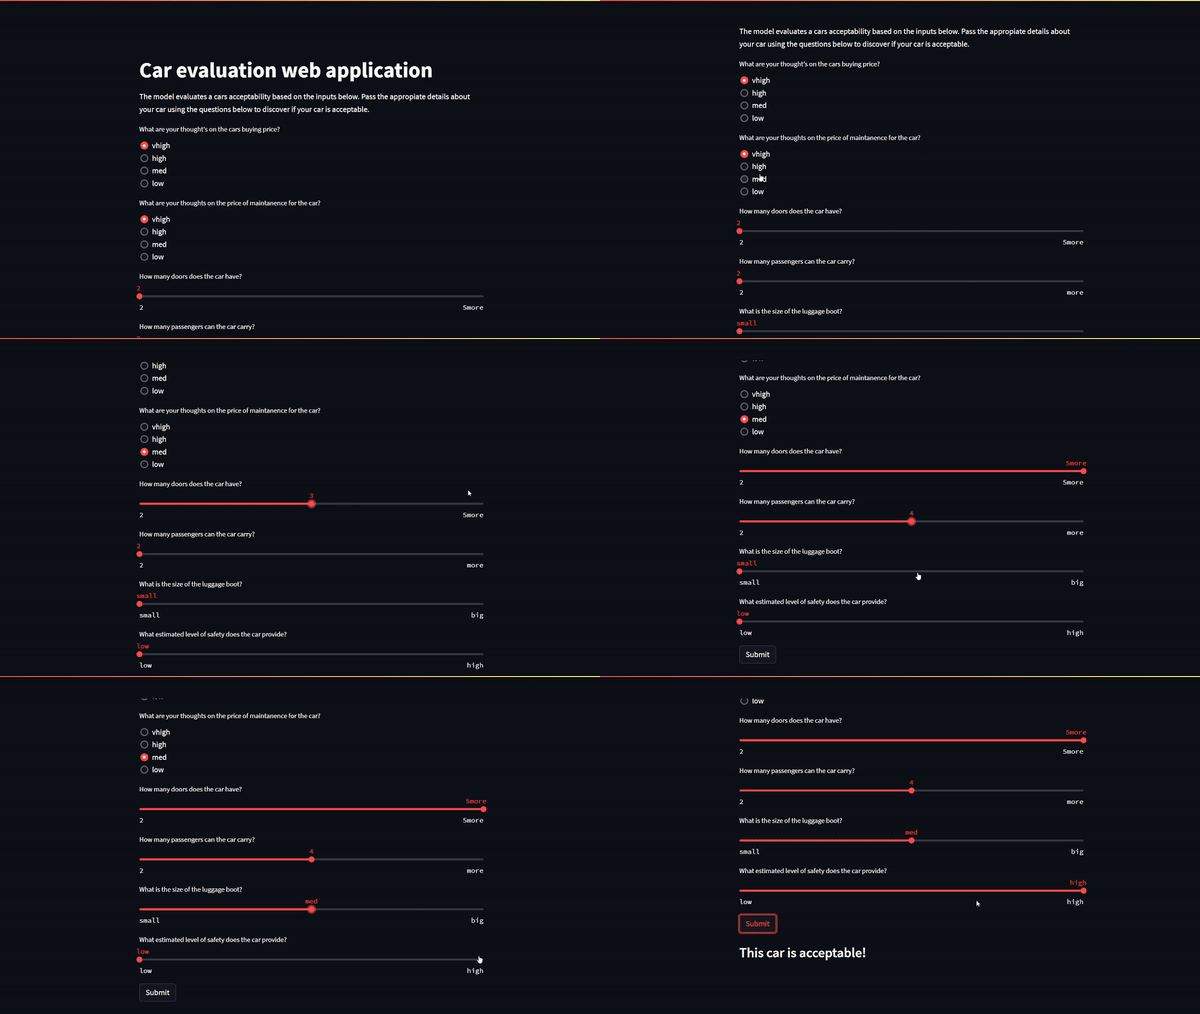
图 1 显示了本文开头概述的六个模型输入:
- 购车价格(低、中、高、非常高)
- 汽车的维护成本(低、中、高、非常高)
- 汽车的门数( 2 、 3 、 4 、 5 +)
- 汽车可运载的乘客数量( 2 、 4 或更多)
- 行李箱的大小(小、中、大)。
- 汽车的预期安全性(低、中、高)
总结
祝贺您刚刚创建了自己的全栈机器学习 web 应用程序。接下来的步骤可能涉及使用 Heroku Cloud 、 Google App Engine 或 Amazon EC2 等服务在 web 上部署应用程序。
Streamlit 使开发人员能够为数据科学和机器学习快速构建美观的用户界面。开始使用 Streamlit 所需的全部工作知识就是 Python 。 FastAPI 是一个现代网络框架,旨在弥补烧瓶掉落的大部分区域。您可以同时使用 Streamlit 和 FastAPI 后端,使用 Docker 和 Docker Compose 构建一个全栈 web 应用程序。

