Deploying an application using a microservice architecture has several advantages: easier main system integration, simpler testing, and reusable code components. FastAPI has recently become one of the most popular web frameworks used to develop microservices in Python. FastAPI is much faster than Flask (a commonly used web framework in Python) because it is built over an Asynchronous Server Gateway Interface (ASGI) instead of a Web Server Gateway Interface (WSGI).
What are microservices
Microservices define an architectural and organizational approach to building software applications. One key aspect of microservices is that they are distributed and have loose couplings. Implementing changes is unlikely to break the entire application.
You can also think of an application built with a microservice architecture as being composed of several small, independent services that communicate through application programming interfaces (APIs). Typically, each service is owned by a smaller, self-contained team responsible for implementing changes and updates when necessary.
One of the major benefits of using microservices is that they enable teams to build new components for their applications rapidly. This is vital to remain aligned with ever-changing business needs.
Another benefit is how simple they make it to scale applications on demand. Businesses can accelerate the time-to-market to ensure that they are meeting customer needs constantly.
The difference between microservices and monoliths
Monoliths are another type of software architecture that proposes a more traditional, unified structure for designing software applications. Here are some of the differences.
Microservices are decoupled
Think about how a microservice breaks down an application into its core functions. Each function is referred to as a service and performs a single task.
In other words, a service can be independently built and deployed. The advantage of this is that individual services work without impacting the other services. For example, if one service is in more demand than the others, it can be independently scaled.
Monoliths are tightly coupled
On the other hand, a monolith architecture is tightly coupled and runs as a single service. The downside is that when one process experiences a demand spike, the entire application must be scaled to prevent this process from becoming a bottleneck. There’s also the increased risk of application downtime, as a single process failure affects the whole application.
With a monolithic architecture, it is much more complex to update or add new features to an application as the codebase grows. This limits the room for experimentation.
When to use microservices or monoliths?
These differences do not necessarily mean microservices are better than monoliths. In some instances, it still makes more sense to use a monolith, such as building a small application that will not demand much business logic, superior scalability, or flexibility.
However, machine learning (ML) applications are often complex systems with many moving parts and must be able to scale to meet business demands. Using a microservice architecture for ML applications is usually desirable.
Packaging a machine learning model
Before I can get into the specifics of the architecture to use for this microservice, there is an important step to go through: model packaging. You can only truly realize the value of an ML model when its predictions can be served to end users. aIn most scenarios, that means going from notebooks to scripts so that you can put your models into production.
In this instance, you convert the scripts to train and make predictions on new instances into a Python package. Packages are an essential part of programming. Without them, most of your development time is wasted rewriting existing code.
To better understand what packages are, it is much easier to start with what scripts are and then introduce modules.
- Script: A file expected to be run directly. Each script execution performs a specific behavior defined by the developer. Creating a script is as simple as saving a file with the .py extension to denote a Python file.
- Module: A program created to be imported into other scripts or modules. A module typically consists of several classes and functions intended to be used by other files. Another way to think of modules is as code to be reused over and over again.
A package may be defined as a collection of related modules. These modules interact with one another in a specific way such that you are enabled to accomplish a task. In Python, packages are typically bundled and distributed through PyPi and they can be installed using pip, a Python package installer.
For this post, bundle the ML model. To follow along with the code, see the kurtispykes/car-evaluation-project GitHub repo.
Figure 1 shows the directory structure for this model.
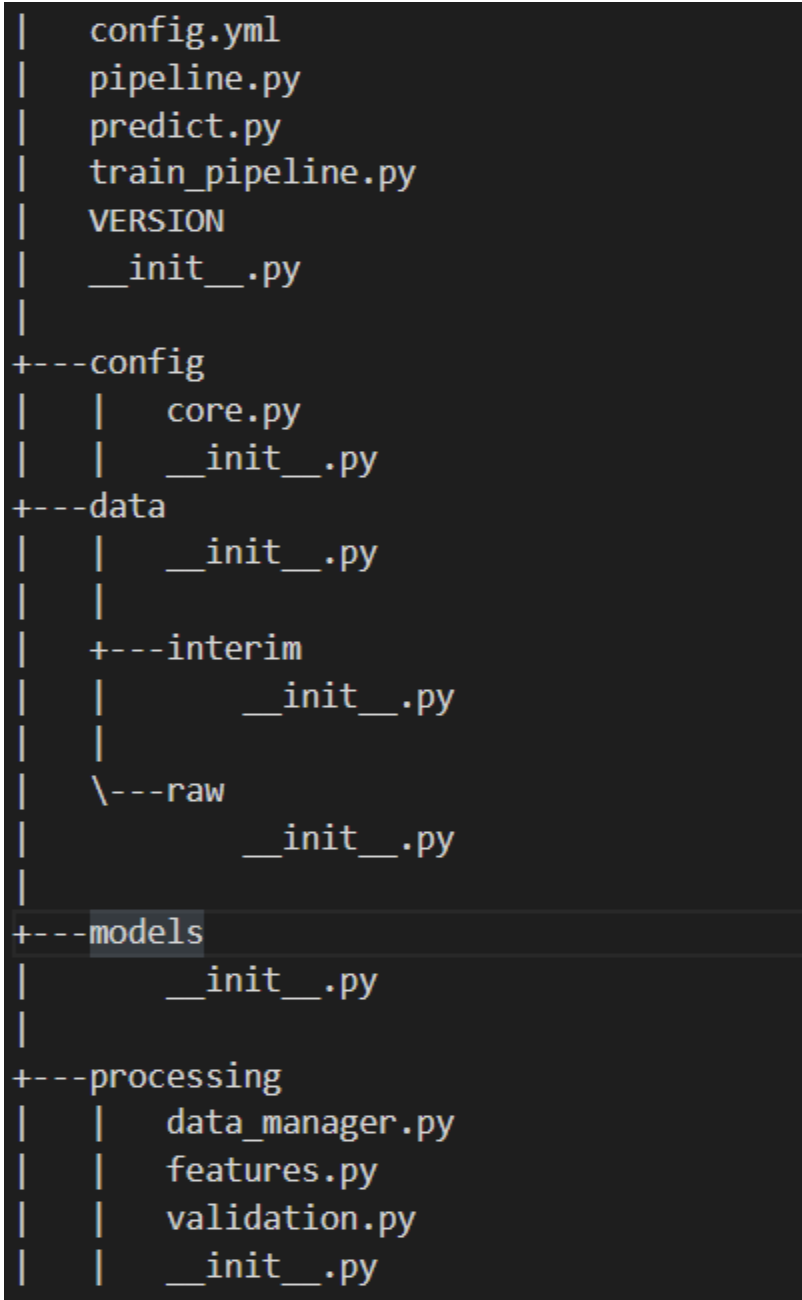
The package modules include the following:
- config.yml: YAML file to define constant variables.
- pipeline.py: Pipeline to perform all feature transformations and modeling.
- predict.py: To make predictions on new instances with the trained model.
- train_pipeline.py: To conduct model training.
- VERSION: The current release.
- config/core.py: Module used to parse YAML file such that constant variables may be accessed in Python.
- data/: All data used for the project.
- models/: The trained serialized model.
- processing/data_manager.py: Utility functions for data management.
- processing/features.py: Feature transformations to be used in the pipeline.
- processing/validation.py: A data validation schema.
The model is not optimized for this problem as the main focus of this post is to show how to build a ML application with a microservice architecture.
Now the model is ready to be distributed, but there is an issue. Distributing the package through the PyPi index would mean that it is accessible worldwide. This may be okay for a scenario where there’s no business value in the model. However, this would be a complete disaster in a real business scenario.
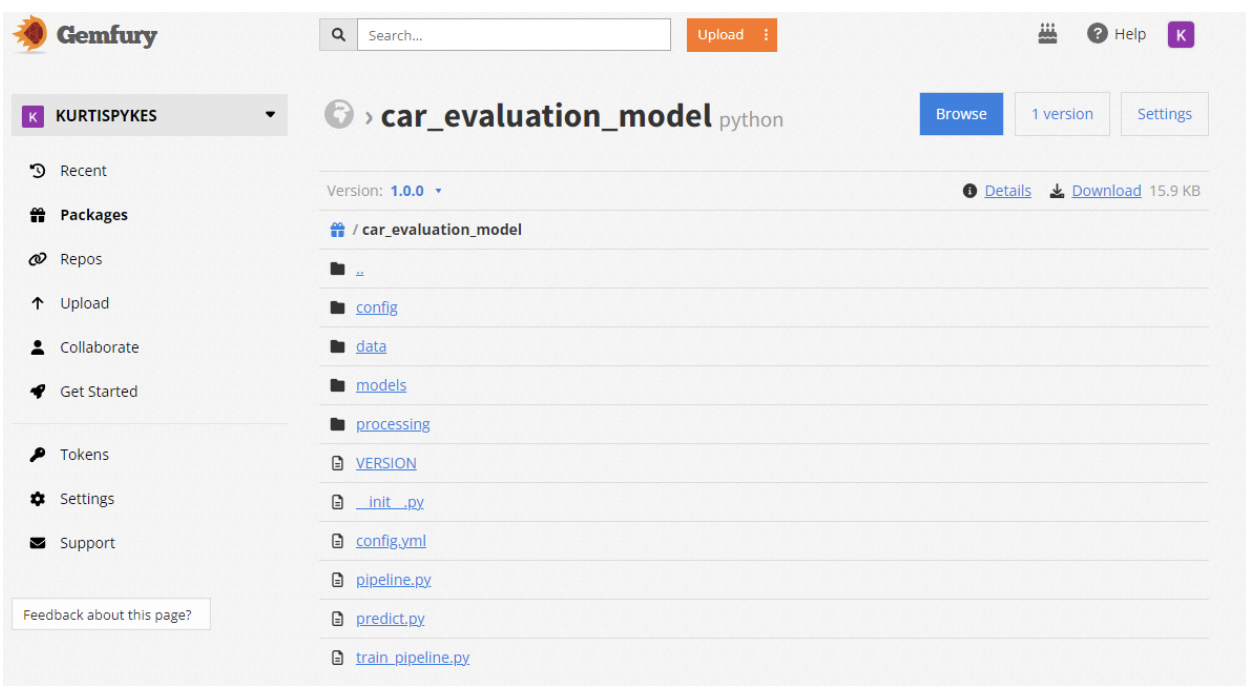
Instead of using PyPi to host private packages, you can use a third-party tool like Gemfury. The steps to do this are beyond the scope of this post. For more information, see Installing private Python packages.
Figure 2 shows the privately packaged model in my Gemfury repository. I’ve made this package public for demonstration purposes.
Microservice system design
After you have trained and saved your model, you need a way of serving predictions to the end user. REST APIs are a great way to achieve this goal. There are several application architectures you could use to integrate the REST API. Figure 3 shows the embedded architecture that I use in this post.

An embedded architecture refers to a system in which the trained model is embedded into the API and installed as a dependency.
There is a natural trade-off between simplicity and flexibility. The embedded approach is much simpler than other approaches but is less flexible. For example, whenever a model update is made, the entire application would have to be redeployed. If your service were being offered on mobile, then you’d have to release a new version of the software.
Building the API with FastAPI
The consideration when building the API is dependencies. You won’t be creating a virtual environment because you are running the application with tox, which is a command-line–driven, automated testing tool also used for generic virtualenv management. Thus, calling tox creates a virtual environment and runs the application.
Nonetheless, here are the dependencies.
--extra-index-url="https://repo.fury.io/kurtispykes/"
car-evaluation-model==1.0.0

uvicorn>=0.18.2, <0.19.0
fastapi>=0.79.0, <1.0.0
python-multipart>=0.0.5, <0.1.0
pydantic>=1.9.1, <1.10.0
typing_extensions>=3.10.0, <3.11.0
loguru>=0.6.0, <0.7.0
There’s an extra index, another index for pip to search for packages if it cannot be found in PyPI. This is a public link to the Gemfury account hosting the packaged model, thus, enabling you to install the trained model from Gemfury. This would be a private package in a professional setting, meaning that the link would be extracted and hidden in an environment variable.
Another thing to take note of is uvicorn. Uvicorn is a server gateway interface that implements the ASGI interface. In other words, it is a dedicated web server that is responsible for dealing with inbound and outbound requests. It’s defined in Procfile.
web: uvicorn app.main:app --host 0.0.0.0 --port $PORT
Now that the dependencies are specified, you can move on to look at the actual application. The main part of the API application is the main.py script:
from typing import Any

from fastapi import APIRouter, FastAPI, Request
from fastapi.middleware.cors import CORSMiddleware
from fastapi.responses import HTMLResponse
from loguru import logger

from app.api import api_router
from app.config import settings, setup_app_logging

# setup logging as early as possible
setup_app_logging(config=settings)


app = FastAPI(
    title=settings.PROJECT_NAME, openapi_url=f"{settings.API_V1_STR}/openapi.json"
)

root_router = APIRouter()


@root_router.get("/")
def index(request: Request) -> Any:
    """Basic HTML response."""
    body = (
        "<html>"
        "<body style='padding: 10px;'>"
        "<h1>Welcome to the API</h1>"
    "<div>"
        "Check the docs: <a href='/docs'>here</a>"
        "</div>"
        "</body>"
        "</html>"
    )

    return HTMLResponse(content=body)


app.include_router(api_router, prefix=settings.API_V1_STR)
app.include_router(root_router)

# Set all CORS enabled origins
if settings.BACKEND_CORS_ORIGINS:
    app.add_middleware(
        CORSMiddleware,
        allow_origins=[str(origin) for origin in settings.BACKEND_CORS_ORIGINS],
        allow_credentials=True,
        allow_methods=["*"],
        allow_headers=["*"],
    )

if __name__ == "__main__":
    # Use this for debugging purposes only
    logger.warning("Running in development mode. Do not run like this in production.")
    import uvicorn  # type: ignore

    uvicorn.run(app, host="localhost", port=8001, log_level="debug")
If you are unable to follow along, do not worry about it. The key thing to note is that there are two routers in the main application:
root_router: This endpoint defines a body that returns an HTML response. You could almost think of it as a home endpoint that is called index.api_router: This endpoint is used to specify the more complex endpoints that permit other applications to interact with the ML model.
Dive deeper into the api.py module to understand api_router better. First, there are two endpoints defined in this module: health and predict.
Take a look at the code example:
@api_router.get("/health", response_model=schemas.Health, status_code=200)
def health() -> dict:
    """
    Root Get
    """
    health = schemas.Health(
        name=settings.PROJECT_NAME, api_version=__version__, model_version=model_version
    )

    return health.dict()

@api_router.post("/predict", response_model=schemas.PredictionResults, status_code=200)
async def predict(input_data: schemas.MultipleCarTransactionInputData) -> Any:
    """
    Make predictions with the Fraud detection model
    """

    input_df = pd.DataFrame(jsonable_encoder(input_data.inputs))

    # Advanced: You can improve performance of your API by rewriting the
    # `make prediction` function to be async and using await here.
    logger.info(f"Making prediction on inputs: {input_data.inputs}")
    results = make_prediction(inputs=input_df.replace({np.nan: None}))

    if results["errors"] is not None:
        logger.warning(f"Prediction validation error: {results.get('errors')}")
        raise HTTPException(status_code=400, detail=json.loads(results["errors"]))

    logger.info(f"Prediction results: {results.get('predictions')}")

    return results
The health endpoint is quite straightforward. It returns the health response schema of the model when you access the web server (Figure 4). You defined this schema in the health.py module in the schemas directory.
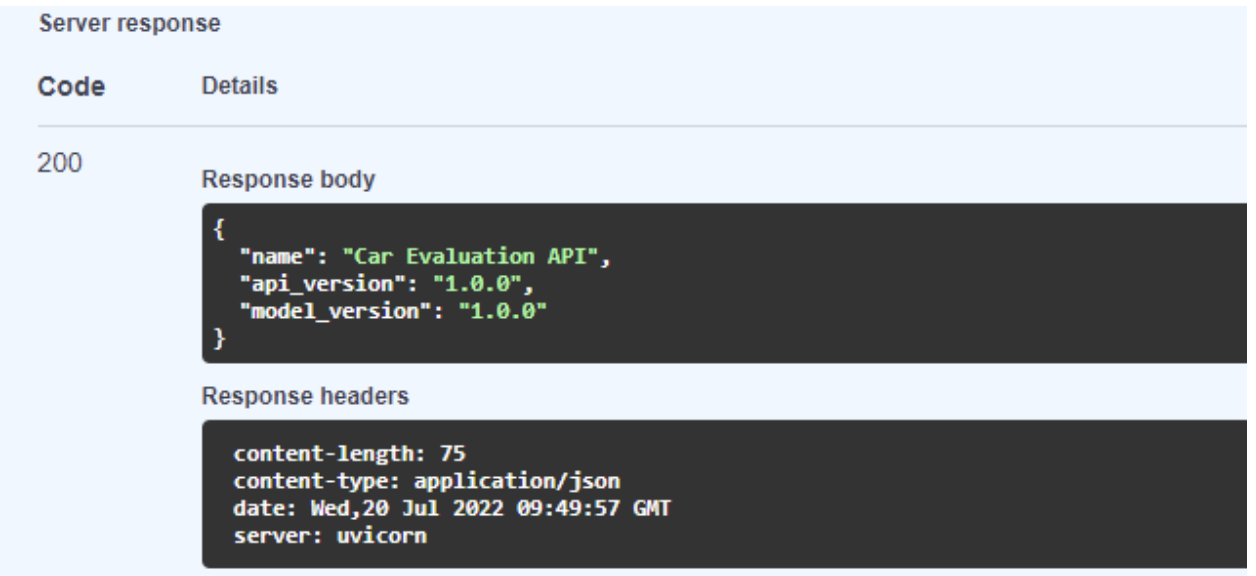
The predict endpoint is slightly more complex. Here are the steps involved:
- Take the input and convert it into a pandas DataFrame: the jsonable_encoder returns a JSON compatible version of the pydantic model.
- Log the input data for audit purposes.
- Make a prediction using the ML model’s
make_predictionfunction. - Catch any errors made by the model.
- Return the results, if the model has no errors.
Check that all is functioning well by spinning up a server with the following command from a terminal window:
py -m tox -e run
This should display several logs if the server is running, as shown in Figure 5.

Now, you can navigate to http://localhost:8001 to see the interactive endpoints of the API.
Testing the microservice API
Navigating to the local server takes you to the index endpoint defined in root_rooter from the main.py script. You can get more information about the API by adding /docs to the end of the local host server URL.
For example, Figure 6 shows that you’ve created the predict endpoint as a POST request, and the health endpoint is a GET request.

First, expand the predict heading to receive information about the endpoint. In this heading, you see an example in the request body. I defined this example in one of the schemas so that you can test the API—this is beyond the scope of this post, but you can browse the schema code.
To try out the model on the request body example, choose Try it out.
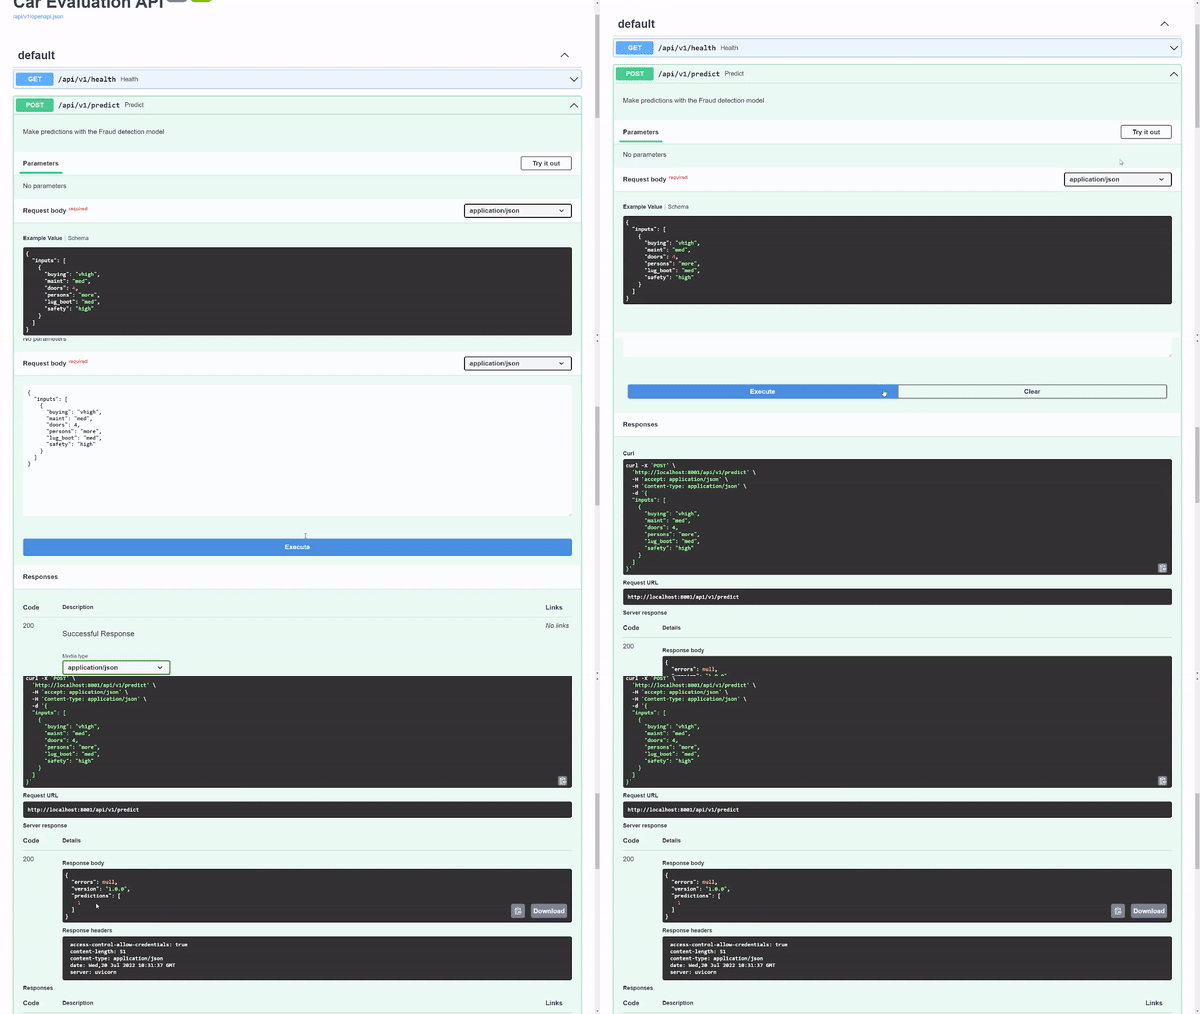
Figure 7 shows that the model returns a predicted output class of 1. Internally, you know that 1 refers to the acc class value, but you may want to reveal that to the user when displayed in a user interface.
What’s next?
Congratulations, you have now built your own ML model microservice. The next steps involve deploying it so that it can run in production.
To recap: A microservice is an architectural and organizational design approach that arranges loosely coupled services. One of the main benefits of using the microservice approach for ML applications is independence from the main software product. Having a feature service (the ML application) that is separate from the main software product has two key benefits:
- It enables cross-functional teams to engage in distributed development, which results in faster deployments.
- The scalability of the software is significantly improved.
Did you find this tutorial helpful? Leave your feedback in the comments or connect with me at kurtispykes (LinkedIn).

