
所以,您现在有大量的数据管道,并且正在考虑使用NVIDIA Base Command Platform进行集成。那么,您应该采取哪些步骤?使用工作流管理将NVIDIA Base Command进入您现有的管道。
工作流管理器使您能够轻松管理管道,并连接到 Base Command 以利用 NVIDIA 计算能力。此示例使用 Apache Airflow,拥有丰富的开源社区,构建良好,并被广泛采用。
什么是工作流管理,为什么它很重要?
工作流管理使您能够连接和管理管道中的所有任务。它通过创建、记录和监控完成必要任务所需的所有步骤来实现这一点。它通过确保正确高效地完成所有工作来简化您的工作流程。
一个企业通常有一个 BizOps 团队、 MLOps 团队和 DevOps 团队,负责完成各种任务以达到给定的目标。对于一个简单的工作流程,许多人完成各种任务,有些人相互关联或依赖,而另一些人则完全独立。工作流管理可以为实现最终结果提供宝贵的支持,特别是在复杂的情况下。
为了提供一个类比,想象一下你在你最喜欢的寿司店,你下了一份你最喜欢卷的订单。在厨房里,有几个厨师在做各种各样的工作来准备你的寿司。一个是准备鱼,下一个是仔细切蔬菜,第三个是做米饭(烹饪、洗涤、调味),第四个是在明火上烤意大利面。
只有在每位厨师完成任务后,寿司大师才能组装寿司卷。在这里,我们看到了具有不同专业知识的多个角色,需要完成各种任务才能完成最终目标。
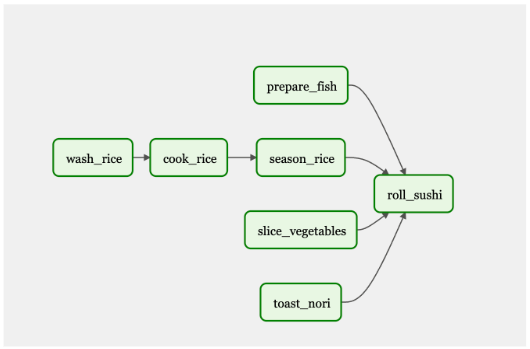
如果寿司店提供 50 种不同的菜单项,那么至少会有 50 种不同工作流程。图 2 显示了一个仅包含几个菜单项的工作流。
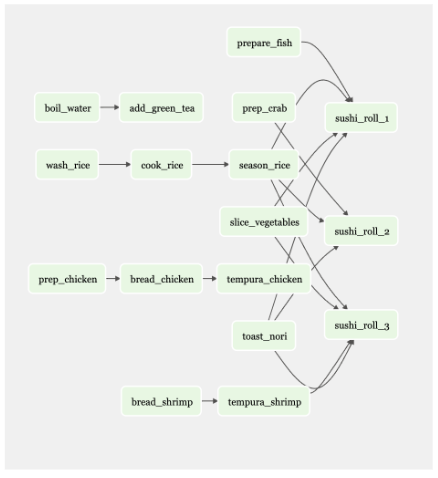
现在想想一个有 20 家餐厅的餐厅,每家餐厅都有自己的菜单和工作流程。
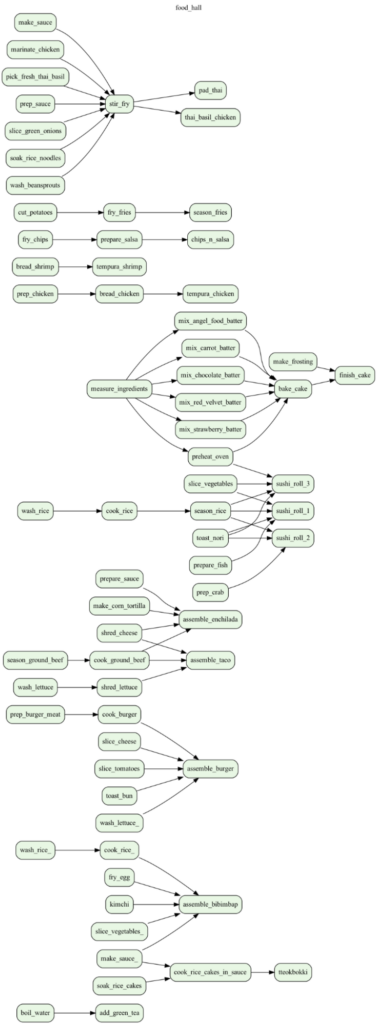
你可以看到这种情况对一个人来说是多么的困难。数字工具有助于组织和执行复杂的任务,比如 Apache Airflow。
如果您需要在添加新步骤的同时维护当前流程,则工作流管理是关键。管理工作流程是一个既定的问题,随着人工智能应用的加速,很明显,将人工智能任务和结果纳入现有工作流程将成为下一个挑战。
阿帕奇气流
将人工智能作为部署应用程序的更大工作流程的一部分意味着什么? 2015 年, Airbnb 在管理其复杂的数据管道时遇到困难,因此他们创建了 Airflow 。在进行市场调查后,他们发现大多数人都在使用 cron 调度器或内部工作流工具。这些工具不是很复杂,也没有预见到未来的需求。它们是“边走边编”的工具。
气流具有可扩展性和动态性。它于 2016 年开源,并成为 Apache 基金会的一部分。这使得 Airflow 越来越受欢迎,并带来了丰富的开源社区。
NVIDIA 基地指挥平台
NVIDIA Base Command Platform 是一个人工智能培训平台,可以帮助企业和科学家加快人工智能的发展。使用 NVIDIA Base Command,您可以利用 NVIDIA GPU 加速 AI 的训练。NVIDIA Base Command 与 NVIDIA 加速的人工智能基础设施相结合,提供了一个云托管解决方案,可以避免您部署和运行自己的平台所带来的开销和陷阱。
NVIDIA Base Command 可以高效地配置和管理人工智能工作负载,提供集成的数据集管理,并在从单个 GPU 到大规模多节点集群的各种资源上执行它们。
Apache Airflow 加上 NVIDIA Base 指挥平台
拥有像 Apache Airflow 这样的工具来安排和运行作业,以及监控作业的进度,有助于简化模型培训过程。此外,一旦模型经过训练并准备好投入生产,您就可以使用 Airflow 从基本指挥平台获得结果,并将其用于NVIDIA Fleet Command用于生产。Airflow 穿过平台,使端到端管道更易于操作。通过工作流管理工具,将具有基本命令的人工智能添加到新的或现有的管道中变得更容易。
MLOP 的主要气流特性
Airflow 是一个流行的、成熟的工具,拥有庞大的用户群体。许多公司已经在使用它,而且资源丰富。它是开源的,也是最早为人所知的工作流管理工具之一。 Cron 调度器有自己的位置,但当作业失败时,很难管理管道。当另一个作业依赖于失败任务的输出时,工作流工具(如 Airflow )有助于解决依赖关系。
工作流管理工具具有更多功能;例如,在任务/作业失败时向团队成员发出警报,以便有人可以修复它并重新运行作业。应用工作流管理工具可以使工作流中的许多人受益,包括从事 ETL 工作的数据工程师、从事模型培训工作的数据科学家、从事报告工作的分析师等等。
任务和 DAG
气流使用有向非循环图( DAG )来运行工作流。 DAG 内置于 Python 中。您设置了任务和依赖项, Airflow 将返回一个描述工作流的图形。一旦完全满足作业的依赖性,气流就会触发作业运行。
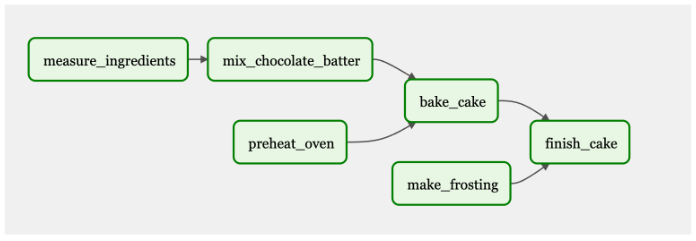
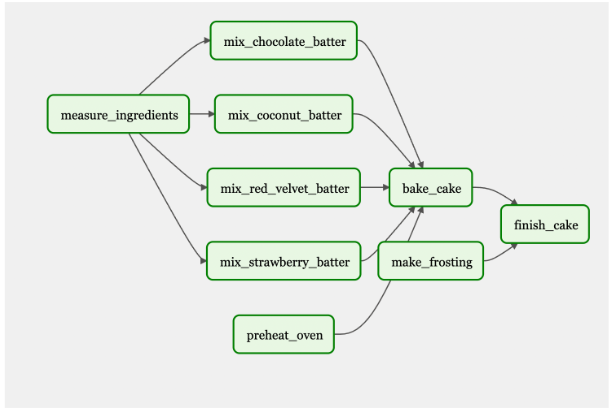
图 4 显示了用于烘焙和冷冻蛋糕的 DAG 工作流程。有些任务是依赖的,比如测量和混合配料,以烘焙蛋糕。其他任务,如“预热烤箱”,是完成最终目标所必需的:一个糖霜蛋糕。一切都需要连接起来才能完成最终产品。
在这个 DAG 中,“测量配料”、“预热烤箱”和“制作糖霜”将首先触发并执行。当这些任务完成后,接下来的步骤将根据它们的依赖关系运行。
气流 UI
气流 UI 直观易用。它可以用来触发 DAG ,以及监视任务和 DAG 的进度。您还可以查看日志,这些日志可用于故障排除。
动态作业
动态作业使您能够运行相同的作业,同时更改一些参数。这些作业将并行运行,您可以添加变量,而不是多次对同一个作业进行微小更改。
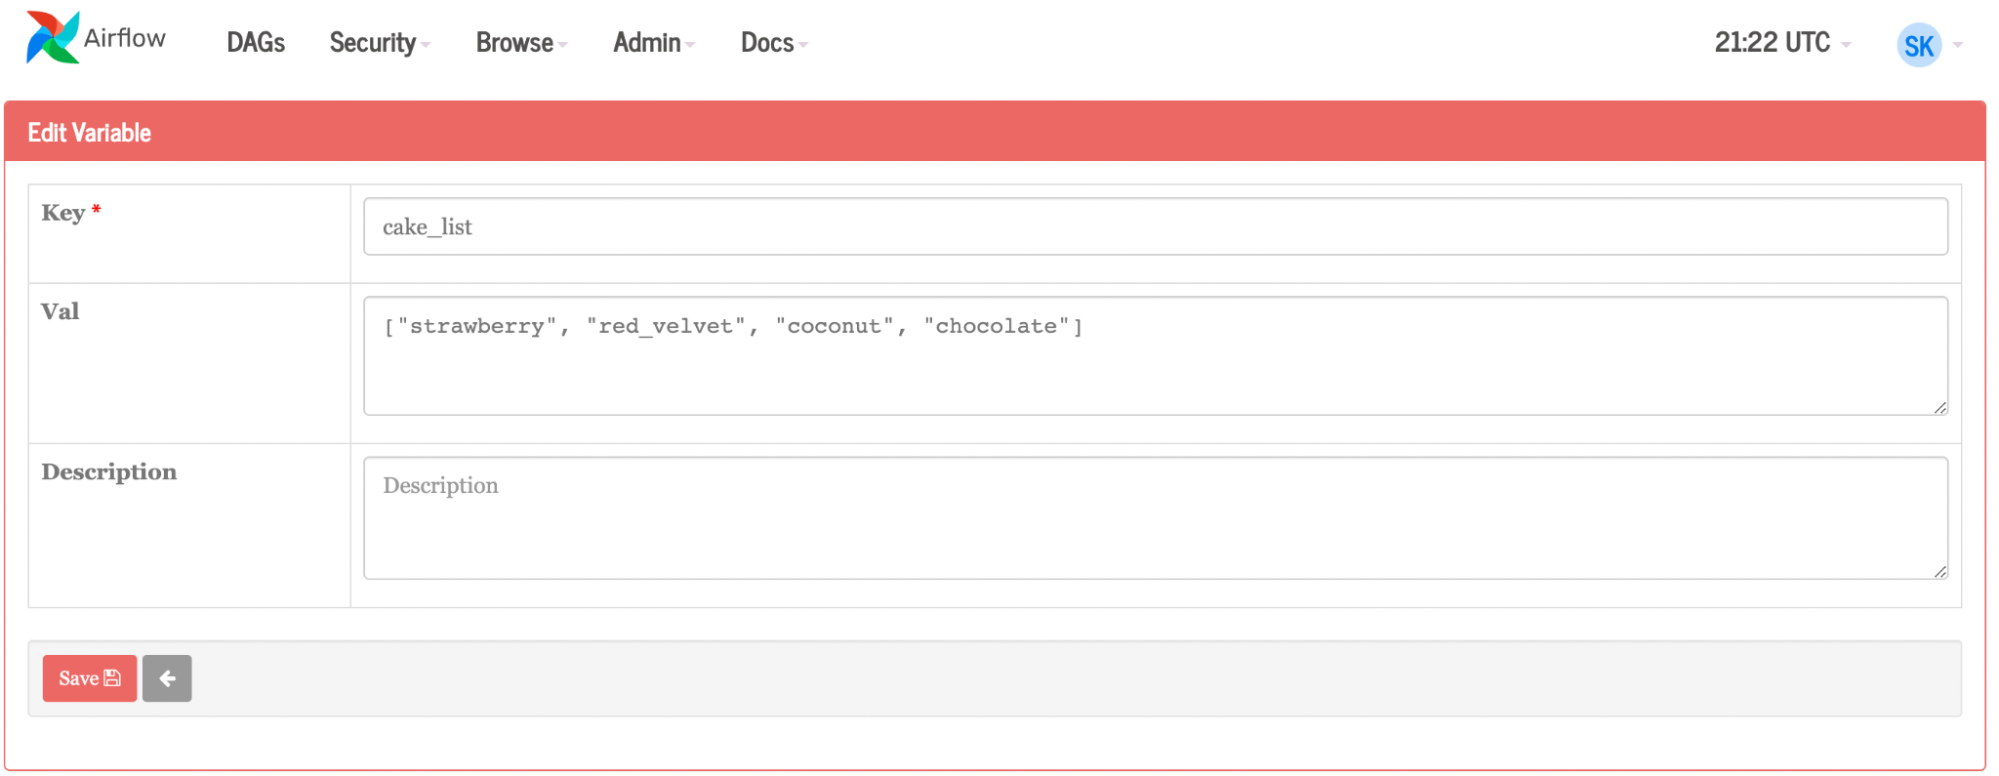
继续以蛋糕为例,假设你打算做一个巧克力蛋糕,但后来决定开一家面包店。您可以为 Airflow 提供一个蛋糕列表,而不是为每个单独的蛋糕手动创建任务:草莓、椰子和红丝绒(图 5 )。您可以通过 UI 或上传 JSON 文件来完成此操作。气流将动态地再创造三个工作岗位,再制造三种蛋糕口味,而不是为每种新的蛋糕口味手动重新创建过程。如果有人对椰子过敏,你可以把它从名单上删除。或者你可以有一个本周的风格,并通过编程每周更改变量(蛋糕口味)。
如果您将这种方法应用于 ML 管道,您可以想象所有这些都可以实现。作为更大管道的一部分,更新可以是程序化的和自动化的。结合更复杂的基本命令作业,例如运行一些框架,每个容器可能只更改一个简单变量或一组变量,然后比较所有不同作业运行的结果以做出决定。
然后,可以根据结果对气流进行配置,以启动额外的多节点训练,或者可以将获胜模型上传到专用注册表,并将进一步的工作负载或任务与 Fleet Command 集成,将其投入生产。
如何使用气流
首先,确保您已经拥有一个 Kubernetes 环境,并且已经安装了 Helm。Helm 是 Kubentes 的包管理器,可以用于查找、共享和使用软件。如果您正在使用 Mac 电脑,可以使用 Homebrew 来安装 Helm 。
helm repo add apache-airflow https://airflow.apache.org
helm repo update
kubectl create namespace airflow
helm upgrade --install airflow apache-airflow/airflow --namespace airflow --debug
接下来,为 Web 服务器生成一个秘密:
Generate Secret for UX
python3 -c 'import secrets; print(secrets.token_hex(16))'
helm show values apache-airflow/airflow > values.yaml
Open the file
When inside file, change: ‘webserverSecretKey: <secret_key>’
helm upgrade --install airflow apache-airflow/airflow -n airflow -f values.yaml --debug
气流将 DAG 存储在本地文件系统中。在 GitHub 存储库中保存 DAG 是一种更可扩展、更简单的方法。 Airflow 在文件系统中检查新的/更新的 DAG ,但使用 GitSync , Airflow 会查看更容易维护和更改的 GitHub 存储库。
接下来,配置 GitSync 。将密钥添加到 GitHub 存储库时,请确保启用写入访问。
ssh-keygen -t ed25519 -C “airflow-git-ssh”
  When asked where to save, press enter
  When asked for a passcode, press enter (do NOT put in a passcode, it will break)
Copy/Paste public key into private github repository
Repository > settings > deploy key > new key
kubectl create secret generic airflow-git-ssh \
 --from-file=gitSshKey=/Users/skropp/.ssh/id_ed25519 \
 --from-file=known_hosts=/Users/skropp/.ssh/known_hosts \
 --from-file=id_ed25519.pub=/Users/skropp/.ssh/id_ed25519.pub \
 -n airflow
edit values.yaml (see below)
helm upgrade --install airflow apache-airflow/airflow -n airflow -f values.yaml —-debug
原件:
gitSync:
 enabled: false
 # git repo clone url
 # ssh examples ssh://git@github.com/apache/airflow.git
 # https example: https://github.com/apache/airflow.git
 repo: https://github.com/apache/airflow.git
 branch: v2-2-stable
 rev: HEAD
 depth: 1
 # the number of consecutive failures allowed before aborting
 maxFailures: 0
 # subpath within the repo where dags are located
 # should be "" if dags are at repo root
 subPath: "tests/dags"
 # if your repo needs a user name password
 # you can load them to a k8s secret like the one below
 # ___
 # apiVersion: vI
 # kind: Secret
 # metadata:
 #    name: git-credentials
 # data:
 #    GIT_SYNC_USERNAME: <base64_encoded_git_username>
 #    GIT_SYNC_PASSWORD: <base64_encoded_git_gat)words
 # and specify the name of the secret below
 # credentialsSecret: git-credentials
 # If you are using an ssh clone url, you can load
 # the ssh private key to a k8s secret like the one below
 # ___
 # apiVersion: vI
 # kind: Secret
 # metadata;
 #    name: airflow-ssh-secret
 # data:
 #    key needs to be gitSshKey
 #    gitSshKey: <base64_encoded_data>
 # and specify the name of the secret below
 # sshKeySecret: airflow-ssh-secret
随着变化:
gitSync:
 enabled: True
 # git repo clone url
 # ssh examples ssh://git@github.com/apache/airflow.git
 # https example: https://github.com/apache/airflow.git
 repo: ssh://git@github.com/sushi-sauce/airflow.git
 branch: main
 rev: HEAD
 depth: 1
 # the number of consecutive failures allowed before aborting
 maxFailures: 0
 # subpath within the repo where dags are located
 # should be "" if dags are at repo root
 subPath: ""
 # if your repo needs a user name password
 # you can load them to a k8s secret like the one below
 # ___
 # apiVersion: v1
 # kind: Secret
 # metadata:
 # name: git-credentials
 # data:
 # GIT_SYNC_USERNAME: <base64_encoded_git_usernames
 # GIT_SYNC_PASSWORD: <base64_encoded_git_password>
 # and specify the name of the secret below
 credentialsSecret: git-credentials
 # If you are using an ssh clone url, you can load
 # the ssh private key to a k8s secret like the one below
 # ___
 # apiVersion: v1
 # kind: Secret
 # metadata:
 # name: airflow-ssh-secret
 # data:
 # key needs to be gitSshKey
 # gitSshKey: <base64_encoded_data>
 # and specify the name of the secret below
sshKeySecret: airflow-git-ssh
现在, Airflow 正在运行,并且有一个存储 DAG 文件的地方。
DAG 示例
下面,找到一个简单的 DAG 示例,以及一个更复杂的示例。
DAG 的简单示例
下面显示了一个非常简单的 DAG :
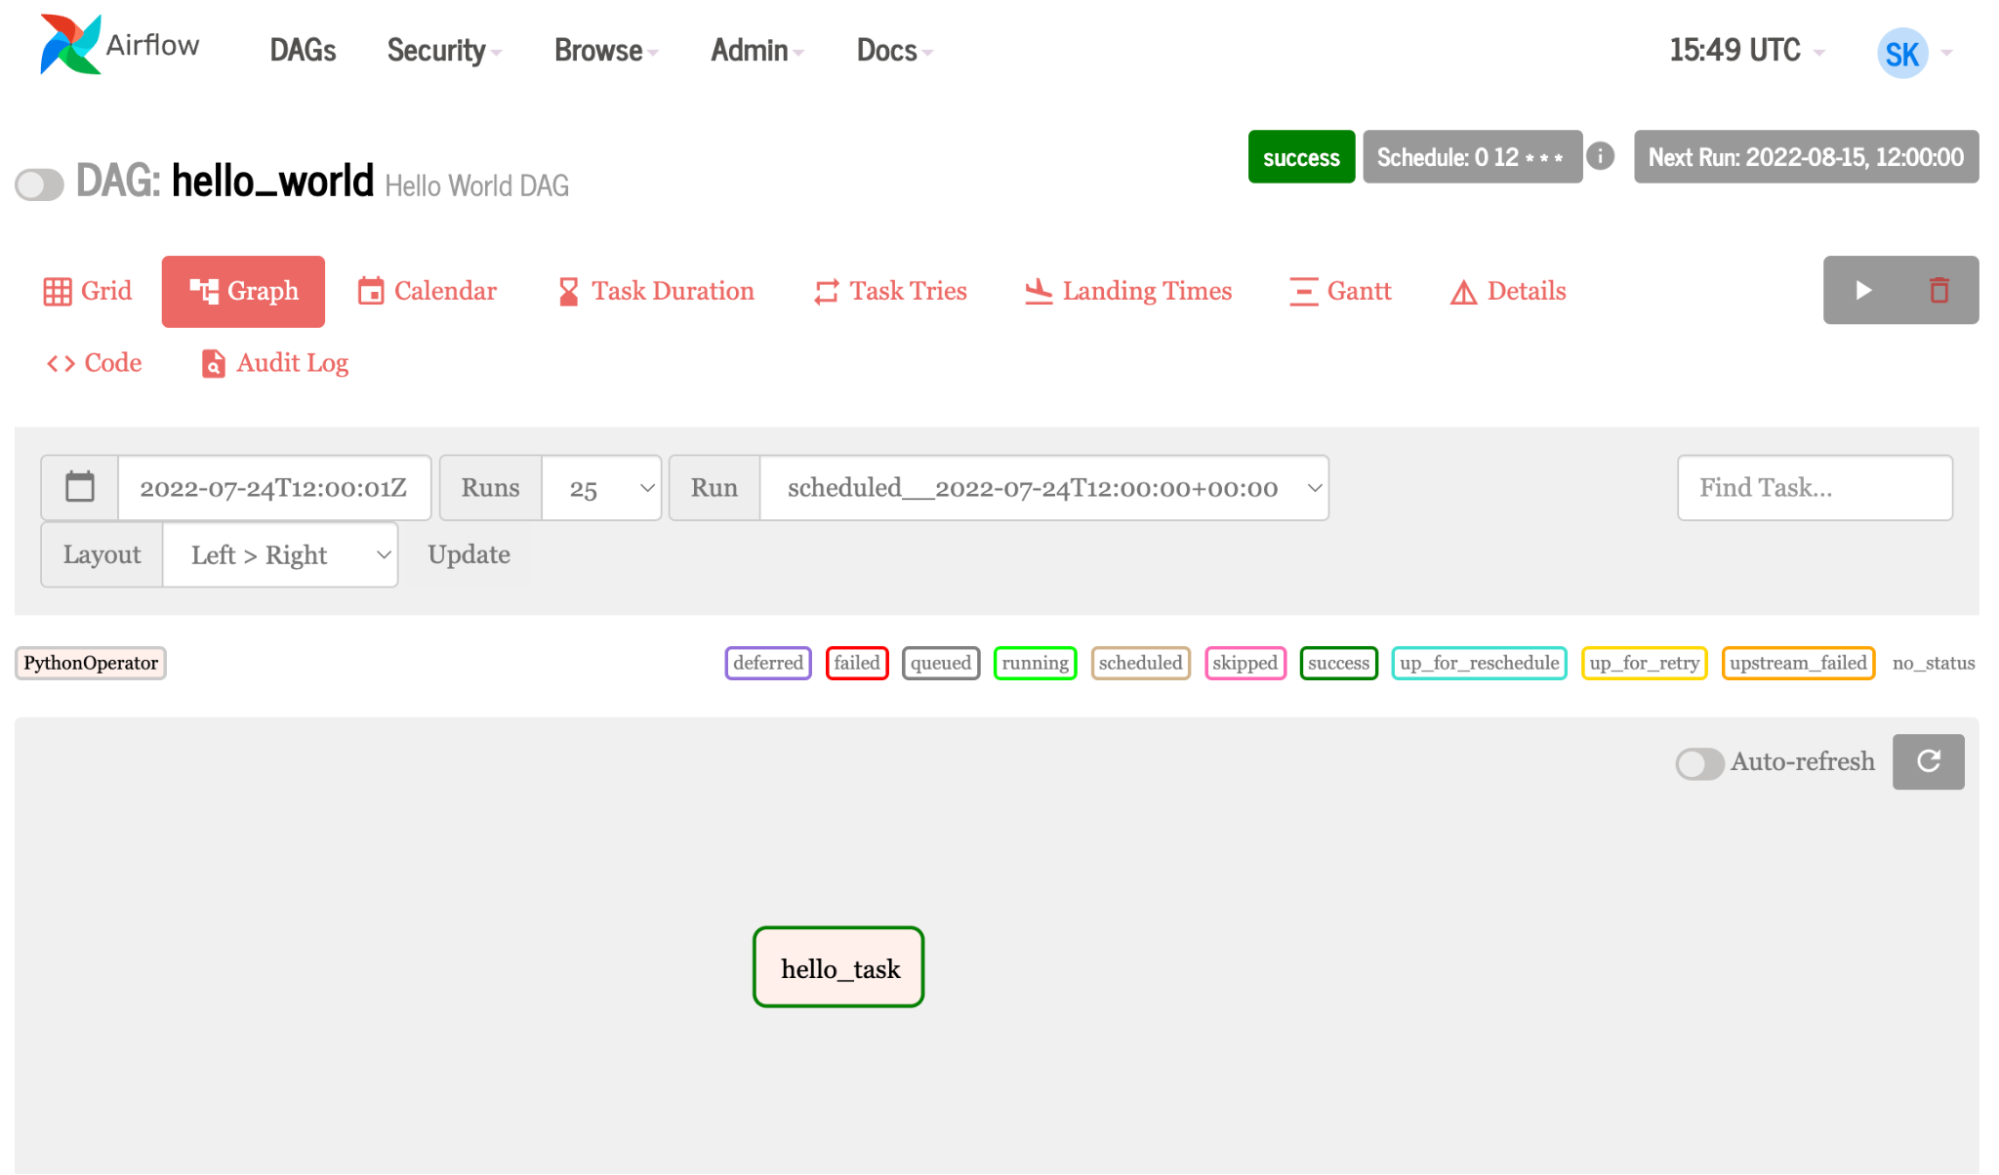
- 第 1-3 行导入运行任务所需的各种工具和运算符。
- 第 5-6 行创建了一个 Python 函数,用于打印一条消息。
- 第 8-10 行定义 DAG ,给出显示名称
hello_world以及描述,以及时间表间隔和开始日期。计划间隔和开始日期是必需的配置。 - 第 12 行定义了任务,
task_id命名任务, Python 可调用调用函数,dag=DAG引入了上面设置的配置。
1 from datetime import datetime
2 from airflow import DAG
3 from airflow.operators.python_operator import PythonOperator
4
5 def print_hello():
6 return 'Hello world from first Airflow DAG!'
7
8 dag = DAG('hello_world', description='Hello World DAG',
9		schedule interval='0 12 * * *',
10 	 	start_date=datetime (2017, 3, 20), catchup=False)
11
12 hello_operator = PythonOperator (task_id-'hello_task', python_callable=print_hello, dag=dag)
13
14 hello_operator
更复杂的 DAG 示例
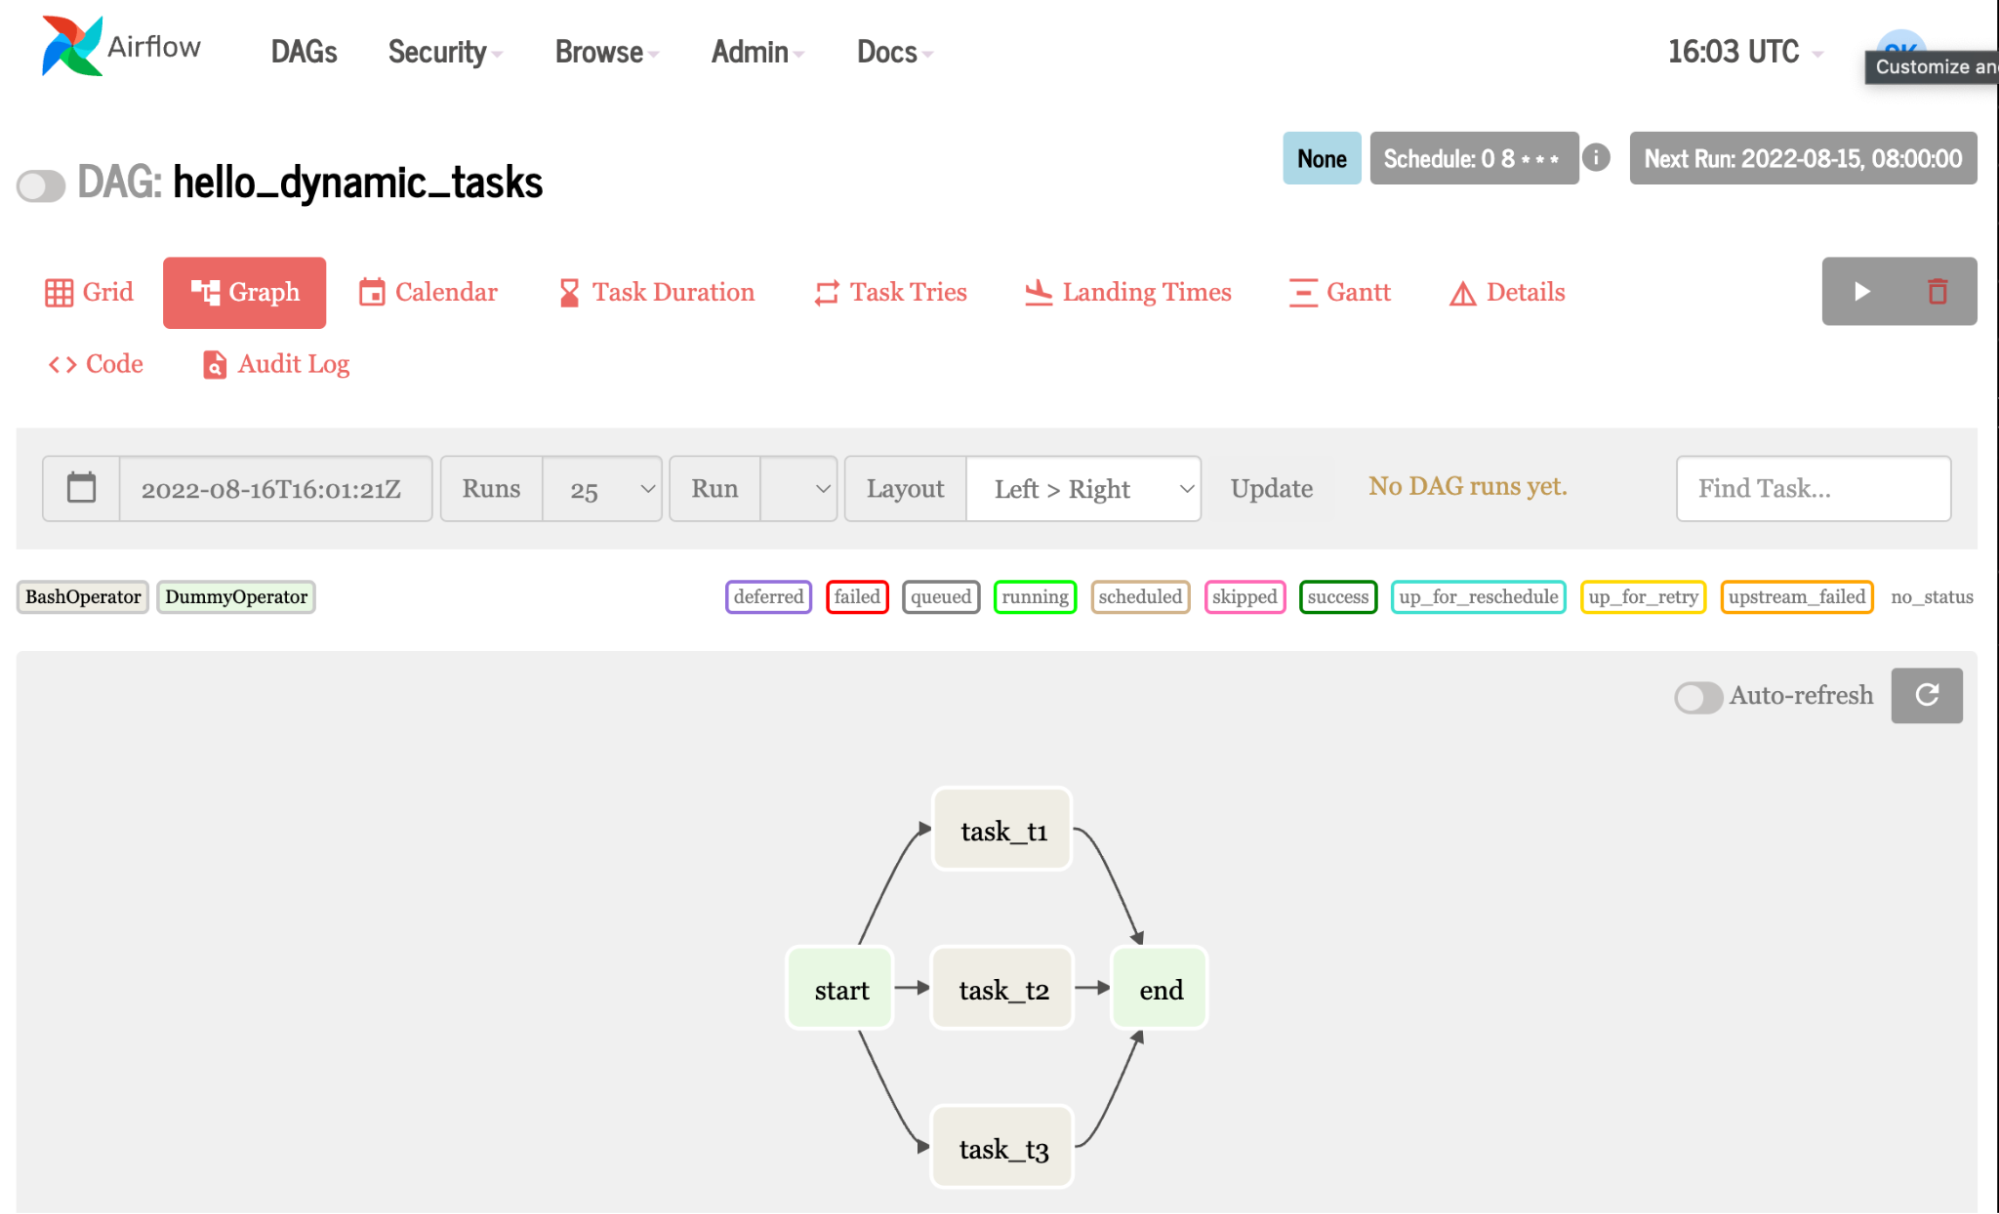
本例创建同一个任务三次,与任务 1 、 2 和 3 中的 hello 相呼应。当您在循环中使用变量列表而不是简单的数字时,它会变得有趣。这意味着你可以 更改代码片段以动态地创建不同的作业。
1 from airflow import DAG
2 from airflow.operators.bash_operator import BashOperator
3 from airflow.operators. dummy_operator import DummyOperator
4 from datetime import datetime, timedelta
5
6 # Step 1 - Define the default arguments for DAG
7 default_args = {
8 	'depends_on_past': False,
9 	'start_date': datetime (2020, 12, 18),
10 	'retry_delay': timedelta(minutes=5)
11 }
12
13 # Step 2 - Declare a DAG with default arguments
14 dag = DAG( 'hello_dynamic_tasks',
15 	schedule_interval='0 8 * * *'
16 	default_args=default_args,
17 	catchup=False
18 	)
19 # Step 3 - Declare dummy start and stop tasks
20 start_task = DummyOperator(task_id='start', dag=dag)
21 end_task = DummyOperator (task_id='end', dag=dag)
22
23 # Step 4 - Create dynamic tasks for a range of numbers
24 for 1 in range(1, 4):
25 	# Step 4a - Declare the task
26 	t1 = BashOperator (
27 		task_id='task_t' + str(i),
28 		bash _command='echo hello from task: '+str(i),
29		dag=dag
30 	)
31 # Step 4b - Define the sequence of execution of tasks
32 start_task »> t1 >> end_task
虽然与第一个示例类似,但此示例使用占位符运算符创建空任务,并使用循环创建动态任务。
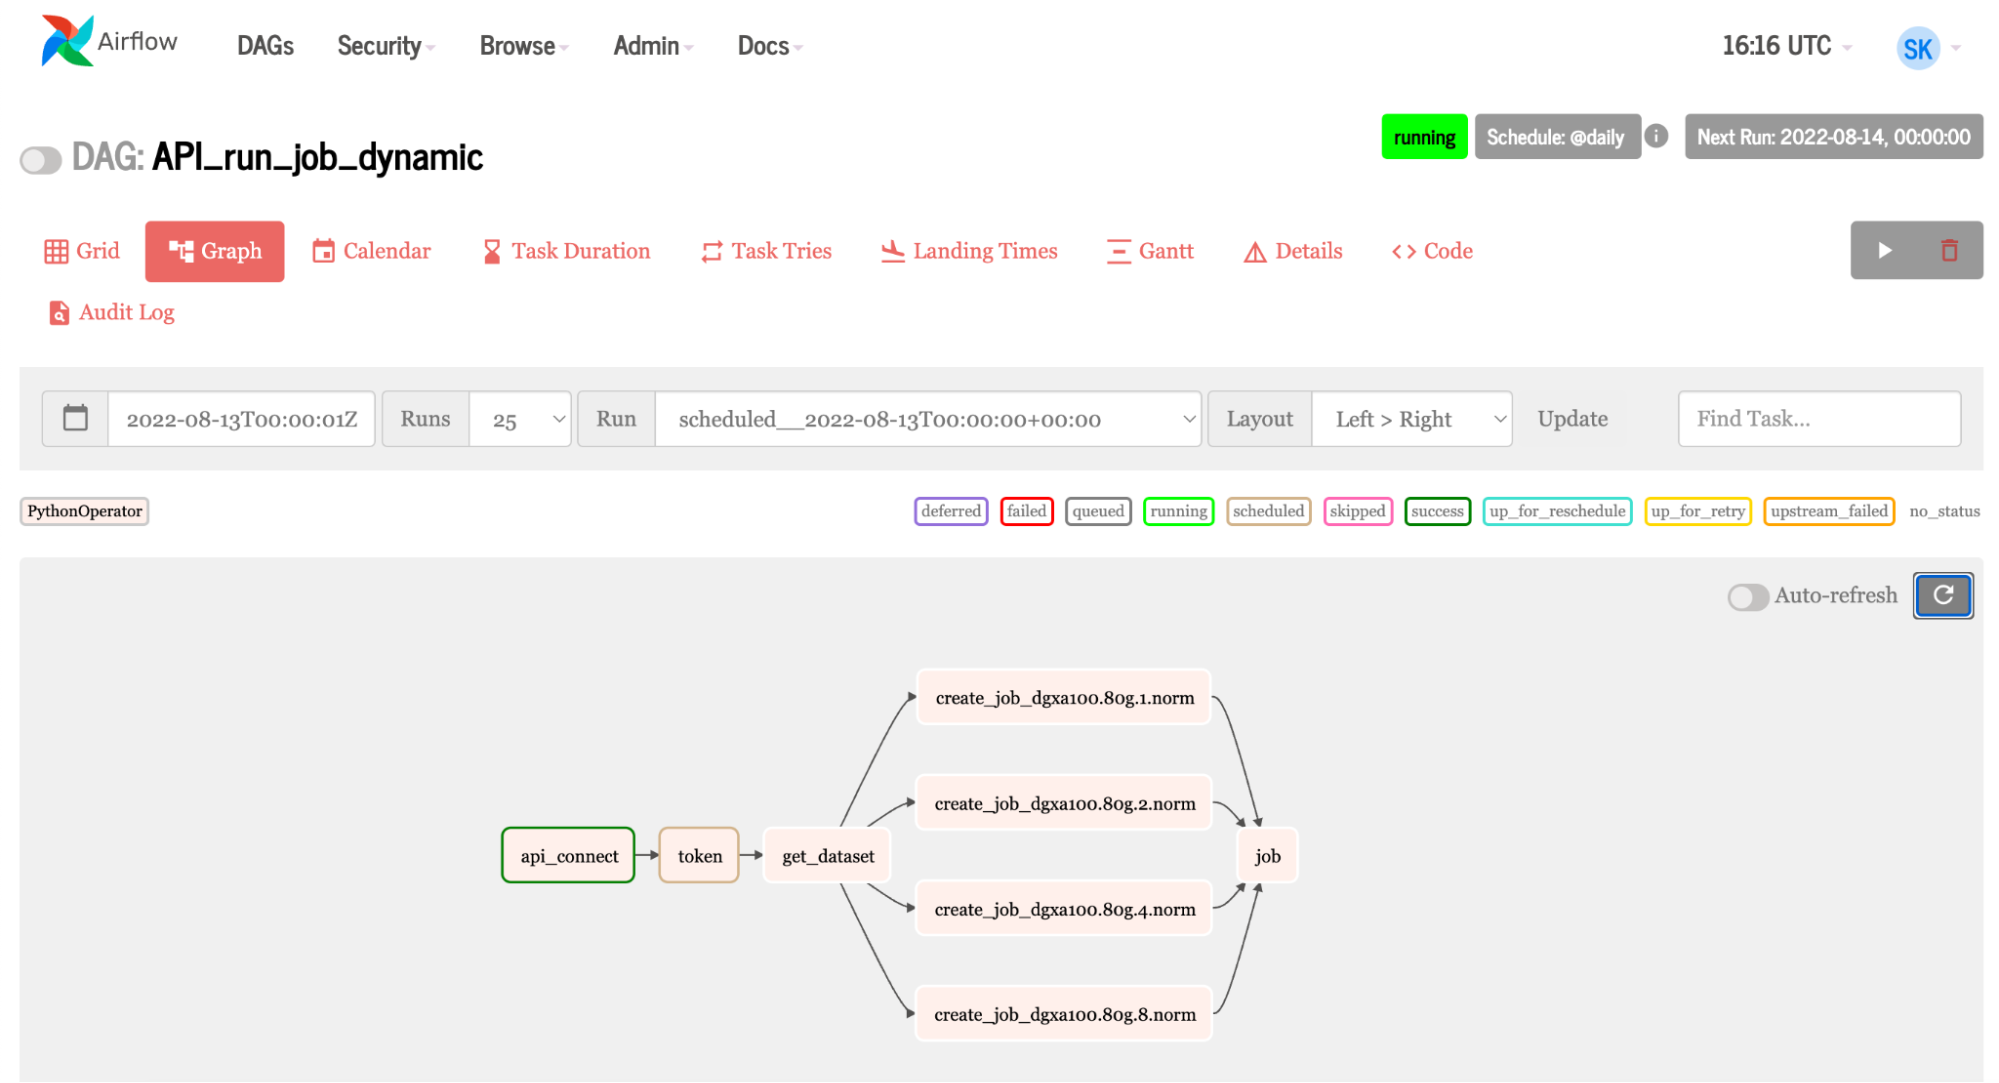
带有 NVIDIA 基本命令的 DAG 示例
气流可以利用基本指令 API 。 Fleet Command 使用相同的 API 。这使 Airflow 能够使用许多 NVIDIA AI 平台,使加速的 AI 管道易于使用 Airflow 进行管理。让我们浏览一下 Airflow 中的一些代码,其中显示了连接到基本命令并运行作业所需的任务。
t1= PythonOperator(
task_id = 'api_connect'
python_callable= find_api_key,
dag = dag,
)
t2 = PythonOperator (
task_id = 'token',
python_callable = get_token,
op_kwargs=("org":org_, "team": team_),
dag = dag
)
t3 = PythonOperator (
task_id = 'get_dataset',
op kwargs=("org":org_),
python_callable = get_datasets,
dag = dag
)

t5 = PythonOperator(
task_id = 'job',
python_callable run_job,
dag = dag
)

for element in instance_v:
t4 = PythonOperator (
task_id = 'create_job_' + str(element),
op_kwargs={"org":org_. ,"team": team_, "ace": ace_, "name": name_, "command": command_ , "container": container_, "instance": str(element))},
python_callable=create_job,
dag = dag
)

t1 >> t2 >> t3 >> t4 >> t5

Key functions being used in the tasks include:

def find_api_key(ti):
        expanded_conf_file_path = os.path.expanduser("~/.ngc/config")
        if os.path.exists(expanded_conf_file_path):
            print("Config file exists, pulling API key from it")
            try:
                config_file = open(expanded_conf_file_path, "r")
                lines = config_file.readlines()
                for line in lines:
                 if "apikey" in line:
                    elements = line.split()
                    return elements[-1]

            except:
                print("Failed to find the API key in config file")
                return ''
        elif os.environ.get('API_KEY'):
            print("Using API_KEY environment variable")
            return os.environ.get('API_KEY')

        else:
            print("Could not find a valid API key")
            return ''

def get_token(ti, org,team ):
        api = ti.xcom_pull(task_ids='api_connect')
        '''Use the api key set environment variable to generate auth token'''
        scope_list = []
        scope = f'group/ngc:{org}'
        scope_list.append(scope)
        if team:
            team_scope = f'group/ngc:{org}/{team}'
            scope_list.append(team_scope)

        querystring = {"service": "ngc", "scope": scope_list}

 auth = '$oauthtoken:{0}'.format(api)
        auth = base64.b64encode(auth.encode('utf-8')).decode('utf-8')
        headers = {
          'Authorization': f'Basic {auth}',
          'Content-Type': 'application/json',
          'Cache-Control': 'no-cache',
        }
        url = 'https://authn.nvidia.com/token'
        response = requests.request("GET", url, headers=headers, params=querystring)
        if response.status_code != 200:
            raise Exception("HTTP Error %d: from %s" % (response.status_code, url))

        return json.loads(response.text.encode('utf8'))["token"]
- 任务 1使用 DAG 中定义的 Python 函数查找 API 密钥。
- 任务 2获得代币;这里发生了两件非常有趣的事情:
- 要获得令牌,需要将密钥交给 API 。任务 1 找到密钥,但在 Airflow 中,所有任务都是单独的。(注意,我使用了
xcom中的功能get_token将任务 1 的结果拉入任务 2 中。xcom提取函数中的 API 密钥find_api_key进入get_token以生成令牌。) - 组织和团队参数是 Airflow 变量。这意味着你可以进入 Airflow UI ,根据使用它的人更改凭据。这使得更改用户变得简单明了。
- 要获得令牌,需要将密钥交给 API 。任务 1 找到密钥,但在 Airflow 中,所有任务都是单独的。(注意,我使用了
- 任务 3获取作业所需的数据集。类似地,它使用在 Airflow UI 中定义的组织变量。
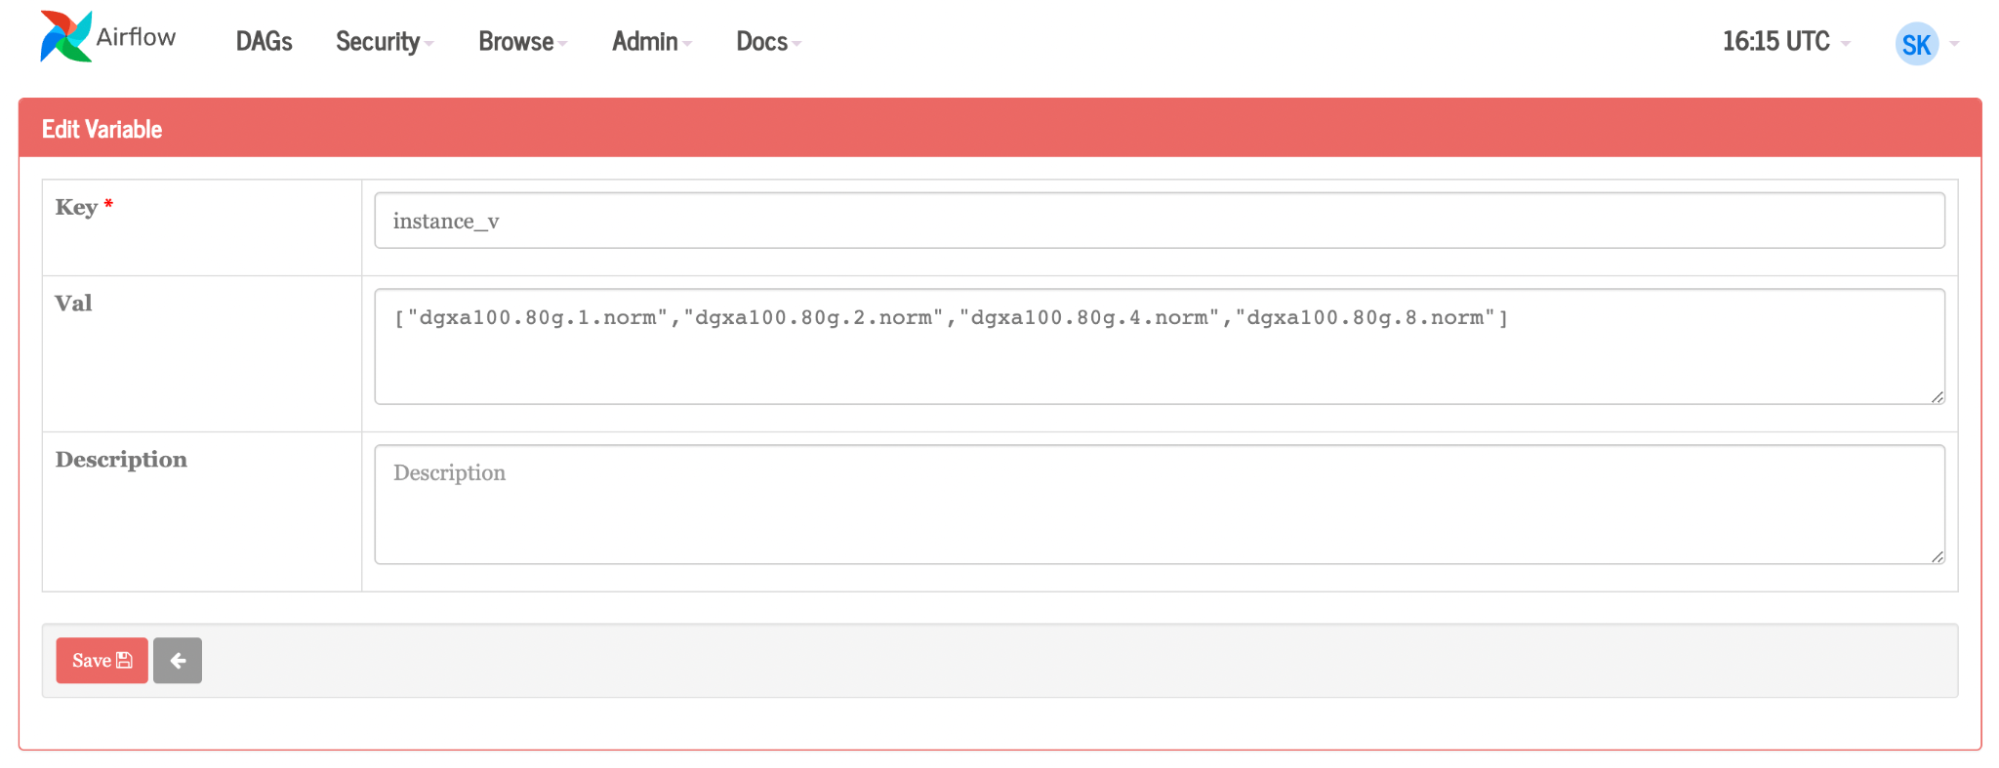
- 任务 4是主角。对于实例列表中的每个图元, Airflow 都会创建一个作业。变量还用于团队、组织、容器、名称、命令和实例。如果要更改这些组件中的任何一个,请在 Airflow 内部的变量页面上进行更改。
- 任务 5运行作业。
结论
将 Apache Airflow 等工作流管理工具集成到数据管道中对于高效管理和执行复杂任务至关重要。随着人工智能在各个行业的快速采用,将人工智能任务集成到现有工作流程中的需求变得越来越重要。
将 Airflow 与利用 GPU 加速的 NVIDIA Base Command 等人工智能平台集成,简化了人工智能模型的训练和部署过程。 Airflow 的自动化和灵活性,再加上通过 Base Command Platform 提供的 NVIDIA 计算能力,使您能够在 ML 管道中进行高效的实验、模型比较和决策。
最终产品是管理良好、速度更快的工作流程。 Base Command Platform 和 Airflow 共同使组织能够优化数据管道,增强不同团队之间的协作,并促进将加速的人工智能集成到现有工作流程中。这导致更快的人工智能开发和部署,更有效、更可扩展、更可靠。
想要了解更多信息,请观看 NVIDIA Base Command 演示视频。并查看相关帖子,如何使用 NVIDIA Base Command 平台简化 AI 开发。