This post is the second in a series that shows you how to use Docker for object detection with NVIDIA Transfer Learning Toolkit (TLT). For part 1, see Deploying Real-time Object Detection Models with the NVIDIA Isaac SDK and NVIDIA Transfer Learning Toolkit.

As part of the NVIDIA Isaac SDK 2020.1 release, a Docker image is available in NVIDIA NGC that contains all the tools necessary to run an object detection pipeline on Linux. For more information about using the Docker imagefor data generation, training with TLT, and inference, see Training Object Detection from Simulation in Docker. This Docker image makes it easy for anyone to get started with Isaac and deploy detection models for custom sets of objects.
In this post, we provide instructions on how you can step through the object detection pipeline including data generation, training using TLT, and inference on a robot platform using a single Docker container.
Setting up the Docker container
Before starting a container using the provided Docker image, install the prerequisite software:
- Ubuntu 18.04 host
- CUDA-capable GPU
- Docker 19.03
- An account on NGC with an API access token configured. Creating an NGC account is free.
For more information, see Host setup.
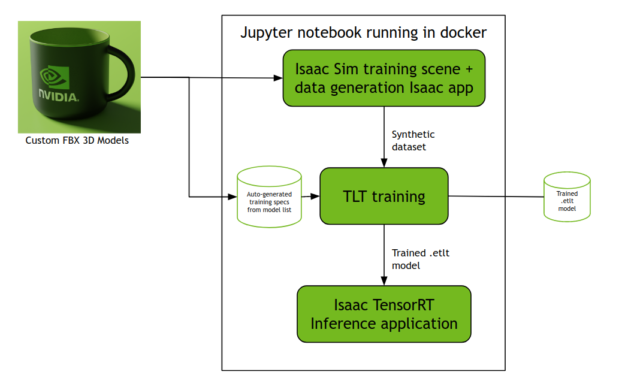
The Docker image contains a Jupyter notebook that provides an interactive walkthrough of the data generation, TLT fine-tuning, and inference steps. To get started, run the ./start.sh script as instructed in the Docker image documentation and follow the onscreen instructions. This starts a Jupyter notebook prepared to run the process outlined in figure 2.
Generating a dataset with custom 3D object models
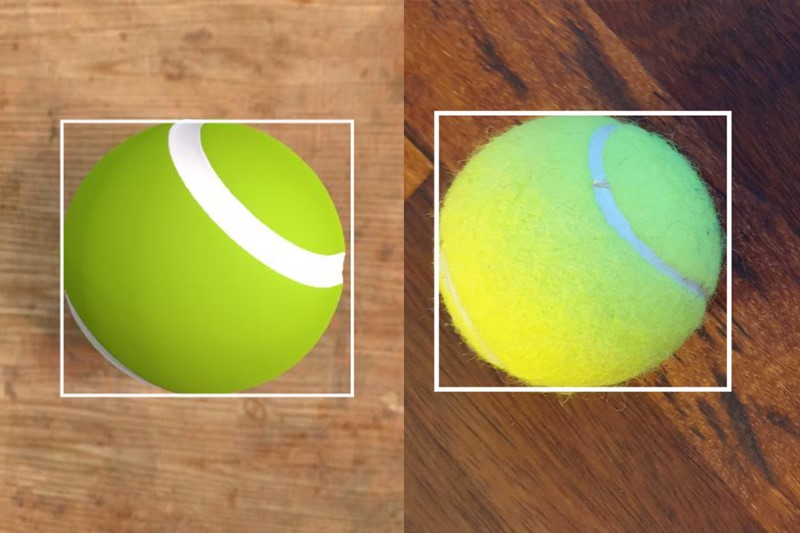
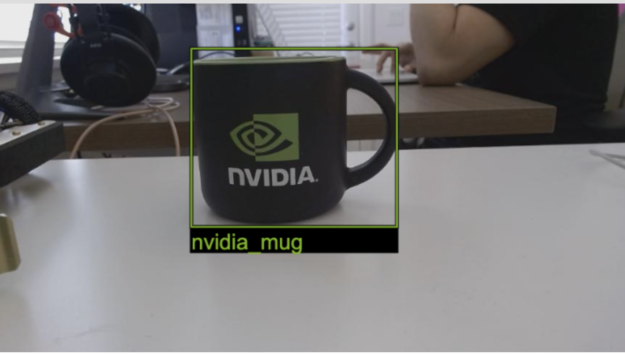
Use the Jupyter notebook in the Docker container to generate the dataset and train a new model for object detection. There should be two FBX files in ~/isaac-experiments/models (the tennis ball in figure 1 and the NVIDIA mug pictured in figure 3). These 3D object models are loaded into the simulation scene to generate training data.
You can replace these models for your own, with the following restrictions:
- Files must be in FBX format.
- Transparent textures are not supported in this mode. If you have transparent textures in your models, they may not render or be labeled correctly.
- Textures should be embedded in the FBX model. If your textures look like they are missing, try regenerating your model with embedded textures. Adding model textures as additional files is not supported.
- The file names are used as the class labels for detection and are converted to lowercase and any spaces replaced with underscores before being used as classes. Avoid the use of uppercase or spaces to prevent problems with class names.
- You can use any number of 3D models if your hardware supports it. Each model is loaded to memory and rendered inside the simulation.
- Keep the size of the objects to 10 inches or 25cm max dimensions, because the included scene for dataset generation is optimized for small desktop objects. For information about detecting larger objects for many use cases, including object detection dataset generation, see IsaacSim Unity3D.
The Jupyter notebook guides you on how to run the Isaac Sim Unity3D scene that loads the provided custom FBX models simultaneously along with the Isaac app for dataset generation. This step results in the generated KITTI dataset saved in ~/isaac-experiments/data/. To modify any parameters, regenerate this by re-running the corresponding sections on the Jupyter notebook.
Fine-tuning with TLT
Based on the provided list of FBX models, training and inference configurations are generated automatically by the ~/isaac-experiments/generate_specs.py script. This cell generates the specification files required by tlt-train, along with the JSON configuration files required by the inference apps in the Isaac SDK.
Next, the Jupyter notebook walks through the training, pruning, and retraining processes to fine-tune the pretrained DetectNetv2 model on the generated synthetic data. The final trained and pruned .etlt model file is contained in ~/isaac-experiments/tlt-experiments/experiment_dir_final/.
Running inference on images
Lastly, the notebook runs the Isaac DetectNetv2 inference sample application on the data in the ~/isaac-experiments/data/testing/image_2 directory. If there is a set of images different from the synthetic dataset to run inference on, the cell on the Jupyter notebook contains an option, --image_directory, that can be used to indicate the folder from which images are loaded. PNG and JPEG images are supported.
Make sure that the path you indicate is accessible by the Docker container. The easiest way to do this is to create a sub-folder in the ~/isaac-experiments directory and reference it as ~/your-custom-sub-folder.
To see a slideshow of images being processed for inference, open the http://localhost:3000 link in the Jupyter notebook cell when the application is running.
Inference on live video feed
If a webcam is available and connected at the time of the container startup, it’s possible to use it to run inference in realtime from the video feed, using the newly trained model.
To do this, create a new cell in the provided Jupyter notebook with the following content and execute it. Choose the values for the --rows and --cols parameters to match the supported resolutions for the camera that you are using.
! cd /workspace/isaac \
&& bazel run packages/detect_net/apps:detect_net_inference_app -- \
    --mode v4l \
    --rows 480 \
    --cols 864\
    --config "$SPECS_DIR/isaac_detect_net_inference.json"
It’s important that the webcam be connected to the host at the container startup, as the block device access must be set up at that time.
To see a video feed from the camera, open the http://localhost:3000 link in the Jupyter notebook cell when the application is running. Place some objects that you trained for detection in the field of view of the camera and the application should start detecting them.
Inference on a real robot
The video shows feeds coming from two cameras, with the x86 host on the top left and Kaya on the bottom left. Both show the same NVIDIA-branded mug on a white desk, from slightly different positions. On the right side is an overview of the desk showing the Kaya robot, webcam, and mug. The video goes on to show a hand manipulating the mug by rotating it and sliding it to the sides. This action is reflected on the left-side videos, with an overlaid object detection box around the mug and the label ‘nvidia_mug’ in both feeds.
The Kaya object detection application is a sample included with Isaac SDK that demonstrates DetectNetv2 inference on a robot-mounted sensor. The application by default runs inference with a single-class, tennis ball detection model that is provided with the Isaac SDK.
To run inference with your custom model on an NVIDIA Jetson-based device like Kaya, you need the following:
- A configured Jetson device with dependencies pre-installed
- The IP address of the Jetson device on the local network
- A copy of SSH keys in a location accessible to the running container.
Next, do the following:
- Set up a connection from the container into the Jetson device.
- Compile and deploy the object_detection application to the robot.
- Copy the trained model to the robot.
- Configure the application to use the custom model.
Now, make sure your SSH key is available inside the Docker container. Assuming that your /isaac-experiments folder is in your home directory, create a new SSH key for use from within the Docker container. This keeps your original key secure in its place and it’s easier to revoke from the robot/jetson device if you need to, without affecting the ability to connect from your host system.
From your host’s desktop environment, open a new terminal window and run the following commands after customizing the variable values to match your Jetson settings. You only need to do this one time.
export JETSON_USER=nvidia
export JETSON_HOST=ip_of_jetson
mkdir ~/isaac-experiments/.ssh
ssh-keygen -f ~/isaac-experiments/.ssh/id_rsa
chmod 600 ~/isaac-experiments/.ssh/id_rsa
ssh-copy-id -i ~/isaac-experiments/.ssh/id_rsa $JETSON_USER@$JETSON_HOST
#Set user account inside the container
ISAAC_ML_CONTAINER=`docker ps --format "{{.ID}} {{.Image}}" | grep nvcr.io/nvidia/isaac-ml-training:2020.1 | awk '{print $1}' `
docker exec -u 0 $ISAAC_ML_CONTAINER useradd -M -d /workspace -u $(id -u) $(whoami)
At any point after this step, you can run the following commands to get a command line inside of Docker.
ISAAC_ML_CONTAINER=`docker ps --format "{{.ID}} {{.Image}}" | grep nvcr.io/nvidia/isaac-ml-training:2020.1 | awk '{print $1}' `
docker exec -u 0 $ISAAC_ML_CONTAINER useradd -M -d /workspace -u $(id -u) $(whoami)
docker exec -it -u $(id -u) $ISAAC_ML_CONTAINER /bin/bash
This is useful for running commands manually or connecting to Kaya from the command line inside Docker.
Using a text editor in your host machine’s desktop, copy the file:
~/isaac-experiments/specs/isaac_detect_net_inference.json to ~/isaac-experiments/specs/isaac_detect_net_inference_kaya.json
Find the line that sets model_file_path and set the value to the following:
‘/home/<JETSON_USER>/isaac-experiments/resnet18_detector.etlt’
Replace the JETSON_USER value with the username set up in Kaya and save the file.
When a secure connection between Docker and Kaya is established and a configuration file for this Kaya app is available, you can deploy the app and trained model to the robot. Add the following code to a new cell in the Inference section of the Jupyter notebook and execute it.
%env JETSON_USER=nvidia
%env JETSON_HOST=kaya_ip
%env LOCAL_USERNAME=your_username
! cd /workspace/isaac \
&& ./engine/build/deploy.sh --user $LOCAL_USERNAME --remote_user "$JETSON_USER" -h $JETSON_HOST -p //apps/kaya:object_detection-pkg -d jetpack43
! ssh $JETSON_USER@$JETSON_HOST mkdir -p isaac-experiments
! scp $SPECS_DIR/isaac_detect_net_inference_kaya.json $USER_EXPERIMENT_DIR/experiment_dir_final/resnet18_detector.etlt $JETSON_USER@$JETSON_HOST:isaac-experiments
!echo "# Copy and Run the following commands on a terminal window\n# on your desktop and then go to "
!echo "# http://$JETSON_HOST:3000 to access WebSight on Kaya"
!echo ssh -i \~/isaac-experiments/.ssh/id_rsa $JETSON_USER@$JETSON_HOST
!echo "# Then run the following commands"
!echo cd \~/deploy/$LOCAL_USERNAME/object_detection-pkg '&&' ./apps/kaya/object_detection --more \~/isaac-experiments/isaac_detect_net_inference_kaya.json
Finally, run the application on Kaya. The cell should have created two commands for you to run on a terminal window of your host system. The first one connects you to Kaya, the second command is what you run after you get a command prompt from Kaya.
You should be able to see your Kaya detecting the desired object using WebSight at <a href="http://:3000″>http://<kaya_ip_address>:3000 or opening the link generated by the cell.

Conclusion
If you followed along with this post, you found the utility of Docker images and how to generate a synthetic dataset using Isaac Sim and the Isaac SDK. With this dataset and TLT, you could train models on custom objects for sim-to-real transfer.
For more information, see the following resources:
- Download Isaac SDK 2020.1
- Deploying Real-time Object Detection Models with the NVIDIA Isaac SDK and NVIDIA Transfer Learning Toolkit
- NVIDIA Isaac Documentation
- NVIDIA Isaac: Sample Applications
Post your product questions or feedback in our Developer Forums.
