
NVIDIA Operators simplify GPU and SmartNIC management on Kubernetes. This post shows how to integrate NVIDIA Operators into new edge AI platforms using preinstalled drivers.
This is the first post in a two-part series. The next post describes how to integrate NVIDIA Operators using custom driver containers.
A Future-proof edge AI platform
Today every industry uses edge AI. Servers deployed in airplanes, stores, and factories respond to IoT sensors in real time. They predict weather, prevent theft, and guarantee manufacturing quality.
AI makes sensor data actionable. Trained AI models recognize patterns and trigger responses. A trained AI model represents a company’s business intelligence. Just as crude oil becomes valuable when refined into petroleum, AI transforms sensor data into insight.
But unlike oil, the amount of IoT sensor data is growing exponentially. The vast amount of data generated at the edge can overwhelm an edge server’s ability to process it.
That is why edge AI needs acceleration. NVIDIA GPUs and SmartNICs future-proof an edge AI platform against exponential data growth.
Edge AI is Cloud Native
This post describes how to integrate NVIDIA accelerators with Kubernetes. Why focus on Kubernetes? Because edge AI is cloud native. Most AI applications are container-based microservices. Kubernetes is the unofficial standard for container orchestration.
Edge AI platforms build on Kubernetes due to its flexibility. The Kubernetes API supports declarative automation and is extensible through custom resource definitions. A robust software ecosystem supports Kubernetes day one and day two operations.
NVIDIA Fleet Command is one example of a Kubernetes-based Edge AI platform. Fleet Command is a hybrid cloud service designed for security and performance. It manages AI application lifecycle on bare metal edge nodes. Fleet Command also integrates with NGC, NVIDIA’s curated registry of more than 700 GPU-optimized applications.
While Fleet Command supports NVIDIA GPUs and SmartNICs, many edge platforms do not. For those, NVIDIA provides open-source Kubernetes operators to enable GPU and SmartNIC acceleration. There are two operators: the NVIDIA GPU Operator and the NVIDIA Network Operator.
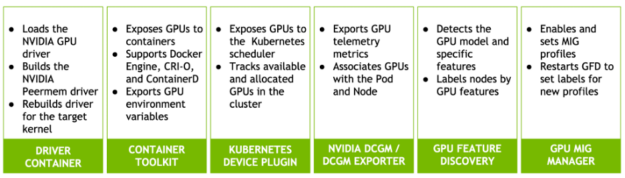
The NVIDIA GPU Operator automates GPU deployment and management on Kubernetes. The GPU Operator Helm Chart is available on NGC. It includes several components:
- The NVIDIA GPU Driver container automates GPU driver installation.
- The NVIDIA Container toolkit allows users to build and run GPU-enabled containers.
- The NVIDIA K8s Device plug-in exposes GPU to pods and to the Kubernetes scheduler.
- NVIDIA DCGM and the NVIDIA DCGM exporter automate GPU telemetry collection and management.
- NVIDIA GPU Feature Discovery labels Kubernetes workers based on GPU characteristics.
- NVIDIA MIG Manager monitors Multi-Instance GPUs (MIG) for configuration changes and applies them.
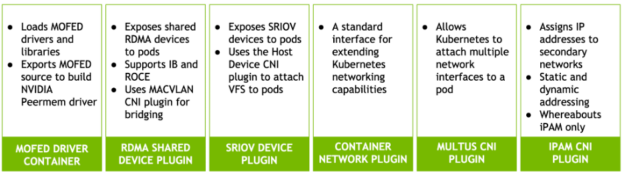
The NVIDIA Network Operator automates CONNECTX SmartNIC configuration for Kubernetes pods that need fast networking. It is also delivered as a Helm chart. The Network Operator adds a second network interface to a pod using the Multus CNI plug-in. It supports both Remote Direct Memory Access (RDMA) and Shared Root I/O Virtualization (SRIOV).
The NVIDIA Network Operator includes the following components:
- The NVIDIA OFED Driver container automates network driver and library installation.
- The Kubernetes RDMA shared-device plug-in attaches RDMA devices to pods. It supports Infiniband and RDMA over Converged Ethernet (RoCE).
- The SRIOV device plug-in attaches SRIOV Virtual Functions (VFs) to pods.
- The Containernetworking CNI plug-in is a standard interface for extending Kubernetes networking capabilities.
- The Whereabouts CNI plug-in manages cluster-wide automatic IP addresses creation and assignment.
- The MACVLAN CNI functions as a virtual switch to connect pods to network functions.
- The Multus CNI plug-in enables attaching multiple network devices to a Kubernetes pod.
- The Host-device CNI plug-in moves an existing device (such as an SRIOV VF) from the host to network namespace the pod’s.
Both operators use Node Feature Discovery. This service identifies which cluster nodes have GPUs and SmartNICs.
The operators work together or separately. Deploying them together enables GPUDirect RDMA. This feature bypasses host buffering to increase throughput between the NIC and GPU.
The NVIDIA operators are open source software. They already support popular Kubernetes distributions running on NVIDIA Certified servers. But many edge platforms run customized Linux distributions the operators do not support. This post explains how to integrate NVIDIA operators with those platforms.
Two Paths, One Way
Portability is one of the main benefits of cloud native software. Containers bundle applications with their dependencies. This lets them run, scale, and migrate across different platforms without friction.
NVIDIA operators are container-based, cloud native applications. Most of the operator services do not need any integration to run on a new platform. But both operators include driver containers, and drivers are the exception. Drivers are kernel-dependent. Integrating NVIDIA operators with a new platform involves rebuilding the driver containers for the target kernel. The platform may be running an unsupported Linux distribution or a custom-compiled kernel.
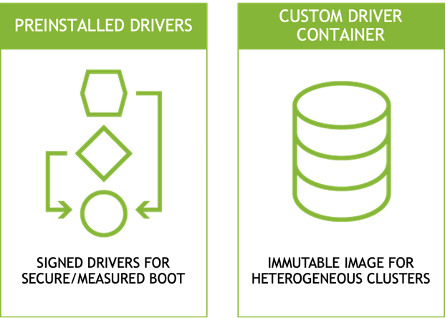
There are two approaches to delivering custom drivers:
First, by installing the drivers onto the host before installing the operators. Many edge platforms deliver signed drivers in their base operating system image to support secure and measured boot. Platforms requiring signed drivers cannot use the driver containers deployed by the operators. NVIDIA Fleet Command follows this pattern. Both the Network and GPU operators support preinstalled drivers by disabling their own driver containers.
The second approach is to replace the operator’s driver containers with custom containers. Edge platforms with immutable file systems prefer this method. Edge servers often run as appliances. They use read-only file systems to increase security and prevent configuration drift. Running driver and application containers in memory instead of adding them to the immutable image reduces its size and complexity. This also allows the same image to run on nodes with different hardware profiles.
This post explains how to set up both patterns. The first section of the post describes driver preinstallation. The second section describes how to build and install custom driver containers.
Apart from the driver containers, the remaining operator services generally run on new platforms without modification. NVIDIA tests both operators on leading container runtimes such as Docker Engine, CRI-O, and Containerd. The GPU Operator also supports the runtime class resource for per-pod runtime selection.
Preinstalled driver integration
The rest of this post shows how to integrate NVIDIA operators with custom edge platforms. It includes step-by-step procedures for both the driver preinstallation and driver container methods.
Table 1 describes the test system used to demonstrate these procedures.
TABLE 1: Test System Description
| Linux Distribution | Centos 7.9.2009 | GPU Operator | v1.8.2 |
| Kernel version | 3.10.0-1160.45.1.el7.custom | GPU Driver (operator) | 470.74 |
| Container runtime | Crio-21.3 | Network Operator | v1.0.0 |
| Kubernetes | 1.21.3-0 | MOFED (operator) | 5.4-1.0.3.0 |
| Helm | v3.3.3 | CUDA | 11.4 |
| Cluster network | Calico v3.20.2 | GPU Driver (local) | 470.57.02 |
| Compiler | GCC 4.8.5 2015062 | MOFED (local) | 5.4-1.0.3.0 |
| Developer tools | Elfutils 0.176-5 | Node Feature Discovery | v0.8.0 |
| Server | NVIDIA DRIVE Constellation | GPU | A100-PCIE-40GB |
| Server BIOS | v5.12 | SmartNIC | ConnectX-6 Dx MT2892 |
| CPU | (2) Intel Xeon Gold 6148 | SmartNIC Firmware | 22.31.1014 |
The operating system, Linux kernel, and container runtime combination on the test system is not supported by either operator. The Linux kernel is custom compiled, so precompiled drivers are not available. The test system also uses the Cri-o container runtime, which is less common than alternatives like Containerd and Docker Engine.
Prepare the System
- First, verify that the CONNECTX SmartNIC and NVIDIA GPU are visible on the test system.
$ lspci | egrep 'nox|NVI'
23:00.0 3D controller: NVIDIA Corporation Device 20f1 (rev a1)
49:00.0 Ethernet controller: Mellanox Technologies MT2892 Family [ConnectX-6 Dx]
49:00.1 Ethernet controller: Mellanox Technologies MT2892 Family [ConnectX-6 Dx]
5e:00.0 Ethernet controller: Mellanox Technologies MT27710 Family [ConnectX-4 Lx]
e3:00.0 Ethernet controller: Mellanox Technologies MT2892 Family [ConnectX-6 Dx]
e3:00.1 Ethernet controller: Mellanox Technologies MT2892 Family [ConnectX-6 Dx]
e6:00.0 3D controller: NVIDIA Corporation Device 20f1 (rev a1)
2. View the operating system and Linux kernel versions. In this example, the Centos 7 3.10.0-1160.45.1 kernel was recompiled to 3.10.0-1160.45.1.el7.custom.x86_64.
$ cat /etc/redhat-release
CentOS Linux release 7.9.2009 (Core)

$ uname -r
3.10.0-1160.45.1.el7.custom.x86_64
3. View the Kubernetes version, network configuration, and cluster nodes. This output shows a single node cluster, which is a typical pattern for edge AI deployments. The node is running Kubernetes version 1.21.
$ kubectl get nodes
NAME     STATUS   ROLES           AGE   VERSION
cgx-20   Ready    control-plane   23d   v1.21.3
4. View the installed container runtime. This example shows the cri-o container runtime.
$ kubectl get node cgx-20 -o yaml | grep containerRuntime
    containerRuntimeVersion: cri-o://1.21.3
5. NVIDIA delivers operators through Helm charts. View the installed Helm version.
$ helm version
version.BuildInfo{Version:"v3.3.3", GitCommit:"55e3ca022e40fe200fbc855938995f40b2a68ce0", GitTreeState:"clean", GoVersion:"go1.14.9"}
Install the Network Operator with preinstalled Drivers
The Mellanox OpenFabrics Enterprise Distribution for Linux installs open source drivers and libraries for high-performance networking. The NVIDIA Network Operator optionally installs a MOFED container to load these drivers and libraries on Kubernetes. This section describes the process for preinstalling MOFED drivers on the host in the event that the included driver container cannot be used.
- Install the prerequisites.
$ yum install -y perl numactl-libs gtk2 atk cairo gcc-gfortran tcsh libnl3 tcl tk python-devel pciutils make lsof redhat-rpm-config rpm-build libxml2-python ethtool iproute net-tools openssh-clients git openssh-server wget fuse-libs
2. Download and extract the MOFED archive for the Linux distribution.
$ wget https://www.mellanox.com/downloads/ofed/MLNX_OFED-5.4-1.0.3.0/MLNX_OFED_LINUX-5.4-1.0.3.0-rhel7.9-x86_64.tgz

$ tar zxf MLNX_OFED_LINUX-5.4-1.0.3.0-rhel7.9-x86_64.tgz
3. Install the kernel-space drivers using mlnxofedinstall. The install script may automatically update the CONNECTX SmartNIC firmware.
$ cd MLNX_OFED_LINUX-5.4-1.0.3.0-rhel7.9-x86_64

$ ./mlnxofedinstall --without-rshim-dkms --without-iser-dkms --without-isert-dkms --without-srp-dkms --without-kernel-mft-dkms --without-mlnx-rdma-rxe-dkms
4. Reboot to load the new drivers.
$ sudo shutdown -r now5. After reboot, make sure that the drivers are loaded.
$ /etc/init.d/openibd status

  HCA driver loaded

Configured Mellanox EN devices:
enp94s0
ens13f0
ens13f1
ens22f0
ens22f1

Currently active Mellanox devices:
enp94s0
ens13f0
ens13f1
ens22f0
ens22f1

The following OFED modules are loaded:

  rdma_ucm
  rdma_cm
  ib_ipoib
  mlx5_core
  mlx5_ib
  ib_uverbs
  ib_umad
  ib_cm
  ib_core
  mlxfw
Once MOFED is successfully installed and the drivers are loaded, proceed to installing the NVIDIA Network Operator.
6. Identify the secondary network device name. This will be the device or devices plumbed into the pod as a secondary network interface.
$ ibdev2netdev
mlx5_0 port 1 ==> ens13f0 (Up)
mlx5_1 port 1 ==> ens13f1 (Down)
mlx5_2 port 1 ==> enp94s0 (Up)
mlx5_3 port 1 ==> ens22f0 (Up)
mlx5_4 port 1 ==> ens22f1 (Down)
7. By default the Network Operator does not deploy to a Kubernetes master. Remove the master label from the node to accommodate the all-in-one cluster deployment.
$ kubectl label nodes --all node-role.kubernetes.io/master- --overwrite
Note this is a temporary workaround to allow Network Operator to schedule pods to the master node in a single node cluster. Future versions of the Network Operator will add toleration and nodeAffinity to avoid this workaround.
8. Add the Mellanox Helm chart repository.
$ helm repo add mellanox https://mellanox.github.io/network-operator
$ helm repo update
$ helm repo ls
NAME            URL
mellanox        https://mellanox.github.io/network-operator
9. Create a values.yaml to specify Network Operator configuration. This example deploys the RDMA shared device plug-in and specifies ens13f0 as the RDMA-capable interface.
$ cat roce_shared_values.yaml
nfd:
  enabled: true
deployCR: true
sriovDevicePlugin:
  deploy: false
rdmaSharedDevicePlugin:
  deploy: true
  resources:
    - name: rdma_shared_device_a
      vendors: [15b3]
      deviceIDs: [101d]
      ifNames: [ens13f0]
10. Install the Network Operator Helm chart, overriding the default values.yaml with the new configuration file.
$ helm install -f ./roce_shared_values.yaml -n network-operator --create-namespace --wait network-operator mellanox/network-operator11. Verify that all Network Operator pods are in Running status.
$ kubectl get pods -n nvidia-network-operator-resources
NAME                      READY   STATUS    RESTARTS   AGE
cni-plugins-ds-fcrsq      1/1     Running   0          3m44s
kube-multus-ds-4n526      1/1     Running   0          3m44s
rdma-shared-dp-ds-5rq4x   1/1     Running   0          3m44s
whereabouts-9njxm         1/1     Running   0          3m44s
Note that some versions of Calico are incompatible with certain Multus CNI versions. Change the Multus API version after the Multus daemonset starts.
$ sed -i 's/0.4.0/0.3.1/' /etc/cni/net.d/00-multus.conf
12. The Helm chart creates a configMap that is used to label the node with the selectors defined in the values.yaml file. Verify that the node is correctly labeled by NFD and that the RDMA shared devices are created.
$ kubectl describe cm -n nvidia-network-operator-resources rdma-devices | grep 15b3
{ "configList": [ { "resourceName": "rdma_shared_device_a", "rdmaHcaMax": 1000, "selectors": { "vendors": ["15b3"], "deviceIDs": ["101d"], "drivers": [], "ifNames": ["ens13f0"], "linkTypes": [] } } ] }

$ kubectl describe node cgx-20 | egrep '15b3|rdma_shared'
                    feature.node.kubernetes.io/pci-15b3.present=true
                    feature.node.kubernetes.io/pci-15b3.sriov.capable=true
  rdma/rdma_shared_device_a:  1k
  rdma/rdma_shared_device_a:  1k
  rdma/rdma_shared_device_a  0           0
Install the GPU Operator with preinstalled Drivers
Follow the same process to install the GPU Operator with precompiled drivers.
- First, disable the nouveau GPU driver, blacklist it from loading, and rebuild the initial RAMdisk.
$ cat << EOF | sudo tee /etc/modprobe.d/blacklist-nouveau.conf
blacklist nouveau
options nouveau modeset=0
EOF

$ sudo dracut --force
2. Download the NVIDIA GPU driver install script for Linux. In this example, we are using driver version 470.57.02.
$ wget https://us.download.nvidia.com/tesla/470.57.02/NVIDIA-Linux-x86_64-470.57.02.run3. Run the install script. The script automatically compiles a driver for the target operating system kernel.
$ sh NVIDIA-Linux-x86_64-470.57.02.run -q -a -n -X -s4. Verify the driver loads successfully.
$ modinfo -F version nvidia
470.57.02
5. Disable SELinux in the Cri-o container runtime configuration and restart the service.
Note that SELinux is in Permissive mode on the test system. Additional steps are needed when SELinux is in Enforcing mode.
$ cat << EOF | sudo tee /etc/crio/crio.conf
[crio]
[crio.runtime]
selinux = false
hooks_dir = [
        "/usr/share/containers/oci/hooks.d",
        "/run/containers/oci/hooks.d",
]
[crio.network]
plugin_dirs = [
	"/opt/cni/bin",
	"/usr/libexec/cni",
]
[crio.metrics]
enable_metrics = true
metrics_port = 9537
EOF

$ systemctl restart crio.service
6. Remove the taint on scheduling to the master node.
$ kubectl taint nodes --all node-role.kubernetes.io/master-
node/cgx-20 untainted
7. Install the GPU Operator Helm chart repository.
$ helm repo add nvidia https://nvidia.github.io/gpu-operator

$ helm repo update

# helm repo ls
NAME    	URL
nvidia  	https://nvidia.github.io/gpu-operator
mellanox	https://mellanox.github.io/network-operator
8. Install the GPU Operator Helm chart. Overriding the driver.enabled parameter to false disables driver container installation. Also specify crio as the container runtime.
$ helm install --generate-name nvidia/gpu-operator --set driver.enabled=false --set toolkit.version=1.7.1-centos7 --set operator.defaultRuntime=crio

$ helm ls
NAME                   	NAMESPACE	REVISION	UPDATED                                	STATUS  	CHART              	APP VERSION
gpu-operator-1635194696	default  	1       	2021-10-25 16:44:57.237363636 -0400 EDT	deployed	gpu-operator-v1.8.2	v1.8.2
9. View the GPU Operator resources. All pods should be in status Running or Completed.
$ kubectl get pods -n gpu-operator-resources
NAME                                       READY   STATUS      RESTARTS   AGE
gpu-feature-discovery-6kpxt                1/1     Running     0          114s
nvidia-container-toolkit-daemonset-sprjb   1/1     Running     0          114s
nvidia-cuda-validator-ndc78                0/1     Completed   0          90s
nvidia-dcgm-exporter-n9xnp                 1/1     Running     0          114s
nvidia-dcgm-pfknx                          1/1     Running     0          114s
nvidia-device-plugin-daemonset-4qnh6       1/1     Running     0          114s
nvidia-device-plugin-validator-845pw       0/1     Completed   0          84s
nvidia-mig-manager-rf7vz                   1/1     Running     0          114s
nvidia-operator-validator-5ngbk            1/1     Running     0          114s
10. View the validation pod logs to verify validation tests completed.
$ kubectl logs -n gpu-operator-resources nvidia-device-plugin-validator-845pw
device-plugin workload validation is successful

$ kubectl logs -n gpu-operator-resources nvidia-cuda-validator-ndc78
cuda workload validation is successful
11. Run nvidia-smi from within the validator container to display the GPU, driver, and CUDA versions. This also validates that the container runtime prestart hook works as expected.
$ kubectl exec -n gpu-operator-resources -i -t nvidia-operator-validator-5ngbk --container nvidia-operator-validator -- nvidia-smi
Mon Oct 25 20:57:28 2021
+-----------------------------------------------------------------------------+
| NVIDIA-SMI 470.57.02    Driver Version: 470.57.02    CUDA Version: 11.4     |
|-------------------------------+----------------------+----------------------+
| GPU  Name        Persistence-M| Bus-Id        Disp.A | Volatile Uncorr. ECC |
| Fan  Temp  Perf  Pwr:Usage/Cap|         Memory-Usage | GPU-Util  Compute M. |
|                               |                      |               MIG M. |
|===============================+======================+======================|
|   0  NVIDIA A100-PCI...  Off  | 00000000:23:00.0 Off |                    0 |
| N/A   26C    P0    32W / 250W |      0MiB / 40536MiB |      0%      Default |
|                               |                      |             Disabled |
+-------------------------------+----------------------+----------------------+
|   1  NVIDIA A100-PCI...  Off  | 00000000:E6:00.0 Off |                    0 |
| N/A   26C    P0    32W / 250W |      0MiB / 40536MiB |      0%      Default |
|                               |                      |             Disabled |
+-------------------------------+----------------------+----------------------+

+-----------------------------------------------------------------------------+
| Processes:                                                                  |
|  GPU   GI   CI        PID   Type   Process name                  GPU Memory |
|        ID   ID                                                   Usage      |
|=============================================================================|
|  No running processes found                                                 |
+-----------------------------------------------------------------------------+
Test the Preinstalled Driver Integration
Test the preinstalled driver integration by creating test pods.
1. Create a network attachment definition. A network attachment definition is a custom resource that allows pods to connect to one or more networks. This network attachment definition defines a MAC VLAN Network that bridges multiple pods across a secondary interface. The Whereabouts CNI automates IP address assignments for pods connected to the secondary network.
$ cat << EOF | sudo tee rdma_shared_macvlan_net.yaml
apiVersion: mellanox.com/v1alpha1
kind: MacvlanNetwork
metadata:
  name: roce-shared-macvlan-network
spec:
  networkNamespace: "default"
  master: "ens13f0"
  mode: "bridge"
  mtu: 1500
  ipam: |
    {
      "type": "whereabouts",
      "datastore": "kubernetes",
      "kubernetes": {
        "kubeconfig": "/etc/cni/net.d/whereabouts.d/whereabouts.kubeconfig"
      },
      "range": "192.168.2.225/28",
      "exclude": [
       "192.168.2.229/30",
       "192.168.2.236/32"
      ],
      "log_file" : "/var/log/whereabouts.log",
      "log_level" : "info",
      "gateway": "192.168.2.1"
    }
EOF
2. Apply the network attachment definition.
$ kubectl create -f roce_shared_macvlan_net.yaml

$ kubectl describe network-attachment-definition roce-shared-macvlan-network | grep Config
  Config:  { "cniVersion":"0.4.0", "name":"roce-shared-macvlan-network", "type":"macvlan","master": "ens13f0","mode" : "bridge","mtu" : 1500,"ipam":{"type":"whereabouts","datastore":"kubernetes","kubernetes":{"kubeconfig":"/etc/cni/net.d/whereabouts.d/whereabouts.kubeconfig"},"range":"192.168.2.225/28","exclude":["192.168.2.229/30","192.168.2.236/32"],"log_file":"/var/log/whereabouts.log","log_level":"info","gateway":"192.168.2.1"} }
3. Create the test pod spec file. The spec file should include an annotation for the network attachment and resources limits for the RDMA device.
$ cat << EOF | sudo tee roce_shared_macvlan_pod.yaml
apiVersion: v1
kind: Pod
metadata:
  name: roce-shared-pod
  annotations:
    k8s.v1.cni.cncf.io/networks: roce-shared-macvlan-network
spec:
  restartPolicy: OnFailure
  containers:
  - image: mellanox/rping-test
    name: mofed-test-ctr
    securityContext:
      capabilities:
        add: [ "IPC_LOCK","NET_RAW" ]
    resources:
      requests:
        rdma/rdma_shared_device_a: 1
      limits:
        rdma/rdma_shared_device_a: 1
    command:
    - sh
    - -c
    - |
      ls -l /dev/infiniband /sys/class/net
      sleep 1000000
EOF
4. Create the test pod.
$ kubectl create -f roce_shared_pod.yaml

$ kubectl get pods | grep roce
roce-shared-pod               1/1     Running   0          6m46s
5. View the test pod logs to verify the network attachment. The secondary interface in this example is named net1.
$ kubectl describe pod roce-shared-pod | grep -B1 rdma
    Limits:
      rdma/rdma_shared_device_a:  1
    Requests:
      rdma/rdma_shared_device_a:  1

$ kubectl logs roce-shared-pod
/dev/infiniband:
total 0
crw-rw-rw-. 1 root root 231,  64 Oct 13 22:48 issm0
crw-rw-rw-. 1 root root  10,  56 Oct 13 22:48 rdma_cm
crw-rw-rw-. 1 root root 231,   0 Oct 13 22:48 umad0
crw-rw-rw-. 1 root root 231, 192 Oct 13 22:48 uverbs0

/sys/class/net:
total 0
lrwxrwxrwx. 1 root root 0 Oct 13 22:48 eth0 -> ../../devices/virtual/net/eth0
lrwxrwxrwx. 1 root root 0 Oct 13 22:48 lo -> ../../devices/virtual/net/lo
lrwxrwxrwx. 1 root root 0 Oct 13 22:48 net1 -> ../../devices/virtual/net/net1
lrwxrwxrwx. 1 root root 0 Oct 13 22:48 tunl0 -> ../../devices/virtual/net/tunl0
6. View the address assignment on net1.
$ kubectl exec -ti roce-shared-pod -- ifconfig net1
<UP,BROADCAST,RUNNING,MULTICAST>  mtu 1500
        inet 192.168.2.225  netmask 255.255.255.240  broadcast 192.168.2.239
        inet6 fe80::6871:9cff:fe1b:afe4  prefixlen 64  scopeid 0x20<link>
        ether 6a:71:9c:1b:af:e4  txqueuelen 0  (Ethernet)
        RX packets 405  bytes 24300 (23.7 KiB)
        RX errors 0  dropped 0  overruns 0  frame 0
        TX packets 9  bytes 698 (698.0 B)
        TX errors 0  dropped 0 overruns 0  carrier 0  collisions 0
7. The GPU Operator creates pods to validate the driver, container runtime, and Kubernetes device plug-in. Create an additional GPU test pod.
$ cat << EOF | kubectl create -f -
apiVersion: v1
kind: Pod
metadata:
  name: cuda-vectoradd
spec:
 restartPolicy: OnFailure
 containers:
 - name: cuda-vectoradd
   image: "nvidia/samples:vectoradd-cuda11.2.1"
   resources:
     limits:
       nvidia.com/gpu: 1
EOF
8. View the results.
$ kubectl get pod cuda-vectoradd
NAME             READY   STATUS      RESTARTS   AGE
cuda-vectoradd   0/1     Completed   0          34s

$ kubectl logs cuda-vectoradd
[Vector addition of 50000 elements]
Copy input data from the host memory to the CUDA device
CUDA kernel launch with 196 blocks of 256 threads
Copy output data from the CUDA device to the host memory
Test PASSED
Done
9. Load the nvidia-peermem driver. It provides GPUDirect RDMA for CONNECTX SmartNICs. This driver is included in NVIDIA Linux GPU driver version 470 and greater. It is compiled automatically during Linux driver installation if both the ib_core and NVIDIA GPU driver sources are present on the system. This means the MOFED driver should be installed before the GPU driver so the MOFED source is available to build the nvidia-peermem driver.
$ modprobe nvidia-peermem

$ lsmod | grep nvidia_peermem
nvidia_peermem         13163  0
nvidia              35224507  113 nvidia_modeset,nvidia_peermem,nvidia_uvm
ib_core               357959  9 rdma_cm,ib_cm,iw_cm,mlx5_ib,ib_umad,nvidia_peermem,ib_uverbs,rdma_ucm,ib_ipoib
Next week, learn more about the process for integrating NVIDIA accelerators using custom driver containers.
