
Bring-your-own-container models are widely supported on today’s modern compute platforms. In other words, you can provide your own container images within your custom software environment.
However, user-provided containers must satisfy each platform’s unique requirements, which can vary from platform to platform. For example, you may need to:
- Use a specific non-root user.
- Place the home directory in a certain location.
- Install dependency packages.
- Run web applications on designated ports.
Keeping your container images conformant with these arbitrary requirements can be challenging. As a result, we are eager to introduce a new open-source tool called Container Canary to capture these requirements and automatically test against them. Container Canary provides a specification for recording these requirements as a manifest that can be checked into version control. You can then use the canary CLI tool to validate containers against that manifest.
This is useful in test and continuous integration (CI) environments to avoid regressions in containers while allowing container developers to move quickly.
$ canary validate --file somespec.yaml foo/bar:latest
Validating foo/bar: latest against somespec
 📦 Required packages are installed              	[passed]
 🤖 Expected services are running                	[passed]
 🎉 Your container is awesome                    	[passed]
validation passed
Installing Container Canary
Container Canary is written in Golang and distributed as static binaries, making it portable and easy to install in CI environments.
To install it, go to the releases page and download the appropriate distribution for your system. For example, Linux users with x86_64 processors would use the canary_linux_amd64 binary. Be sure to replace VERSION in the following commands with the version to install.
$ curl -L https://github.com/NVIDIA/container-canary/releases/download/VERSION/canary_linux_amd64 > canary_linux_amd64
Container Canary also provides sha256 sums to verify the binaries.
$ curl -L https://github.com/NVIDIA/container-canary/releases/download/VERSION/canary_linux_amd64.sha256sum > canary_linux_amd64.sha256sum

$ sha256sum --check --status canary_linux_amd64.sha256sum
Now, you can put the binary somewhere on your path.
$ chmod +x canary_linux_amd64

$ mv canary_linux_amd64 /usr/local/bin/canary
Finally, validate that it works.
$ canary version
Container Canary
 Version:         VERSION
 ...
Validating containers with a Kubeflow example
With Container Canary installed, you can begin validating containers. The /examples/ GitHub directory contains some manifests for popular container platforms, including the Kubeflow example. You can use these manifests to get started right away.
Kubeflow is a popular platform for designing, training, and inferencing machine learning models. The Kubeflow Notebooks service enables you to launch web-based development environments inside Kubeflow. While it does have default containers maintained by the Kubeflow community for running tools like JupyterLab, RStudio, and Visual Studio Code (code-server), you can also choose your own container images with your own software environment.
The list of requirements specifies what your custom container must meet to run correctly on Kubeflow Notebooks. That list looks like the following example:
For Kubeflow Notebooks to work with a container image, the image must:
- expose an HTTP interface on port 8888:
- kubeflow sets an environment variable NB_PREFIX at runtime with the URL path that we expect the container be listening under
- kubeflow uses IFrames, so ensure your application sets Access-Control-Allow-Origin: * in HTTP response headers
- run as a user called jovyan:
- the home directory of jovyan should be /home/jovyan
- the UID of jovyan should be 1000
- start successfully with an empty PVC mounted at /home/jovyan:
- kubeflow mounts a PVC at /home/jovyan to keep state across Pod restarts
With Container Canary, we have written these requirements out in our example manifest. If you have ever written a Kubernetes pod manifest, this syntax should look familiar to you. You can see that each requirement has been written out in the form of a probe that Container Canary runs against your container to check that the requirement is met.
The process looks like the following example:
apiVersion: container-canary.nvidia.com/v1
kind: Validator
name: kubeflow
description: Kubeflow notebooks
documentation: https://www.kubeflow.org/docs/components/notebooks/container-images/#custom-images
env:
 - name: NB_PREFIX
   value: /hub/jovyan/
ports:
 - port: 8888
   protocol: TCP
volumes:
 - mountPath: /home/jovyan
checks:
 - name: user
   description: 👩 User is jovyan
   probe:
     exec:
       command:
         - /bin/sh
         - -c
         - "[ $(whoami) = jovyan ]"
 - name: uid
   description: 🆔 User ID is 1000
   probe:
     exec:
       command:
         - /bin/sh
         - -c
         - "id | grep uid=1000"
 - name: home
   description: 🏠 Home directory is /home/jovyan
   probe:
     exec:
       command:
         - /bin/sh
         - -c
         - "[ $HOME = /home/jovyan ]"
 - name: http
   description: 🌏 Exposes an HTTP interface on port 8888
   probe:
     httpGet:
       path: /
       port: 8888
     initialDelaySeconds: 10
 - name: NB_PREFIX
   description: 🧭 Correctly routes the NB_PREFIX
   probe:
     httpGet:
       path: /hub/jovyan/lab
       port: 8888
     initialDelaySeconds: 10
 - name: allow-origin-all
   description: "🔓 Sets 'Access-Control-Allow-Origin: *' header"
   probe:
     httpGet:
       path: /
       port: 8888
       responseHttpHeaders:
         - name: Access-Control-Allow-Origin
           value: "*"
     initialDelaySeconds: 10
Now that there is a manifest, I can test a container against it. First, I chose a public image that I knew would not pass the requirements, such as the popular web server NGINX.
$ canary validate --file https://github.com/NVIDIA/container-canary/raw/main/examples/kubeflow.yaml nginx:latest
Cannot find nginx:latest, pulling…
Validating nginx:latest against kubeflow
 🏠 Home directory is /home/jovyan               	[failed]
 👩 User is jovyan                               	[failed]
 🆔 User ID is 1000                              	[failed]
 🌏 Exposes an HTTP interface on port 8888       	[failed]
 🔓 Sets 'Access-Control-Allow-Origin: *' header 	[failed]
 🧭 Correctly routes the NB_PREFIX               	[failed]
validation failed
Unsurprisingly, this image fails validation.
Next, I tried one of the official Kubeflow images that have been designed to run on Kubeflow Notebooks.
$ canary validate --file https://github.com/NVIDIA/container-canary/raw/main/examples/kubeflow.yaml public.ecr.aws/j1r0q0g6/notebooks/notebook-servers/jupyter-pytorch-cuda:v1.5.0
Cannot find public.ecr.aws/j1r0q0g6/notebooks/notebook-servers/jupyter-pytorch-cuda:v1.5.0, pulling…
Validating public.ecr.aws/j1r0q0g6/notebooks/notebook-servers/jupyter-pytorch-cuda:v1.5.0 against kubeflow
 🏠 Home directory is /home/jovyan               	[passed]
 👩 User is jovyan                               	[passed]
 🆔 User ID is 1000                              	[passed]
 🔓 Sets 'Access-Control-Allow-Origin: *' header 	[passed]
 🧭 Correctly routes the NB_PREFIX               	[passed]
 🌏 Exposes an HTTP interface on port 8888       	[passed]
validation passed
Success! This image passes validation.
If you are building images for use on Kubeflow, you can validate them in the same way and be confident that changes you make will not cause issues when other users come to run them.
Writing your own validation manifest
You can also write your own manifests to validate containers. Container Canary can help you ensure that your container manifests will run in your own deployments and in third-party platforms. It also assists you with running unit tests on container builds.
Each manifest is a YAML file that begins with some metadata.
# Manifest versioning
apiVersion: container-canary.nvidia.com/v1
kind: Validator

# Metadata
name: foo  # The name of the platform that this manifest validates for
description: Foo runs containers for you  # Optional, A description of that platform
documentation: https://example.com  # Optional, A link to the documentation that defines the container requirements in prose
Next, you can configure some runtime options for the container. These are used when Container Canary starts the image to validate and should imitate the options set on your target platform. These include environment variables, ports to expose, and volumes to attach.
env:
  - name: NB_PREFIX
	value: /hub/jovyan/
ports:
  - port: 8888
    protocol: TCP
volumes:
  - mountPath: /home/jovyan
Then, you specify your checks. Checks are the tests to be run against the container to ensure it is compliant. Every check contains a probe that interacts with the container. These interactions include running commands, making HTTP requests, and pinging TCP sockets.
The probes in Container Canary are a superset of those in Kubernetes, so if you have used those before, they should be familiar.
checks:
  - name: mycheck  # Name of the check
    description: Ensuring a thing  # Description of what is being checked (will be used in output)
    probe:
      ...  # A probe to run
An exec check runs a command inside the running container. If the command exits with 0, the check passes.
checks:
  - name: uid
    description: User ID is 1234
    probe:
      exec:
        command:
          - /bin/sh
          - -c
          - "id | grep uid=1234"
An HTTP Get check performs an HTTP GET request against your container. If the response code is <300 and the optional response headers match, the check passes.
checks:
  - name: http
    description: Exposes an HTTP interface on port 80
    probe:
      httpGet:
        path: /
        port: 80
        httpHeaders:  # Optional, headers to set in the request
          - name: Foo-Header
            value: "myheader"
        responseHttpHeaders:  # Optional, headers that you expect to see in the response
          - name: Access-Control-Allow-Origin
            value: "*"
For more information, see the Validator API reference.
After you’ve written your manifest, you can use canary to test containers with it.
$ canary validate --file examples/awesome.yaml your/container:latest
Validating your/container:latest against awesome
 📦 Required packages are installed                  [passed]
 🤖 Expected services are running                    [passed]
 🎉 Your container is awesome                        [passed]
validation passed
Example of automating Container Canary with GitHub Actions
Now that I’ve covered installing Container Canary, validating containers, and writing your own manifests, here’s a quick CI example.
Suppose that you want to build a container that should run a web application on a specific port and also has Python installed. In a new repository, you can create a small Python web application called app.py using fastapi.
from fastapi import FastAPI
import uvicorn

app = FastAPI()


@app.get("/")
def read_root():
	return {"Hello": "World"}


@app.get("/foo")
def foo():
	return {"foo": "bar"}

if __name__ == "__main__":
	uvicorn.run(app, host="0.0.0.0", port=5000, log_level="info")
Then you can create a Dockerfile to package the application into a container.
FROM python

COPY app.py /app.py

RUN pip install fastapi uvicorn[standard]

EXPOSE 5000

CMD python /app.py
Now, write a Container Canary Validator manifest that tests the container image to ensure that it runs a web server on port 5000 and has Python installed. Call it canary-validator.yaml.
apiVersion: container-canary.nvidia.com/v1
kind: Validator
name: example
description: Container Canary CI Example
env: []
ports:
 - port: 5000
   protocol: TCP
volumes: []
checks:
 - name: http
   description: Exposes an HTTP interface on port 5000
   probe:
     httpGet:
       path: /foo
       port: 5000
     failureThreshold: 30
 - name: python
   description: Has Python installed
   probe:
     exec:
       command:
         - /bin/sh
         - -c
         - "which python"
Finally, create a GitHub Actions config to run this in CI. We chose GitHub Actions for this example because it is popular, free, and easily available, but this configuration should translate for all CI systems.
Create a file called .github/workflows/ci.yaml.
name: ci

on:
 push:
 pull_request:

jobs:
 canary:
   runs-on: ubuntu-latest
   steps:
     - name: Checkout
       uses: actions/checkout@v2

     - name: Install Container Canary
       run: |
         curl -L https://github.com/NVIDIA/container-canary/releases/download/v0.2.0/canary_linux_amd64 > /usr/local/bin/canary
         chmod +x /usr/local/bin/canary

     - name: Build Container
       run: docker build -t foo/canary-ci-example:latest .

     - name: Validate container
       run: canary validate --file canary-validator.yaml foo/canary-ci-example:latest
Now when you push your code to GitHub, the Actions runner checks out the code, installs Container Canary, builds the container image, and validates it with canary validate.
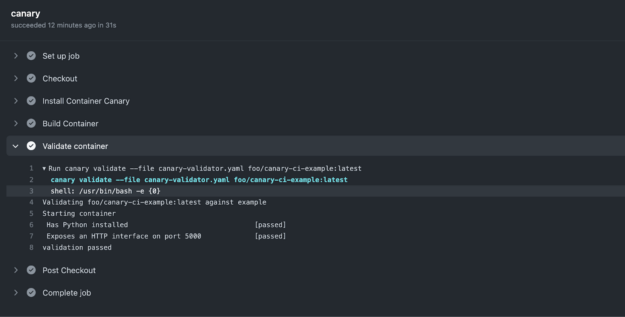
The workflow has been executed and our container image has successfully been validated–and fast! For more information, see all the code for this example in the /jacobtomlinson/canary-ci-example GitHub repo.
Apply what you learned
With Container Canary, you can define concrete interfaces for your container images and validate them to ensure that the images you build always meet a defined specification.
If you are regularly building container images, Container Canary is a must-have in your testing toolkit due to its usefulness in test and CI environments. Container developers can successfully avoid regressions in containers, and move quicker through their projects to save time.
