![]() One of my favorite things is getting to talk to people about GPU computing and Python. The productivity and interactivity of Python combined with the high performance of GPUs is a killer combination for many problems in science and engineering. There are several approaches to accelerating Python with GPUs, but the one I am most familiar with is Numba, a just-in-time compiler for Python functions. Numba runs inside the standard Python interpreter, so you can write CUDA kernels directly in Python syntax and execute them on the GPU. The NVIDIA Developer Blog recently featured an introduction to Numba; I suggest reading that post for a general introduction to Numba on the GPU.
One of my favorite things is getting to talk to people about GPU computing and Python. The productivity and interactivity of Python combined with the high performance of GPUs is a killer combination for many problems in science and engineering. There are several approaches to accelerating Python with GPUs, but the one I am most familiar with is Numba, a just-in-time compiler for Python functions. Numba runs inside the standard Python interpreter, so you can write CUDA kernels directly in Python syntax and execute them on the GPU. The NVIDIA Developer Blog recently featured an introduction to Numba; I suggest reading that post for a general introduction to Numba on the GPU.
When I talk to people about Numba, I find that they quickly pick up the basics of writing CUDA kernels in Python. But often we don’t have time to get into some of the more advanced things that Numba has to offer GPU programmers. In this post, I want to dive deeper and demonstrate several aspects of using Numba on the GPU that are often overlooked. I’ll quickly breeze through a number of topics, but I’ll provide links throughout for additional reading.
1. Numba is 100% Open Source
You might be surprised to see this as the first item on the list, but I often talk to people who don’t realize that Numba, especially its CUDA support, is fully open source. The confusion is understandable since Numba has taken a long journey from its semi-proprietary beginnings in 2012 to its current state. When the Numba project began, there were actually two different code bases: Numba, an open-source Python compiler for the CPU, and NumbaPro (later renamed “Accelerate”), a proprietary Python compiler for the GPU. Over the next several years, we merged components of the GPU support from NumbaPro into the open-source Numba project, finally concluding in mid-2017 with the release of Pyculib.
Pyculib is the new name for our set of Python wrappers around standard CUDA algorithms. It includes Python wrappers for:
These wrappers used to be part of Anaconda Accelerate, and are primarily of interest to Numba users because they work with both standard NumPy arrays on the CPU as well as GPU arrays allocated by Numba. As a result, it is quite easy to combine standard operations, like an FFT, with a custom CUDA kernel written with Numba, as shown in this code fragment:
import pyculib.fft
import numba.cuda
import numpy as np

@numba.cuda.jit
def apply_mask(frame, mask):
    i, j = numba.cuda.grid(2)
    frame[i, j] *= mask[i, j]

# … skipping some array setup here: frame is a 720x1280 numpy array

out = np.empty_like(mask, dtype=np.complex64)
gpu_temp = numba.cuda.to_device(out)  # make GPU array
gpu_mask = numba.cuda.to_device(mask)  # make GPU array

pyculib.fft.fft(frame.astype(np.complex64), gpu_temp)  # implied host->device
apply_mask[blocks, tpb](gpu_temp, gpu_mask)  # all on device
pyculib.fft.ifft(gpu_temp, out)  # implied device->host
You can learn more about the functions in Pyculib in its documentation. Now that Pyculib is open source, we are actively seeking contributions to expand Pyculib to include other CUDA libraries, like cuSOLVER and nvGRAPH.
2. Numba + Jupyter = Rapid CUDA Prototyping
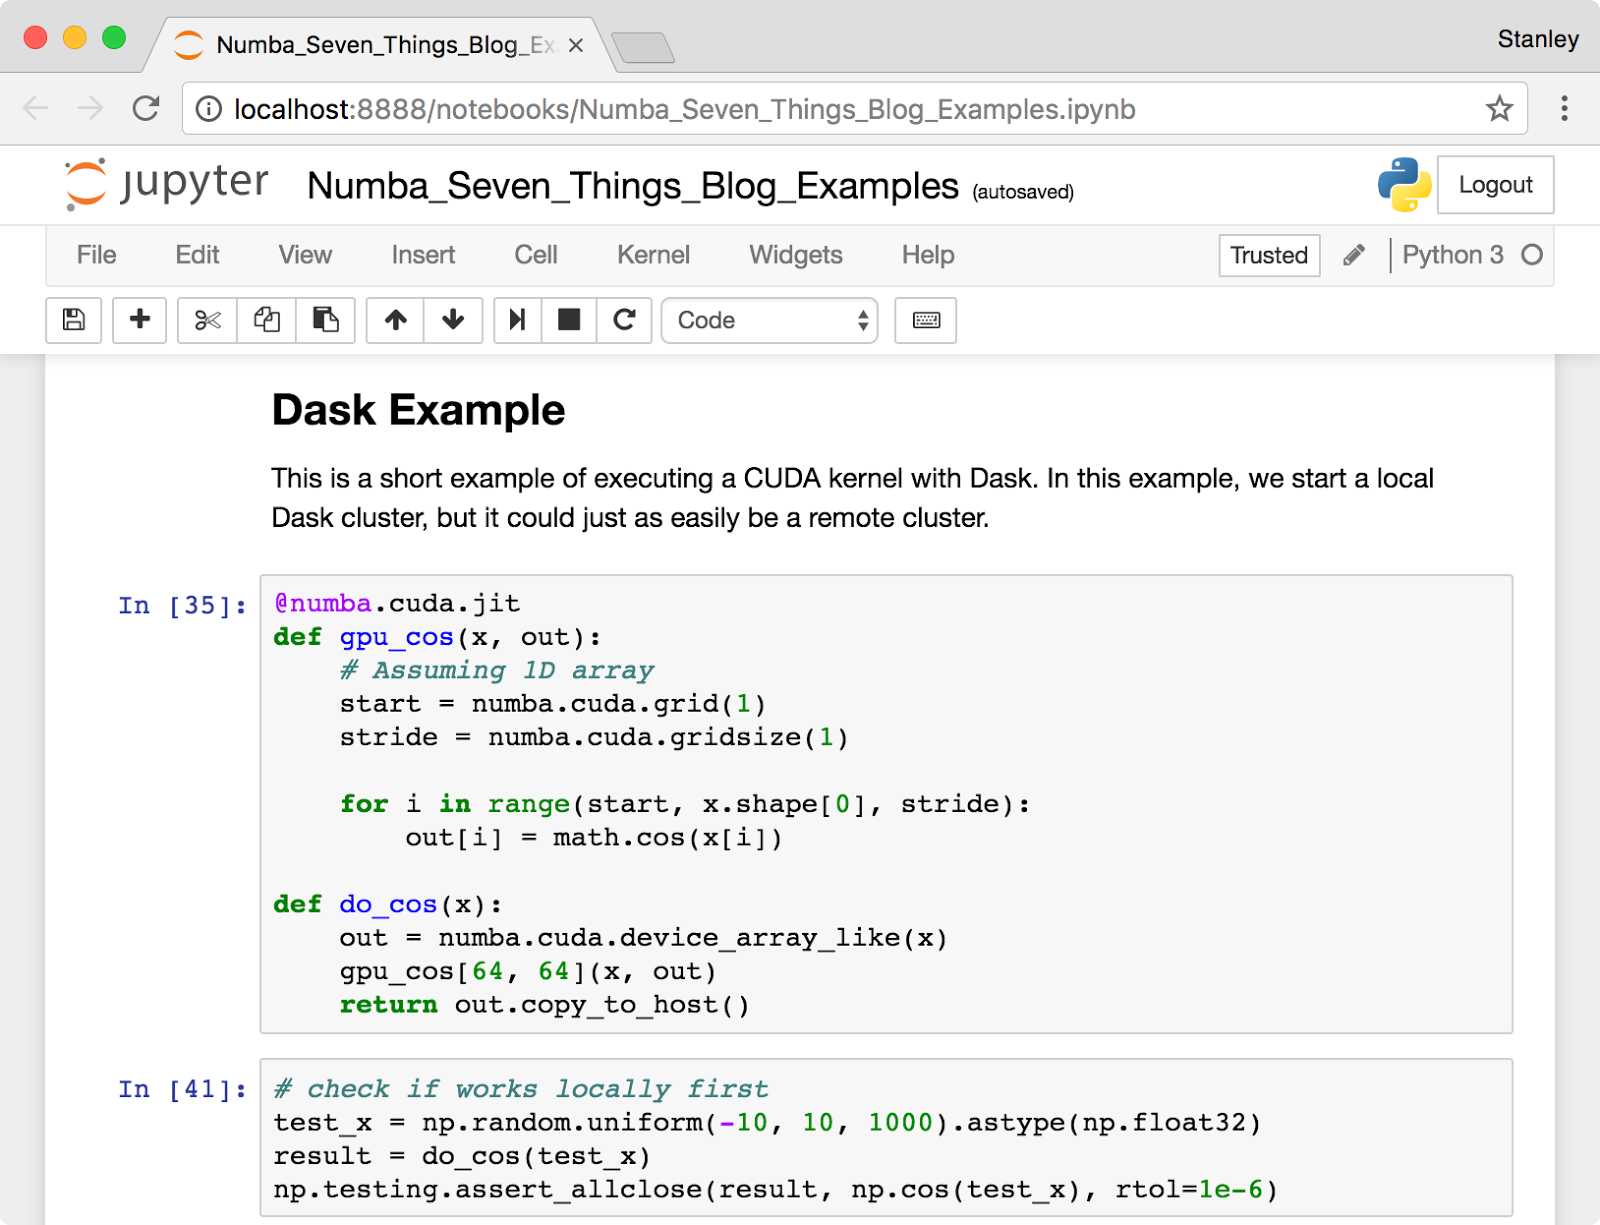
 It is easy to think of Numba as just “writing CUDA with Python syntax,” but the combination of Numba with other tools in the Python data science ecosystem transforms the experience of GPU computing. We especially enjoy using Numba with Jupyter Notebook (and JupyterLab, the next generation of the notebook). The Jupyter Notebook, shown in Figure 1, provides a browser-based document creation environment that allows the combination of Markdown text, executable code, and graphical output of plots and images. Jupyter has become very popular for teaching, documenting scientific analyses, and interactive prototyping. In fact, all the examples in this blog post were created in a Jupyter notebook that you can find here.
Why are Numba and Jupyter such a good fit for experimentation with GPU computing? There are several reasons:
- As a just-in-time compiler, Numba compiles your CUDA code on the fly, so changes are immediately available by re-executing the Jupyter code cell. No external files need to be saved, and no build step is needed. Your CUDA kernel can be embedded right into the notebook itself, and updated as fast as you can hit Shift-Enter.
- If you pass a NumPy array to a CUDA function, Numba will allocate the GPU memory and handle the host-to-device and device-to-host copies automatically. This may not be the most performant way to use the GPU, but it is extremely convenient when prototyping. Those NumPy arrays can always be changed into Numba GPU device arrays later.
- Jupyter includes a benchmarking tool in its set of “magic” commands. By prefixing a line with
%timeit, Jupyter will automatically run the command many times to get an accurate measurement of run time. (Don’t forget to synchronize the device after running a kernel to get accurate timing!)
The Jupyter Notebook can be tunneled over SSH, making it possible to edit a notebook with the web browser on your desktop or laptop, but execute code on remote Linux server. (We’ve done this with a DGX-1, for example.) On my laptop, I run a command like:
ssh -L 9999:localhost:9999 me@gpu-server.example.com
which logs me into our GPU server and forwards port 9999 back to my laptop. Then I can launch Jupyter on the remote system with this command (this assumes you have Jupyter installed on the server):
jupyter notebook --port 9999 --no-browser
Jupyter will start and print a URL to paste into your browser to access the notebook interface. The SSH port forwarding will encrypt the data and route it between the remote server and your local computer. Now you can run algorithm experiments on your Tesla P100 from the comfort of your web browser!
3. Numba Can Compile for the CPU and GPU at the Same Time
Quite often when writing an application, it is convenient to have helper functions that work on both the CPU and GPU without having to duplicate the function contents. That way, you can be certain the implementation is identical in both places. Additionally, it can be easier to unit test CUDA device functions on the CPU to verify the logic without always having to write special CUDA kernel wrappers just to exercise device functions on the GPU for testing purposes.
In CUDA C++, using the combination of the __host__ and __device__ keywords on a function definition makes it callable from either the CPU (host) or the GPU (device). For example, I might write this in CUDA C++:
__host__ __device__ float clamp(float x, float xmin, float xmax) {
    if (x < xmin){
        return xmin;
    } else if (x > xmax) {
        return xmax;
    } else {
        return x;
    }
}
Then I can use the clamp() function directly on the host, and in other CUDA C++ functions.
With Numba, I can write the same function in Python using the normal CPU compiler decorator:
@numba.jit
def clamp(x, xmin, xmax):
    if x < xmin:
        return xmin
    elif x > xmax:
        return xmax
    else:
        return x
But I can use this function directly from a CUDA kernel without redeclaring it, like this:
@numba.cuda.jit
def clamp_array(x, xmin, xmax, out):
    # Assuming 1D array
    start = numba.cuda.grid(1)
    stride = numba.cuda.gridsize(1)
    for i in range(start, x.shape[0], stride):
        out[i] = clamp(x[i], xmin, xmax)  # call "CPU" function here
The Numba compiler automatically compiles a CUDA version of clamp() when I call it from the CUDA kernel clamp_array(). Note that the Numba GPU compiler is much more restrictive than the CPU compiler, so some functions may fail to recompile for the GPU. Here are some tips.
- NumPy arrays are supported on the GPU, but array math functions and array allocation is not.
- Use math functions from the Python
mathmodule, rather than thenumpymodule. - Don’t use explicit type signatures in the
@jitdecorator. Frequently on the CPU, 64-bit data types are used, whereas on the GPU, 32-bit types are more common. Numba will automatically recompile for the right data types wherever they are needed. - You can pass shared memory arrays into device functions as arguments, which makes it easier to write utility functions that can be called from both CPU and GPU.
4. Numba Makes Array Processing Easy with @vectorize
The ability to write full CUDA kernels in Python is very powerful, but for element-wise array functions, it can be tedious. You have to decide on a thread and block indexing strategy suitable for the dimensions of the arrays, pick a suitable CUDA launch configuration, and so on. Thankfully, Numba offers a simpler way to create these special array functions (called “universal functions” or “ufuncs” in NumPy) that requires almost no knowledge of CUDA at all!
Along with the normal @jit decorator for compiling regular functions, Numba offers a @vectorize decorator for creating ufuncs from a “kernel function”. This kernel function (not to be confused with a CUDA kernel) is a scalar function that describes the operation to be performed on the array elements from all inputs. For example, I can implement a Gaussian distribution:
import numba
import math
import numpy as np

SQRT_TWOPI = np.float32(math.sqrt(2 * math.pi))

@numba.vectorize(['float32(float32, float32, float32)'], target='cuda')
def gaussian(x, x0, sigma):
    return math.exp(-((x - x0) / sigma)**2 / 2) / SQRT_TWOPI / sigma
Unlike with the normal function compiler, I need to give the ufunc compiler a list of type signatures for the arguments. Now I can call this function with NumPy arrays and get back an array result:
x = np.linspace(-3, 3, 10000, dtype=np.float32)
g = gaussian(x, 0, 1)  # 1D result

x2d = x.reshape((100,100))
g2d = gaussian(x2d, 0, 1) # 2D result
I don’t have to use the special kernel launch calling convention, or pick a launch configuration. Numba automatically handles all the CUDA details, and copies the input arrays from the CPU to the GPU, and the result back to the CPU. (Alternatively, I can pass in GPU device memory, and avoid the CUDA memory copy.)
Note that in the first call, x is a 1D array, and x0 and sigma are scalars. The scalars are implicitly treated by Numba as 1D arrays to match the other input argument through a process called broadcasting. Broadcasting is a very powerful concept from NumPy, and can be used to combine arrays of different, but compatible, dimensions. Numba automatically handles all the parallelization and looping, regardless of the dimensions of your function inputs.
To learn more about ufuncs and Numba, take a look at the NumPy documentation on broadcasting and the Numba documentation on ufuncs.
5. Numba comes with a CUDA simulator
Debugging CUDA applications is tricky, and Python adds an additional layer of complexity. With function call stacks in both Python and C, and code running on both the CPU and the GPU, there is not a one-size-fits-all debugging solution. As a result, the Numba developers are always looking for new ways to facilitate debugging of CUDA Python applications.
A few years ago, we introduced a Numba feature we call the CUDA Simulator. The purpose of the simulator is to run the CUDA kernel directly in the Python interpreter to make it easier to debug with standard Python tools. Several caveats apply:
- The simulator is designed to reproduce the logical behavior of parallel kernel execution entirely in the Python interpreter, but does not simulate GPU hardware characteristics.
- The simulator is not intended to be an efficient CPU code path for an application. Kernels will run extremely slowly, and should only be used for testing purposes.
- A function running in the simulator can contain code which would not normally be allowed on the GPU. This allows the function to do things like invoke PDB (the Python debugger) or do other logging.
- The simulator will likely not reproduce race conditions present on the device.
To invoke the CUDA simulator, you must set the NUMBA_ENABLE_CUDASIM environment variable to 1 before starting the Python application. This will force all kernels to run through the interpreter code path. You can find more information in the Numba documentation on the CUDA simulator.
Of course, this is not the only CUDA debugging option available in Numba. Numba also allows limited printing from the GPU (constant strings and scalars) using the standard Python print function/statement. In addition, you can run Numba applications with nvprof (the CUDA command-line profiler), the NVIDIA Visual Profiler, and cuda-memcheck. Passing debug=True to the @numba.cuda.jit decorator will allow cuda-memcheck to display Python source code line numbers for detected memory errors.
6. You Can Send Numba Functions Over the Network
Distributed computing systems for Python, like Dask and the Spark Python API, achieve high performance by sharding data over many workers and bringing the code to where the data resides. This requires the ability to serialize code and transmit it through the network. In Python, distributed frameworks typically use the cloudpickle library, an enhanced version of the Python pickle module, to convert objects, including functions, into a stream of bytes. These bytes can be sent from the client, where the function was input by the user, to remote worker processes, where they are turned back into executable functions.
Numba-compiled CPU and GPU functions (but not ufuncs, due to some technical issues) are specifically designed to support pickling. When a Numba-compiled GPU function is pickled, both the NVVM IR and the PTX are saved in the serialized bytestream. Once this data is transmitted to the remote worker, the function is recreated in memory. If the CUDA architecture of the GPU on the worker matches the client, the PTX version of the function will be used. If the CUDA architecture does not match, then the CUDA kernel will be recompiled from the NVVM IR to ensure the best performance. Figure 2 shows this process. The net result is that you can test and debug your GPU code on a mobile Kepler GPU, and then send it off to a Dask cluster of Pascal GPUs seamlessly.
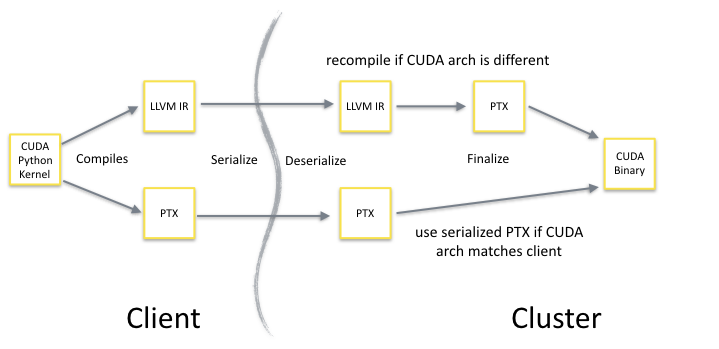
As a short example, here’s some code that starts a local Dask cluster and executes a simple CUDA kernel using the dask.distributed futures API:
@numba.cuda.jit
def gpu_cos(x, out):
    # Assuming 1D array
    start = numba.cuda.grid(1)
    stride = numba.cuda.gridsize(1)
    for i in range(start, x.shape[0], stride):
        out[i] = math.cos(x[i])

def do_cos(x):
    out = numba.cuda.device_array_like(x)
    gpu_cos[64, 64](x, out)
    return out.copy_to_host()

# check if works locally first
test_x = np.random.uniform(-10, 10, 1000).astype(np.float32)
result = do_cos(test_x)

# now try remote
from dask.distributed import Client
client = Client() # starts a local cluster

future = client.submit(do_cos, test_x)
gpu_result = future.result()
While this example does a trivial amount of work, it shows the general pattern for using Numba with a distributed system. The function submitted to the cluster is a regular Python function that internally calls a CUDA function. The wrapper function provides a place to allocate GPU memory and determine the CUDA kernel launch configuration, which the distributed frameworks cannot do for you. When do_cos is submitted to the cluster, cloudpickle also detects the dependency on the gpu_cos function and serializes it. This ensures that do_cos has everything it needs to run on the remote worker. Typically when working with Dask, we lean toward higher level APIs to construct compute graphs, like dask.delayed, but for some iterative algorithms, directly working with futures is the most straightforward approach.
The Numba community considers distributed GPU computing with Numba an exciting, but still bleeding edge, capability. There are definitely some things to improve both in Numba and Dask for this use case, so if you experiment with this feature, please get in contact with the Numba community on the Google Group so we can learn more about your needs and provide guidance.
7. Numba Developers are working on a GPU DataFrame
 At GTC 2017, Anaconda, Inc. (the primary sponsor of Numba development) in collaboration with H2O, MapD, BlazingDB, Graphistry, and Gunrock announced the formation of the GPU Open Analytics Initiative (“GOAI” for short). We all recognized a need for GPU data exchange between applications and libraries as data science workloads increasingly require the combination of multiple tools. GPU computing has become ubiquitous, so we can no longer always treat the GPU as a hidden implementation detail. The time has come for more applications and libraries to expose interfaces that allow direct passing of GPU memory between components. For an in-depth look on GOAI, check out the NVIDIA Developer Blog post on the GOAI project.
The group members have been working together since March 2017, and more recently with Wes McKinney from the Apache Arrow project, to create a GPU DataFrame that can be shared between applications and libraries. The GPU DataFrame implementation is using the Arrow format to represent tabular data on the GPU, and we are looking to move much of the implementation directly into the Arrow codebase in the future. As part of this software stack, the Numba developers have created PyGDF, a Python library for manipulating GPU DataFrames with a subset of the Pandas API. The library supports filtering, sorting, columnar math operations, reductions, joining, group by operations, and zero-copy sharing of GPU DataFrames with other processes. To make this possible, PyGDF uses Numba to JIT compile CUDA kernels for customized grouping, reduction, and filter operations. In addition, PyGDF columns can be passed to Numba CUDA functions to perform custom transformations not expressible as DataFrame operations.
GOAI has made a lot of progress so far, but it is still early days and we have a lot more work to do. There are a number of exciting developments yet to come! To stay informed about GOAI activities, join the GOAI Google Group.
Learning More About Numba
I hope that this post has shown you a few things about Numba that you didn’t know before. If you want to learn more about these advanced Numba topics, I suggest the following resources.
- Anaconda Python Distribution: the easiest way to install Numba
- Materials from the Numba GPU tutorial at GTC2017
- Numba CUDA Documentation
- Numba Issue Tracker on Github: for bug reports and feature requests
- Introduction to Numba blog post.
Additionally, if you want to ask questions or get help with Numba, the best place is the Numba Users Google Group.
