
We introduced Variable Rate Shading (VRS) last year with the Turing architecture. This new, easy to implement rendering technique allows developers to vary the amount of processing power spent across the image, to spend time and increase quality in the areas where they are most needed. Since virtual reality demands both a high performance and a high image quality, VRS is the perfect fit for VR experiences, especially when used in conjunction with eye tracking.
In this blog, we explain the technology behind VRS in detail and show how a Beta version of Autodesk VRED used in a demo at SIGGRAPH 2019 leverages this technology to improve the VR experience in an HTC VIVE Pro Eye.
The following video should be watched full screen, at the highest possible quality available. VRS quality differences can sometimes be hard to see at lower resolutions.
What is Variable Rate Shading?
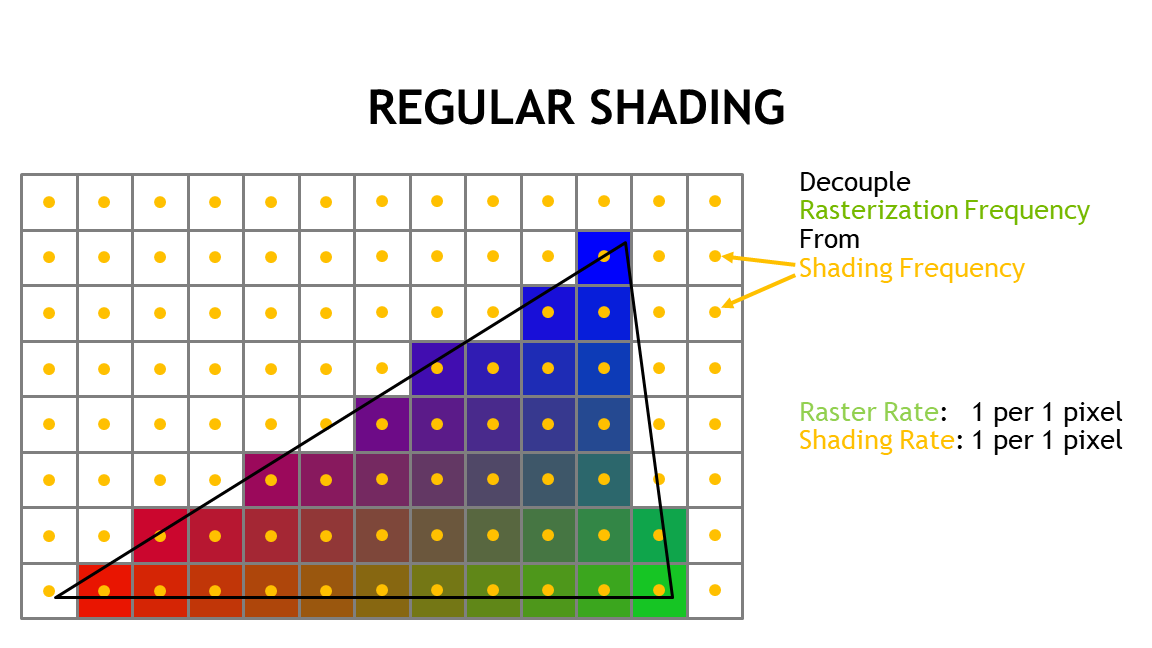
Variable Rate Shading (VRS) works by decoupling the rasterization frequency from the shading frequency while rendering a triangle. The default rate when rendering a triangle is to shade one sample per rasterized pixel.
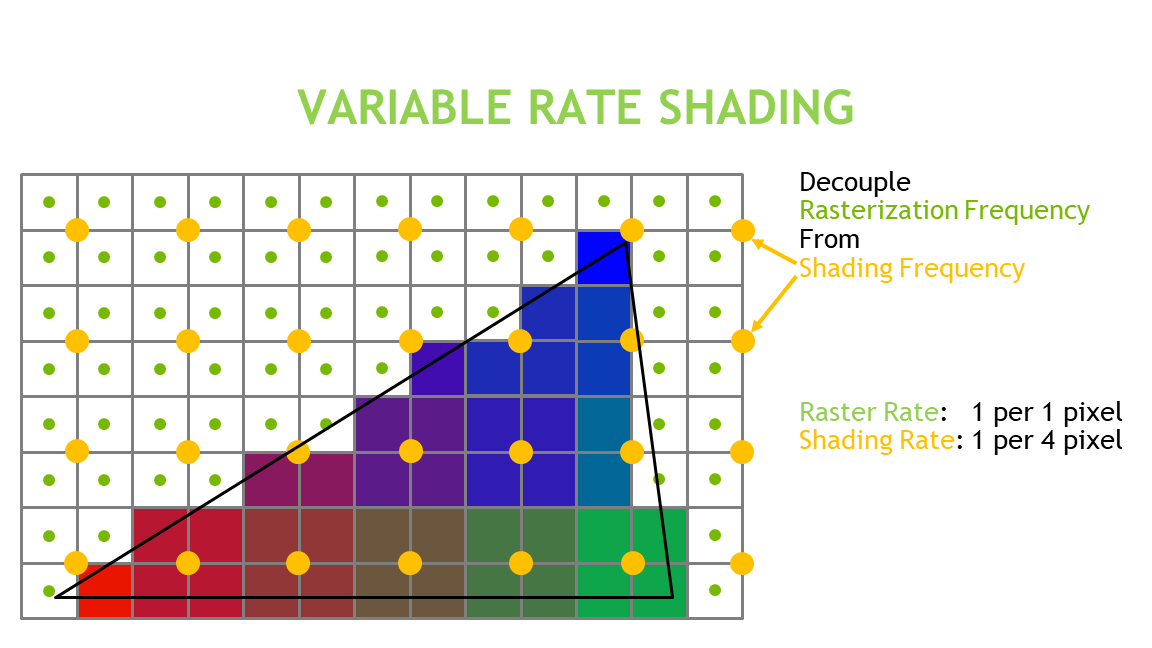
With VRS it is possible to change the shading rate, and for example shade only one sample per four pixels, or even only shade one sample per sixteen pixels. This can lead to a dramatic reduction in rendering complexity, speeding up the rendering. This improvement in rendering performance can provide the needed push to make an application perform fast enough for VR rendering. This reduction in shading rate comes with a reduction in quality, but depending on the image region or the material that is rendered this quality reduction can be made almost unnoticeable, as discussed later in this blog.
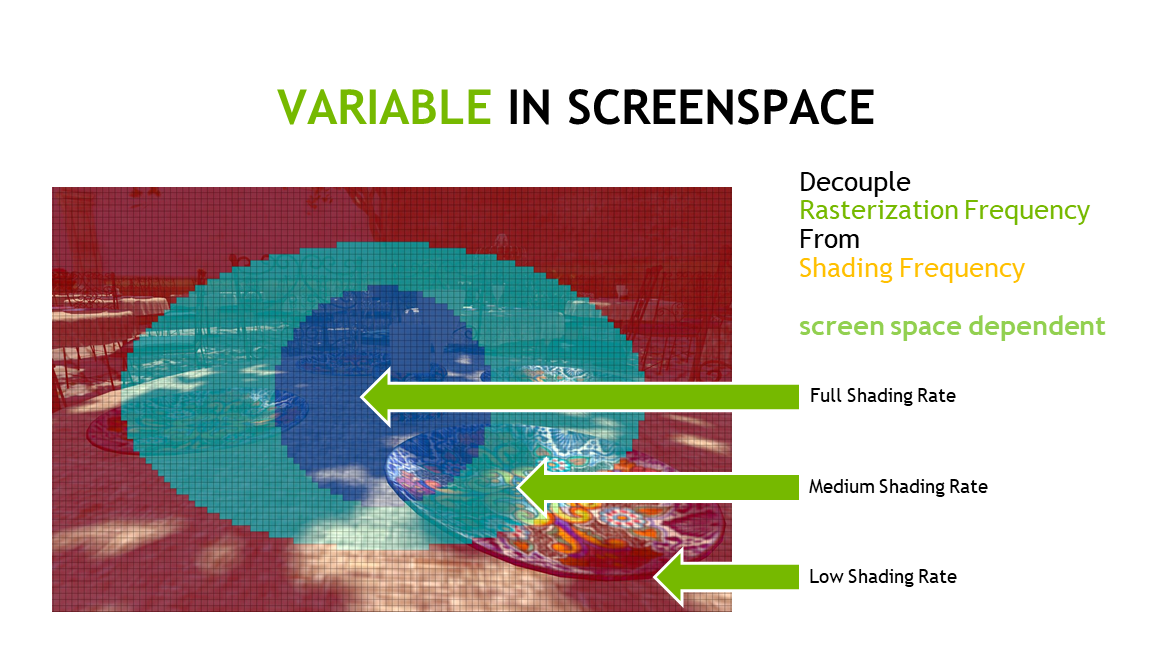
The shading rate can be screen-space dependent, so the area where the user is looking receives the full shading rate, an area around it receives a lower shading rate, and the peripheral is rendered with a yet-lower shading rate. This mode is called foveated rendering and biases the rendering workload towards the area where the user is looking.
Impact of VRS on Quality
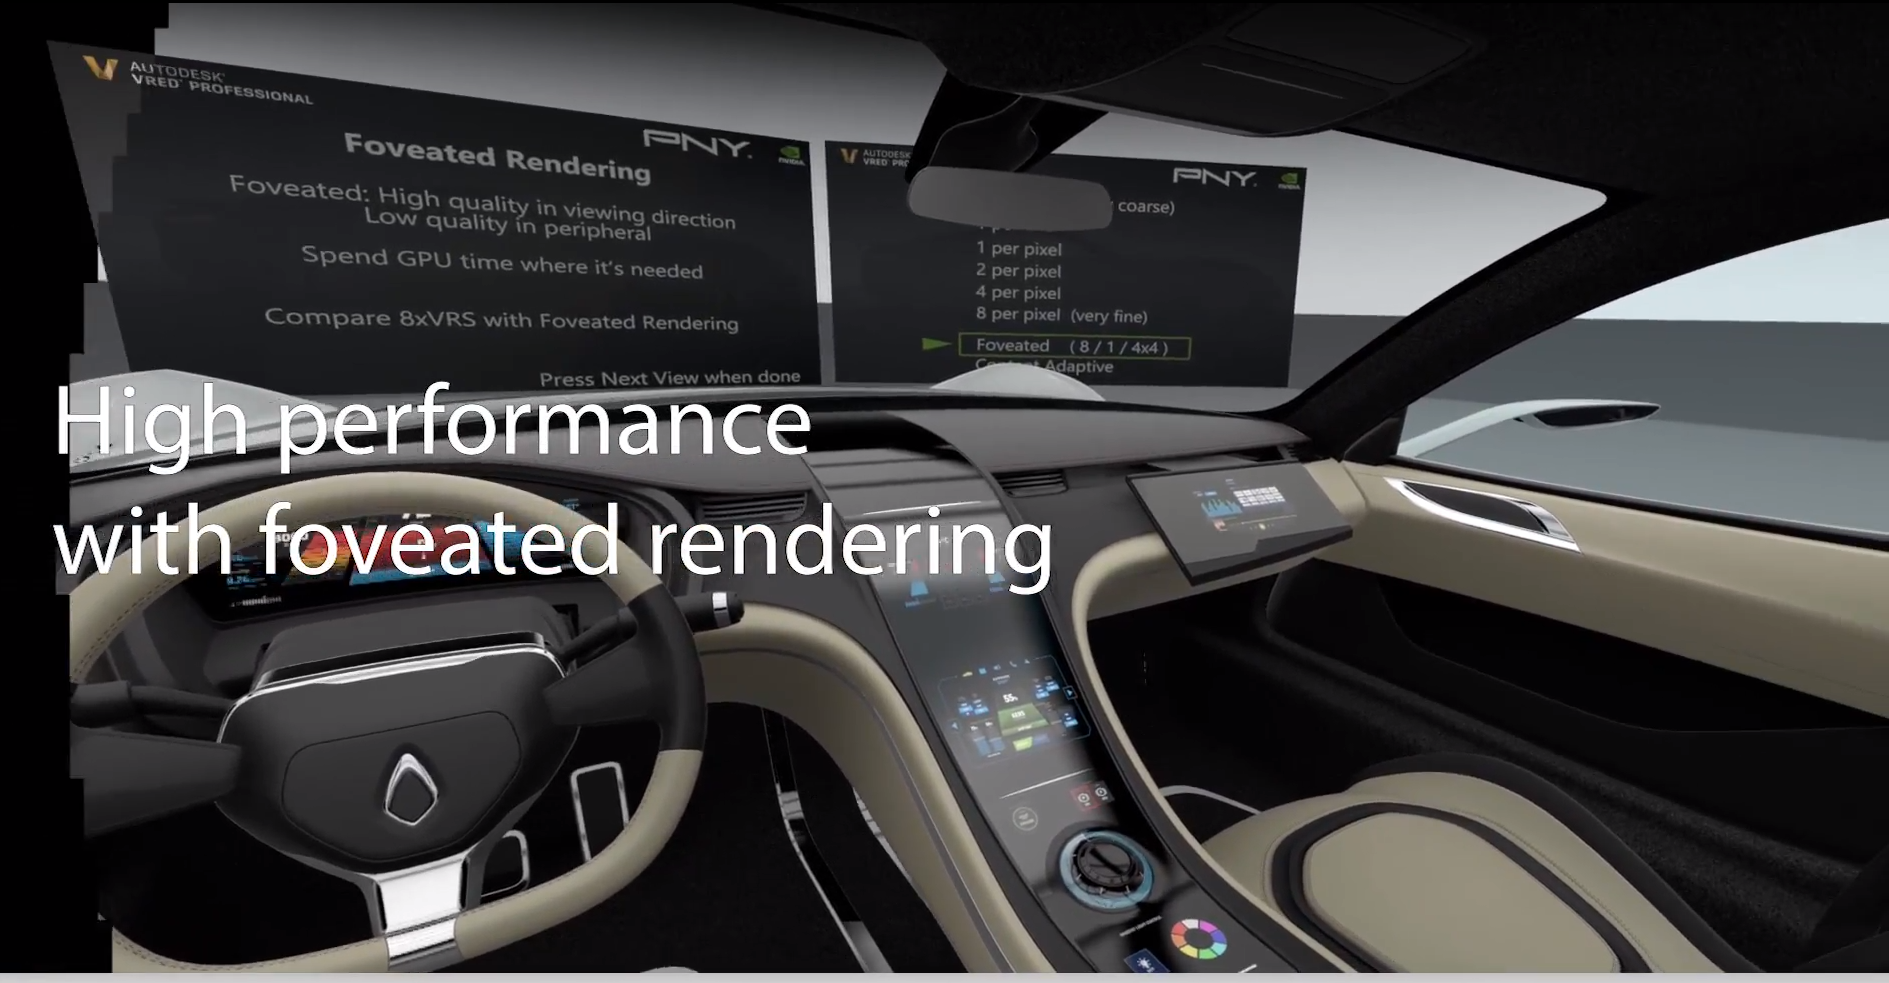
To examine the effects of VRS in Autodesk VRED, we partnered with PNY and Autodesk to create an impressive, interactive demo shown at SIGGRAPH earlier this year. It’s based on a design review scenario in VR running on two NVIDIA Quadro RTX 8000 GPUs in VR SLI. In this demo, VRS is used not only for foveated rendering, but also to show the effects of content adaptive shading by setting the shading rate dependent on the material. The following screenshots were taken from this demo in Autodesk VRED.
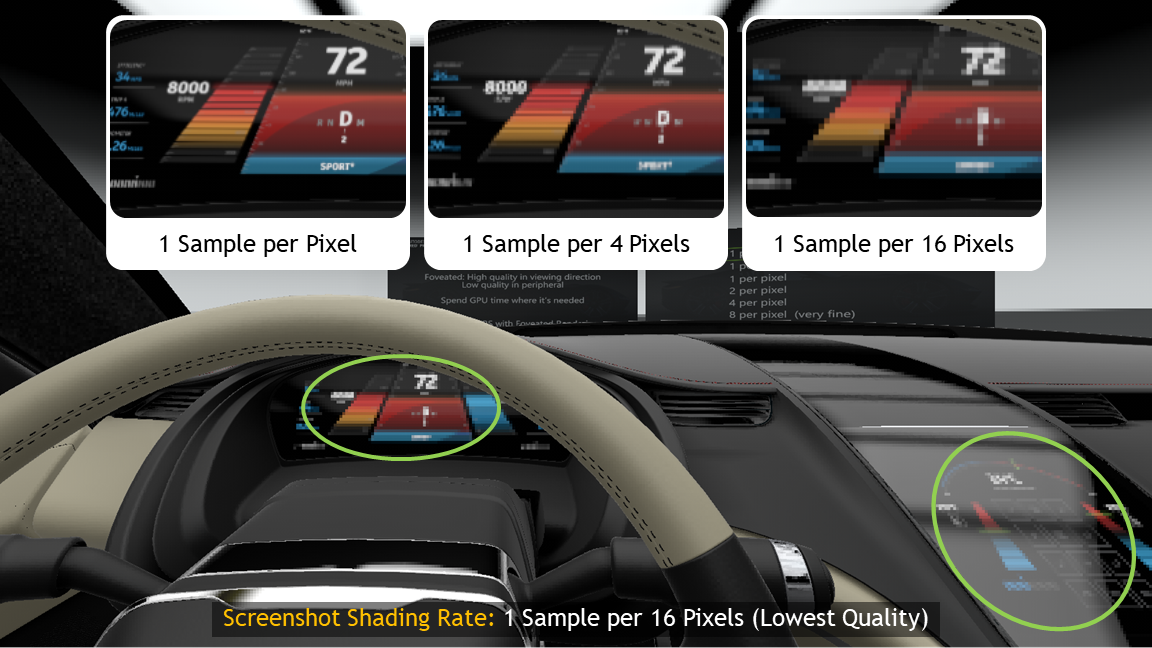
First we want to show examples of how the different VRS shading rates impact the rendering quality of different kinds of materials. Materials with high detail or high frequency show the strongest degradation in quality when rendered with a lower shading rate. Especially materials with text, such as the dashboard in our screenshots, should not be reduced in shading rate, to retain readability.
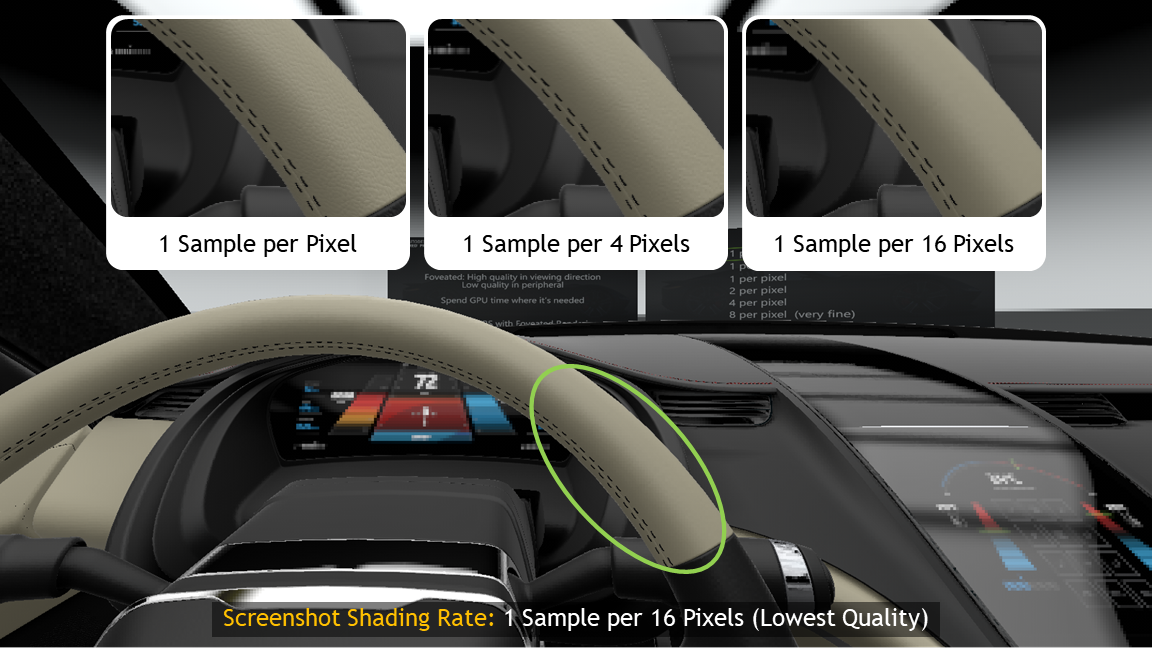
Other materials show a more subtle change in quality when rendered at different VRS levels. For example, the leather on the steering wheel in the following screenshot has a subtle structure on it which will get lost in low shading rates, but this effect is much harder to spot in the application compared to the dashboard example.
Some materials, especially materials with low detail, show almost no change when they are rendered with lower shading rates. The smooth surfaces of the car’s interior are great examples of this.
As we have seen, there is no single shading rate which would be ideal for this scene. While the text on the dashboard requires a high shading rate to avoid a strong degradation of the experience, the smooth surfaces could get away with a much lower shading rate which would increase the performance significantly.
To optimize shading rate, VRS provides controls for specifying the shading rate not only per image region, but also per material. This technique is called “Content Adaptive Shading” which provides a mechanism for rendering every material with the quality it needs to produce a high quality and high performance VR experience.
With Content Adaptive Shading it is even possible to render materials in a higher quality than just shading one sample per pixel, to perform selective super sampling. The carbon fibre material in our demo is a great example for this — many procedural materials fall into this category.

This variant of Content Adaptive Shading can be interesting for non-VR experiences, too. If a scene has a few materials that are prone to flicker with low anti-aliasing settings, the overall quality of the rendering can be improved by only rendering these materials at a high quality, without the performance impact of rendering the whole scene at a higher quality level.
Autodesk VRED VRS Demo
The Autodesk VRED VRS demo shows the effect of the available VRS settings on different materials in three stages.
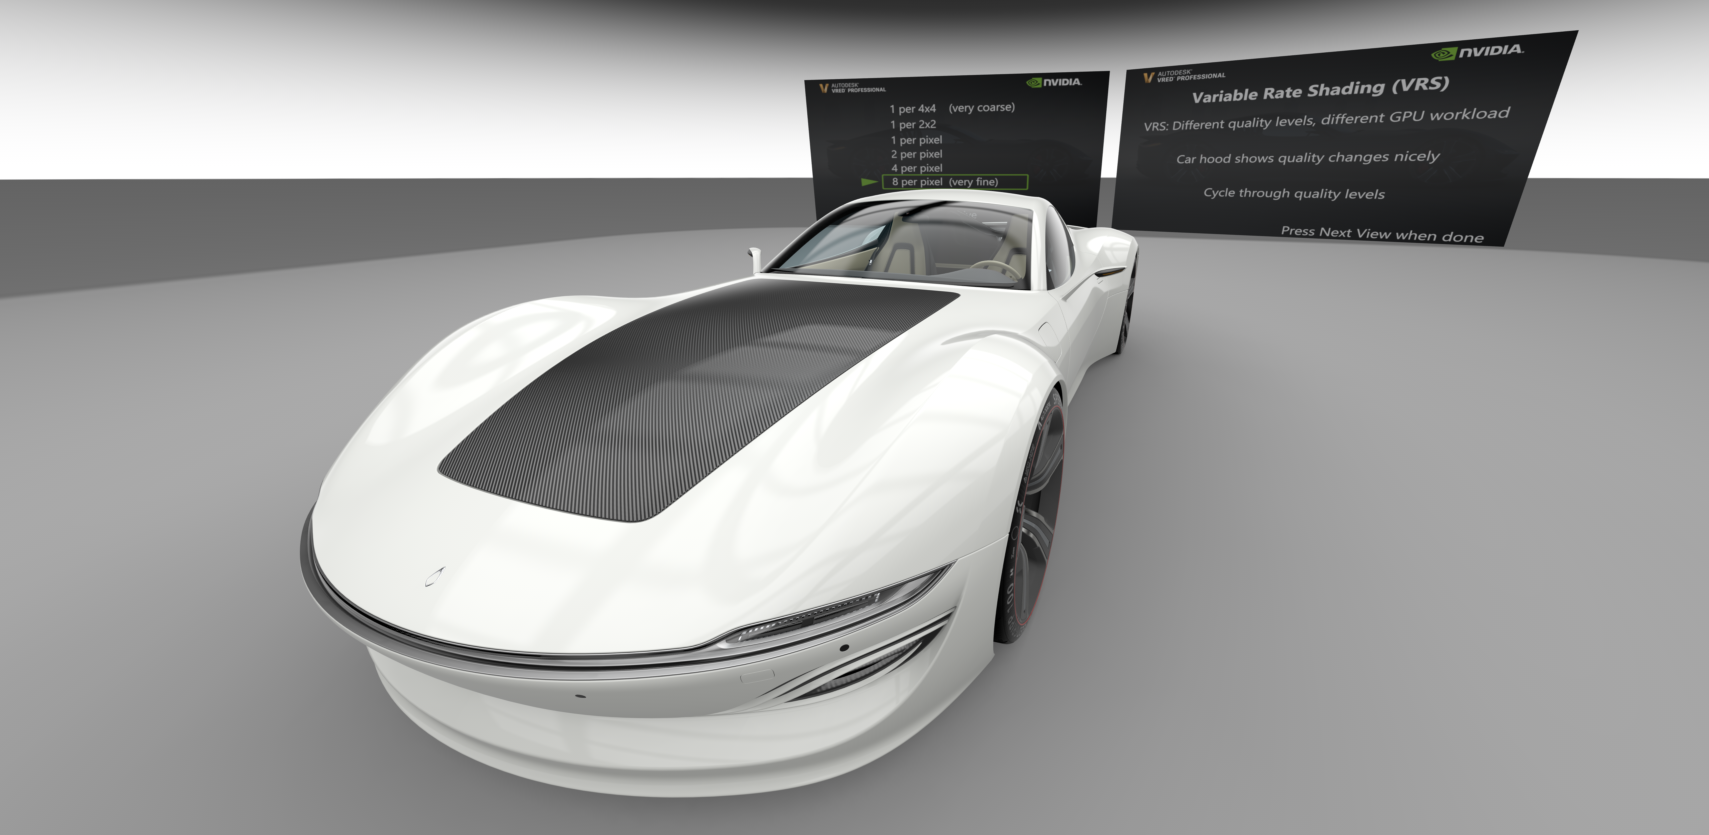
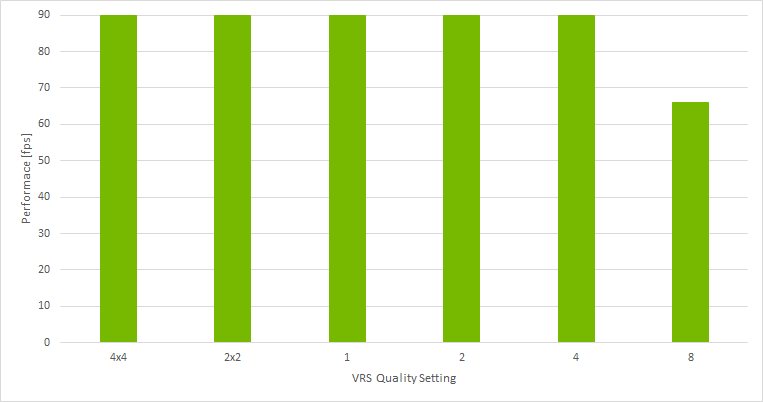
VRS Quality Levels
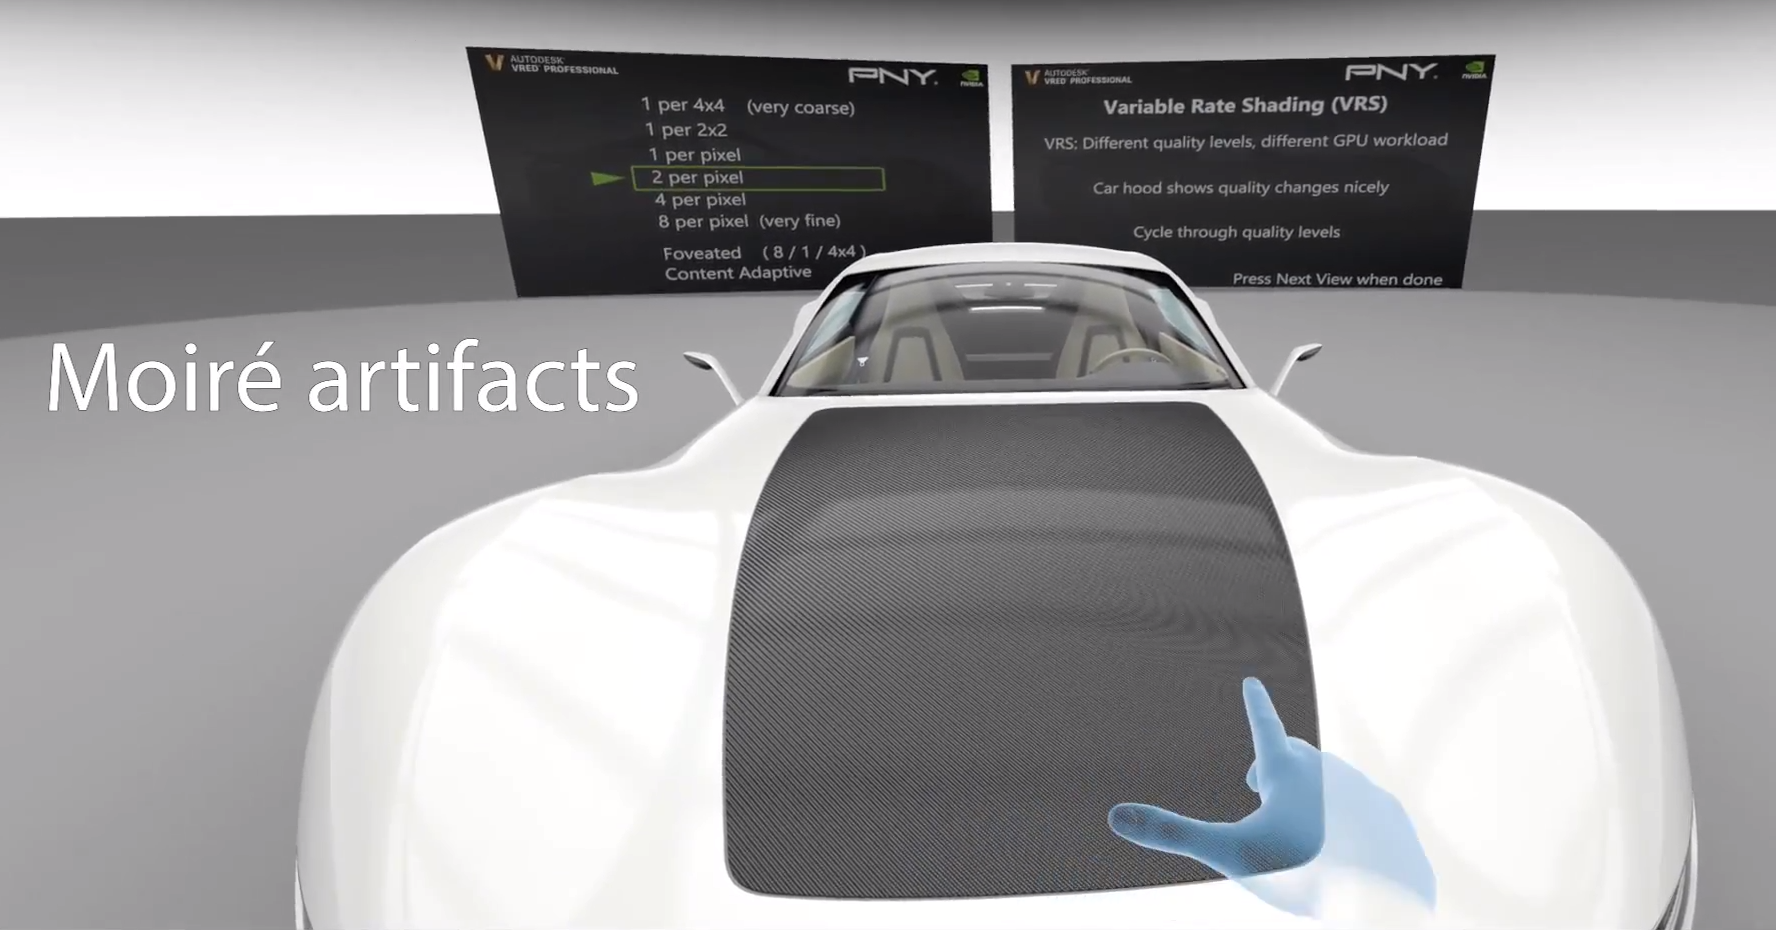
The first stage can toggle through a number of VRS quality levels that are applied to the whole screen. The user can see that the material on the hood looks better with higher VRS quality settings.
Even with two and four samples per pixel, this material still shows slight moiré effects in certain areas.
Rendering the scene with eight samples per pixel results in the best quality, and removes the moiré artifacts from the rendering.
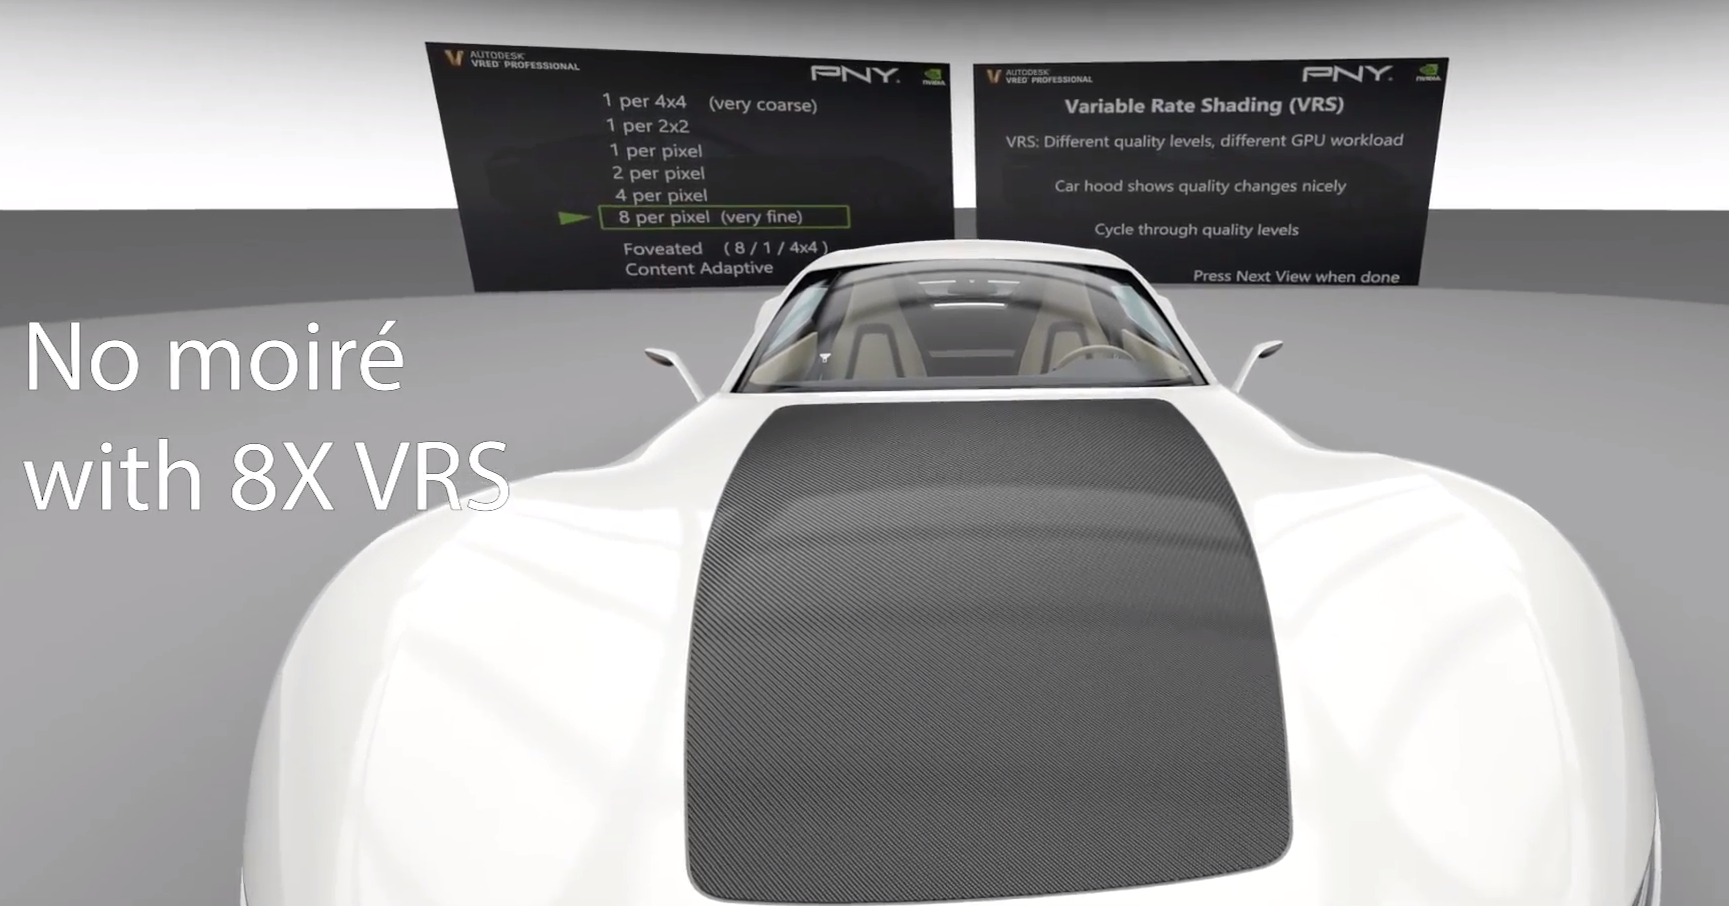
In the system used for our demo, rendering the scene using VR SLI on two NVIDIA Quadro RTX 8000 GPUs, the performance in this view is at full 90 frames per second for all VRS modes, up to four samples per pixel. Increasing the VRS quality to eight samples per pixel results in a frame rate drop to 66 frames per second. This quality improvement comes with a high cost because this setting is applied for the whole screen.
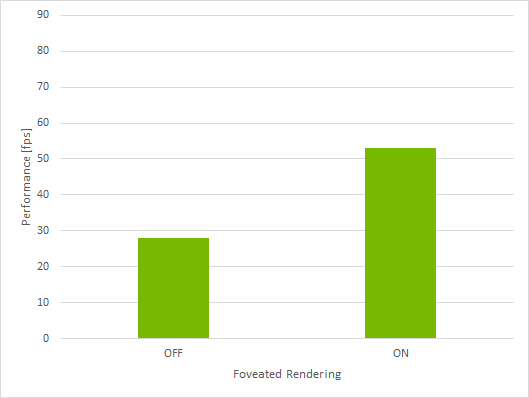
Foveated Rendering
The second stage shows the effects of foveated rendering. When using eight samples per pixel over the whole screen for a complex scene, the rendering performance can drop and degrade the VR experience.
Foveated rendering makes use of the eye tracking technology available in the HTC Vive Pro Eye to detect where the user is looking. The region of the display where the user is looking is rendered with a higher quality sampling rate to produce higher image quality in that region; the sampling rate and corresponding image quality fall off toward the periphery. This results in a high performance, high quality VR experience.
For the interior viewpoint shown above, using eight samples per pixel over the entire screen results in a frame-rate of 28 frames per second, which is not high enough for a good VR experience. Enabling foveated rendering almost doubles this performance. With 53 frames per second the VR experience is noticeably better.
Content-Adaptive Rendering
The third stage shows a technique called Content Adaptive Rendering. With foveated rendering, some materials can start flickering in the periphery, because they react strongly to VRS quality changes.
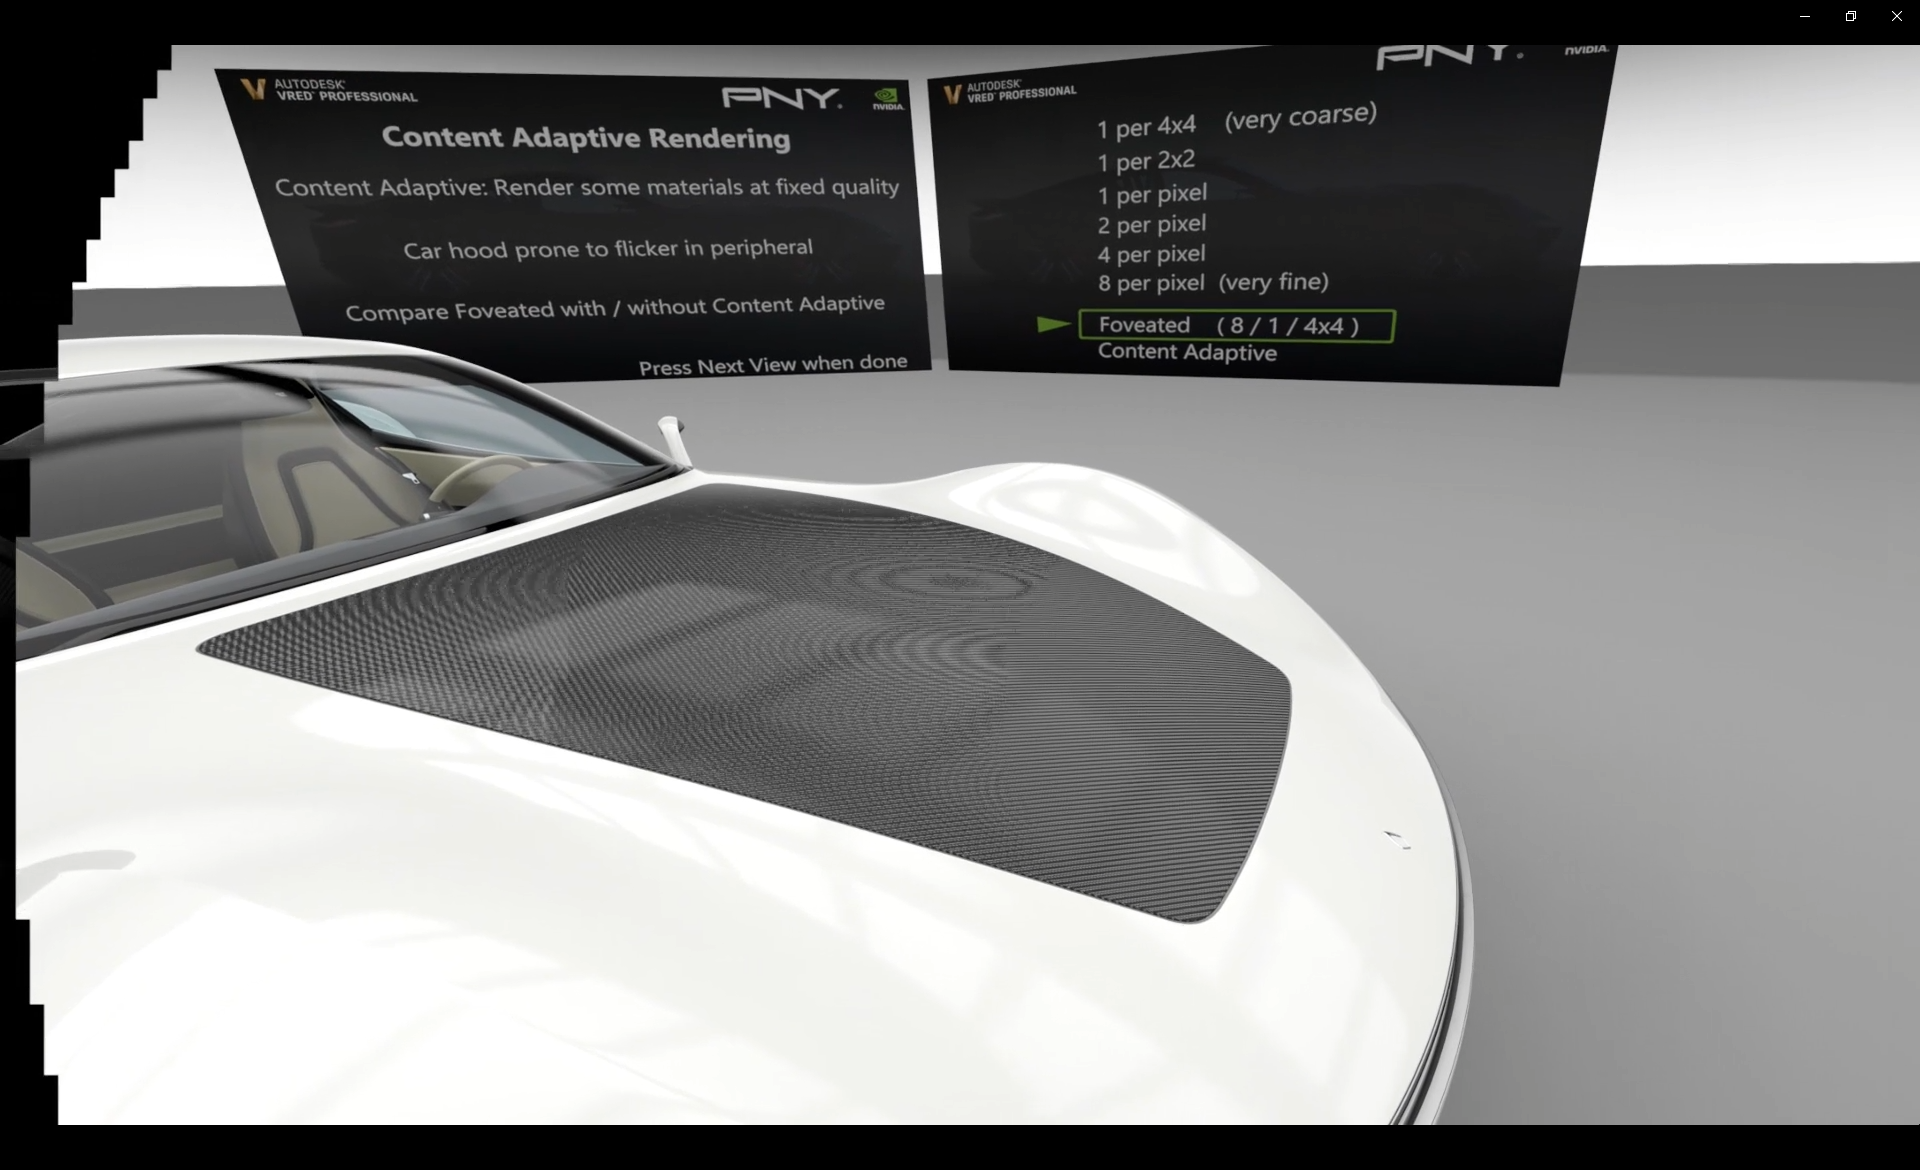
These materials can be selected for a high quality setting, overriding any quality setting dictated by foveated rendering. This may lower the performance a little, but will still result in superior performance and image quality as compared to standard non-VRS rendering.
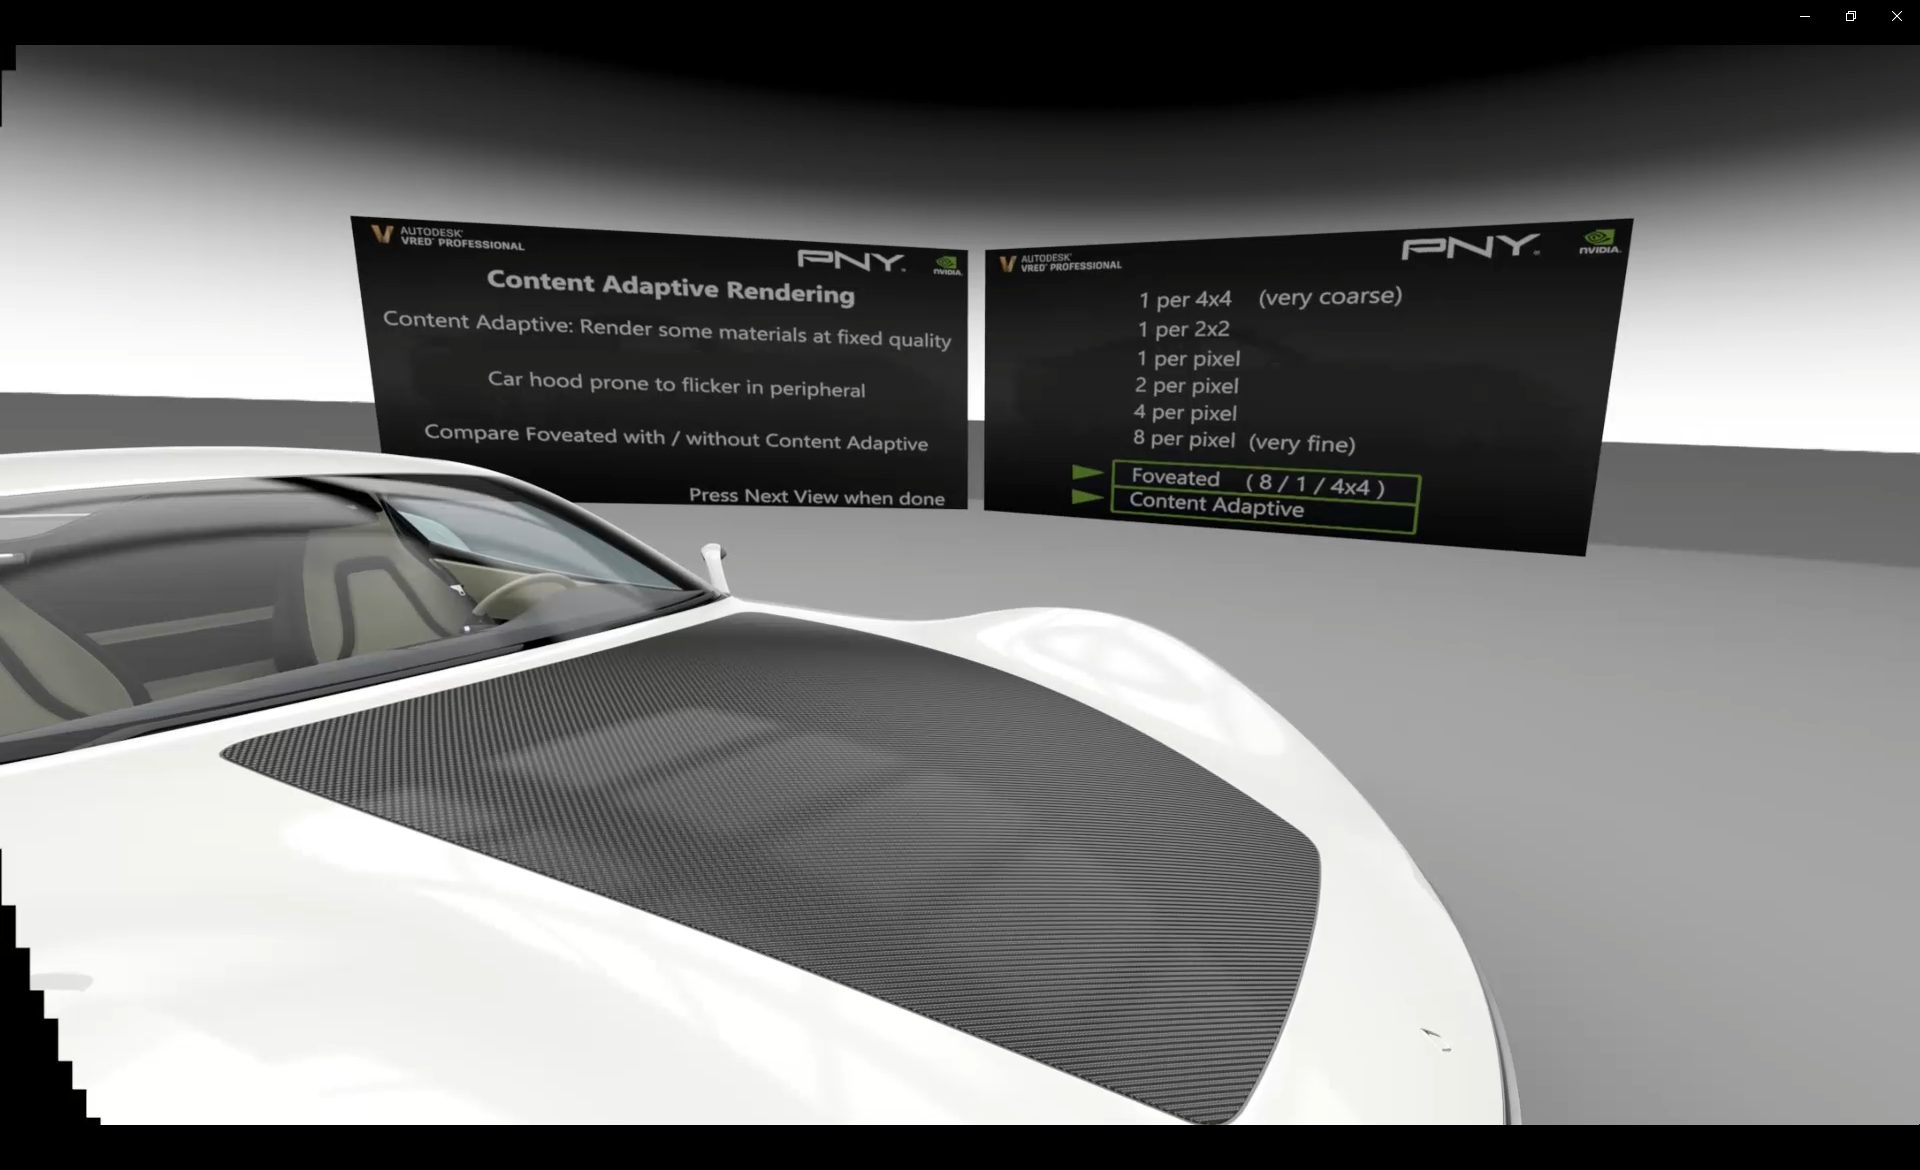
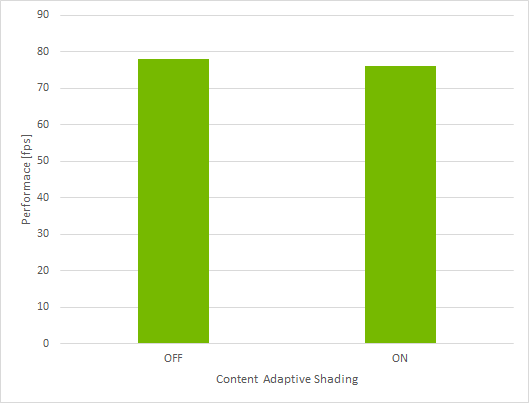
For the viewpoint shown above, the lower VRS quality in the periphery makes the car hood flicker noticeably. With foveated rendering alone, the performance for this view is 78 frames per second. The frame rate alone would indicate a great VR experience, but the flickering in the periphery can distract the user. Enabling Content Adaptive Rendering lowers the frame rate to 76 frames per second, a drop that is not noticeable. Content Adaptive Rendering removes the flickering from the car hood though, greatly improving the VR experience.

To implement VRS in your own application, refer to the samples provided for OpenGL, Vulkan and DirectX available in the VRWorks SDK downloadable here: https://developer.nvidia.com/vrworks .