NVIDIA Vision Programming Interface (VPI) is a computer vision and image-processing software library from NVIDIA that enables you to implement algorithms that are accelerated on different hardware backends available on NVIDIA Jetson embedded devices and discrete GPUs.
Some of the algorithms in the library include filtering methods, perspective warp, temporal noise reduction, histogram equalization, stereo disparity, and lens distortion correction. VPI provides easy-to-use Python bindings, along with a C++ API.
In addition to interfacing with OpenCV, VPI is capable of interoperating with PyTorch and other libraries based on Python. In this post, we show you how this interoperability works through a PyTorch-based object detection and tracking example. For more information, see the Vision Programming Interface (VPI) page and Vision Programming Interface documentation.
Interoperability with PyTorch and other libraries
You may have to use multiple libraries depending on the application that you are implementing in computer vision and deep learning pipelines. One of the challenges in developing such pipelines is the efficiency with which these libraries interact with each other. For instance, there could be performance issues due to memory copies when the image data is being exchanged between them.
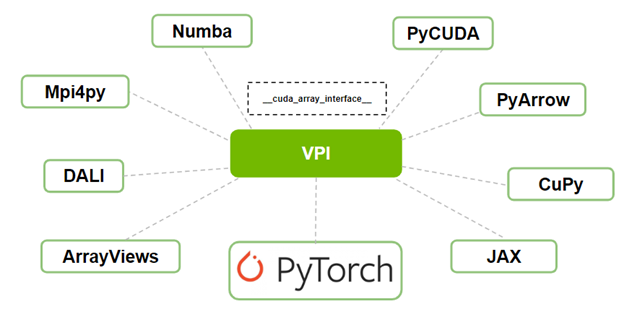
With VPI, you now have interoperability available with PyTorch or any other library that supports the __cuda_array_interace__. The __cuda_array_interface__ (CUDA Array Interface) is an attribute in Python that enables interoperability between different implementations of GPU array-like objects in various projects, such as libraries.
The array object, such as images, may be created in one library and modified in another, without copying the data in the GPU or passing it through the CPU.
Temporal noise reduction to improve object detection and tracking
Noise is a common characteristic across frames in a video. Such temporal noise negatively impacts the performance of the object detection and tracking algorithm in videos.
The VPI library provides a temporal noise reduction (TNR) algorithm, which is a common method used in computer vision applications to reduce noise in video data. For more information, see Reducing Temporal Noise on Images with NVIDIA VPI on NVIDIA Jetson Embedded Computers.
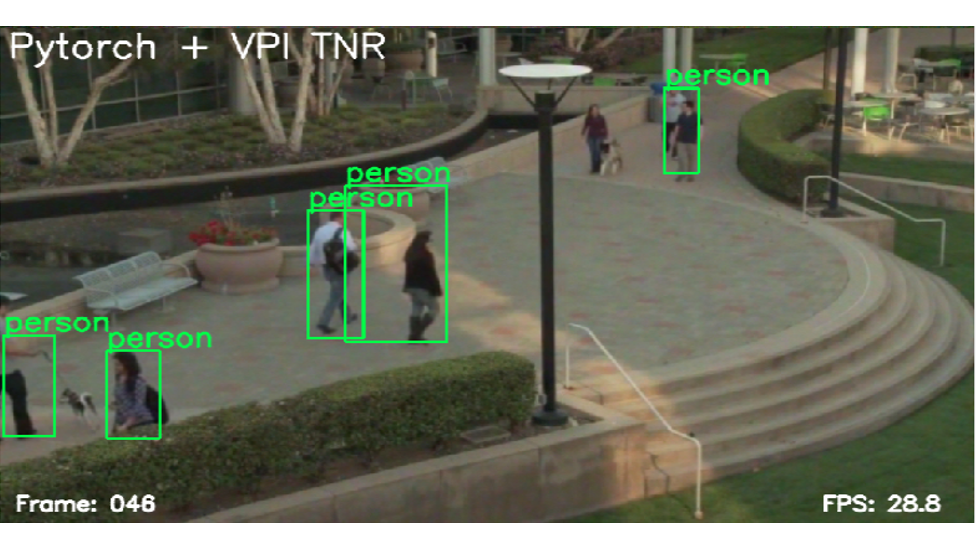
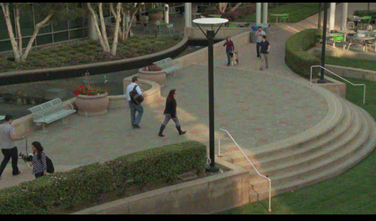
In this walkthrough, you use a PyTorch-based object detection and tracking example on a noisy video (Figure 2). You then apply the TNR algorithm from VPI to reduce noise, thus improving object detection and tracking.
We show that both VPI and PyTorch work seamlessly without any memory copies during the execution of algorithms from both VPI and PyTorch.
The example covers the following:
- PyTorch object detection and tracking on raw input video
- PyTorch object detection and tracking on cleaned input video by VPI TNR
- Interoperability between VPI and PyTorch using the CUDA array interface
PyTorch object detection and tracking on raw input video
First, start by defining a PyTorch-based application to detect objects in an image. This example application is based on the SSDLite with MobileNetV3 backbone for object detection using PyTorch and Torchvision Example.
Create a class called PyTorchDetection to handle all PyTorch objects and calls. When creating an object of this class, the application is loading a pretrained, deep-learning model for object detection to the GPU for inference only. The following code example shows the needed imports and class constructor definition:
import torch
import torchvision

class PyTorchDetection:
    def __init__(self):
       assert torch.cuda.is_available()
       self.cuda_device = torch.device('cuda')
       self.convert = torchvision.transforms.Compose([
           torchvision.transforms.ConvertImageDtype(torch.float32),
           torchvision.transforms.Lambda(lambda x: x.permute(2, 0, 1)),
           torchvision.transforms.Lambda(lambda x: x.unsqueeze(0)),
       ])
       model = torchvision.models.detection.ssdlite320_mobilenet_v3_large(
pretrained=True)
       self.torch_model = model.eval().to(self.cuda_device)
The PyTorchDetection class is also responsible for creating a CUDA image frame from an array, effectively uploading it to the GPU. Later, you use OpenCV to read an input video from a file, where each video frame is a NumPy array that serves as input for this class creation function.
In addition, the PyTorchDetection class can convert the CUDA image frame into a CUDA tensor object, making it ready for model inferencing, and converting a VPI-based CUDA frame into a tensor. This last conversion uses the __cuda_array_interface__ interoperability of VPI to avoid copying the frame.
    def CreateCUDAFrame(self, np_frame):
        return torch.from_numpy(np_frame).to(self.cuda_device)

    def ConvertToTensor(self, cuda_frame):
        return self.convert(cuda_frame)

    def ConvertFromVPIFrame(self, vpi_cuda_frame):
        return torch.as_tensor(vpi_cuda_frame, device=self.cuda_device)
Apart from the functions defined earlier, the PyTorchDetection class defines a function to detect and draw objects in the current OpenCV frame, given a scores_threshold value:
   def DetectAndDraw(self, cv_frame, torch_tensor, title, scores_threshold=0.2):
       with torch.no_grad():
           pred = self.torch_model(torch_tensor)
       (...)
For this post, we have omitted the code to draw attention to the PyTorch model’s prediction results. By downloading or using the code, you accept the terms and conditions of this code here. You can download and review the code.
The next section explains how to use VPI to reduce noise in the input video, coupling VPI with PyTorch to improve its object detection.
PyTorch object detection and tracking on cleaned input video by VPI TNR
In this section, define a VPI-based utility class, VPITemporalNoiseReduction, to clean up noise from video frames.
When creating an object of this class, the application loads the main VPI TNR object and a VPI-based CUDA frame to store the cleaned output. The following code example shows the needed import and class constructor definition:
import vpi

class VPITemporalNoiseReduction:
   def __init__(self, shape, image_format):
       if (image_format == 'BGR8'):
           self.vpi_image_format = vpi.Format.BGR8
       else:
           self.vpi_image_format = vpi.Format.INVALID
       self.vpi_output_frame = vpi.Image(shape, format=self.vpi_image_format)
       self.tnr = vpi.TemporalNoiseReduction(shape, vpi.Format.NV12_ER, version=vpi.TNRVersion.V3, backend=vpi.Backend.CUDA)
The constructor of the VPITemporalNoiseReduction class expects the shape (image width and height) and format of each input image frame. For simplicity, you are accepting only BGR8 image formats, as this is the format used by OpenCV when reading an input video.
Also, you are creating the VPI image to store the output frame using the provided shape and format. The TNR object is then constructed for this shape, using the TNR code version 3 and CUDA backend. The input format for TNR is NV12_ER, different from the one in the input image frame. You deal with converting frames in the Denoise utility function next.
   def Denoise(self, torch_cuda_frame, tnr_strength=1.0):
       vpi_input_frame = vpi.asimage(torch_cuda_frame, format=self.vpi_image_format)
       with vpi.Backend.CUDA:
           vpi_input_frame = vpi_input_frame.convert(vpi.Format.NV12_ER)
           vpi_input_frame = self.tnr(vpi_input_frame, preset=vpi.TNRPreset.OUTDOOR_LOW_LIGHT, strength=tnr_strength)
           vpi_input_frame.convert(out=self.vpi_output_frame)
       return self.vpi_output_frame
The last function does the actual cleanup of input image frames. This function removes noise from a PyTorch-based input CUDA frame, returning an output VPI-based CUDA frame.
- The PyTorch CUDA frame is first converted to VPI, using the
vpi.asimagefunction.torch_cuda_frameshares the same memory space ofvpi_input_frame: that is, there are no memory copies involved. - Next, the input frame is converted from the given input format (BGR8) to NV12_ER in CUDA for processing.
- The TNR algorithm is executed on this converted input frame, using the TNR preset
OUTDOOR_LOW_LIGHTand a given TNR strength. - The cleaned input frame (the output of the TNR algorithm) is converted back to the original format (BGR8) and stored in the VPI-based CUDA output frame.
- The resulting output frame is returned for later use by PyTorch.
Interoperability between VPI and PyTorch using the CUDA Array Interface
To wrap up, you define a MainWindow class in the main module. This class is based on PySide2 and provides a graphical user interface for this example.
The window interface shows two output image frames, one using only PyTorch for detection and another using PyTorch after VPI TNR. Also, the window interface contains two sliders to control the scores threshold for PyTorch detection and TNR strength for VPI temporal noise removal.
import cv2
import numpy as np
(...)
from PySide2 import QtWidgets, QtGui, QtCore
(...)
from vpitnr import VPITemporalNoiseReduction
from torchdetection import PyTorchDetection

class MainWindow(QMainWindow):
   def __init__(self, input_path):
       super().__init__()
       #-------- OpenCV part --------
       self.video_capture = cv2.VideoCapture(input_path)
       if not self.video_capture.isOpened():
           self.Quit()
       self.input_width = int(self.video_capture.get(cv2.CAP_PROP_FRAME_WIDTH))
       self.input_height = int(self.video_capture.get(cv2.CAP_PROP_FRAME_HEIGHT))
       self.output_video_shape = (self.input_height * 2, self.input_width, 3)
       self.output_frame_shape = (self.input_height, self.input_width, 3)
       self.cv_output_video = np.zeros(self.output_video_shape, dtype=np.uint8)
       #-------- Main objects of this example --------
       self.torch_detection = PyTorchDetection()
       self.vpi_tnr = VPITemporalNoiseReduction((self.input_width,
                       self.input_height), 'BGR8')
       (...)

   def UpdateDetection(self):
       in_frame = self.cv_input_frame
       if in_frame is None:
           return
       cuda_input_frame = self.torch_detection.CreateCUDAFrame(in_frame)
       # -------- Top Frame: No VPI ---------
       cuda_tensor = self.torch_detection.ConvertToTensor(cuda_input_frame)
       self.torch_detection.DetectAndDraw(self.TopFrame(), cuda_tensor,
                  'Pytorch only (no VPI)', self.scores_threshold)
       # -------- Bottom Frame: With VPI ---------
       vpi_output_frame = self.vpi_tnr.Denoise(cuda_input_frame,
                                               self.tnr_strength)
       with vpi_output_frame.rlock_cuda() as cuda_frame:
           cuda_output_frame=self.torch_detection.ConvertFromVPIFrame(cuda_frame)
           cuda_tensor = self.torch_detection.ConvertToTensor(cuda_output_frame)
           self.torch_detection.DetectAndDraw(self.BottomFrame(), cuda_tensor, 'Pytorch + VPI TNR', self.scores_threshold)
       (...)
The constructor of the MainWindow class expects the path for the input video. It uses OpenCV to read the input video and create an output video frame with twice the height of the input video. This is used to store two output frames, one with the PyTorch-only output and another with the VPI+PyTorch output.
The constructor also creates the objects for PyTorch detection and VPI TNR. For this post, we omitted the code for creating the widgets of the graphical user interface and handling its callbacks. We also omitted the code for creating the main window and starting the application. For more information about this part of TNR code, download the example.
The UpdateDetection function, called when a new input video frame is available, creates a PyTorch-based CUDA input frame from the NumPy OpenCV input frame. It then converts it to a tensor to do the detect and draw of the PyTorchDetection class. This pipeline for the top frame runs PyTorch detection directly in the input video frame.
The next pipeline for the bottom frame starts by denoising the PyTorch CUDA-based input frame. The denoised output is a VPI-based CUDA frame named vpi_output_frame, which is locked for reading in CUDA, using the rlock_cuda function. This function provides the __cuda_array_interface__ for VPI CUDA interoperability in the cuda_frame object. This object is converted to the PyTorch CUDA frame and then to tensor. Again, the detect and draw function is called on the result of the pipeline. This second pipeline runs PyTorchDetection after the VPI denoise functionality.
Results
Figure 3 shows the results of PyTorch object detection and tracking without and with VPI TNR on the noisy input video of pedestrians in a public place. As you can see from the output videos with annotations, the detection and tracking results are improved when applying denoising before detection (right).
The frames per second (FPS) shown (32.8 for PyTorch only and 32.1 for VPI + PyTorch) on the bottom right of the video frames show that adding VPI to the PyTorch detection pipeline does not add too much overhead. This is in part due to avoiding more than 20Mb per frame copies from CUDA memory to the CPU memory and back, which was enabled through using __cuda_array_interface__.
Summary
In this post, we showed how interoperability works between VPI and other libraries that support __cuda_array_interface__ using PyTorch object detection and tracking as an example. You applied temporal noise reduction from VPI before object detection and tracking to improve it. We also demonstrated that there is no loss of performance with the addition of VPI in the PyTorch pipeline.
For more information, see Vision Programming Interface (VPI) page or watch the VPI and PyTorch Interoperability Demo on-demand webinar.
