
This post is the second in a series about optimizing end-to-end AI.
In this post, I discuss how to use ONNX to transition your AI models from research to production while avoiding common mistakes. Considering that PyTorch has become the most popular machine learning framework, all my examples use it but I also supply references to TensorFlow tutorials.
Interoperability with ONNX
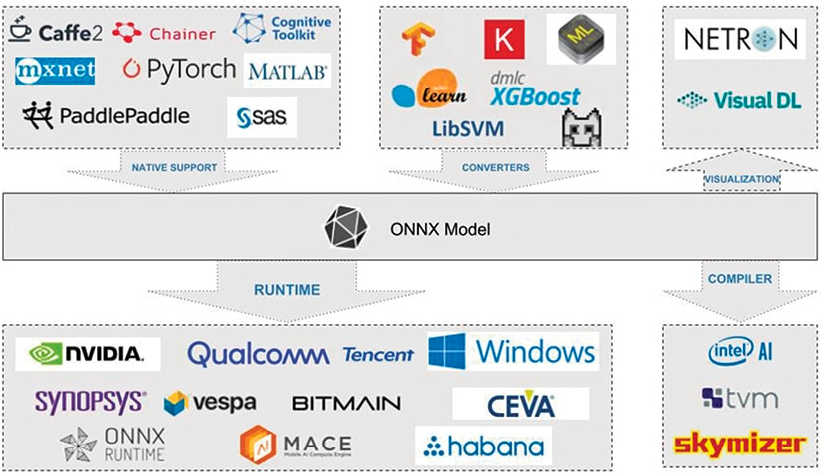
ONNX (Open Neural Network Exchange) is an open standard for describing deep learning models designed to facilitate framework compatibility.
Consider the following scenario: you can train a neural network in PyTorch, then run it through the TensorRT optimizing compiler before deploying it to production. This is just one of many interoperable deep-learning tool combinations, which include visualizations, performance profilers, and optimizers.
Researchers and DevOps no longer have to make do with a single toolchain that is unoptimized for modeling and deployment performance.
To do this, ONNX defines a standard set of operators as well as a standard file format based on the Protocol Buffers serialization format. The model is described as a directed graph with edges indicating data flow between the various node inputs and outputs, and nodes expressing an operator and its parameters.
Exporting a model
I defined a simple model consisting of two Convolution-BatchNorm-ReLu blocks for the following cases.
import torch

class Model(torch.nn.Module):
    def __init__(self):
        super().__init__()

        self.model = torch.nn.Sequential(
            torch.nn.Conv2d(3, 16, 3, 2),
            torch.nn.BatchNorm2d(16),
            torch.nn.ReLU(),
            torch.nn.Conv2d(16, 64, 3, 2),
            torch.nn.BatchNorm2d(64),
            torch.nn.ReLU()
        )

    def forward(self, x):
        return self.model(x)
You can use the PyTorch built-in exporter to export this model to ONNX by creating a model instance and calling torch.onnx.export. You must also supply a dummy input with the appropriate input dimensions and data type, as well as symbolic names for the given inputs and outputs.
In the code example, I defined that index 0 for both inputs and outputs is dynamic to run the model with varying batch sizes at runtime.
import torch

model = Model().eval().to(device="cpu")
dummy_input = torch.rand((1, 3, 128, 128), device="cpu")

torch.onnx.export(
    model,
    dummy_input,
    "model.onnx",
    input_names=["input"],
    output_names=["output"],
    dynamic_axes={"input": {0: "N"}, "output": {0: "N"}},
    opset_version=13
)
Internally, PyTorch calls torch.jit.trace, which executes the models using the given arguments and records all operations during that execution as a directed graph.
Tracing unrolls loops and if statements, producing a static graph identical to the traced run. There is no data-dependent control flow being captured. This export type is adequate for many use cases but keep these limitations in mind.
If dynamic behavior is required, you can use scripting. As a result, the model must be exported to a ScriptModule object before being converted to ONNX, as shown in the following example.
import torch

model = Model().eval().to(device="cpu")
dummy_input = torch.rand((1, 3, 128, 128), device="cpu")
scripted_model = torch.jit.script(model)

torch.onnx.export(
    scripted_model,
    dummy_input,
    "model.onnx",
    input_names=["input"],
    output_names=["output"],
    dynamic_axes={"input": {0: "N"}, "output": {0: "N"}},
    opset_version=13
)
Converting a model to a ScriptModule object is not always trivial and usually necessitates some code changes. For more information, see Avoiding Pitfalls and TorchScript.
Because there are no data dependencies in the forward call, you can convert the model to a scriptable model without making any more changes in the code.
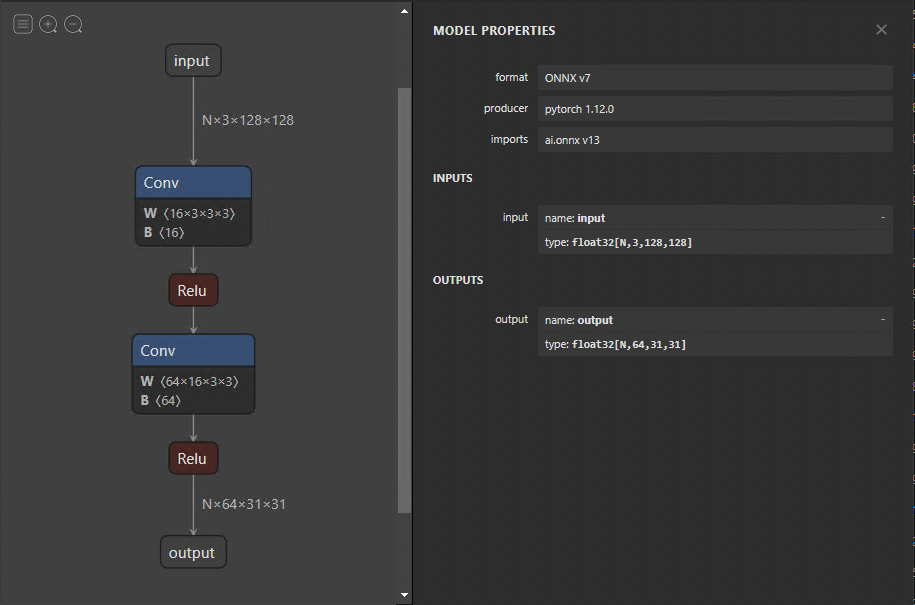
When the model has been exported, you can visualize it using Netron. The default view provides a graph of models and a properties panel (Figure 2). If you select the input or output, the properties panel displays generic information, such as name, OpSet, and dimensions.
Similarly, selecting a node in the graph reveals the node’s properties. This is an excellent approach to check whether your model was exported correctly and also to debug and analyze problems later on.
Custom operator
Right now, ONNX currently defines about 150 operations. They range in complexity from arithmetic addition to a complete long short-term memory (LSTM) implementation. Although this list grows with each new release, you may encounter times when an operator from your research model is not included.
In such a scenario, you can define torch.autograd.Function, which includes the custom functionality in the forward function and a symbolic definition in symbolic. In this case, the forward function implements a no-operation by returning its input.
class FooOp(torch.autograd.Function):
@staticmethod
def forward(ctx, input1: torch.Tensor) -> torch.Tensor:
return input1
@staticmethod
def symbolic(g, input1):
return g.op("devtech::FooOp", input1)
class FooModel(torch.nn.Module):
def __init__(self):
super().__init__()
self.model = torch.nn.Sequential(
torch.nn.Conv2d(3, 16, 3, 2),
torch.nn.BatchNorm2d(16),
torch.nn.ReLU()
)
def forward(self, x):
x = self.model(x)
return FooOp.apply(x)
model = FooModel().eval().to(device="cpu")
dummy_input = torch.rand((1, 3, 128, 128), device="cpu")
torch.onnx.export(
model,
dummy_input,
"model_foo.onnx",
input_names=["input"],
output_names=["output"],
dynamic_axes={"input": {0: "N"}, "output": {0: "N"}},
opset_version=13,
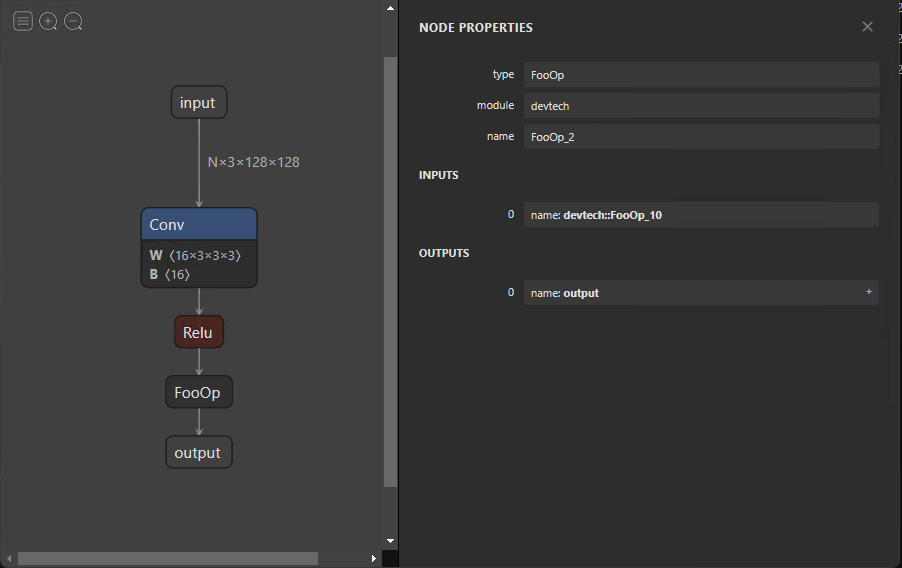
)This example demonstrates how to define a symbolic node for exporting your model to ONNX. Although the functionality of symbolic nodes is offered in the forward function, it must be implemented and provided to the runtime used to infer the ONNX model. This is specific to the execution provider and is addressed later in this post.
Modifying ONNX models
You may want to make changes to your ONNX model without having to export it again. Changes can range from changing names to eliminating entire nodes. Modifying the model directly is difficult because all the information was encoded as protocol buffers. Fortunately, you can simply alter your models using GraphSurgeon.
The following code example shows how to remove the fake FooOp node from the exported model. There are numerous other ways you can use GraphSurgeon to modify and debug the model that I can’t cover here. For more information, see the GitHub repo.
import onnx_graphsurgeon as gs
import onnx
graph = gs.import_onnx(onnx.load("model_foo.onnx"))
fake_node = [node for node in graph.nodes if node.op == "FooOp"][0]
# Get the input node of the fake node
# For example, node.i() is equivalent to node.inputs[0].inputs[0]
inp_node = fake_node.i()
# Reconnect the input node to the output tensors of the fake node, so that the first identity
# node in the example graph now skips over the fake node.
inp_node.outputs = fake_node.outputs
fake_node.outputs.clear()
# Remove the fake node from the graph completely
graph.cleanup()
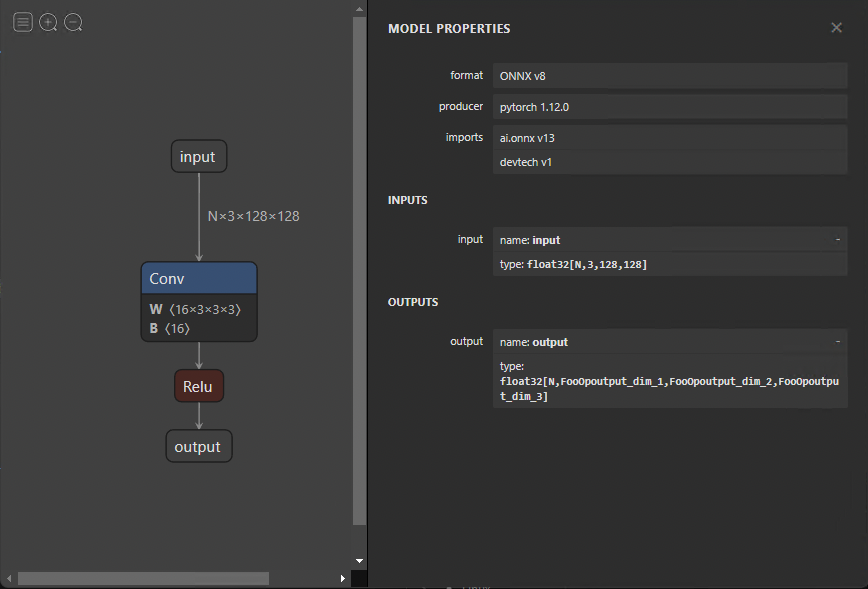
onnx.save(gs.export_onnx(graph), "removed.onnx")To remove a node, you must first load the model with the GraphSurgeon API. Next, iterate through the graph, looking for the node to replace and matching it with the FooOp node type. Replace the output tensors of its input node with its own outputs and then remove its own connection to its outputs, removing the node.
Figure 4 shows the resulting graph.
Summary
This post walked through running a model with ONNX runtime, model optimizations, and architecture considerations. If you have any further questions about these topics, reach out on Developer Forums or join NVIDIA Developer Discord.
To read the next post in this series, see End-to-End AI for NVIDIA-Based PCs: ONNX Runtime and Optimization.
Sign up to learn more about accelerating your creative application with NVIDIA technologies.