The modular and easy-to-use perception stack of NVIDIA Isaac SDK continues to accelerate the development of various mobile robots. Isaac SDK 2020.1 introduces the Python API, making it easier to build robotic applications for those who are familiar with Python.
In this post, we explore this feature and share a step-by-step guide to building your own Isaac applications with Python. We introduce Python programming in Isaac SDK with examples on how to create an application; work with codelets, modules, and data flow; and work with different data types. We wrap the post up with examples to add subgraphs to the same application and deploy it on Jetson. We also show you how to work with Jupyter notebooks, a power UI tool for Python developers. For more advanced Python developers, we’ve also included examples of deploying Isaac apps on a mobile robot as well as a collaborative robot arm in IsaacSim.
Getting started with Python programming in Isaac SDK
To guide you through the creation of an Isaac application in Python, create a mybot.py application file. Start with a new folder under the folder of apps, //apps/mybot. Create a BUILD file with the following code and save it under //apps/mybot/BUILD so that Bazel can recognize it.
load("//engine/build:isaac.bzl", "isaac_py_app")
isaac_py_app(
   name = "mybot",
   srcs = ["mybot.py"],
   data = [],
   modules=[],
   deps = [
       "//engine/pyalice",
   ],
)
In the BUILD file, //engine/pyalice is the supporting code of Python API while mybot.py is the robot application coded in Python. Put the following code into //apps/mybot/mybot.py and run it with bazel run apps/mybot:mybot. You can tell it is running by the console spew, which you can stop anytime with the classic CTRL-C.
from engine.pyalice import Application

app = Application(name="mybot")
app.run()
Point the browser to http://localhost:3000 while the app is running and you’ll see nothing in Sight, which is the visualization tool in Isaac SDK.
Getting to know codelets, modules, and data flow
Isaac SDK comes with many building blocks for robot applications, called codelets. For more information about the full list, see Component API Overview.
Some of these codelets are available as-is, such as Recorder. Others are packed as modules that must be loaded explicitly before the codelets are available. Add the following modules to the Bazel BUILD file just created to make them available for loading.
   modules = [
       "message_generators",
       "viewers",
   ],
You can now load them from Python with the application instance created before app.run:
app.load_module('message_generators')
app.load_module('viewers')
In Isaac SDK, data is generated from sensors and flows between instances of codelets until they are consumed by actuators. To create instances from loaded codelets, add the following code to the Python application before calling app.run.
node_src = app.add('src')
component_src = \
  node_src.add(app.registry.isaac.message_generators.ImageLoader, 'ImageLoader')
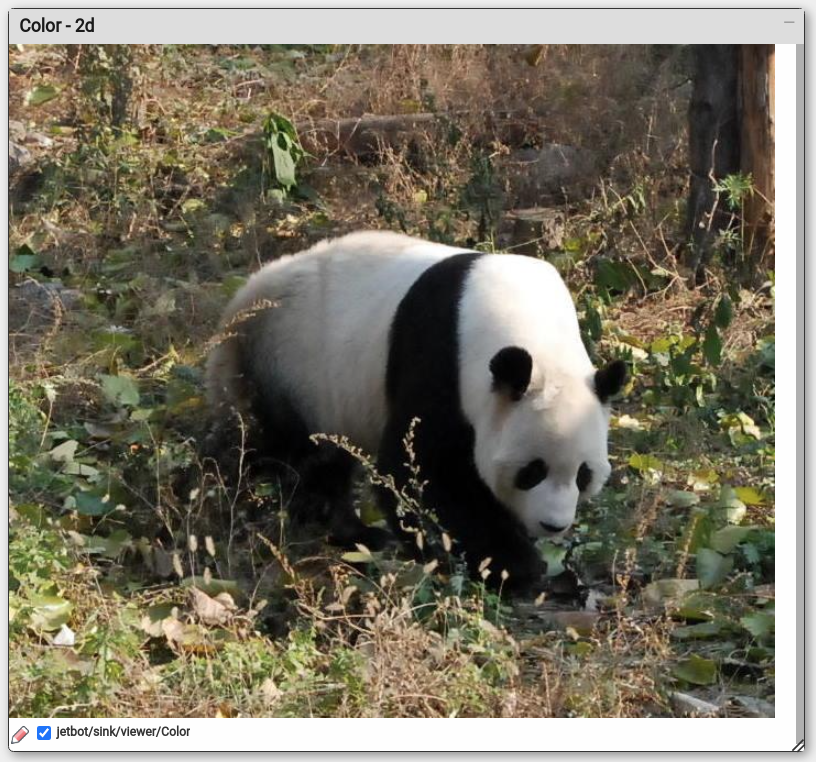
Here, a node named src is created. A component of ImageLoader, which is provided by the message_generators module, is created with the name ImageLoader and attached to the node of src. It publishes image data from a specified PNG file as ColorCameraProto messages as if they were from a real camera. You could specify the image to load data from as well as several other parameters (though they don’t matter in this sample) and how often the message is published. For more information, see isaac.message_generators.ImageLoader.
component_src.config['color_filename'] = '/home/bob/Pictures/panda.png'
component_src.config['focal_length'] = [35.0, 35.0]
component_src.config['optical_center'] = [300.0, 400.0]
component_src.config['tick_period'] = '1hz'
To visualize camera images, the ColorCameraViewer codelet would help. Similarly, you could create an instance of it with the following code:
node_sink = app.add('sink')
component_sink = \
  node_sink.add(app.registry.isaac.viewers.ColorCameraViewer, 'ColorCameraViewer')
Data should flow between codelets. However, you must make connections between them to make the data flow. From the documentation, you know that CameraGenerator has three output channels. Pick the color_left channel to which ColorCameraProto messages are published. Similarly, you could see that the ColorCameraViewer codelet reads messages from the color_listener channel. Connect them (referred to as “edge”):
app.connect(component_src, 'color', component_sink, 'color_listener')
Run the application (mybot.py) again and check Sight for the image, as shown in Figure 2.
Working with different Isaac image data types in Python
Isaac SDK allows you to work with several sources of data in your application:
- Recorded sensor data (cask)
- Real sensor data (camera)
- Simulated sensor data
In this section, we explain how you can work with these data types in a Python application.
Working with cameras
Isaac SDK supports many USB cameras with the V4L2Camera codelet. For more information, see Displaying a Camera Feed.
In this section, you use a Realsense camera, which is supported with the RealsenseCamera codelet in the module of realsense. Similarly, you could see the camera footage from Sight just like the earlier image. Because this is kind of a drop-in replacement of ImageLoader, you could use a command-line argument to switch between them. For more information about how to handle command-line arguments in Python, argparse — Parser for command-line options, arguments and sub-commands. You would have something like the following code example:
parser = argparse.ArgumentParser(description='Sample Python API app')
parser.add_argument('--source',
                   type=str,
                   dest='source',
                   help='The source to get data from',
                   choices=['camera', 'image'],
                   default='camera')
args, _ = parser.parse_known_args()
if args.source == 'image':
   app.load_module('message_generators')
   component_src = \
     node_src.add(app.registry.isaac.message_generators.ImageLoader, 'src')
   component_src.config['color_filename'] = '/home/bob/Pictures/panda.png'
   component_src.config['focal_length'] = [35.0, 35.0]
   component_src.config['optical_center'] = [300.0, 400.0]
   component_src.config['tick_period'] = '1hz'
   app.connect(component_src, 'color', viewer_component, 'color_listener')
elif args.source == 'camera':
   app.load_module('realsense')
   camera = app.add("cam").add(app.registry.isaac.RealsenseCamera)
   camera.config.rows = 480
   camera.config.cols = 640
   camera.config.color_framerate = 30
   camera.config.depth_framerate = 30
   app.connect(camera, 'color', viewer_component, 'color_listener')
app.run()
As shown earlier, the Python API provides flexibility in how you handle different environments.
Working with Cask
Working with real sensor data is intuitive, yet it may not be always practical to do so. Cask could help. Cask is the format for recording messages used in the Isaac SDK. In Isaac SDK, it is possible to record a stream of messages and replay it later for debugging purposes or analysis. To record image streams from a Realsense camera, try running the sample application at //apps/samples/camera:record_realsense.
With a recorded cask, you can replay it and play with the message streams anytime anywhere without the real sensor. Suppose the recorded cask resides in the folder of /home/bob/cask/. You could retrieve the messages with the Replay codelet:
   player_node = app.add('player')
   player_component = player_node.add(app.registry.isaac.alice.Replay)
   player_component.config['cask_directory'] = '/home/bob/cask'
   app.connect(player_component, 'color', viewer_component, 'color_listener')
Similarly, you could add a cask as a possible option to the Python application, just like you did with the Realsense camera. Here, the name color is the channel name that is used to record the color camera image stream. Then you could check the stream on Sight as if it were from the real camera.
Working with simulated sensors
As described earlier, you already have a Python application that could switch between recorded sensor data (cask) and real sensor data (camera). Now add one more possible source of data: the simulated sensor from IsaacSim Unity3D. Add the sim option to the command-line argument source and connect the simulated camera message stream to the viewer for visualization, as in following code example:
parser.add_argument('--source',
                   type=str,
                   dest='source',
                   help='The source to get data from',
                   choices=['cask', 'camera', 'image', 'sim'],
                   default='sim')
…

if args.source == 'image':
  ...
elif args.source == 'cask':
  ...
elif args.source == 'camera':
  ...
elif args.source == 'sim':
   app.load('packages/navsim/apps/navsim_tcp.subgraph.json')
   app.connect('interface/output', 'color', 'viewer/ColorCameraViewer', 'color_listener')

app.run()
Retrieve IsaacSim Unity3D. For more information, see IsaacSim Unity3D.
Start IsaacSim Unity3D:
./build/sample.x86_64 --scene medium_warehouse
By default, the Python application tries to talk with the simulation on the same host. If the application is running on another host, configure the parameter of host accordingly for component interface/output. For more information, see isaac.alice.TcpSubscriber. Run the application and the footage of a simulated camera is available on Sight as shown in Figure 3.

The footage is from the simulated camera mounted on the simulated robot. Try to play with movable objects like the Nano box on the simulation GUI and see that the simulated camera is working like a real one.
Pulling it all together with subgraphs
As you might have noticed, components (instances created from codelets) and the edges connecting them make a graph. Such graphs could be loaded from JSON files and loaded from the Python application as needed. For more information, see Introduction to Isaac Robotics Engine.
For example, the simulation communication subgraph packages/navsim/apps/navsim_tcp.subgraph.json packs nodes, components, and edges for communicating with IsaacSim Unity3D or NVIDIA Omniverse using TCP. To make it available to your application, add the following Bazel data dependencies to the BUILD file that you created earlier:
   data = [
       "//packages/navsim/apps:navsim_tcp_subgraph",
   ],
In the Python application, it could then be loaded with the following command:
app.load('packages/navsim/apps/navsim_tcp.subgraph.json')
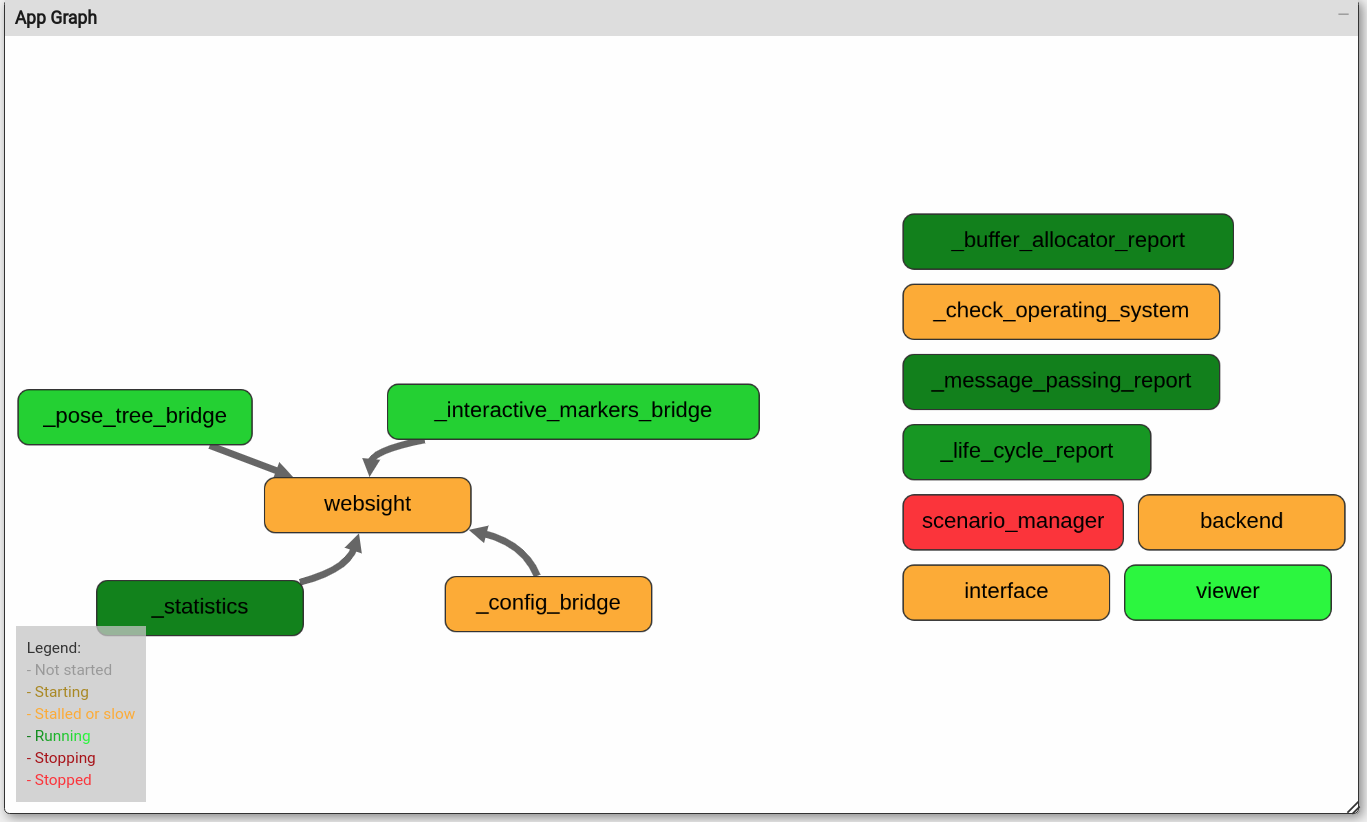
The subgraph component is more like a recipe consisting of a group of nodes than a container. Loading a subgraph is more like creating nodes and components following the recipe. In Sight, you could see all those nodes (scenario_manager, interface) created from the subgraph (Figure 4). By connecting them with other nodes, you could create more complicated applications using app.connect.
When more than one subgraph is loaded, naming conflicts might happen as nodes are required to have unique names in any application. To avoid such conflicts, load the subgraph with one more argument:
app.load(
   'packages/navsim/apps/navsim_tcp.subgraph.json',
   'simulation',
)
Here, the second argument is a “node name prefix” for all nodes specified in the JSON file. For example, the packages/navsim/apps/navsim_tcp.subgraph.json file specifies a node named interface. The earlier statement would create a node named simulation.interface, instead of interface.
Deploying the application on Jetson
Now you have an application in Python. It takes only one command to run on a real Jetson board:
./engine/build/deploy.sh -h -p //apps/mybot:mybot-pkg -d jetpack43
For more information about deploying applications to Jetson, see Getting Started and Deploying and Running on Jetson.
Connect using SSH to your Jetson board or open a terminal from the GUI and check folder /home/nvidia/deploy/bob/mybot-pkg. If you are using different usernames on Jetson and the development setup, replace nvidia with the username on the Jetson board and bob with the username on the development setup.
Run the application on Jetson with the following command:
nvidia@Jetson:~/deploy/bob/mybot-pkg$ ./run apps/mybot/mybot.py
If you are using resources outside of the repository, consider adding them to Bazel dependencies of the application, so that they can be automatically deployed to Jetson, along with the application, using deploy.sh.
If you are using IsaacSim Unity3D on PC, configure the host parameter so that they can communicate properly.
Working with Jupyter notebooks
Because you have the Python API here, a Jupyter notebook surely works. Use following BUILD file with empty mybot.ipynb:
isaac_jupyter_app(
   name = "mybot",
   modules = [
       "message_generators",
       "viewers",
   ],
   notebook = "mybot.ipynb",
)
Deploy the application similarly to the Jetson board or X86 workstation and start Jupyter with the following command:
jupyter notebook apps/mybot/mybot.ipynb
You are now good to go. The run function is blocking and returns only when the robotic application has stopped. To play with a robotics application interactively, use the start and stop functions accordingly.
Using Python for simulated mobile robots
In the section Working with simulated sensors, there is a simulated robot on which the simulated camera is mounted. IsaacSim Unity3D is designed to simulate mobile robots. For a sample robot application that controls a simulated robot with a differential base in IsaacSim Unity3D, check the application at //apps/navsim:navsim_navigate. The components and subgraphs can be found in the JSON file, apps/navsim/navsim_navigate.app.json. For more information, see IsaacSim Unity3D.
Using Python for simulated robotic arms
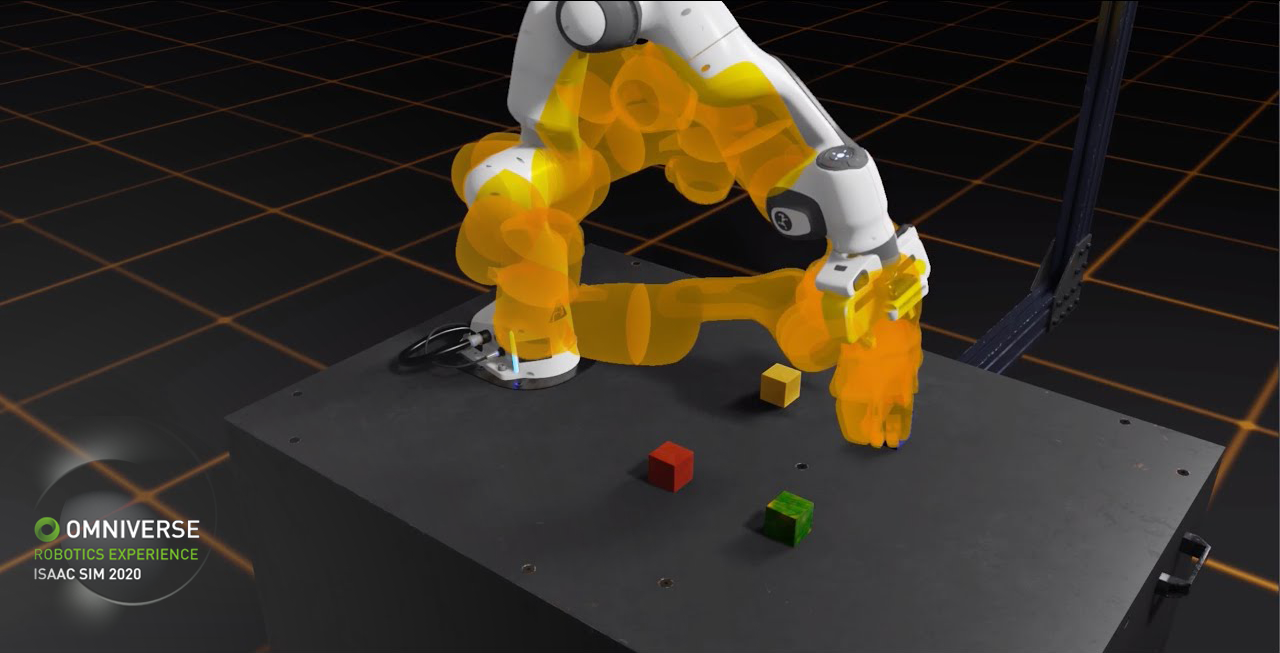
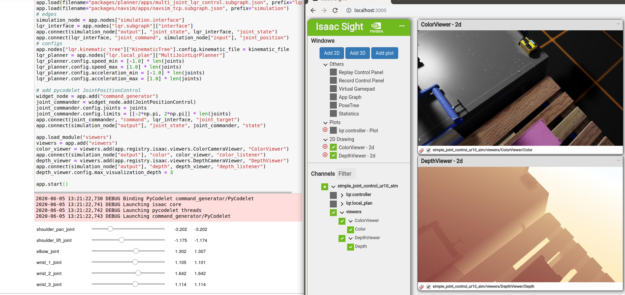
Besides mobile robots, the Isaac SDK could also be used to build applications for robotic arms. With Omniverse IsaacSim, you could play with simulated robotic arms without the real hardware. For more information, follow the “UR10 in Omniverse IsaacSim” session instructions at Simple Joint Control with Jupyter Notebook. The application would control the robotic arm in simulation, as shown in Figure 5.

Here’s what is happening in the application. The first thing is to load a subgraph enabling communication with the simulator over TCP.
app.load(filename="packages/navsim/apps/navsim_tcp.subgraph.json",
         prefix="simulation")
To generate smooth motions for the joints, load another subgraph for nodes:
app.load(
    filename="packages/planner/apps/multi_joint_lqr_control.subgraph.json",
    prefix="lqr")
This subgraph packs the nodes of the LQR planner, which generates commands for current joint states and target joint positions. Connect the nodes for simulation with the nodes for the planner to enable the flow of robotic arm joint state messages and command messages between them:
app.connect(simulation_node["output"], "joint_state", lqr_interface, "joint_state")
app.connect(lqr_interface, "joint_command", simulation_node["input"], "joint_position")
A codelet coded with Python, PyCodelet JointPositionControl, reads target joint position values from sliders and publishes these values as CompositeProto messages:
class JointPositionControl(Codelet):
    def start(self):
        self.tx = self.isaac_proto_tx("CompositeProto", "command")
      self._widget = CompositeWidget(self.config.joints "position", self.config.limits)
    def tick(self):
        self.tx._msg = self._widget.composite
      self.tx.publish()
For more information, see Creating Python Codelets.
The JointPositionControl codelet is then attached to a node and connected to the LQR planner’s target input channel:
widget_node = app.add("command_generator")
joint_commander = widget_node.add(JointPositionControl)
app.connect(joint_commander, "command", lqr_interface, "joint_target")
Start the application with app.start and the arm is at your disposal.
Simulated robotic arms with a simulated camera
To have a robotic arm with a camera, in Omniverse IsaacSim, load the stage omni:/Isaac/Samples/Isaac_SDK/Scenario/sortbot_sim.usd instead. Start the simulation and robot engine bridge in Omniverse IsaacSim and switch the viewport from perspective to wrist camera, as shown in Figures 6 and 7.

As in previous application, you could connect the simulated camera channel to the ColorCameraViewer codelet to visualize the footage, and DepthCameraViewer to visualize the simulated depth sensor data.
app.load_module("viewers")
viewers = app.add("viewers")
color_viewer = viewers.add(app.registry.isaac.viewers.ColorCameraViewer,
                           "ColorViewer")
app.connect(simulation_node["output"], "color", color_viewer,
            "color_listener")
depth_viewer = viewers.add(app.registry.isaac.viewers.DepthCameraViewer,
                           "DepthViewer")
app.connect(simulation_node["output"], "depth", depth_viewer,
            "depth_listener")
depth_viewer.config.max_visualization_depth = 3
Start the app and the simulated camera footage should show up in Sight:
Summary
In this post, you created a robotics application from scratch with the Python API. You made the application work with a real camera, recorded camera data, and a simulated camera. We also showed you how to work with a simulated mobile robot and simulated robotic arm using the Python API. Have fun building robots!
Use the following resources to get started with the Isaac SDK:
- Download Isaac SDK release 2020.1 and follow the setup steps.
- For more information, see Python API in the NVIDIA Isaac documentation.
Isaac SDK 2020.1 comes with many sample Python applications, for example, //apps/samples/april_tags:april_tags_python. The corresponding Python code lives in //apps/samples/april_tags/april_tags_python.py. This application detects specific April Tags from camera footage and visualizes the results. For more information about it, see April Tags in the Isaac SDK documentation and AprilTag from the April Robotics Laboratory.