HashiCorp Nomad 0.9 introduces device plugins which support an extensible set of devices for scheduling and deploying workloads. A device plugin allows physical hardware devices to be detected, fingerprinted, and made available to the Nomad job scheduler. The 0.9 release includes a device plugin for NVIDIA GPUs. Some example use cases are:
- Compute-intensive workloads employing accelerators like GPUs or TPUs
- Hardware security modules for securing applications and infrastructure
- Additional programmable devices
This post describes the device plugin system, introduces NVIDIA GPU support, and gives an example of GPU-accelerated machine-learning workflows using this capability.
Device Plugins
Device plugins represent a new feature in Nomad 0.9. They allow the Nomad client to discover available hardware resources in addition to existing built-in resources such as CPU, memory, and disk. A device plugin detects devices and fingerprints their attributes. When scheduling a task using resources associated with a device plugin, the plugin also assists the Nomad client in making the allocated device available to the task.
During fingerprinting, a device plugin reports the number of detected devices, general information about each device (vendor, type, and model), and device-specific attributes (e.g., available memory, hardware features). The information returned by the plugin passes from the client to the server and is made available for use in scheduling jobs, using the device stanza in the task’s resource stanza, for example:
resources {
  device "vendor/type/model" {
    count = 2
    constraint { ... }
    affinity { ... }
  }
}
This stanza allows selection of custom devices. Users can indicate their requirements to varying degrees of specificity. For example, a user can specify nvidia/gpu to get any NVIDIA GPU, or they can specify the exact model they want, such as nvidia/gpu/1080ti. In addition to specifying some number of necessary devices, the device stanza supports both affinities and constraints on device resources. These allow specifying device preferences and/or constraints using any of the device attributes fingerprinted by the device plugin.
In keeping with Nomad’s goal of easy cluster deployment, registering these plugins does not require recompiling Nomad. It’s only necessary to place them on the client nodes alongside the Nomad binary.
NVIDIA GPU Device Plugin
While originally dedicated to computer graphics computations, graphics processing units (GPUs) have become critical compute resources for workloads, ranging from high-performance scientific computing to machine learning to cryptocurrency mining. We bundle the NVIDIA GPU device plugin as part of the Nomad 0.9 binary in order to facilitate orchestrating GPU-accelerated workloads on Nomad clusters.
The NVIDIA device plugin first scans the client node for suitable NVIDIA GPUs, then fingerprints their hardware and capabilities, including clock speeds, driver version, and memory size. The plugin ultimately reports discovered devices as NVIDIA resources for the node. For example, the following node status indicates a GPU device discovered by the NVIDIA device plugin, along with all of the fingerprinted attributes of that device:
$ nomad node status -verbose 1d6
...
Host Resource Utilization
CPU            Memory          Disk
181/24000 MHz  955 MiB/60 GiB  4.6 GiB/97 GiB

Device Resource Utilization
nvidia/gpu/Tesla V100-SXM2-16GB[...]  0 / 16130 MiB

...

Device Group Attributes
Device Group     = nvidia/gpu/Tesla V100-SXM2-16GB
bar1             = 16384 MiB
cores_clock      = 1530 MHz
display_state    = Enabled
driver_version   = 418.39
memory_clock     = 877 MHz
memory           = 16130 MiB
pci_bandwidth    = 15760 MB/s
persistence_mode = Enabled
power            = 300 W
The Nomad job specification’s resource stanza works with any detected and available devices. The following example shows a resource stanza that requests 2 NVIDIA GPUs. The label “nvidia/gpu” indicates a requirement for devices of type “gpu” with vendor “nvidia”. A constraint stanza indicates memory requirement using human-readable units while an affinity stanza indicates an optional preference for a device with model Tesla. The scheduler filters nodes that don’t have at least two devices matching the constraints and then ranks according to the satisfaction of any affinities. When the task is scheduled to a node, the scheduler marks the GPUs made available to the task as allocated and unavailable to other jobs for the lifetime of this task.
resources {
  device "nvidia/gpu" {

    count = 2

    constraint {
      attribute = "${device.attr.memory}"
      operator  = ">="
      value     = "4 GiB"
    }

    affinity {
      attribute = "${device.model}"
      operator  = "regexp"
      value     = "Tesla"
    }

  }
}
The video demonstrates using a GPU-enabled Nomad cluster to schedule NVIDIA TensorRT Inference Server platform.
To run the demo yourself in AWS, you can provision Nomad infrastructure using this Terraform configuration and run the TensorRT example job.
Integration with Nomad
Figure 1 shows how the libnvidia-container integrates with the Nomad client, specifically at the runc layer. We use a custom OCI prestart hook called nvidia-container-runtime-hook in order to enable GPU containers in Docker (more information about hooks can be found in the OCI runtime spec).
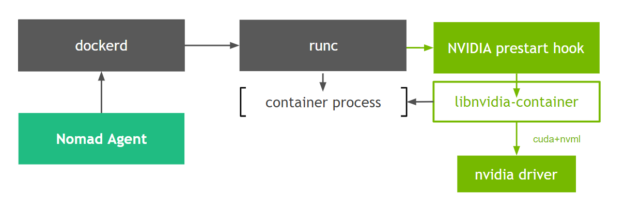
At container creation time, the prestart hook uses environment variables to check whether the container is GPU-enabled and uses the container runtime library to expose the NVIDIA GPUs to the container.
Nomad’s plugin-based integration strategy yields several advantages for users:
- Production Ready: The NVIDIA runtime library (libnvidia-container) and the prestart hook have been running in production for over 2 years in widely different environments. NVIDIA also ensures that CUDA containers that use the runtime library will remain supported and benefit from the latest features.
- Simple Feature Integration. New CUDA platform features (e.g. CUDA compatibility) are available without having to upgrade Nomad.
Typical GPU Deep Learning Inference Application
The use cases for running orchestration software with GPUs range from managing a GPU cluster for scientists to running Deep Learning models as production services. Let’s focus on the latter use case and how this maps into a smooth experience with Nomad.
The result of the many hours it takes to train a neural network is a model. The model describes the structure of your neural network (layers, weights, etc) and adheres to a specific format depending on the framework that you use. If you or your data science team have built, trained, tweaked and tuned a model, Nomad is a great choice for going to production.
Going to production with a Deep Learning model is far from simple, so let’s walk through the various concerns that exist:
- Request Routing. You need to be able to accept incoming requests (HTTP, GRPC, …) and feed them to your network.
- Monitoring. You must be able to observe how your network performs and how much resources it uses.
- Parallelization. You require reasonable latency and throughput, and will likely need to handle requests in parallel
- Scalability. You want the number of instances in your cluster to grow with the demand.
- Cost. You must make optimal use of the available GPUs to get the maximum possible performance to cost ratio.
- Flexibility. This allows you to A/B test different versions of your model.
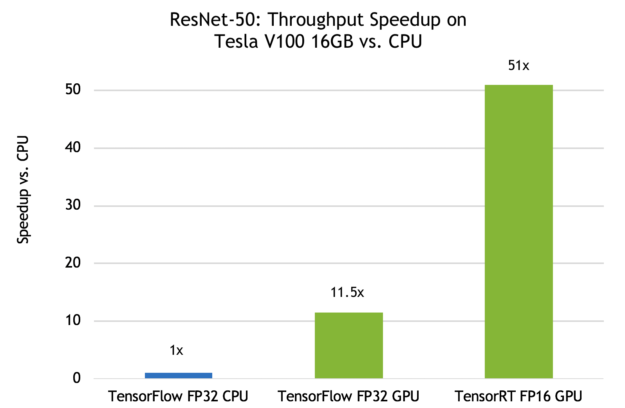
You can address many of the concerns above through a combination of the orchestration software and the inference solution. For example, NVIDIA’s TensorRT Inference Server makes optimal use of the available GPUs to obtain the maximum possible performance, provides metrics to Prometheus, and takes care of handling incoming network requests via HTTPS and gRPC. We use the TensorRT Inference Server which allows us to benefit from the GPU’s ability to significantly speed up the compute time, as seen in Figure 2.
Now let’s look at the process of taking a known model (RESNET-50) and getting to a production setup that can serve thousands of requests. This uses the following steps:
- Writing the TensorRT inference server Nomad job
- Feeding the model to the TensorRT inference server
- Deploying a sample frontend web app to communicate with the inference server using HTTP
Step 1. Writing the TensorRT inference server job
You can download the TensorRT inference server container from the NVIDIA container registry.
It requires substantial setup, such as specifying the different ports used to communicate over HTTP, gRPC, or its metrics. It also requires specifying the number of devices to use. As a side note, the server can serve requests for multiple models in the same container on multiple GPUs.
This is a much better architecture than one server per model per GPU, allowing “sharing” of the compute power of the GPU to multiple models.
job "tensorrt" {
    ...
    task "rtserver" {
      config {
        image = "nvcr.io/nvidia/tensorrtserver:19.02-py3"
        ...

        shm_size=1024
        port_map {
          http = 8000
          grpc = 8001
          metrics = 8002
        }

        ulimit {
          memlock = "-1"
          stack = "67108864"
        }

        resources {
          device "nvidia/gpu" {
            count = 2
          }
          ...
        }
     }
The amazing people at Hashicorp already wrote a pretty good nomad job that can be customized by you for your specific setup!
Step 2. Feeding the model to the TensorRT inference server
The TensorRT inference server functions quite simply. When you start it, you tell it where to look for your models and it will try to load them according to the specification available here (supports many specifications).
In this example, we tell it to load a resnet-50 caffe2 model which comes with 4 files: the init network (that that initializes the parameters), the predict network (that runs the actual training), the config.pbtxt (which describes the layers), and finally the labels.txt which lists the labels (your model outputs a number which maps to a label).
The task specification below uses multiple instances of the Nomad artifact stanza to download the models to the container before it starts. The “image”, “command”, and “args” parameters define the location of the Docker image and the command to run.
You have multiple options for feeding the model when using the TensorRT Inference Server:
- Here we feed the model through artifacts, as this is an example (not recommended for production).
- You can build our own container extending from the base tensorrtserver image.
- You can create a “model store” in one of the major cloud providers (AWS S3 bucket, GCP bucket, …).
The below example is suitable for testing. When you go to production you might want to consider option (2) above, as it provides you with the most flexibility.
job "tensorrt" {
    ...
    task "rtserver" {
      config {
        image = "nvcr.io/nvidia/tensorrtserver:19.02-py3"
        command = "trtserver"
        args = [
          "--model-store=${NOMAD_TASK_DIR}/models"
        ]
      }

      # load the example model into ${NOMAD_TASK_DIR}/models
      artifact {
        source      = "http://download.caffe2.ai/.../resnet50/predict_net.pb"
        destination = "local/models/resnet50_netdef/1/model.netdef"
        mode = "file"
      }
      artifact {
        source      = "http://download.caffe2.ai/.../resnet50/init_net.pb"
        destination = "local/models/resnet50_netdef/1/init_model.netdef"
        mode = "file"
      }
      artifact {
        source      = "https://raw.githubusercontent.com/NVIDIA/.../config.pbtxt"
        destination = "local/models/resnet50_netdef/config.pbtxt"
        mode = "file"
      }
      artifact {
        source      = "https://raw.githubusercontent.com/NVIDIA/.../labels.txt"
        destination = "local/models/resnet50_netdef/resnet50_labels.txt"
        mode = "file"
      }
      ...
Step 3. Deploying a sample frontend web app
You can interact with the server using the following CLI command (more on setting up the client):
$ image_client.py -m resnet50_netdef -u $SERVER_IP -s INCEPTION -c 3 mug.jpg
However, in order to confirm that our model is able to handle HTTP requests, we deploy a sample web application which allows us to upload an image and send it to the inference server.
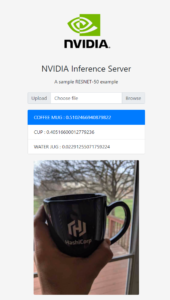 We’ll deploy the tensorrt-frontend container, which is a simple HTML upload form that invokes the above command line in python.
task "web" {

  config {
    image = "nvidia/tensorrt-labs:frontend"
    args = [
      "main.py", "--server-ip", "${RTSERVER}"
    ]
    ...
  }

  resources {
    ...
    network {
      port "http" { static = "8888" }
    }
  }

  template {
    data = <
In the above example, the template section allows us to point the frontend to the server. When we deploy this Nomad job we can quickly get to the following screen. Please check out the full demo for more details.
Note that this blog post describes a deployment workflow and is not intended to showcase the best inference performance. The inference accuracy may be improved by pre-processing of the images.
Try It Yourself
The Nomad 0.9 device plugin feature builds on Nomad’s mission of running any application on any infrastructure. The NVIDIA GPU device plugin gives us the ability to exploit NVIDIA GPUs for those workloads that benefit from GPU acceleration, using the same cluster scheduler that runs our non-GPU workloads. To learn more about Nomad itself, please visit the README page or the Introduction to Nomad documentation.
