
The NVIDIA Isaac SDK includes a production-ready, real-time visual odometry solution. According to the KITTI visual odometry algorithm comparison benchmark, it is 11th for accuracy and the fastest for performance.
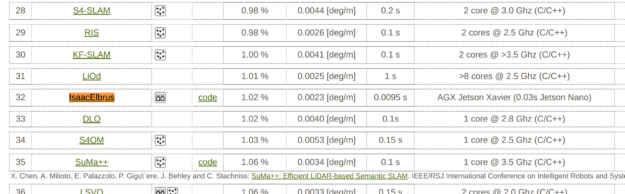
Figure 2 shows that Isaac provides better speed and accuracy than the widely used ORB Slam2.
This post shows you how to run Isaac SDK visual odometry with a prerecorded sequence of stereo images from KITTI. The following video shows using KITTI Vision Benchmark Suite to compare computer vision algorithms.
KITTI Vision Benchmark Suite
The KITTI Vision Benchmark Suite is a high-quality dataset to benchmark and compare various computer vision algorithms. Among other options, the KITTI dataset has sequences for evaluating stereo visual odometry.
To get the KITTI test sequences, download the odometry data set (grayscale, 22 GB). After registering, you receive a download link to the data_odometry_gray.zip file. When you unpack it, you get the following structure:
dataset_odometry_gray
   dataset
      00
         image_0
            000000.png
              ...
            004550.png
         image_1
            000000.png
              ...
            004550.png
         calib.txt
         times.txt
      01
         ...
Each of the 20 folders has a stereo sequence and calibration of cameras.
Running Isaac visual odometry with a KITTI sequence
To get started with this solution, download the Isaac SDK. Install the SDK using the provided instructions and create the subfolder visual_odometry under the isaac/apps/tutorials folder.
Write a KittiLoader codelet
First, you must implement a codelet to import the stereo images from disk. Create the KittiLoader.hpp file:
#pragma once
#include "engine/alice/alice_codelet.hpp"
#include "messages/camera.capnp.h"
namespace isaac {
class KittiLoader : public alice::Codelet {
public:
 void start() override;
 void tick() override;
 ISAAC_PROTO_TX(ImageProto, left_image);
 ISAAC_PROTO_TX(ImageProto, right_image);
 ISAAC_PROTO_TX(CameraIntrinsicsProto, left_intrinsics);
 ISAAC_PROTO_TX(CameraIntrinsicsProto, right_intrinsics);
private:
 int frame_id_ = 1;
};
}  // namespace isaac
ISAAC_ALICE_REGISTER_CODELET(isaac::KittiLoader);
Also, create its implementation, KittiLoader.cpp:
#include "KittiLoader.hpp"
#include <iomanip>
#include <string>
#include <utility>
#include "engine/core/image/image.hpp"
#include "messages/camera.hpp"
namespace isaac {
std::string KittiFileName(int camera_id, int frame_id) {
 std::stringstream s;
 s << camera_id << "/" << std::setw(6) << std::setfill('0') << frame_id << ".png";
 return "/path/to/dataset/dataset_odometry_gray/dataset/00/image_" + s.str();
}
void FillIntrinsics(auto& tx_intrinsics) {
 auto camera = tx_intrinsics.initProto();
 auto pinhole = camera.initPinhole();
 auto distortion = camera.initDistortion();
 pinhole.setCols(1241);
 pinhole.setRows(376);
 ToProto(Vector2d{718.855999999, 718.855999999}, pinhole.getFocal());
 ToProto(Vector2d{185.2157, 607.192799999}, pinhole.getCenter());
 distortion.setModel(DistortionProto::DistortionModel::BROWN);
 ToProto(VectorXd::Constant(4, 0), distortion.getCoefficients());
}
void KittiLoader::start() {
 Pose3d extrinsics = Pose3d::Identity();
 extrinsics.translation.x() = 0.1 * 0.5371657188644179;
 node()->pose().set("left_camera", "right_camera", extrinsics, 0);
 tickPeriodically();
}
void KittiLoader::tick() {
 std::array<Image1ub, 2> images;
 for (int camera_id = 0; camera_id < 2; ++camera_id) {
   const std::string filename = KittiFileName(camera_id, frame_id_);
   if (!LoadImage(filename, images[camera_id])) {
     reportFailure("Couldn't load image from file '%s'", filename.c_str());
     return;
   }
 }
 ++frame_id_;
 show("left_image", [&](sight::Sop& sop) {
   sop.add(images[0]);
 });
 ToProto(std::move(images[0]), tx_left_image().initProto(), tx_left_image().buffers());
 ToProto(std::move(images[1]), tx_right_image().initProto(), tx_right_image().buffers());
 FillIntrinsics(tx_left_intrinsics());
 FillIntrinsics(tx_right_intrinsics());
 const int64_t acqtime = getTickTimestamp();
 tx_left_image().publish(acqtime);
 tx_right_image().publish(acqtime);
 tx_left_intrinsics().publish(acqtime);
 tx_right_intrinsics().publish(acqtime);
}
}  // namespace isaac
Create a test app
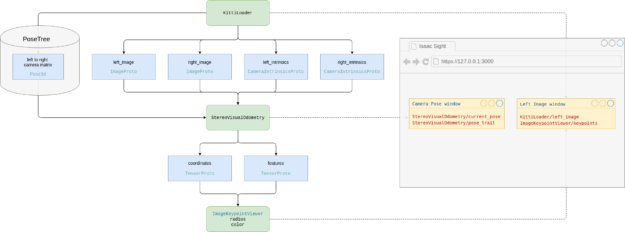
Figure 3 shows the KITTI workflow and objects created.
To make a test application, create a file called kitti_run.app.json:
{
 "name": "kitti_run",
 "modules": [
   "//apps/tutorials/visual_odometry:kitti_loader_components",
   "visual_slam",
   "viewers"
 ],
 "graph": {
   "nodes": [
     {
       "name": "kitti",
       "components": [
         {"name": "MessageLedger", "type": "isaac::alice::MessageLedger"},
         {"name": "Loader"       , "type": "isaac::KittiLoader"}
       ]
     },
     {
       "name": "tracker",
       "components": [
         {"name": "MessageLedger", "type": "isaac::alice::MessageLedger"},
         {"name": "SVO"          , "type": "isaac::StereoVisualOdometry"}
       ]
     },
     {
       "name": "keypoint_viewer",
       "components": [
         {"name": "isaac.alice.MessageLedger", "type": "isaac::alice::MessageLedger"},
         {"name": "Viewer"                    ,"type": "isaac::viewers::ImageKeypointViewer"}
       ]
     }
   ],
   "edges": [
     {"source": "kitti/Loader/left_image"      , "target": "tracker/SVO/left_image"},
     {"source": "kitti/Loader/right_image"     , "target": "tracker/SVO/right_image"},
     {"source": "kitti/Loader/left_intrinsics" , "target": "tracker/SVO/left_intrinsics"},
     {"source": "kitti/Loader/right_intrinsics", "target": "tracker/SVO/right_intrinsics"},
     {"source": "tracker/SVO/coordinates"      , "target": "keypoint_viewer/Viewer/coordinates"},
     {"source": "tracker/SVO/features"         , "target": "keypoint_viewer/Viewer/features"}
   ]
 },
 "config": {
   "kitti": {
     "Loader": {"tick_period": "30hz"}
   },
   "tracker": {
     "SVO": {
       "horizontal_stereo_camera": true,
       "process_imu_readings": false,
       "lhs_camera_frame": "left_camera",
       "rhs_camera_frame": "right_camera",
       "num_points": 10000
     }
   },
   "websight": {
     "WebsightServer": {
       "port": 3000,
       "ui_config": {
         "windows": {
           "Left image": {
             "renderer": "2d",
             "channels": [
               {"name": "kitti_run/kitti/Loader/left_image"},
               {"name": "kitti_run/keypoint_viewer/Viewer/keypoints"}
             ]
           },
           "Camera Pose": {
             "renderer": "3d",
             "channels": [
               {"name": "kitti_run/tracker/SVO/current_pose"},
               {"name": "kitti_run/tracker/SVO/pose_trail"}
             ]
           }
         }
       }
     }
   }
 }
}
Create a build script
To build it all together, create a build script named BUILD that contains the following code:
load("//bzl:module.bzl", "isaac_cc_module", "isaac_app")

isaac_cc_module(
   name = "kitti_loader_components",
   srcs = ["KittiLoader.cpp"],
   hdrs = ["KittiLoader.hpp"],
)

isaac_app(
   name = "kitti_run",
   modules = [
       "//apps/tutorials/visual_odometry:kitti_loader_components",
       "visual_slam",
       "viewers",
   ],
)
Your folder should look like the following:
~/isaac$ ls apps/tutorials/visual_odometry/
BUILD  KittiLoader.cpp  KittiLoader.hpp  kitti_run.app.json
View the results
In the Isaac root folder, run the following command:
bazel run //apps/tutorials/visual_odometry:kitti_run
To see the result in the Isaac websight tool, open http://127.0.0.1:3000/ in your browser (Figure 4).

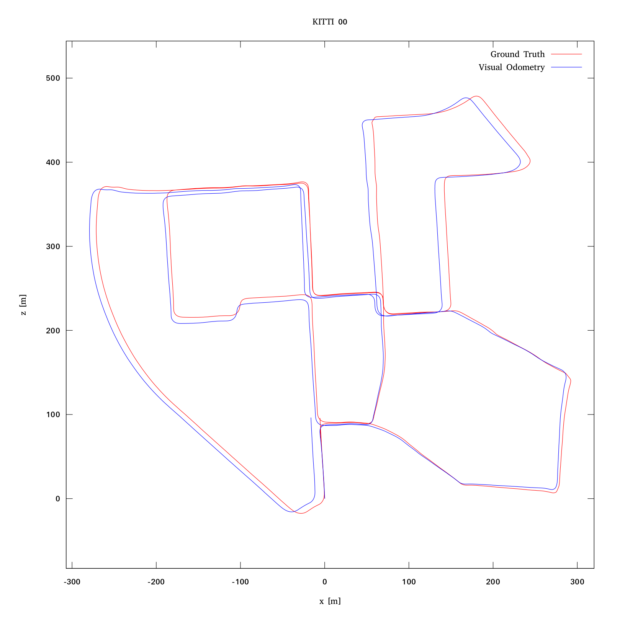
Figure 5 shows the result:
Summary
In this post, I showed you how to run Isaac SDK visual odometry with a prerecorded sequence of stereo images from KITTI. For more information, see the following resources:
