
The NVIDIA NGC team is hosting a webinar with live Q&A to dive into this Jupyter notebook available from the NGC catalog. Learn how to use these resources to kickstart your AI journey. Register now: NVIDIA NGC Jupyter Notebook Day: Recommender System.
Recommender systems deal with predicting user preferences for products based on historical behavior and are widespread in online retail for product recommendations, in social media for targeted ads, in streaming video and music platforms for providing user centric content, and more.
In my previous post, Building Image Segmentation Faster Using Jupyter Notebooks from NGC, I discussed some of the problems inherent in building, training, and optimizing state-of-the-art models. I also explained how NGC is now adding sample Jupyter notebooks, complete with instructions on how to train and deploy a model using these artefacts from the NGC Catalog.
In this post, I show how you can use the sample recommendation system notebook. The trained model in this notebook predicts the rate of a movie for a user and recommends movies.
Recommender system
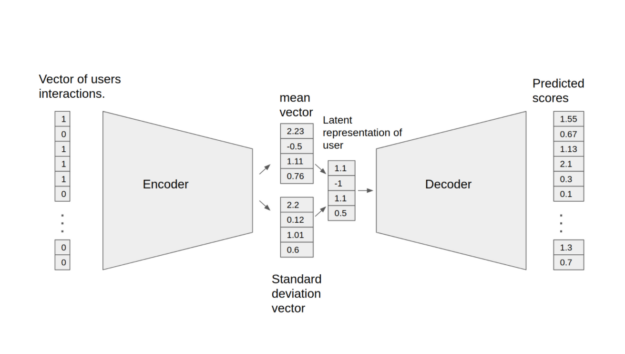
The Variational Autoencoder (VAE) shown here is an optimized implementation of the architecture first described in Variational Autoencoders for Collaborative Filtering and can be used for recommendation tasks. The Jupyter notebook shows the process of training and testing the VAE model. The model consists of two parts: the encoder and decoder. The encoder transforms the vector, which contains the interactions for a specific user, into a n-dimensional variational distribution. You can use this variational distribution to obtain a latent representation of a user. This latent representation is then fed into the decoder. The result is a vector of item interaction probabilities for a particular user.
The following features were implemented in this model:
- Sparse matrix support
- Data-parallel multi-GPU training
- Dynamic loss scaling with backoff for tensor cores (mixed precision) training
- Feature support matrix
To follow this tutorial, ensure that you have the following resources:
- NVIDIA Docker
- TensorFlow 20.12-tf1-py3 NGC container
- Access to an NVIDIA GPU-based system
Clone the repository
You can find the resources related to this model on the NGC Catalog resources page. The resource can be downloaded manually from the top right menu or by using the wget resource command.
To download and unzip resources using the command line interface, follow these steps:
- Make a new folder using
mkdir. - Go to the new folder using cd.
- Use
wgetto download resources as a zip file inside the folder. - Unzip the zip file using
unzip.
mkdir VAE

cd VAE

wget --content-disposition https://api.ngc.nvidia.com/v2/resources/nvidia/vae_for_tensorflow/versions/20.06.0/zip -O vae_for_tensorflow_20.06.0.zip

unzip vae_for_tensorflow_20.06.0.zip
Build the container
Make the container using the Dockerfile inside the resource folder that you just downloaded:
docker build . -t < tagname>
You can tag the container with any name.
docker build . -t vae
Run the container
Start the container. This mounts a folder for the data inside the container. You download a movie rating dataset inside this folder. Set port 8888:8888 for this container so that you can access the Jupyter notebooks inside the container later using this port.
docker run -it --rm --runtime=nvidia -v /data/vae-cf:/data -p 8888:8888 vae /bin/bash
Data set
For this post, you use the MovieLens 20m data set to train the model. MovieLens 20M is a movie-rating data set that includes 20 million ratings and 465,000 tag applications applied to 27,000 movies by 138,000 users. The goal of the model is to predict the rating of a new movie for a user considering the previous sets of the user: movie, ratings, and so on.
If you do not have the dataset downloaded, run the following commands to download and extract the MovieLens dataset to the /data/ml-20m/extracted/ folder. The data set can be preprocessed by running the following command in the Docker container:
python prepare_dataset.py
By default, the dataset is stored in the /data directory. To store the data in a different location, pass the desired location to the --data_dir argument.
mkdir /data/ml-20m

mkdir /data/ml-20m/extracted

wget http://files.grouplens.org/datasets/movielens/ml-20m.zip

unzip ml-20m.zip
If you already have the data set downloaded and unzipped elsewhere, run the following commands to first exit the current VAE-CF Docker container and then restart the VAE-CF Docker container by mounting the MovieLens data set location.
exit
docker run -it --rm --gpus all -v /data/vae-cf:/data -v <ml-20m folder path>:/data/ml-20m/extracted/ml-20m -p 8888:8888 vae /bin/bash
Train and test the model inside the container
When you have the container running and the dataset accessible within the container, run the rest of commands using a Jupyter notebook. Open the Jupyterlab workspace in the container. After that, upload the VAE-model notebook and run the cells of the notebook to train, test, and run inference on this model.
jupyter notebook --ip 0.0.0.0 --port 8888 --allow-root
Preparing the dataset
After downloading the dataset in the extracted folder, go back to the main workspace and run prepare_dataset.py. This command takes the ml-20m dataset and divides it up so that it can be used for training, validating, and testing.
python prepare_dataset.py
Training the model
Start the training by running the main.py script with the train argument. The resulting checkpoints, containing the trained model weights, are then stored in the directory specified by the --checkpoint_dir directory option. By default, no checkpoints are saved.
Additionally, the --results_dir command-line argument (by default, None) specifies where to save the following statistics in a JSON format. A complete list of command-line arguments is saved as /args.json, along with a dictionary of validation metrics and performance metrics recorded during training.
When you run the training command, you see the details of the training process in each epoch. Also, you can change the training hyperparameters of the model by changing the arguments of main.py. For more information about the main.py arguments, see the last cell of the notebook.
After each 50 epochs, run inference to see the recall of the model. Recall is a metric that shows the performance of this model as a percentage of the correctly predicted ratings over all the correct ratings: true positive /true positive + false negative.
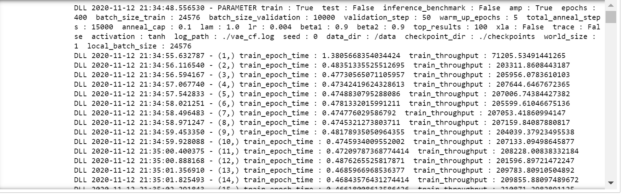
mpirun --allow-run-as-root -np 1 -H localhost:8 python main.py --train --amp --checkpoint_dir ./checkpoints
Figure 3 shows the output of running the previous command.
Testing the model
The model is exported to the default model_dir location and can be loaded and tested using the following command. You use the weights of the trained model that have been saved in the checkpoints folder and test data for performance on the unseen data.
In this step, use the data set set aside for testing on the trained model to test the performance of the model. You also view the recall metric to view the accuracy of the prediction.
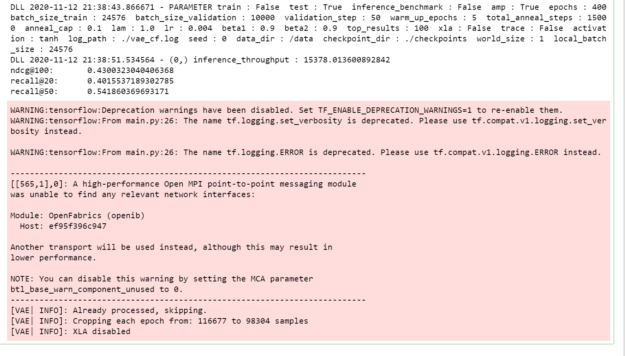
python main.py --test --amp --checkpoint_dir ./checkpoints
Figure 4 shows the output of the test command.
Main.py
This model was trained using some default hyperparameters and small dataset for 400 epochs. You can use larger datasets, increase the training epochs, and choose different hyperparameters to enhance the model performance. The Main.py --help command shows you the different options you have for working with this specific model. The main.py script also provides an entry point to all the provided functionalities such as training, testing, and inference. The behavior of the script is controlled by command-line arguments listed in the next section. The prepare_dataset.py script can be used to preprocess the MovieLens 20m data set.
Parameters
The most important command-line parameters include:
--data_dir—Specifies the directory inside the Docker container where the data is stored, overriding the default location /data.--checkpoint_dir—Controls if and where the checkpoints are stored.--amp—Enables mixed precision training.
There are also multiple parameters controlling the various hyperparameters of the training process, such as learning rate, batch size, and so on. To see the full list of available options and their descriptions, use the -h or --help command-line option.
python main.py --help
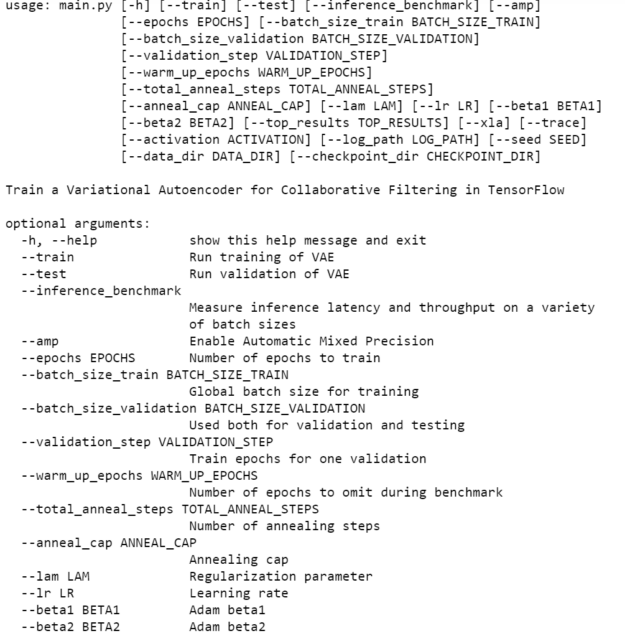
Figure 5 shows some available options to customize running main.py.
NEEDS ALT TEXT
Summary
In this post, I showed you how to pull the VAE model and build a container from the resources related to this model. After that, you uploaded a notebook in the container to train and test the model.
Get started today by visiting the NGC Catalog, downloading the Jupyter notebooks for a recommender system, and applying it to your own use cases.
NVIDIA GTC provides training, insights, and direct access to experts. Join us for breakthroughs in AI, data center, accelerated computing, healthcare, game development, networking, and more. Invent the future with us April 12-16, 2021.
