NVIDIA Isaac Sim
NVIDIA Isaac Sim™ is an open source reference framework built on NVIDIA Omniverse™ libraries for robotics simulation, testing, and synthetic data generation in physically based virtual environments.
Isaac Sim is fully extensible, so developers can build custom OpenUSD-based simulators or integrate framework capabilities into existing testing and validation pipelines.
Ready to get started?
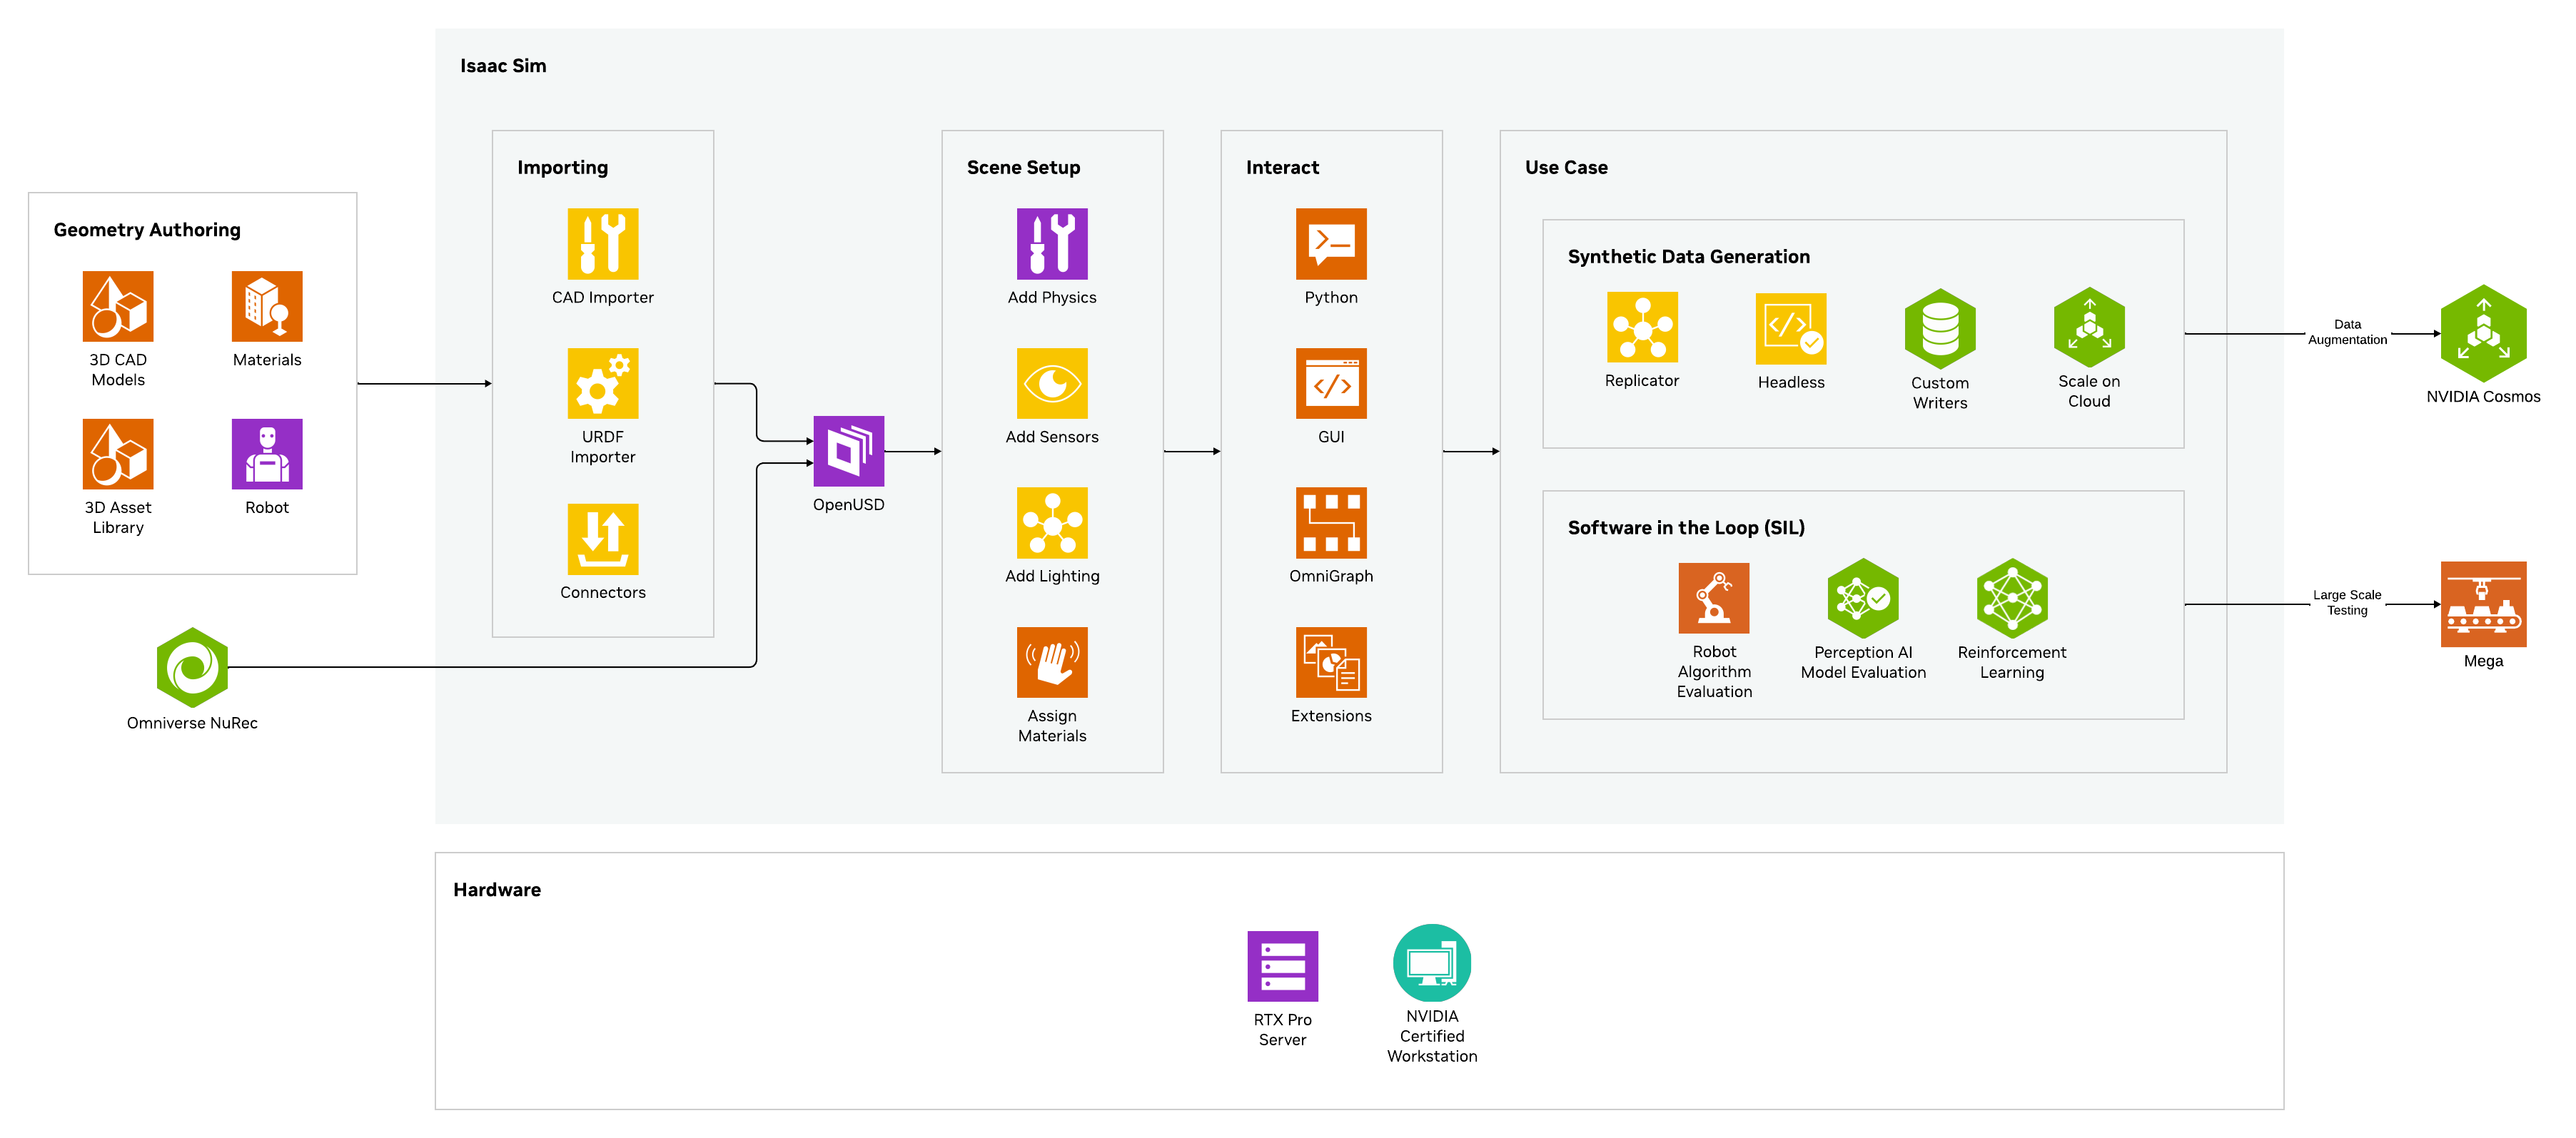
How Isaac Sim Works
Isaac Sim can ingest data from multiple sources—such as computer-aided design (CAD), Unified Robot Description Format (URDF), or real-world captures via NVIDIA Omniverse NuRec and Isaac TeleOp—and convert it into USD. Developers then assemble simulation scenes by assigning materials, enabling physics, and configuring robot and sensor models. From there, robots can be used with NVIDIA Isaac Lab for robot learning and simulated in Isaac Sim.
Isaac Sim also supports controllable synthetic data generation, letting developers build custom data pipelines that complement their existing data sources. That data can be further augmented with NVIDIA Cosmos™ world foundation models. Finally, developers can train perception and mobility stacks in simulation and evaluate the end-to-end system in Isaac Sim using software-in-the-loop or hardware-in-the-loop testing.
Isaac Sim Documentation
Browse documentation and learn how to get started on Isaac Sim.
Robotics Simulation Overview
Learn how robotics simulation helps developers virtually train, test, and validate robots, and the advantages of a simulation-first approach.
Isaac Sim Courses
Gain a foundational understanding of core robotics concepts and explore essential workflows in simulation and robot learning with hands-on training in Isaac Sim™ and Isaac Lab.
Isaac Sim Office Hours
Stay informed with our recurring Office Hours that cover in-depth topics with experts and customers using Isaac Sim.
Get Started With Isaac Sim

Set Up Your System
Check to see if your machine meets the system requirements and compatibility, then get started by installing Isaac Sim.

Take the Self-Paced Course
In this beginner course, you will learn how to build a simple robot, apply physics properties, integrate advanced sensors, and troubleshoot common issues in Isaac Sim.

Connect With the Community
Engage with the Isaac Sim community by joining the NVIDIA forum. Find answers for troubleshooting and post your own questions.
Join the Isaac Sim ForumExtend Isaac Sim Workflows

NVIDIA Cosmos
NVIDIA Cosmos is a platform comprising state-of-the-art generative world foundation models, and a video processing pipeline built to accelerate the development of physical AI systems.
Get Started With NVIDIA Cosmos
NVIDIA Isaac™ Lab
Train your robot policy in the Isaac Lab open source unified framework for robot learning.
Learn More
NVIDIA Physical AI Dataset
Unblock data bottlenecks with the NVIDIA Physical AI Open Datasets, composed of validated data used to build NVIDIA physical AI—now freely available to developers on Hugging Face.
Access the Datasets
NVIDIA Isaac Teleop
WIth NVIDIA Isaac TeleOp, robotics developers can collect high-quality demonstrations in the real world and through simulation to train, test, and evaluate robot policies in NVIDIA Isaac Sim and Isaac Lab.
Starter Kits
Neural Reconstruction and Rendering With NVIDIA Omniverse NuRec
Turn real world sensor data into interactive simulation with NuRec using 3D Gaussian Splatting-based rendering for enhanced efficiency and accuracy.
Realistic Physics Simulation
Model the physical behavior of objects and systems foundational to physical AI.
Isaac Sim can simulate rigid body and vehicle dynamics, multi-joint articulation, SDF colliders, and more for realistic physics simulation
Scalable Synthetic Data Generation
Bootstrap AI model training with synthetic data.
Generate training data by randomizing attributes like lighting, reflection, color, and position of scene and assets.
ROS Support
Custom ROS2 messages and URDF/MJCF are now open-source.
Get support for custom ROS messages that allow standalone scripting to manually control the simulation steps.
Robotics Learning
Virtually train, test, and validate robotics systems using NVIDIA Isaac Lab.
Industrial Facility Digital Twin
Build intelligent factory, warehouse, and industrial facility solutions that enable comprehensive design, simulation, and optimization of industrial assets and processes.
Newton, the Next-Generation Open-Source Physics Simulation Engine
Newton is an open-source, GPU-accelerated, and extensible physics engine, co-developed by Google DeepMind and Disney Research, and managed by the Linux Foundation. Built on NVIDIA Warp and OpenUSD, Newton is optimized for robotics and compatible with learning frameworks such as MuJoCo Playground or NVIDIA Isaac Lab. Newton Beta is now available to use.
Isaac Sim Learning Library
Latest Robotics News
More Resources


FAQ
Yes, Isaac Sim is free to use, licensed as open source under Apache 2.0 and available on GitHub. With Isaac Sim, which can be used for free with Isaac Sim under the NVIDIA Isaac Sim Additional Software and Materials License.
Yes, ISVs can integrate Isaac Sim into their software solutions with Omniverse Kit. While Isaac Sim is open-source and can be distributed freely, distribution of Omniverse Kit requires a separate license with NVIDIA, which is available via an Omniverse Enterprise subscription. This license grants the rights to redistribute, sublicense and and support Omniverse Kit as part of Isaac Sim within your product.
You can import 3D robot models using OnShape, URDF, MJCF, and ShapeNet Importers and through CAD converter. Please refer to the documentation for more details.
Yes, you can connect Isaac Sim to ROS/ROS2 using the Isaac ROS/ROS2 Bridge Extensions. Please refer to the documentation for more details.
Yes, you can access Isaac Sim on Brev, which gives one-click access to NVIDIA GPU instances on popular cloud platforms. You can also download it as a container from NGC and run it on your preferred CSP (cloud service provider).
For AWS users, the Isaac Sim container is available on the AWS marketplace for easy deployment. While Isaac Sim is free to deploy on AWS EC2 for development and research purposes, you'll still need to pay for any AWS EC2-related services and fees.
Isaac Lab is an open-source, lightweight reference application built on the Isaac Sim platform specifically optimized for robot learning at scale. Learn more about Isaac Lab here.
Annotators can include RGB, bounding box, instance segmentation, semantic segmentation, and more.
The annotated data can be exported in COCO and KITTI formats.
Isaac Sim can be easily scaled to multiple GPUs for faster simulations. Learn more here.