CUDA 5 added a powerful new tool to the CUDA Toolkit: nvprof. nvprof is a command-line profiler available for Linux, Windows, and OS X. At first glance, nvprof seems to be just a GUI-less version of the graphical profiling features available in the NVIDIA Visual Profiler and NSight Eclipse edition. But nvprof is much more than that; to me, nvprof is the light-weight profiler that reaches where other tools can’t.
Use nvprof for Quick Checks
I often find myself wondering if my CUDA application is running as I expect it to. Sometimes this is just a sanity check: is the app running kernels on the GPU at all? Is it performing excessive memory copies? By running my application with nvprof ./myApp, I can quickly see a summary of all the kernels and memory copies that it used, as shown in the following sample output.
    ==9261== Profiling application: ./tHogbomCleanHemi
    ==9261== Profiling result:
    Time(%)      Time     Calls       Avg       Min       Max  Name
     58.73%  737.97ms      1000  737.97us  424.77us  1.1405ms  subtractPSFLoop_kernel(float const *, int, float*, int, int, int, int, int, int, int, float, float)
     38.39%  482.31ms      1001  481.83us  475.74us  492.16us  findPeakLoop_kernel(MaxCandidate*, float const *, int)
      1.87%  23.450ms         2  11.725ms  11.721ms  11.728ms  [CUDA memcpy HtoD]
      1.01%  12.715ms      1002  12.689us  2.1760us  10.502ms  [CUDA memcpy DtoH]
In its default summary mode, nvprof presents an overview of the GPU kernels and memory copies in your application. The summary groups all calls to the same kernel together, presenting the total time and percentage of the total application time for each kernel. In addition to summary mode, nvprof supports GPU-Trace and API-Trace modes that let you see a complete list of all kernel launches and memory copies, and in the case of API-Trace mode, all CUDA API calls.
Following is an example of profiling the nbody sample application running on two GPUs on my PC, using nvprof --print-gpu-trace. We can see on which GPU each kernel ran, as well as the grid dimensions used for each launch. This is very useful when you want to verify that a multi-GPU application is running as you expect.
nvprof --print-gpu-trace ./nbody --benchmark -numdevices=2 -i=1
...
==4125== Profiling application: ./nbody --benchmark -numdevices=2 -i=1
==4125== Profiling result:
   Start  Duration            Grid Size      Block Size     Regs*    SSMem*    DSMem*      Size  Throughput           Device   Context    Stream  Name
260.78ms     864ns                    -               -         -         -         -        4B  4.6296MB/s   Tesla K20c (0)         2         2  [CUDA memcpy HtoD]
260.79ms     960ns                    -               -         -         -         -        4B  4.1667MB/s  GeForce GTX 680         1         2  [CUDA memcpy HtoD]
260.93ms     896ns                    -               -         -         -         -        4B  4.4643MB/s   Tesla K20c (0)         2         2  [CUDA memcpy HtoD]
260.94ms     672ns                    -               -         -         -         -        4B  5.9524MB/s  GeForce GTX 680         1         2  [CUDA memcpy HtoD]
268.03ms  1.3120us                    -               -         -         -         -        8B  6.0976MB/s   Tesla K20c (0)         2         2  [CUDA memcpy HtoD]
268.04ms     928ns                    -               -         -         -         -        8B  8.6207MB/s  GeForce GTX 680         1         2  [CUDA memcpy HtoD]
268.19ms     864ns                    -               -         -         -         -        8B  9.2593MB/s   Tesla K20c (0)         2         2  [CUDA memcpy HtoD]
268.19ms     800ns                    -               -         -         -         -        8B  10.000MB/s  GeForce GTX 680         1         2  [CUDA memcpy HtoD]
274.59ms  2.2887ms             (52 1 1)       (256 1 1)        36        0B  4.0960KB         -           -   Tesla K20c (0)         2         2  void integrateBodies(vec4::Type*, vec4::Type*, vec4::Type*, unsigned int, unsigned int, float, float, int) [242]
274.67ms  981.47us             (32 1 1)       (256 1 1)        36        0B  4.0960KB         -           -  GeForce GTX 680         1         2  void integrateBodies(vec4::Type*, vec4::Type*, vec4::Type*, unsigned int, unsigned int, float, float, int) [257]
276.94ms  2.3146ms             (52 1 1)       (256 1 1)        36        0B  4.0960KB         -           -   Tesla K20c (0)         2         2  void integrateBodies(vec4::Type*, vec4::Type*, vec4::Type*, unsigned int, unsigned int, float, float, int) [275]
276.99ms  979.36us             (32 1 1)       (256 1 1)        36        0B  4.0960KB         -           -  GeForce GTX 680         1         2  void integrateBodies(vec4::Type*, vec4::Type*, vec4::Type*, unsigned int, unsigned int, float, float, int) [290]

Regs: Number of registers used per CUDA thread.
SSMem: Static shared memory allocated per CUDA block.
DSMem: Dynamic shared memory allocated per CUDA block.
Use nvprof to Profile Anything
nvprof knows how to profile CUDA kernels running on NVIDIA GPUs, no matter what language they are written in (as long as they are launched using the CUDA runtime API or driver API). This means that I can use nvprof to profile OpenACC programs (which have no explicit kernels), or even programs that generate PTX assembly kernels internally. Mark Ebersole showed a great example of this in his recent CUDACast (Episode #10) about CUDA Python, in which he used the NumbaPro compiler (from Continuum Analytics) to Just-In-Time compile a Python function and run it in parallel on the GPU.
During initial implementation of OpenACC or CUDA Python programs, it may not be obvious whether or not a function is running on the GPU or the CPU (especially if you aren’t timing it). In Mark’s example, he ran the Python interpreter inside of nvprof, capturing a trace of the application’s CUDA function calls and kernel launches, showing that the kernel was indeed running on the GPU, as well as the cudaMemcpy calls used to transfer data from the CPU to the GPU. This is a great example of the “sanity check” ability of a lightweight command line GPU profiler like nvprof.
Use nvprof for Remote Profiling
Sometimes the system that you are deploying on is not your desktop system. For example, if you use a GPU cluster or a cloud system such as Amazon EC2, and you only have terminal access to the machine. This is another great use for nvprof. Simply connect to the remote machine (using ssh, for example), and run your application under nvprof.
By using the --output-profile command-line option, you can output a data file for later import into either nvprof or the NVIDIA Visual Profiler. This means that you can capture a profile on a remote machine, and then visualize and analyze the results on your desktop in the Visual Profiler (see “Remote Profiling” for more details).
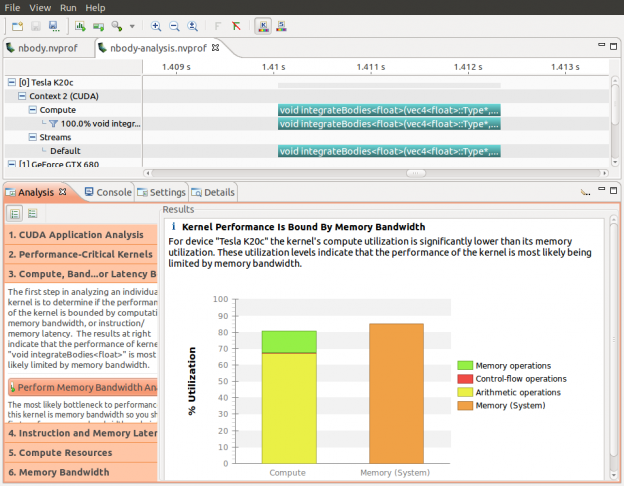
nvprof provides a handy option (--analysis-metrics) to capture all of the GPU metrics that the Visual Profiler needs for its “guided analysis” mode. The screenshot below shows the visual profiler being used to determine the bottleneck of a kernel. The data for this analysis were captured using the command line below.
nvprof --analysis-metrics -o nbody-analysis.nvprof ./nbody --benchmark -numdevices=2 -i=1

A Very Handy Tool
If you are a fan of command-line tools, I think you will love using nvprof. There is a lot more that nvprof can do that I haven’t even touched on here, such as collecting profiling metrics for analysis in the NVIDIA Visual Profiler. Check out the nvprof documentation for full details.
I hope that after reading this post, you’ll find yourself using it every day, like a handy pocket knife that you carry with you.


