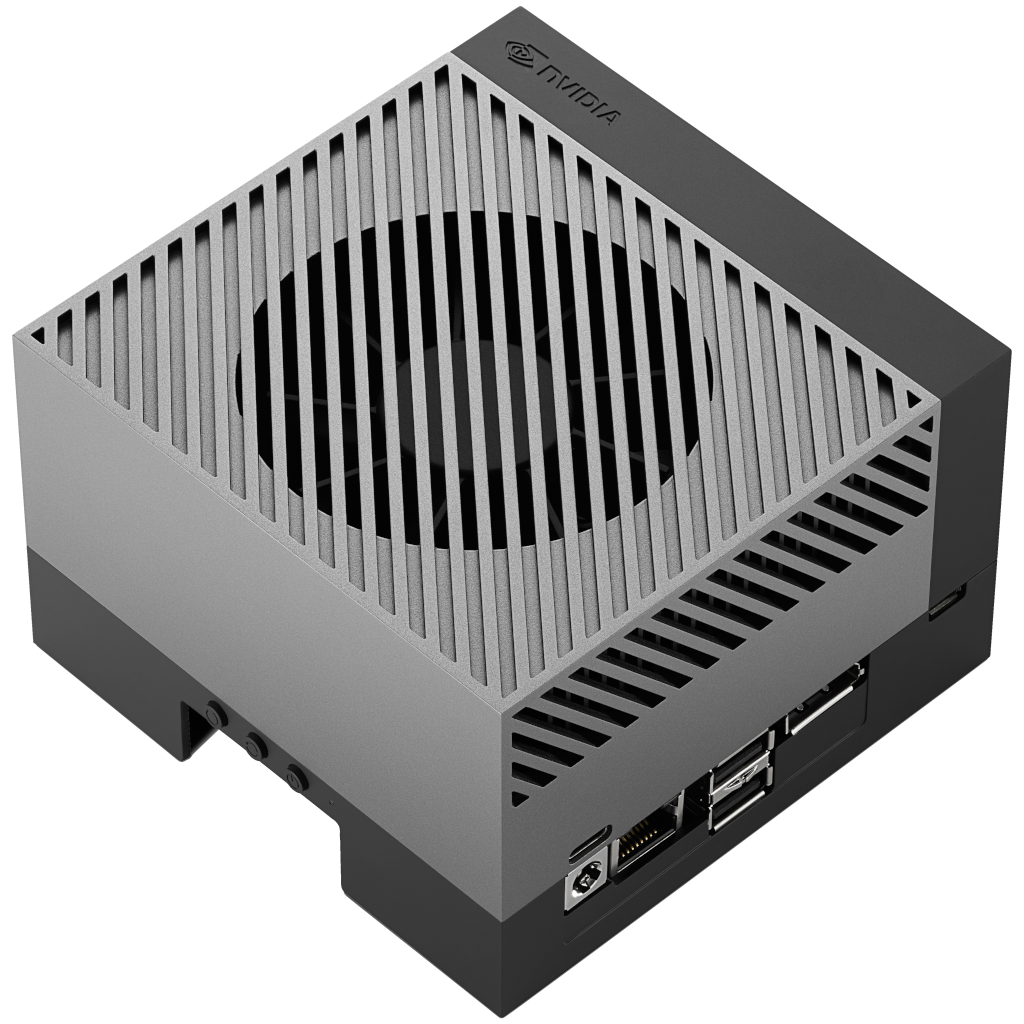
NVIDIA® Jetson AGX Orin™ Developer Kit enables development of full-featured AI applications for products based on Jetson Orin modules. It includes a high-performance, power-efficient Jetson AGX Orin module, and can emulate the other Jetson Orin modules.
This guide explains how to quickly set up your NVIDIA® Jetson AGX Orin™ Developer Kit for your development needs.

Optional Setup Flow
To set up your developer kit using the SDK Manager, see Jetson AGX Orin Developer Kit User Guide.
Included in the Box
Your Jetson AGX Orin Developer Kit includes:
- NVIDIA Jetson AGX module with heat sink and reference carrier board
- 802.11ac/abgn wireless Network Interface Controller
- USB Type-C power supply
- USB Type-C to USB Type-A cable
- Quick Start and Support Guide
What You'll Need
- Internet connection
-
And you need either of the following set (for headless, see below):
- PC monitor with DisplayPort cable
- USB keyboard and mouse
- Extra computer (Windows, Mac, Linux)
-
First, connect the following to the developer kit;
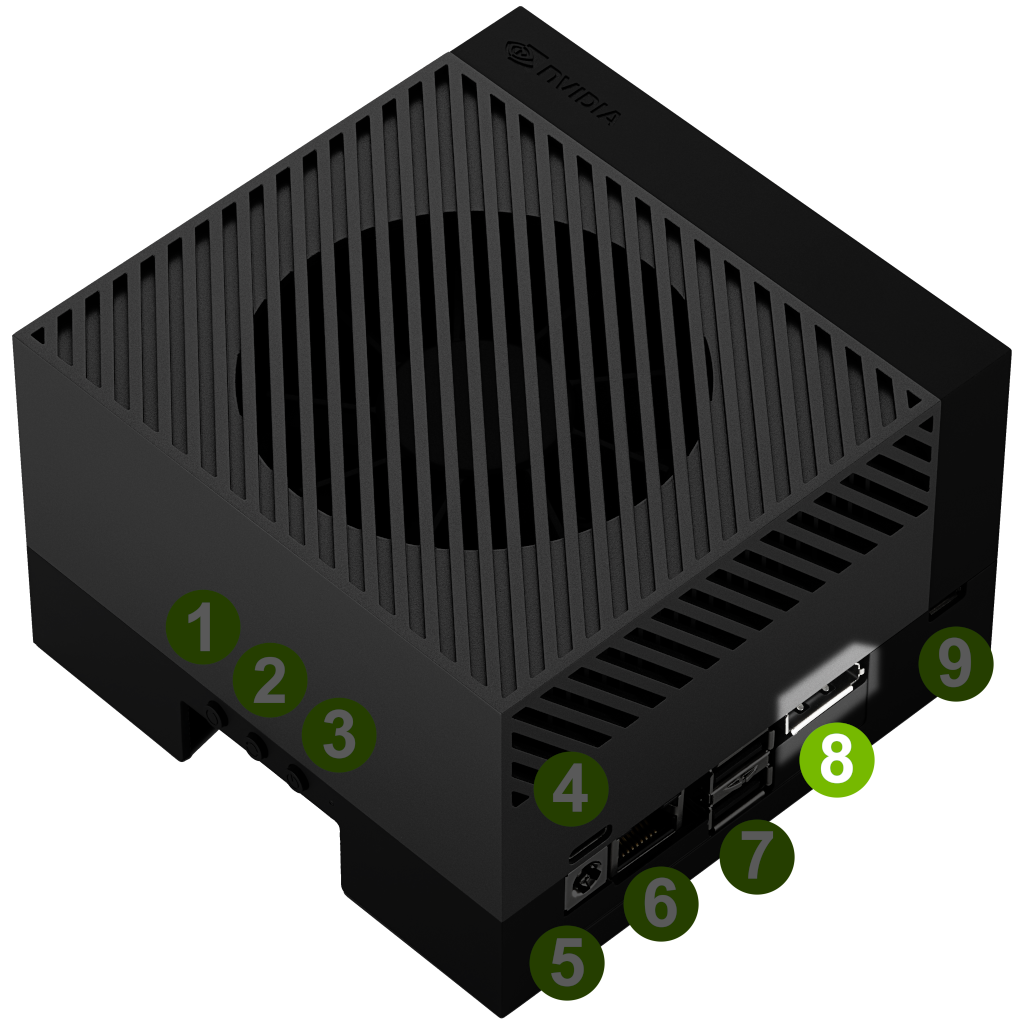
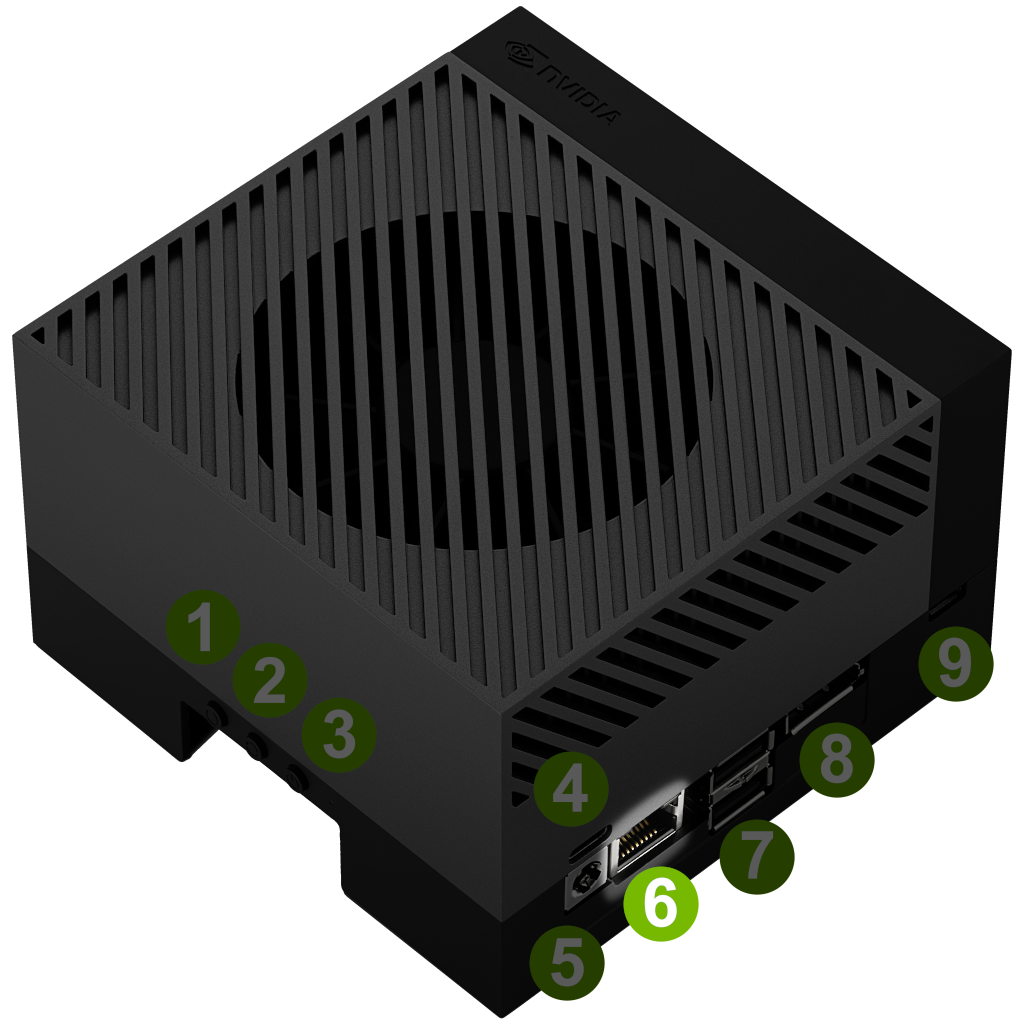
- DisplayPort cable attached to a computer monitor (8
 )
)
- For a monitor with HDMI input, use an active DisplayPort to HDMI adapter/cable.
- USB keyboard and mouse (12
 )
) - Ethernet cable (6
 ) (optional if you plan to connect to the Internet via WLAN)
- DisplayPort cable attached to a computer monitor (8
-
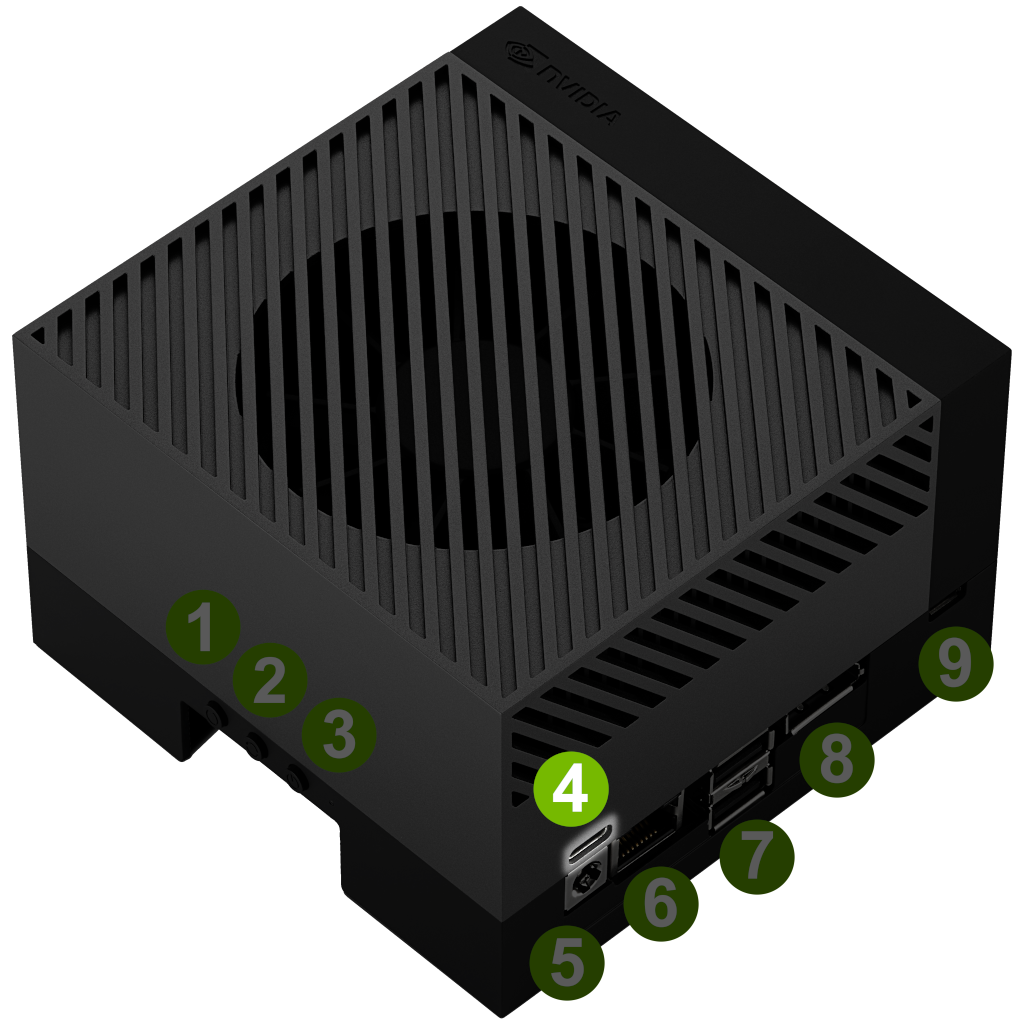
Then connect the included power supply into the USB Type-C™ port above the DC jack (4
 )
) - Your developer kit should automatically power on, and the white LED (0
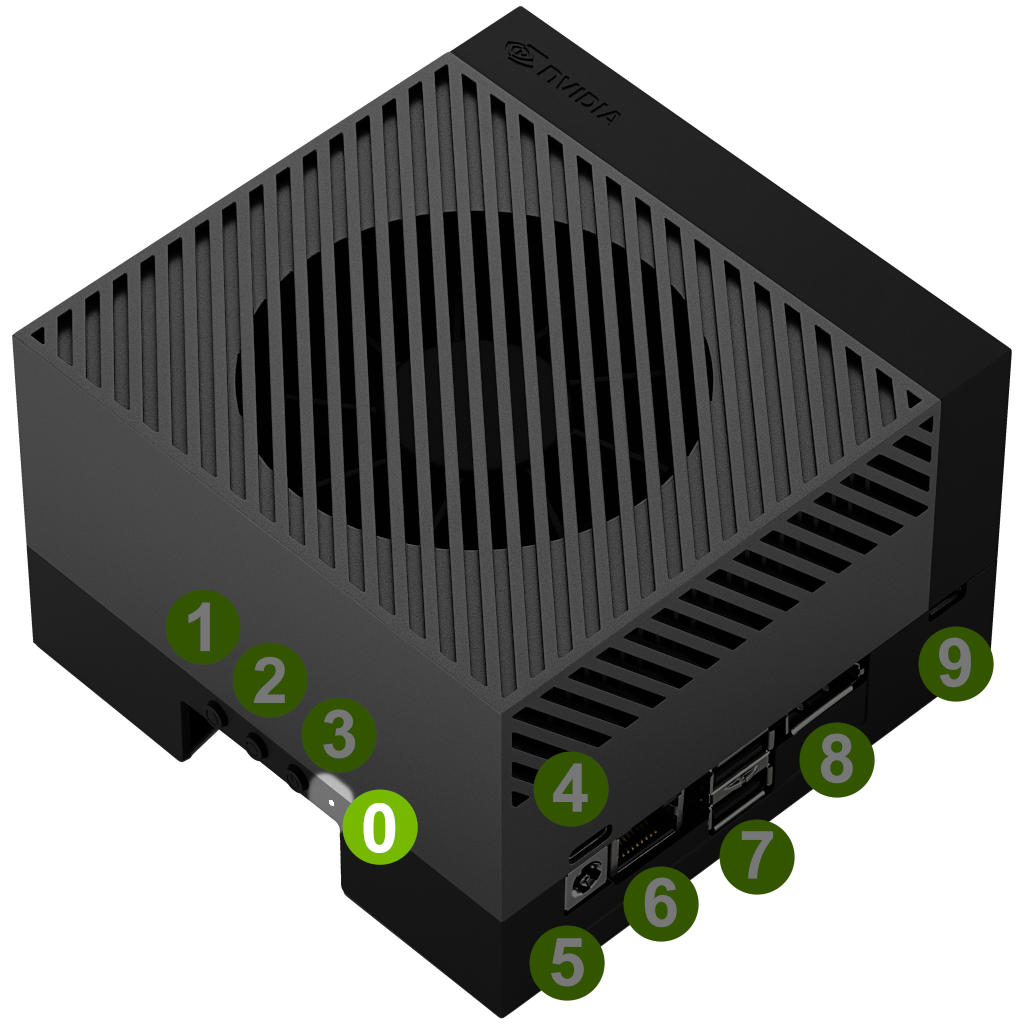 ) near the power button will light. If not, press the Power button (1
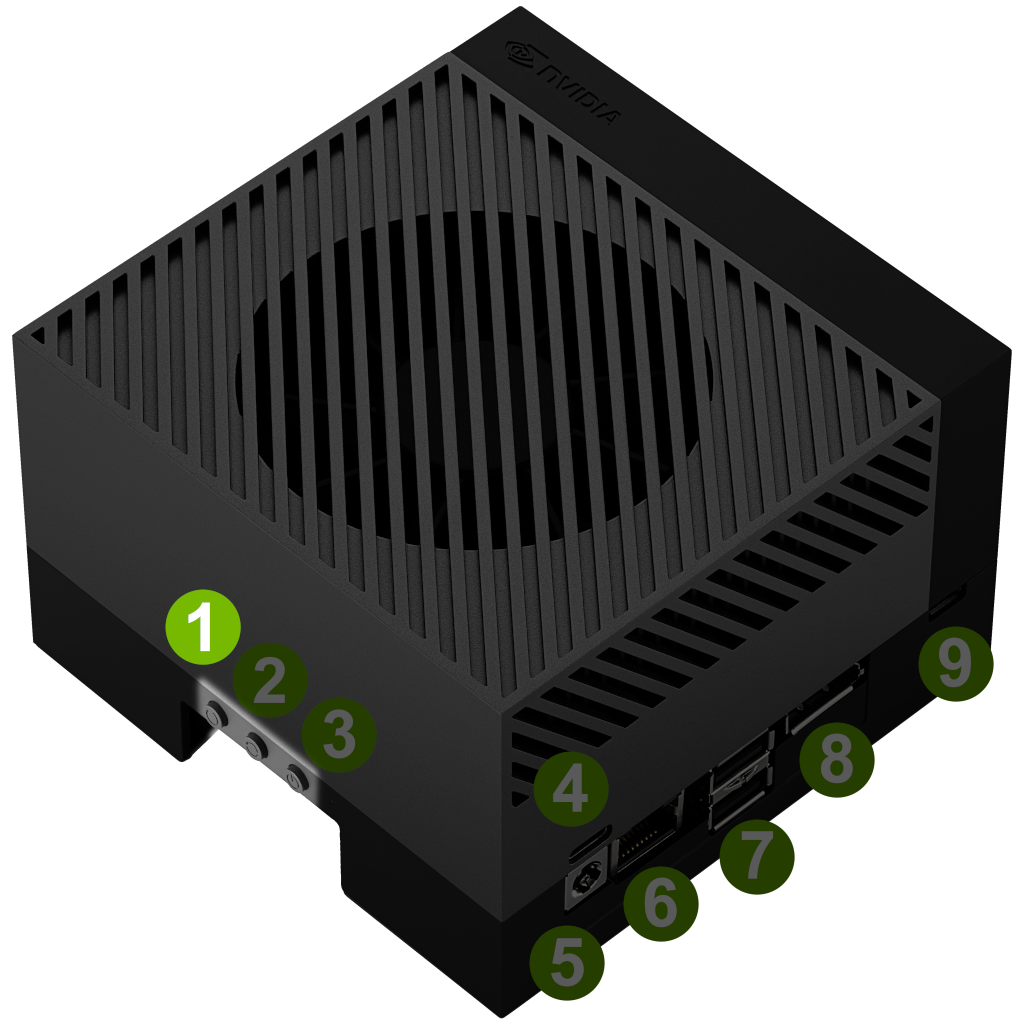 ).
). - Wait up to 1 minute to have Ubuntu screen on the computer monitor.
- Review and accept NVIDIA Jetson software EULA
- Select system language, keyboard layout, and time zone
- Create username, password, and computer name
- Configure wireless networking
-
First, connect the following to the developer kit;
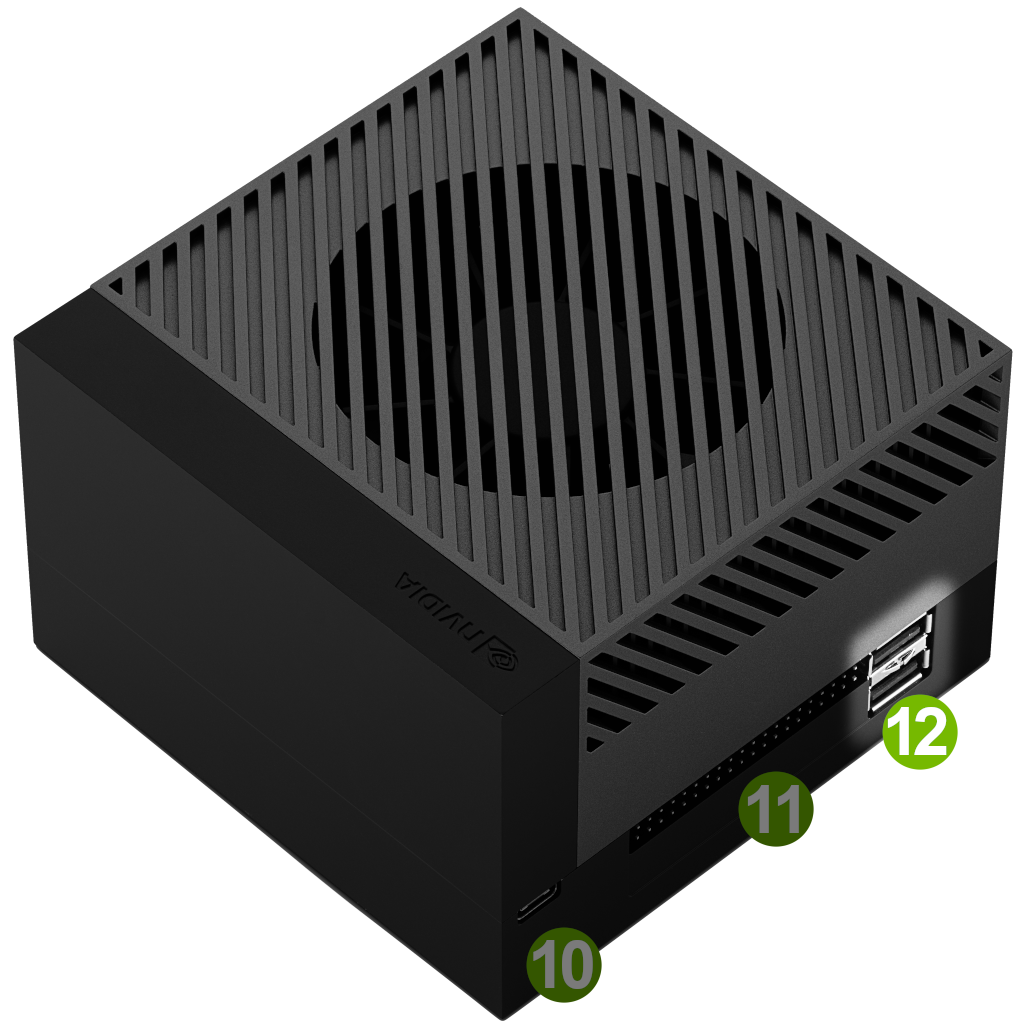
- The USB Type-C end of the included USB Type-A to USB Type-C cable. Use the USB Type-C port (10
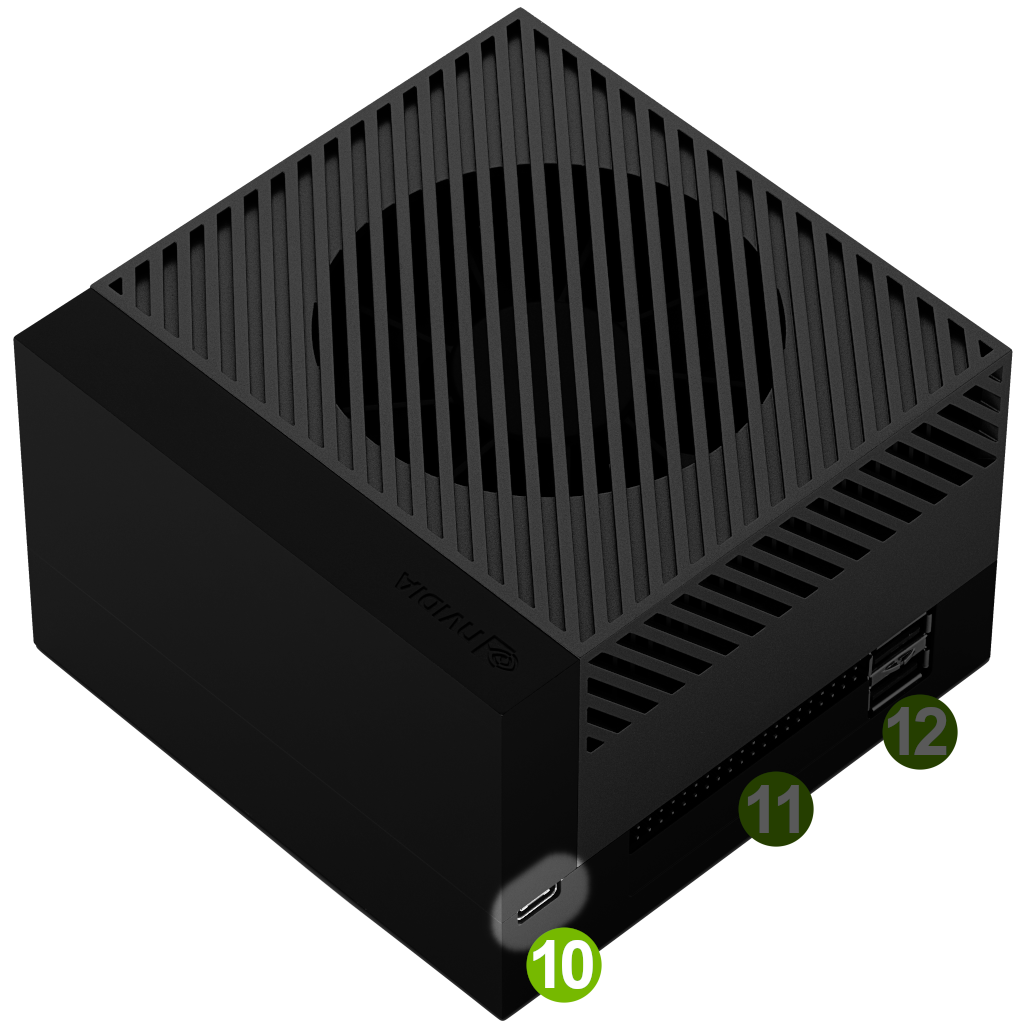 ) next to the 40-pin connector. The other end should be connected to your computer.
 - Ethernet cable (6) (optional if you plan to connect to the Internet via WLAN)
Attention
Make sure you do NOT connect anything into DisplayPort output. It may direct the oem-config session to desktop and not allow you to perform the initial setup via USB.
- The USB Type-C end of the included USB Type-A to USB Type-C cable. Use the USB Type-C port (10
-
Then connect the included power supply into the USB Type-C™ port above the DC jack (4
) - Your developer kit should automatically power on, and the white LED (0) near the power button will light. If not, press the Power button (1).
- Wait up to 1 minute.
- On your computer, use a serial terminal application to connect via host serial port to the developer kit.
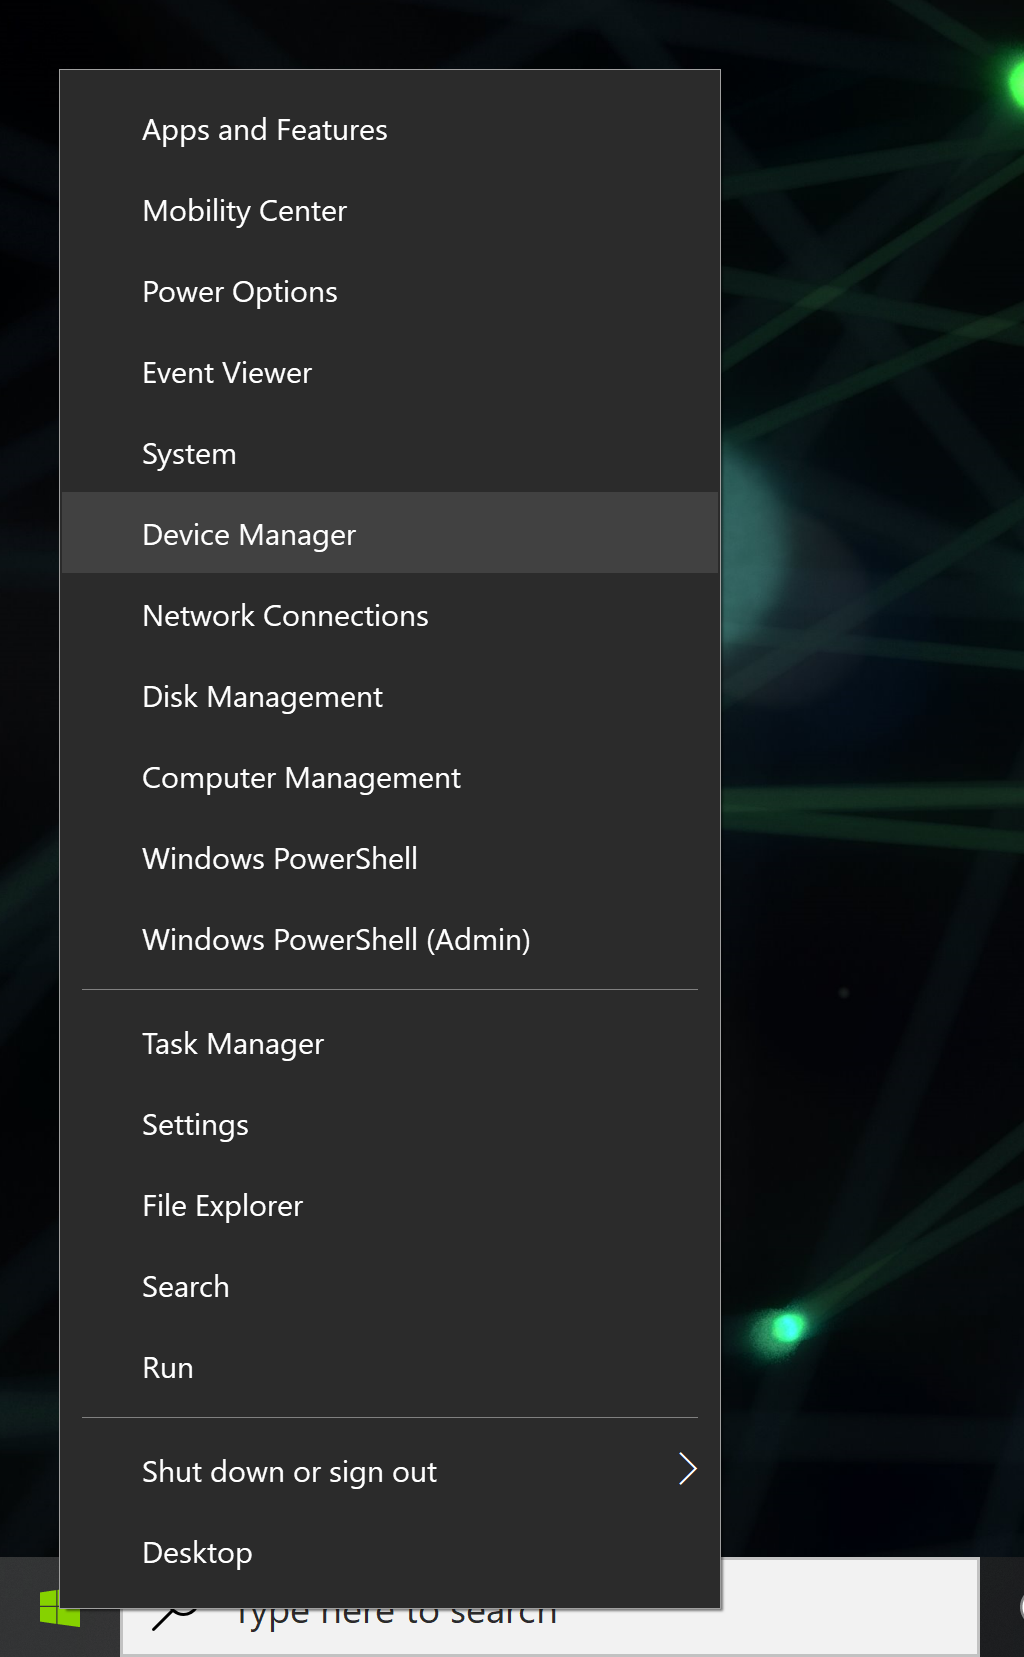
- Right click on the Windows Start icon and select "Device Manager".
- Open the
Ports (COM & LPT)to find aUSB Serial Device(in this caseCOM10).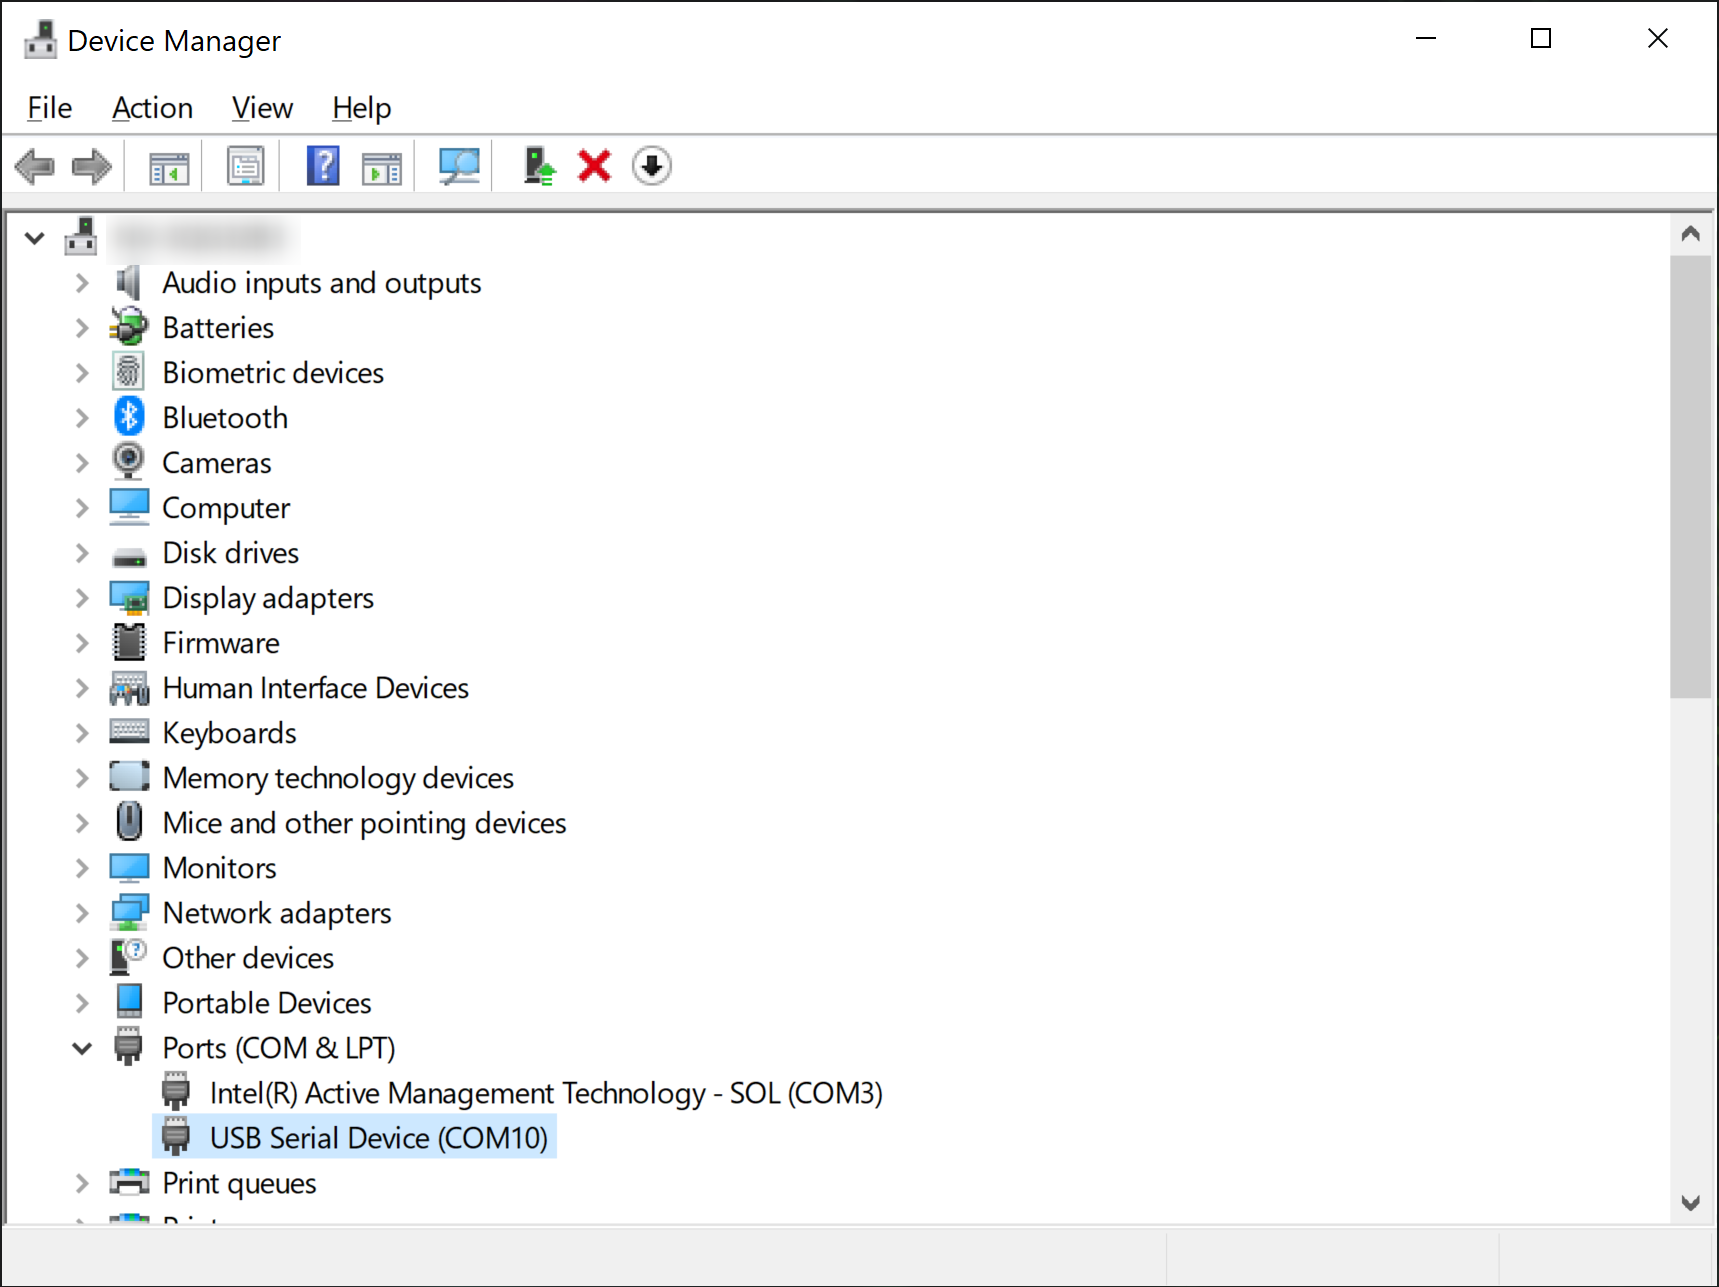
- Check the device property by double-clicking the device entry, make sure the VID and PID are
0955and7020respectively underDetailstab.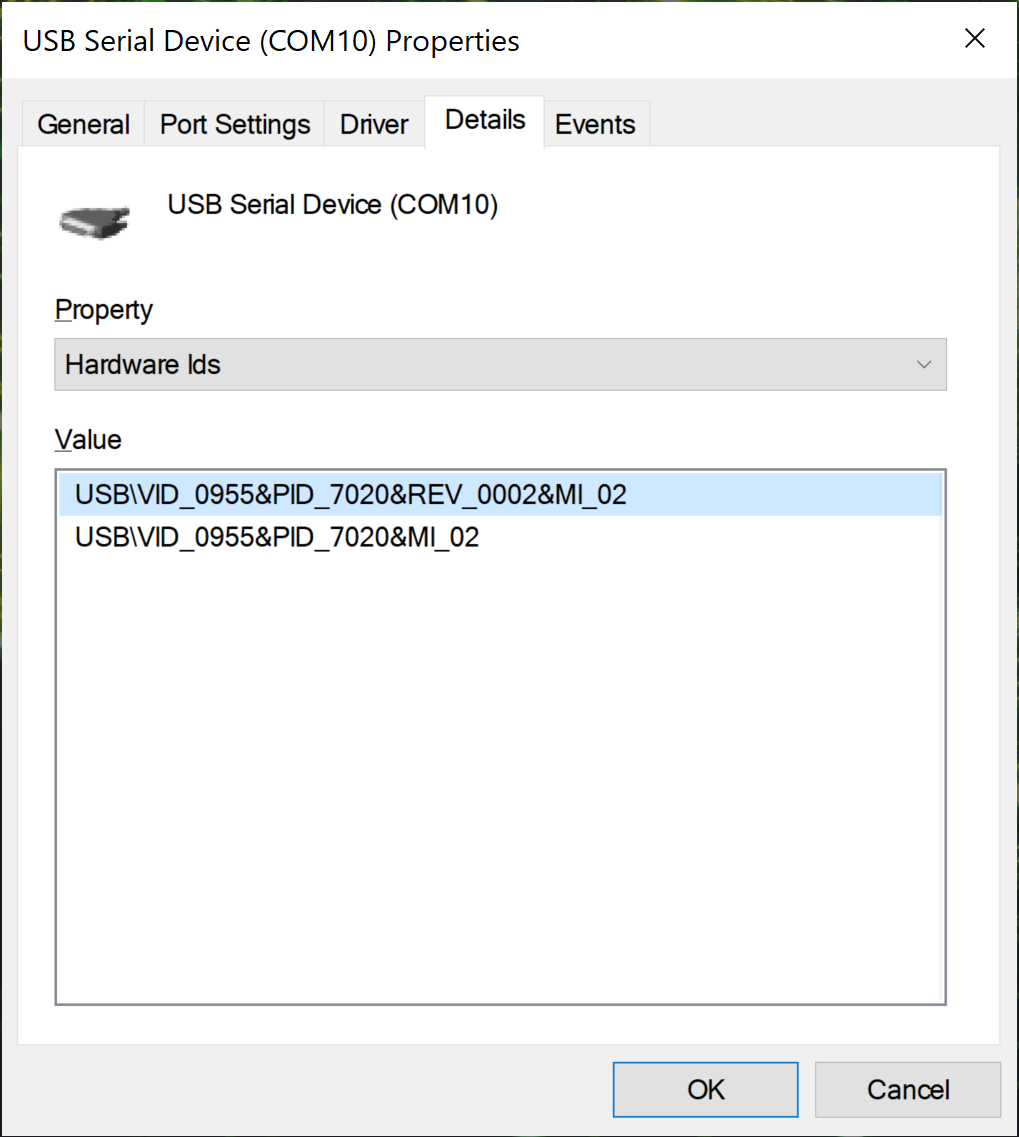
- Follow the instruction below based on your choice of terminal application;
- Open the PuTTY application
- When
Sessionis selected in the leftCategory:pane, input the COM port name forSerial lineand115200forSpeed.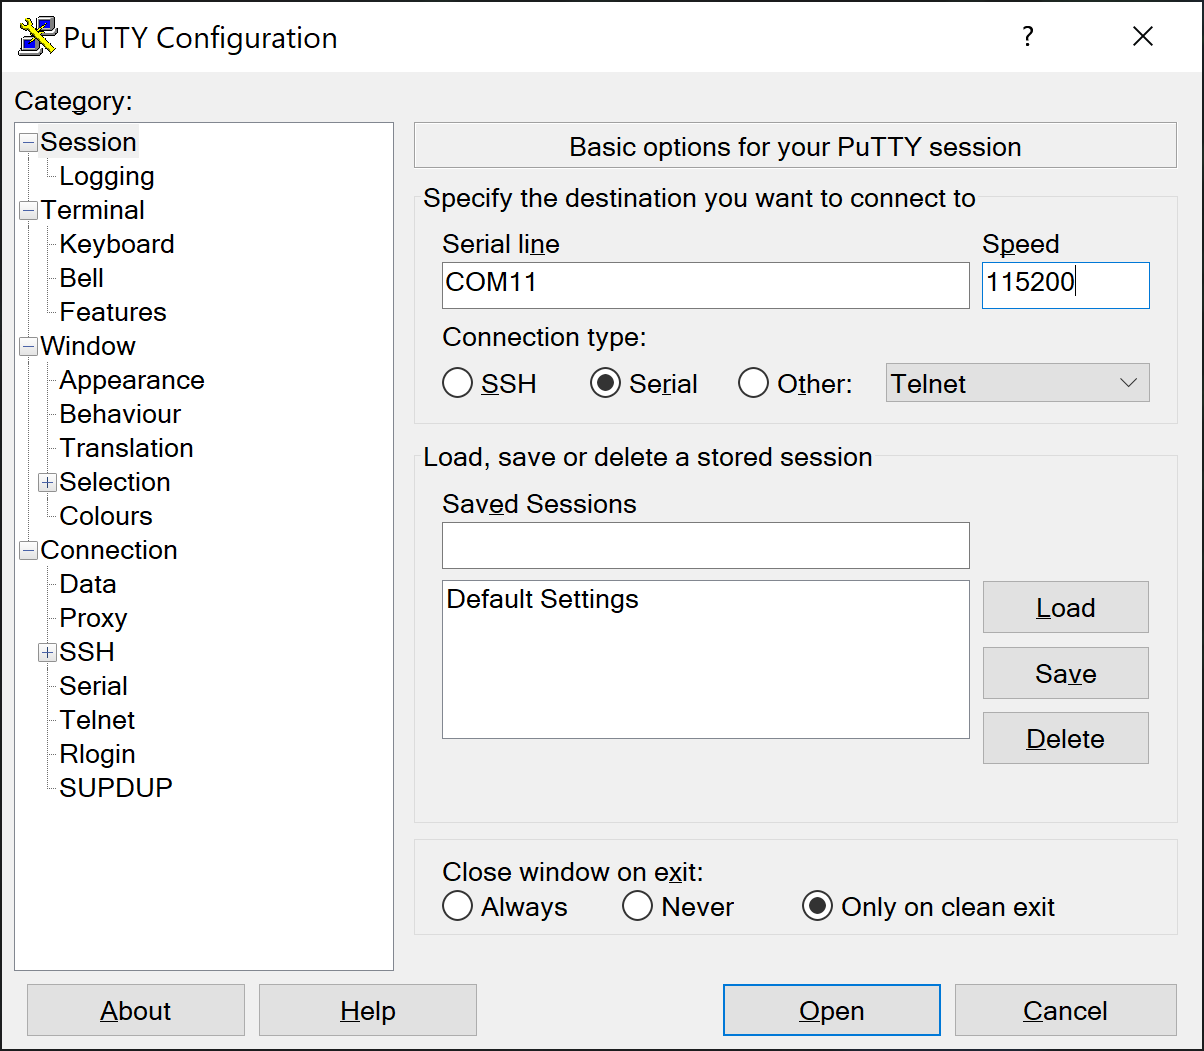
- Click
Opento connect to the console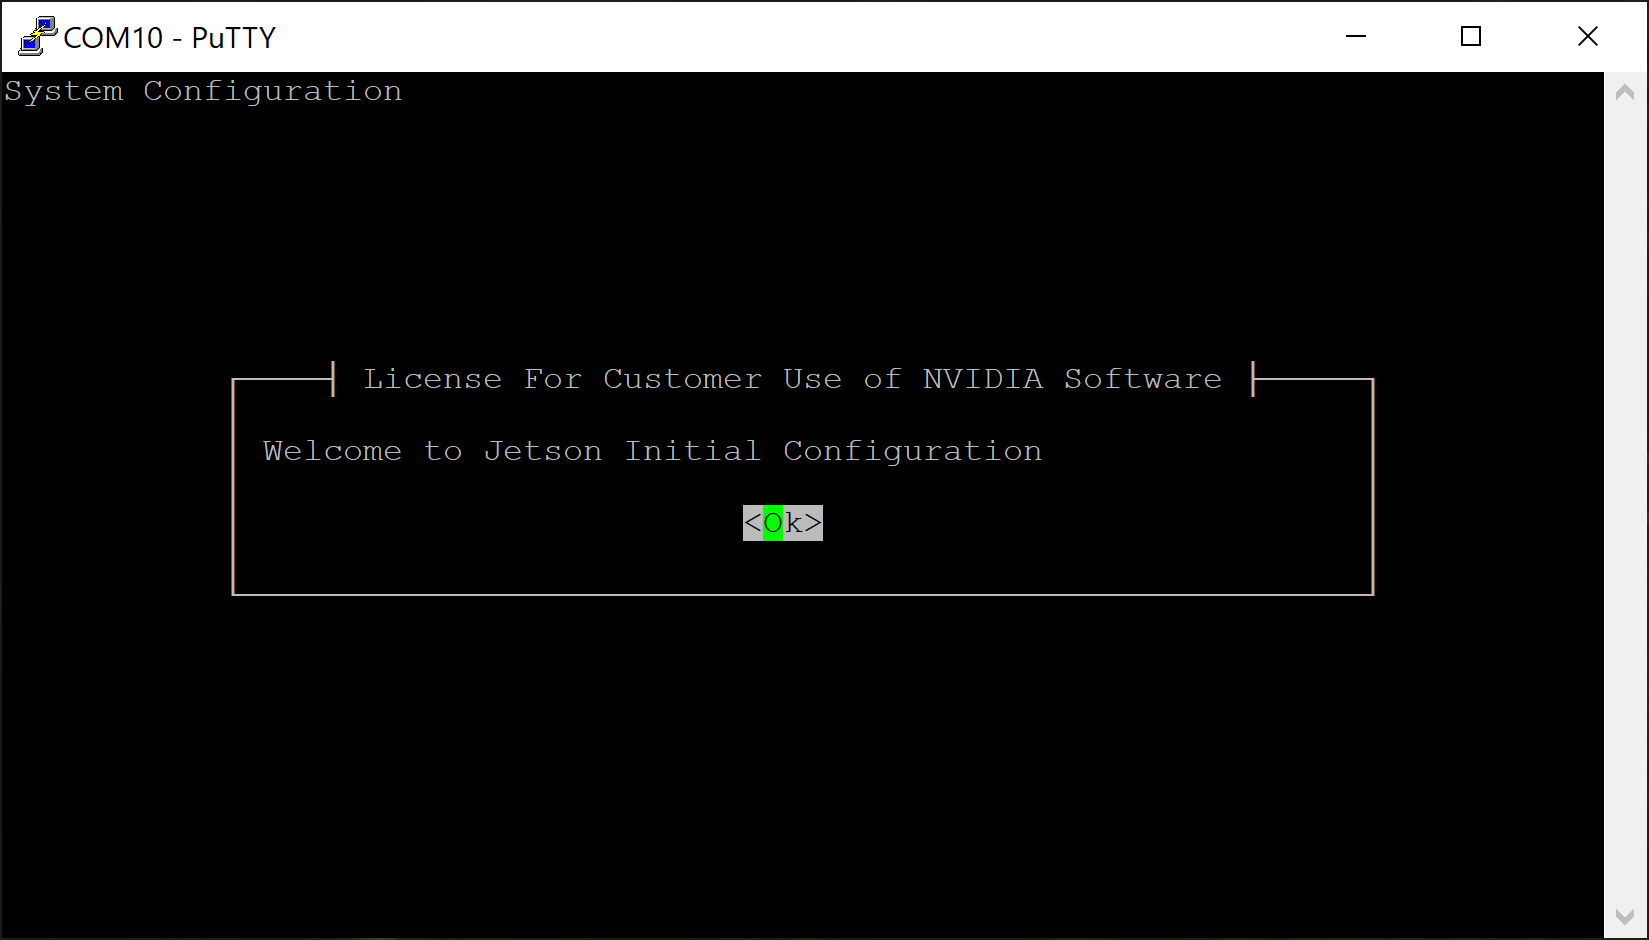
- Complete this CUI-based "Jetson Initial configuration" (
oem-config) using your PC's keyboard. - Open
MobaXtermapplication. - Click
Sessionicon in the top menu bar (or from menu, selectSessions->New session). - Select
Serialfrom the top bar, select the serial port you verified with Device Manager in the previous step, and setSpeed (bps)to be115200.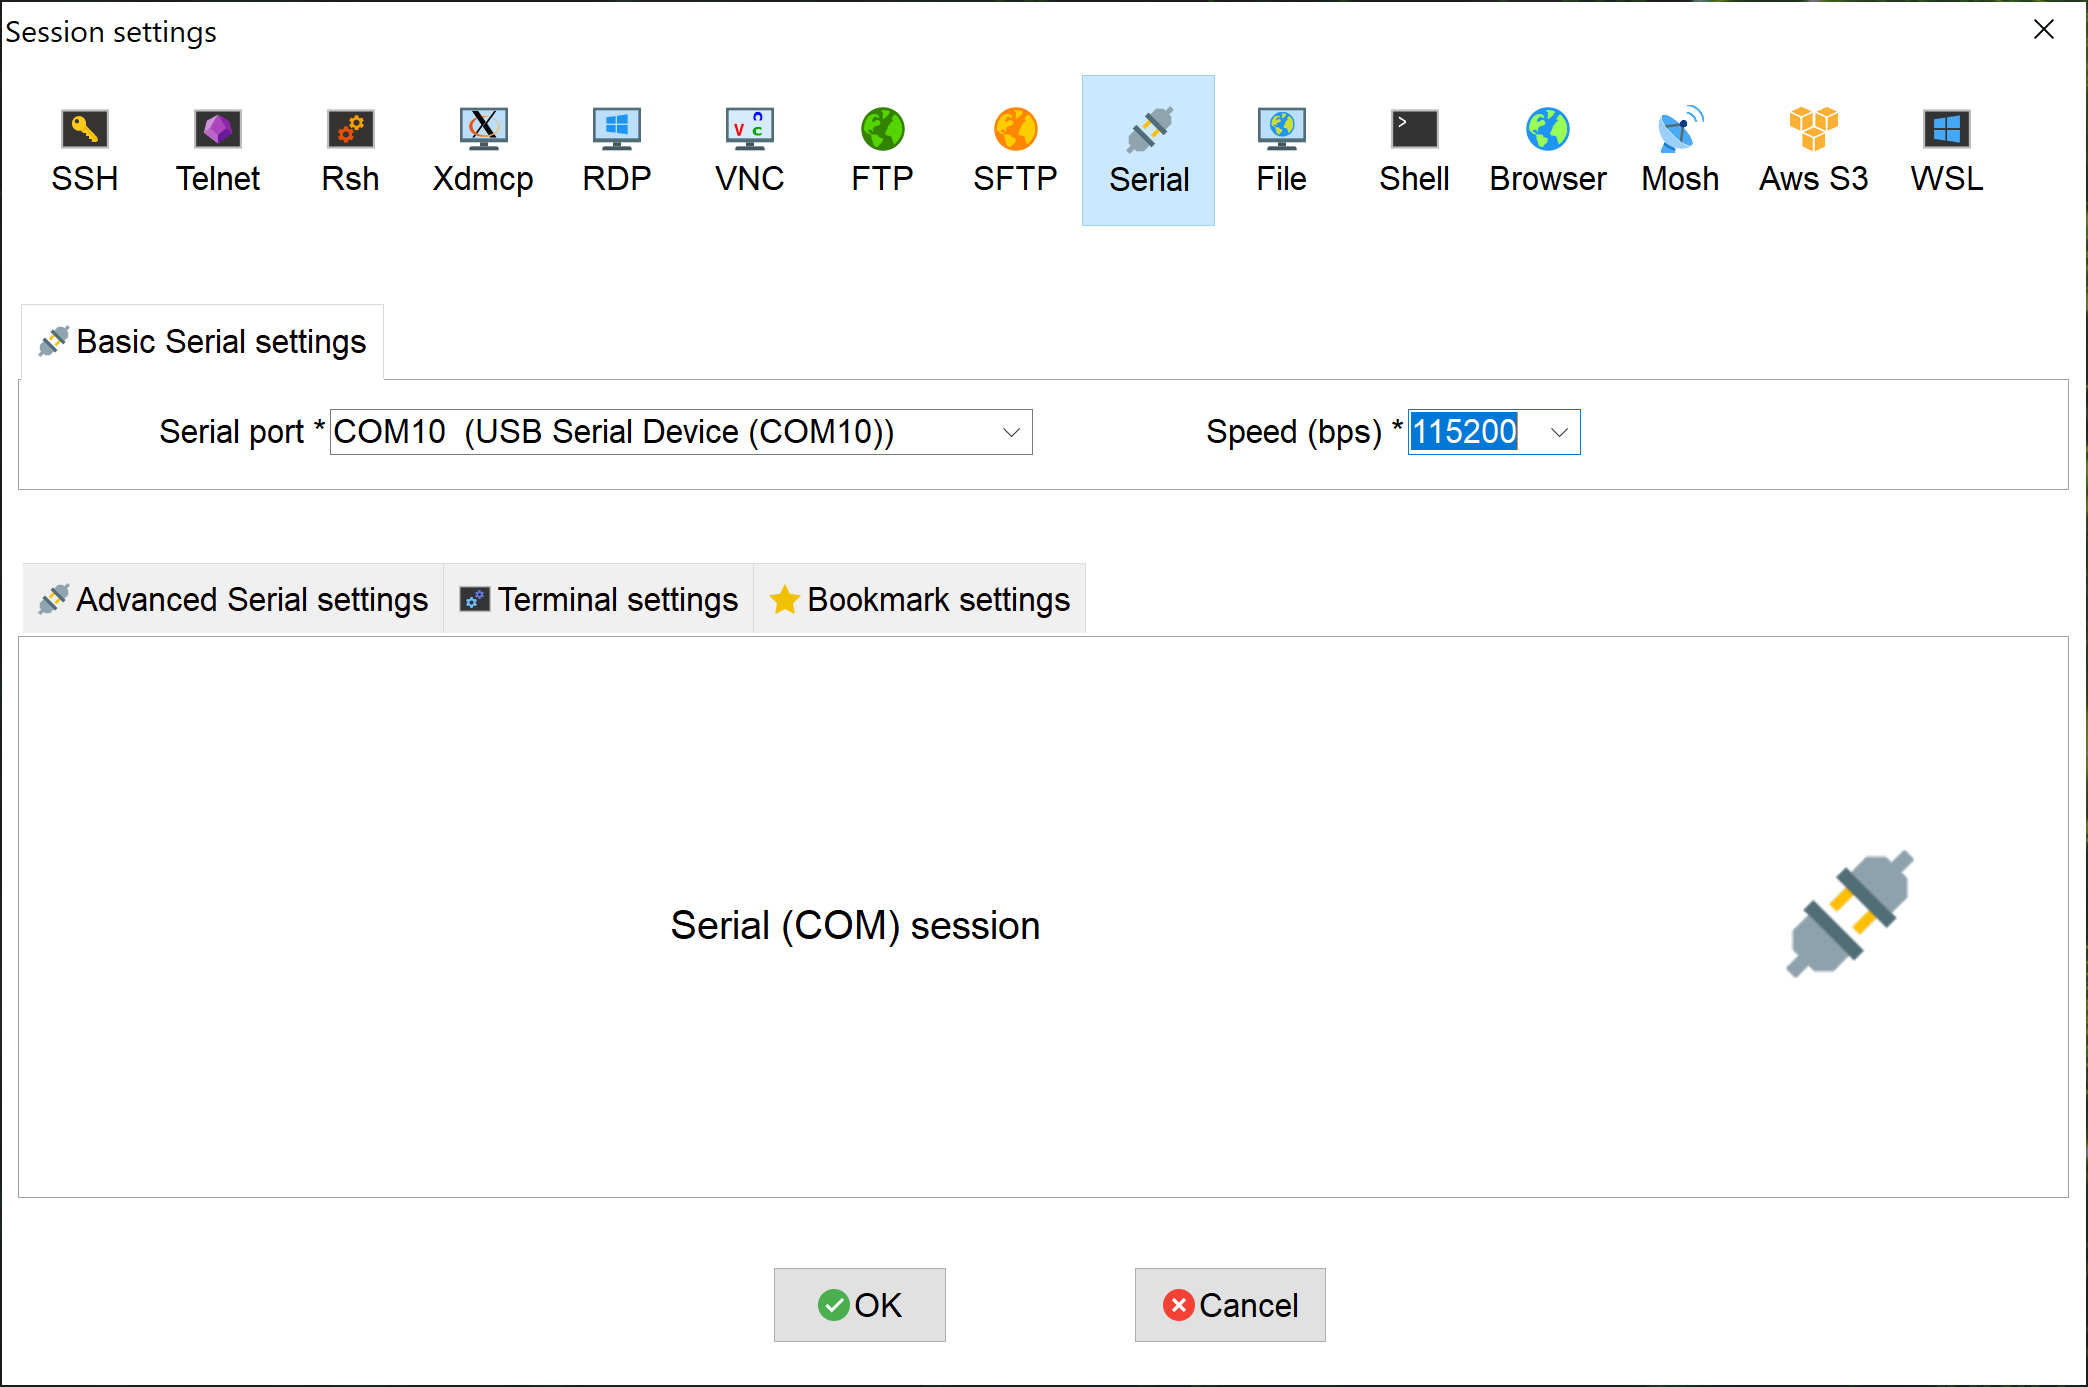
- Click
OKto connect to the console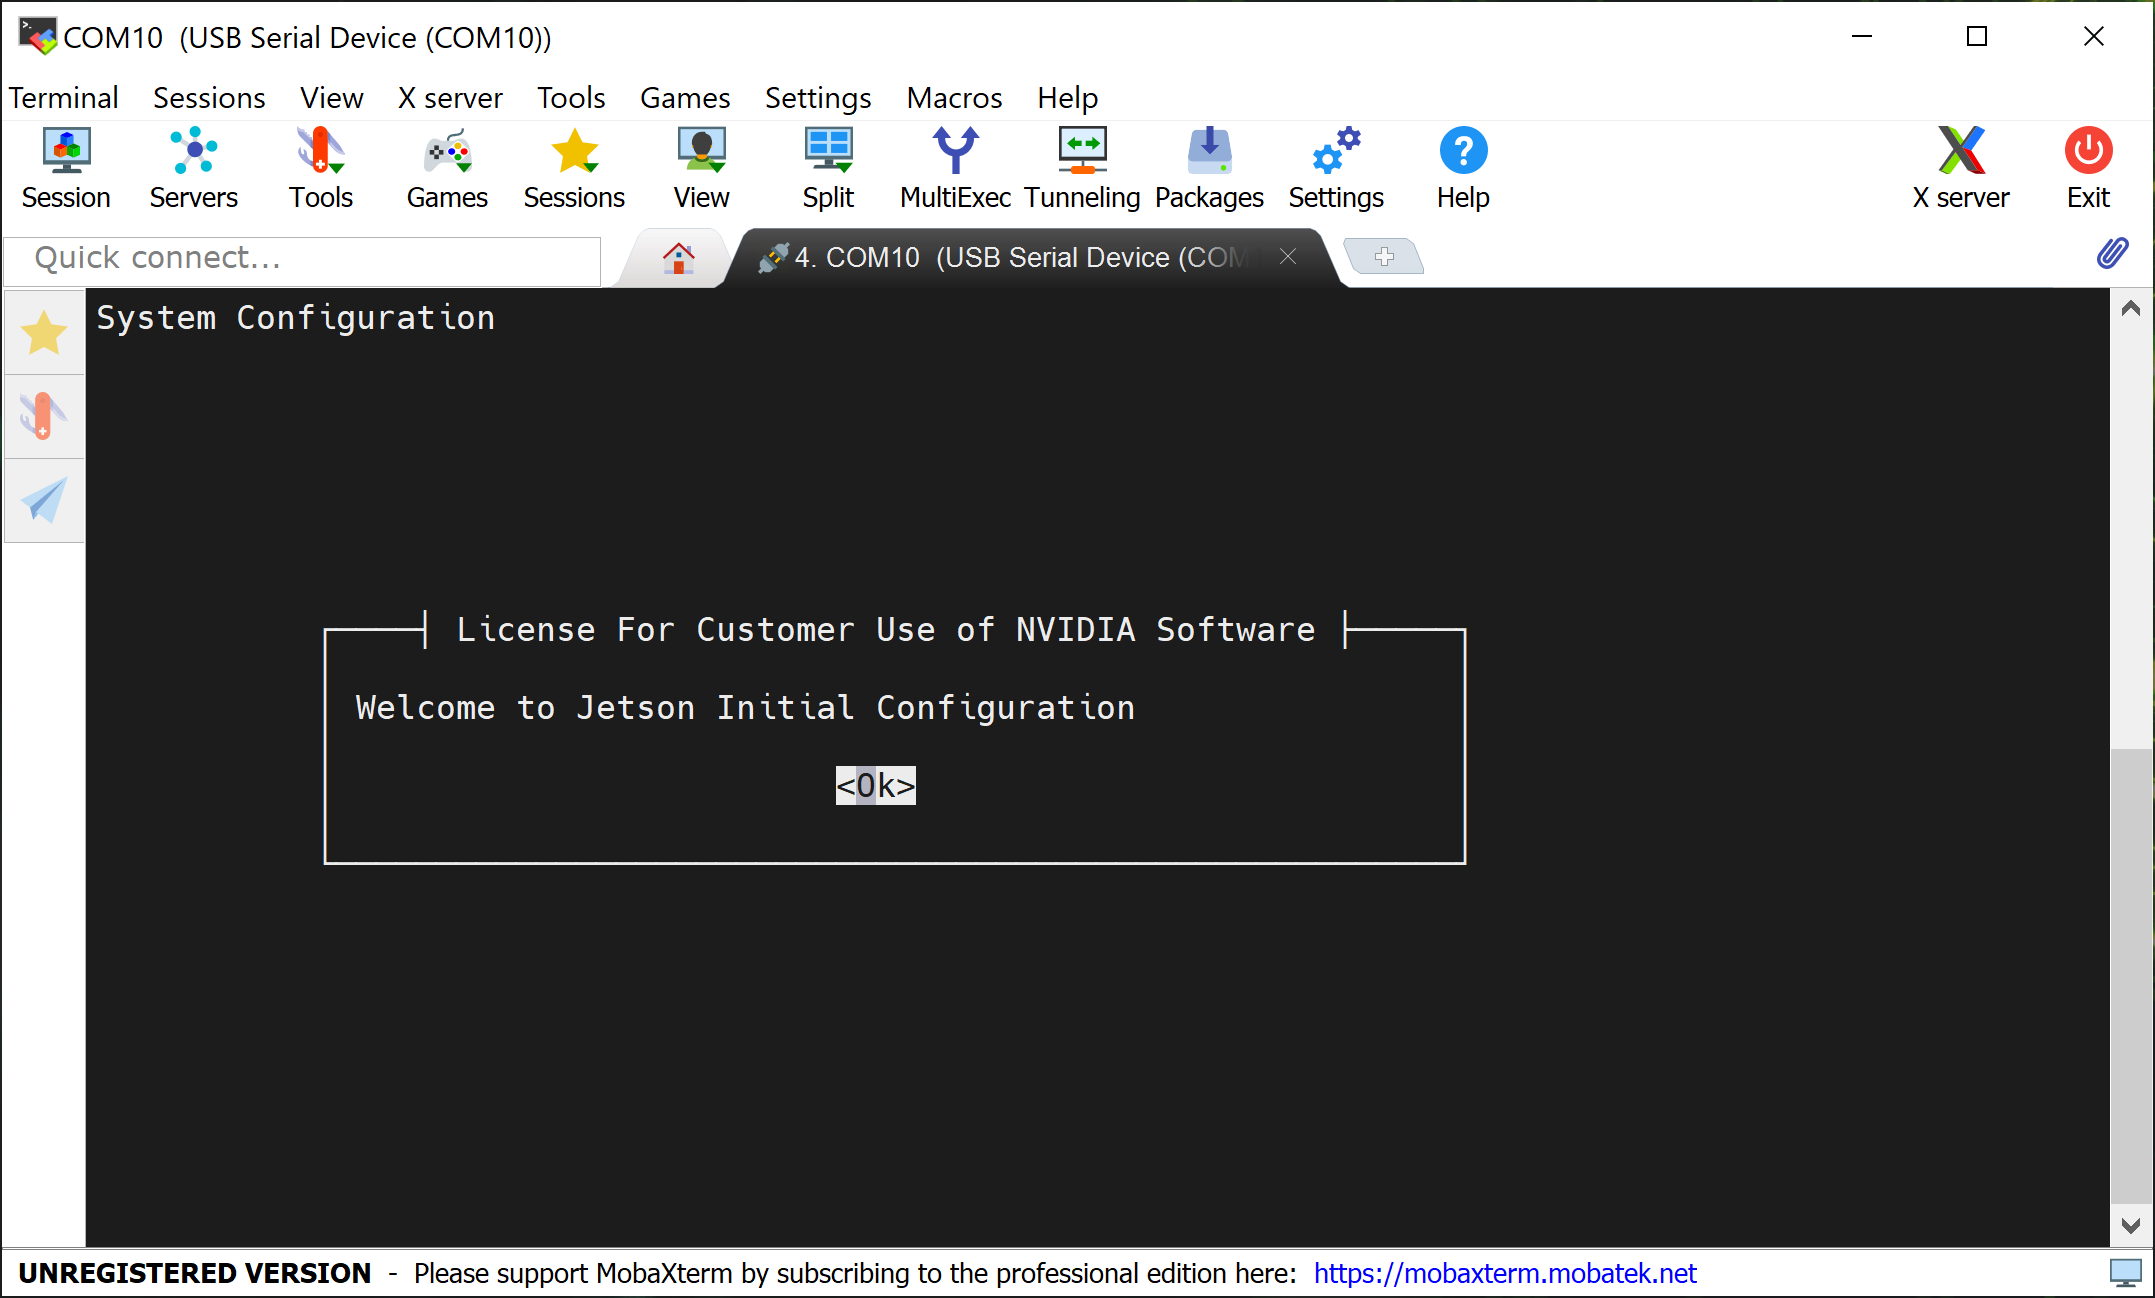
- Complete this CUI-based "Jetson Initial configuration" (
oem-config) using your PC's keyboard. -
NVIDIA AI tutorials and courses
-
Jetson Community
- Get inspired with the latest Jetson community projects.
-
Learn other NVIDIA software solutions available on Jetson platform
-
Jetson Forum
- Ask and answer questions on the Jetson AGX Orin forum.
-
Jetson Wiki
- Don’t miss the Jetson Zoo with instructions for installing various open source add-on packages and frameworks for Machine Learning, Computer Vision, Robotics, and more.
Instructions
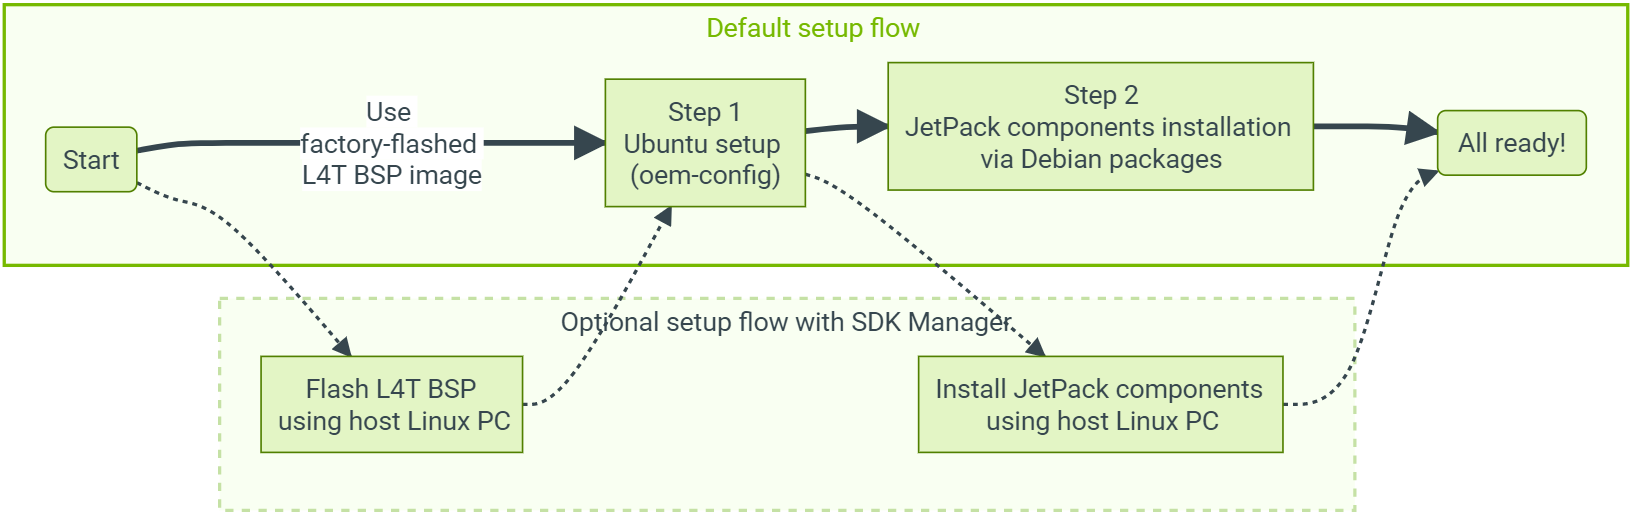
Step 1 - Run through Ubuntu Setup (oem-config)
There are two ways to interact with the developer kit: with a display, keyboard and mouse attached ("display attached" or "headed" configuration); or in a “headless" configuration through a connection from another (host) computer.
You can conduct the initial setup either way.
|
Initial setup with display attached |
Initial setup in a headless configuration |
|
|---|---|---|
| Monitor, keyboard and mouse |
 Required Required |
Not required |
| Extra computer (Windows, Mac, Linux) | Not required |
Required |
When you boot for the first time, the developer kit will take you through some initial setup, including:
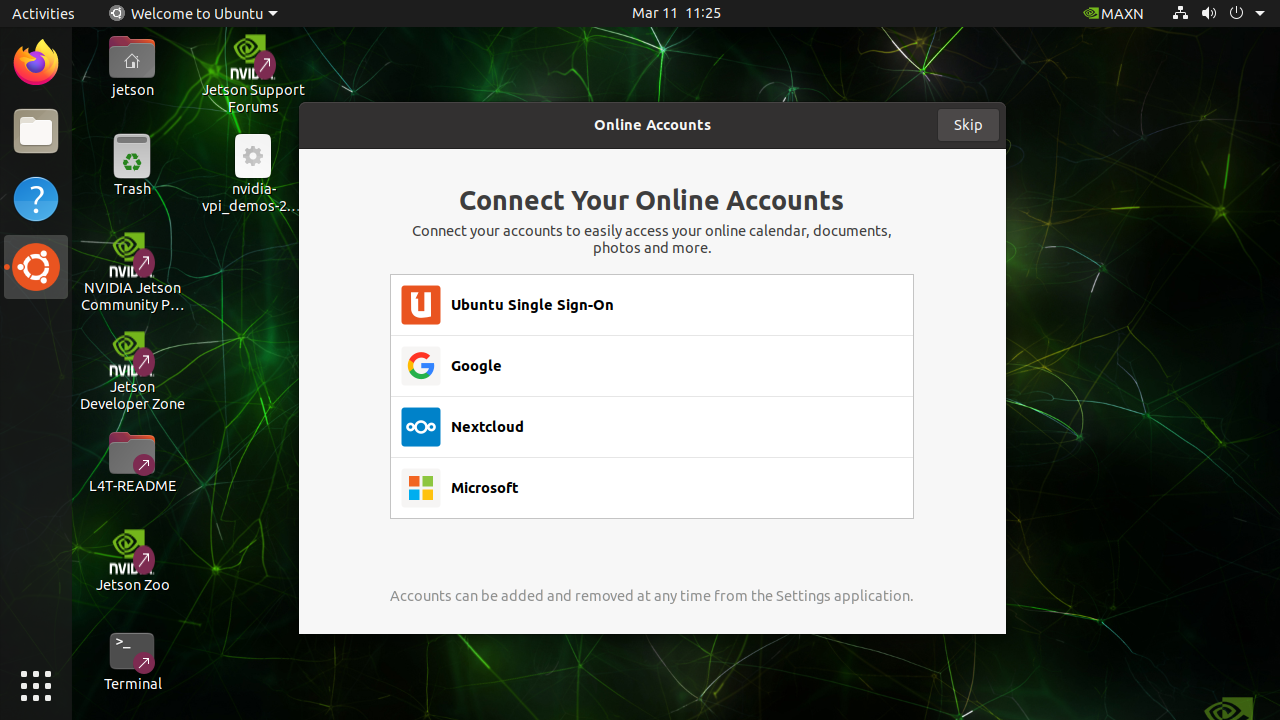
Upon completing the oem-config, the developer kit reboots, and you should see the Ubuntu desktop like this on the display.
Move onto the next step.
Set up the developer kit in headless configuration
Complete oem-config via USB from your computer
Pick the type of your computer:
PuTTY is one of the most widely used terminal applications for accessing serial consoles. You can use other terminal applications, but if you don’t have any on your Windows PC, you can download PuTTY from here.
Locate the tty device
Before connecting to your Jetson developer kit for initial setup, check to see what Serial devices are already shown on your macOS computer.
ls /dev/cu.usbmodem*
Connect your macOS computer to the Jetson AGX Orin Developer Kit's USB Type-C port (10) next to the 40-pin connector and run the same command to find what’s newly added.
~$ ls /dev/cu.usbmodem*
/dev/cu.usbmodem14133200001053
The new serial device is for your Jetson developer kit.
~$ ls -l /dev/cu.usbmodem*
crw-rw-rw-  1 root  wheel   18,  19 Oct  2 03:54 /dev/cu.usbmodem14133200001053
Screen command
screen is already installed by default as part of macOS.
Use the device name discovered previously as a command line option for the screen command.
sudo screen /dev/cu.usbmodem14133200001053 115200
Complete the CUI-based "Jetson Initial configuration" (oem-config) using your Mac's keyboard.
Terminate screen
To terminate your screen session, press C-a + k ( Ctrl+A then K ), then press y on confirmation.
Locate the tty device
Before connecting to your Jetson developer kit for initial setup, check to see what Serial devices are already shown on your Linux computer.
dmesg | grep --color 'tty'
Connect your Linux computer to the Jetson AGX Orin Developer Kit's USB Type-C port (10) next to the 40-pin connector and run the same command to find what’s newly added.
~$ dmesg | grep --color 'tty'
…
…
[xxxxxx.xxxxxx] cdc_acm 1-5:1.2: ttyACM0: USB ACM device
The new serial device is for your Jetson developer kit.
$ ls -l /dev/ttyACM0
crw-rw---- 1 root dialout 166, 0 Oct  2 02:45 /dev/ttyACM0
Screen command
Install the Screen program on your Linux computer if it is now already available.
For example, use this command to install Screen if you are running Ubuntu.
sudo apt-get install -y screen
Use the device name discovered previously as a command line option for the screen command.
sudo screen /dev/ttyACM0 115200
Complete the CUI-based "Jetson Initial configuration" (oem-config) using your PC's keyboard.
Terminate screen
To terminate your screen session, press C-a + k ( Ctrl+A then K ), then press y on confirmation.
Move onto the next step.
Step 2 - Install JetPack Components
Once the initial setup is complete, you can install the latest JetPack components that correspond to your L4T version from the Internet.
Open a terminal window if you are on Ubuntu desktop ( Ctrl+Alt+T ).
Attention
Check your L4T version first to see if you have a unit flashed with older version of the BSP.
cat /etc/nv_tegra_releaseYou may get something like this, # R34 (release), REVISION: 1.0, GCID: 30102743, BOARD: t186ref, EABI: aarch64, DATE: Wed Apr 6 19:11:41 UTC 2022, and this shows that you have L4T for JetPack 5.0 Developer Preview.
If you have an earlier version of L4T, issue the following command to manually put the apt repository entries using commands below.
sudo bash -c 'echo "deb https://repo.download.nvidia.com/jetson/common r34.1 main" >> /etc/apt/sources.list.d/nvidia-l4t-apt-source.list'
sudo bash -c 'echo "deb https://repo.download.nvidia.com/jetson/t234 r34.1 main" >> /etc/apt/sources.list.d/nvidia-l4t-apt-source.list'
If you see R34 (release), REVISION: 1.0 or newer, then your apt sources lists are already up to date and you can proceed
Issue the following commands to install JetPack components.
sudo apt update
sudo apt dist-upgrade
sudo reboot
sudo apt install nvidia-jetpack
It can take about an hour to complete the installation (depending on the speed of your Internet connection).
Note
For more detail, see the "Package Management Tool" section of "JetPack documentation".
Next Steps
Congratulations on setting up your Jetson AGX Orin Developer Kit!
The following guides will help you to learn more about the developer kit and setting up your ideal developer environment: