はじめに
物体検出というと、コンピューター ビジョンの伝統的なアプローチは、検出したいオブジェクトの種類に応じたサイズのスライディング ウィンドウを使用して、画像の左から右、上から下へと小さな一定サイズの領域を順次スキャンしていきます。スライディング ウィンドウの各位置で、物体分類器は、その領域内に興味深いオブジェクトがあるかどうかを判断する必要があります。このアプローチは論理的ですが、CPU で実行すると非常に時間がかかります。GPU は、データ並列アルゴリズムを実装する強力な機能を備えているため、推論を高速化することができ、この場合、異なるスライディング ウィンドウの位置で分類器を同時に実行します。
その後の物体検出のためのディープラーニング技術では、関心のある領域に対してのみオブジェクト分類器を実行すればよいという基本的な考え方が提案されました。画像全体をスキャンするのではなく、まず、興味のあるオブジェクトがどこに現れるかについて、いくつかの仮定を立てます。例えば、R-CNN アプローチでは、領域提案技術を用いて画像内の潜在的な関心領域を生成し、これらの提案領域に対して物体分類器を実行し、オブジェクトを予測します。分類ステップの後、後処理パイプラインが適用されて、予測領域が調整され、重複検出の排除、シーン内の他のオブジェクトの情報に基づく領域の再スコアが行われます [1]。これらのステップはすべて、リアルタイムのパフォーマンスを達成するために最適化される必要があります。
2015 年以降、物体検出の問題に対して、YOLO (You Only Look Once) と呼ばれる根本的に新しいアプローチが登場しました。この手法は、画像を一度だけ見て関心物体を検出するもので、複数の関心領域とその領域のクラス確率を同時に予測する単一の畳み込みネットワークに画像を送り込むことでこれを実現します [2]。オリジナル バージョンから現在のバージョン 8 まで継続的な進化を遂げた YOLO は、その速度と精度で高速物体検出ベースのアプリケーションを作成するための新しい波をもたらしました。
今回は、NVIDIA による YOLO バージョン 5 の GPU 最適化実装を紹介します。YOLOv5 は Ultralytics LLC によって開発され、そのオリジナル ソース コードは https://github.com/ultralytics/yolov5 に掲載されています。YOLOv5 の詳細については、https://blog.roboflow.com/yolov5-improvements-and-evaluation/ に記載されています。
CPU と GPU による非極大値抑制の実現
前述したように、検出結果を改良するために使用される後処理パイプラインのパフォーマンスは、リアルタイムの物体検出アプリケーションにとって非常に重要であり、特に、検出された物体を覆う多数の重複領域 (YOLO 用語ではオーバーラップ バウンディング ボックスと呼ばれる) を削減することが重要です。YOLO はこの目標を達成するために、Non-Maximum Suppression/NMS (非極大値抑制) 技術を使用しています。そのため、YOLO を高速化するためには、CPU や GPU で NMS の性能を最適化する課題に取り組む必要があります。
NVIDIA による YOLOv5 の最適化された実装は、以下のサイトで見ることができます。
https://github.com/NVIDIA-AI-IOT/yolov5_gpu_optimization、CPU と GPU による 2 つの最適化された NMS アルゴリズム実装を提供します:
- DeepStream のサンプル (CPU NMS)
- TensorRT のサンプル (GPU NMS)
下表は、NVIDIA T4 プラットフォームで、3 x 640 x 640 の入力サイズで YOLOv5n を実行した場合の、2 つの方法の性能を示しています。
| リファレンス コード | デコード技術 | NMS の導入 | デバイス | 数値精度 | 1 ストリーム Batchsize=1 (fps) | 4 ストリーム Batchsize=4 (fps) | 8 ストリーム Batchsize=8 (fps) |
| TensorRT のサンプル | ONNX op | TensorRT GPU NMS | T4 | FP16 | 410 | 508 | 522 |
| DeepStream のサンプル | Plugin | DeepStream CPU NMS | T4 | FP16 | 640 | 980 | 988 |
ここでは、性能の違いは主に 2 つの最適化技術に起因しています:
- デコーディング処理を 1 つのプラグインに融合させるステップ
- TensorRT GPU NMS の代わりに DeepStream CPU NMS を使用
TensorRT GPU NMS と DeepStream CPU NMS で使用されている NMS アルゴリズムは異なります。CPU NMS アルゴリズムはサンプル動画で高速に動作するものの、検出閾値が低い場合は mAP の精度が低くなります。詳細には、TensorRT サンプルの batchedNMS アルゴリズムは、マルチラベル NMS を実行するため、クラス スコアが検出閾値よりも大きい場合、1 つの予測バウンディング ボックスは複数のクラスを表すことができます。しかし、DeepStream で NMS を計算すると、1 つのバウンディング ボックスは 1 つのクラスだけを表すことになります。
YOLOv5 のデコード出力に 25,200 個のバウンディング ボックスがあり、各バウンディング ボックス情報は 4 つの座標値 (xmin, ymin, xmax, ymax) と 25,200 x 80 個の検出スコア (80 クラスに対応) が以下の条件を満たすタプルであるとする:
- すべてのスコアが NMS 前の検出閾値より大きいことと
- NMS を適用する前に保持する必要がある、検出スコアの高いオブジェクトの最大量に制限はない
TensorRT batchedNMS アルゴリズム (およびオリジナルの YOLOv5 PyTorch コード) の場合、クラス単位の NMS では各バウンディング ボックス座標タプルはすべてのクラスでカウントされ、クラスは 80 あるので、25,200 x 80 バウンディング ボックスをスキャンすることになります。DeepStream CPU ベースの NMS では、各バウンディング ボックス タプルは 1つのクラスのバウンディング ボックスを表すだけなので、アルゴリズムはまずバウンディング ボックスに最も信頼度の高いクラス ラベルを割り当て、その後 NMS を行う。このため、スキャンする必要があるバウンディング ボックスの数は、25,200 ボックス だけとなります。この結果は、後のセクションのガイダンスに従うことで、COCO データセットで再現することができます。
TensorRT batchedNMS プラグインで YOLOv5 モデルを ONNX にエクスポートする
YOLOv5 を GPU で最適化して使用するには、TensorRT batchedNMS Plugin を使って Ultralytics YOLOv5 モデルを ONNX 形式にエクスポートする必要があります。このプロセスは、Jetson プラットフォームではなく、x86 デスクトップ マシン (GPU なしでも問題ありません) で行う必要があります。
https://catalog.ngc.nvidia.com/orgs/nvidia/containers/pytorch の「Prerequisites」セクションのガイダンスに従って作業環境を準備し、NVIDIA NGC サイトから PyTorch バージョン 22 を以下のコマンドで引き出します (nvcr.io/nvidia/pytorch:22.03-py3 container)。
sudo docker run --gpus all --ipc=host --ulimit memlock=-1 --ulimit stack=67108864 -it --rm -v $(pwd):/workspace nvcr.io/nvidia/pytorch:22.03-py3先ほど起動したコンテナーの中で、Ultralytics のリポジトリから YOLOv5 のオリジナル実装を取得するために、次のようにします。
git clone https://github.com/ultralytics/yolov5.git次に、NVIDIA の yolov5_trt_infer リポジトリをクローンし、上記のステップで既に作成した yolov5 フォルダーにファイルをコピーする必要があります。
git clone https://github.com/NVIDIA-AI-IOT/yolov5_gpu_optimization.git
cp -r yolov5_gpu_optimization/0001-Enable-onnx-export-with-batchNMS-plugin.patch
              yolov5_gpu_optimization/requirement_export.txt yolov5/
cd yolov5
ここでは、以下のコマンドでローカル リポジトリを設定する必要があります。
git stash
git checkout a80dd66efe0bc7fe3772f259260d5b7278aab42f
git config -–global user.email “your email”
git config -–global user.name “your name”
git am 0001-Enable-onnx-export-with-batchNMS-plugin.patch
Applying: Enable onnx export with batchNMS plugin
.git/rebase-apply/patch:102: trailing whitespace.
.git/rebase-apply/patch:186: trailing whitespace.
.git/rebase-apply/patch:205: trailing whitespace.
.git/rebase-apply/patch:227: trailing whitespace.
      cls_conf *= obj_conf
.git/rebase-apply/patch:231: trailing whitespace.
warning: 5 lines add whitespace errors.
このステップでは、空白文字に関する以下のような警告が表示されます。しかし、これらの警告は無視してもかまいません。pylint が捕捉した冗長な空白のインラインの問題です。
また、このセクションと次のセクションのYOLOv5 モデルのエクスポート処理の違いは、この下のコマンドだけであることに注意してください。次のセクションでは、以下のようにして最適化された TensorRT デコード プラグインを取得します。下記はこのセクションでは実行する必要はありません。
git am 0001-Enable-onnx-export-with-decode-plugin.patchそしてここでは、以下を用いて batchedNMS プラグインを取得します。
git am 0001-Enable-onnx-export-with-batchNMS-plugin.patchまた、モデル エクスポートのステップの準備のために、追加のソフトウェア パッケージをインストールする必要があります。
pip install -r requirement_export.txt
apt update && apt install -y libgl1-mesa-glx
これで、Ultralytics のオリジナル YOLOv5 モデルを ONNX にエクスポートする準備が整いました。例えば、このコマンドで YOLOv5s モデルを試してみましょう。
python export.py --weights yolov5s.pt --include onnx --simplify –--dynamicこの時点で、次のようなログを確認できるはずです。
root@8ce7c775ea58:/workspace/yolo/yolov5# python export.py --weights yolov5s.pt --include onnx --simplify --dynamic
export: data=data/coco128.yaml, weights=['yolov5s.pt'], imgsz=[640, 640], batch_size=1, device=cpu, half=False, inplace=False, train=False, keras=False, optimize=False, int8=False, dynamic=True, simplify=True, opset=12, verbose=False, workspace=4, nms=False, agnostic_nms=False, topk_per_class=100, topk_all=100, iou_thres=0.45, conf_thres=0.25, include=['onnx']
YOLOv5 🚀 v6.1-242-ga80dd66 Python-3.8.12 torch-1.12.0a0+2c916ef CPU
Downloading https://github.com/ultralytics/yolov5/releases/download/v6.1/yolov5s.pt to yolov5s.pt...
100%|███████████████████████████████████████████████████████████████████████████████████████| 14.1M/14.1M [00:02<00:00, 6.59MB/s]
Fusing layers…
YOLOv5s summary: 213 layers, 7225885 parameters, 0 gradients
PyTorch: starting from yolov5s.pt with output shape (1, 25200, 85) (14.1 MB)
ONNX: starting export with onnx 1.10.1…
ONNX: simplifying with onnx-simplifier 0.3.10…
ONNX: export success, saved as yolov5s.onnx (27.6 MB)
Export complete (6.64s)
Results saved to /workspace/yolo/yolov5
Detect:          python detect.py --weights yolov5s.onnx
PyTorch Hub: 	model = torch.hub.load('ultralytics/yolov5', 'custom', 'yolov5s.onnx')
Validate:        python val.py --weights yolov5s.onnx
Visualize:       https://netron.app
TensorRT デコード プラグインや batchedNMS プラグインで ONNX 形式でエクスポートされた YOLOv5 モデルを入手したら、https://github.com/NVIDIA-AI-IOT/yolov5_gpu_optimization 「DeepStream サンプル」「TensorRT サンプル」の項で説明したサンプル コードの実行を試してみることができます。次の 2 つのセクションでは、これらのサンプルの詳細な操作方法についてご案内します。
重要なのは、これらの以下のセクションは推論を行いたいデバイス上で行う必要があることです。私の実験では、Jetson AGX Orin 開発キットに YOLOv5 モデルをデプロイする予定です。Jetson と JetPack 5.0.2 を使用することで、JetPack 5.0.2 が提供するソフトウェア スタックにはすでにすべてのソフトウェア依存関係 (TensorRT/DeepStream/CUDA/CuDNN など) がインストールされているので、GitHub ページに記載されているように TensorRT/PyTorch のコンテナー化バージョンで実行する必要はありません。
DeepStream および TensorRT デコード プラグインを使用した YOLOv5 モデルの実行 (CPU NMS)
「DeepStream サンプル」のサンプル コードを実行するには、Jetson 開発者キットに DeepStream 6.1.1 をインストールする必要があります。詳しい案内は、https://developer.nvidia.com/deepstream-getting-started をご参照ください。
DeepStream 推論用のライブラリを以下の手順で準備する必要があります。
DeepStream のサンプル フォルダーに移動します。
cd yolov5_gpu_optimization/deepstream-sampleここでは、Jetson デバイス上でデコード プラグインと DeepStream パーサーをコンパイルして
nvcc -Xcompiler -fPIC -shared -o yolov5_decode.so ./yoloForward_nc.cu ./yoloPlugins.cpp ./nvdsparsebbox_Yolo.cpp -isystem /usr/include/aarch64-linux-gnu/ -L /usr/lib/aarch64-linux-gnu/ -I /opt/nvidia/deepstream/deepstream/sources/includes -lnvinferこのビルド処理が終わると、yolov5_decode.soという YOLOv5 での推論に必要な DeepStream ライブラリが見つかるはずです。
everest@ubuntu:~/yolov5_gpu_optimization/deepstream-sample$ ll
total 1028
drwxrwxr-x 3 everest everest   4096 Dec  6 13:35 ./
drwxrwxr-x 6 everest everest   4096 Dec  6 13:31 ../
drwxrwxr-x 2 everest everest   4096 Dec  6 13:06 config/
-rw-rw-r-- 1 everest everest      4909 Dec  6 13:06 nvdsparsebbox_Yolo.cpp
-rw-rw-r-- 1 everest everes         495 Dec  6 13:06 README.md
-rw-rw-r-- 1 everest everest      4298 Dec  6 13:06 yoloForward_nc.cu
-rw-rw-r-- 1 everest everest    12540 Dec  6 13:06 yoloPlugins.cpp
-rw-rw-r-- 1 everest everest      6391 Dec  6 13:06 yoloPlugins.h
-rwxrwxr-x 1 everest everest 994016 Dec  6 13:35 yolov5_decode.so*
これで推論のサンプル コードを実行する準備が整いました。
エクスポートした ONNX モデル (例えば、yolov5s.onnx) を deepstream-sample フォルダーに、以下のようにコピーします。
cp yolov5/yolov5s.onnx yolov5_gpu_optimization/deepstream-sample/deepstream-sample/config では、あらかじめ定義された設定をいくつか用意しているので、試してみてください。
everest@ubuntu:~/yolov5_gpu_optimization/deepstream-sample$ ll config/
total 32
drwxrwxr-x 2 everest everest 4096 Dec  6 13:06 ./
drwxrwxr-x 3 everest everest 4096 Dec  6 13:35 ../
-rw-rw-r-- 1 everest everest  526 Dec  6 13:06 config_infer_primary_yoloV5_bs8.txt
-rw-rw-r-- 1 everest everest  526 Dec  6 13:06 config_infer_primary_yoloV5.txt
-rw-rw-r-- 1 everest everest  881 Dec  6 13:06 deepstream_app_config_8s.txt
-rw-rw-r-- 1 everest everest  946 Dec  6 13:06 deepstream_app_config_save_video.txt
-rw-rw-r-- 1 everest everest  877 Dec  6 13:06 deepstream_app_config.txt
-rw-rw-r-- 1 everest everest  624 Dec  6 13:06 labels.txt
例えば、検出結果をオーバーレイした結果映像を保存しながら推論を実行するには、次のようにコマンドを起動します。
deepstream-app -c config/deepstream_app_config_save_video.txt「-c」 フラグは、この推論実験に使用される設定ファイルを指定します。
以下の画面ログが表示されます。なお、ストリーミングのスループット (fps) は「**PERF」の行で確認することができます。
everest@ubuntu:~/yolov5_gpu_optimization/deepstream-sample$ deepstream-app -c config/deepstream_app_config_save_video.txt
...
Created input binding for images with dimensions 64x3x640x640
Using random values for output DecodeNumDetection
Created output binding for DecodeNumDetection with dimensions 64x1
Using random values for output DecodeDetectionBoxes
Created output binding for DecodeDetectionBoxes with dimensions 64x25200x4
Using random values for output DecodeDetectionScores
Created output binding for DecodeDetectionScores with dimensions 64x25200
Using random values for output DecodeDetectionClasses
Created output binding for DecodeDetectionClasses with dimensions 64x25200
...
**PERF:  112.84 (112.77)
**PERF:  108.41 (110.52)
**PERF:  115.60 (112.24)
**PERF:  115.56 (112.99)
**PERF:  107.61 (111.98)
**PERF:  115.18 (112.51)
**PERF:  110.00 (112.15)
表示させずに推論を実行するには、上記と同様の構文で、非表示設定ファイルを使用します。
deepstream-app -c config/deepstream_app_config.txtこの様な画面ログが表示されるはずです。推論動画を保存するように設定した場合と比べて、パフォーマンス値が高くなっていることに注意してください。
everest@ubuntu:~/yolov5_gpu_optimization/deepstream-sample$ deepstream-app -c config/deepstream_app_config.txt
...
Created input binding for images with dimensions 64x3x640x640
Using random values for output DecodeNumDetection
Created output binding for DecodeNumDetection with dimensions 64x1
Using random values for output DecodeDetectionBoxes
Created output binding for DecodeDetectionBoxes with dimensions 64x25200x4
Using random values for output DecodeDetectionScores
Created output binding for DecodeDetectionScores with dimensions 64x25200
Using random values for output DecodeDetectionClasses
Created output binding for DecodeDetectionClasses with dimensions 64x25200
...
**PERF:  198.49 (198.43)
**PERF:  196.36 (197.36)
**PERF:  194.55 (196.41)
**PERF:  196.82 (196.50)
**PERF:  198.54 (196.92)
**PERF:  199.92 (197.43)
**PERF:  200.10 (197.80)
8 ストリーム、batch_size=8、表示なしで推論を実行するには、設定ファイルを適切なものに置き換え、上記と同様の構文で実験を開始する必要があります。
deepstream-app -c config/deepstream_app_config_8s.txtTensorRT batchedNMS プラグイン (GPU NMS) による YOLOv5 モデルの実行
この実験では、「coco/val2017」検証データセットの 5,000 枚の画像を、フラグ 「input_images_folder」で場所を指定してスキャンし、フラグ 「onnx」 で指定した ONNX 形式のモデルで画像中のオブジェクトを検出し、オブジェクトを検出した画像を新しいフォルダーである 「output_images_folder」 に書き出します。この作業は完了するまでに時間がかかります。また、実験終了時に以下のようなセグメンテーション エラーが発生する可能性があることをご了承ください。ONNX 形式のモデルは3章で作成したモデルを使用してください。
everest@ubuntu:~/yolov5_gpu_optimization/tensorrt-sample$ python3 yolov5_trt_inference.py --input_images_folder=/home/everest/datasets/coco/val2017 --output_images_folder=./coco_output --onnx=../onnx_models/yolov5s.onnx
[10/31/2022-23:12:18] [TRT] [W] onnx2trt_utils.cpp:367: Your ONNX model has been generated with INT64 weights, while TensorRT does not natively support INT64. Attempting to cast down to INT32.
images:(-1, 3, -1, -1)
Generating FP16 engine
…
[11/01/2022-10:12:48] [TRT] [W] The enqueue() method has been deprecated when used with engines built from a network created with NetworkDefinitionCreationFlag::kEXPLICIT_BATCH flag. Please use enqueueV2() instead.
[11/01/2022-10:12:48] [TRT] [W] Also, the batchSize argument passed into this function has no effect on changing the input shapes. Please use setBindingDimensions() function to change input shapes instead.
100% … 5000/5000 [04:12<00:00, 19.78it/s]
[11/01/2022-10:12:50] [TRT] [E] 1: [resizingAllocator.cpp::deallocate::105] Error Code 1: Cuda Runtime (invalid argument)
[11/01/2022-10:12:50] [TRT] [E] 1: [cudaDriverHelpers.cpp::operator()::29] Error Code 1: Cuda Driver (invalid device context)
[11/01/2022-10:12:50] [TRT] [E] 1: [cudaDriverHelpers.cpp::operator()::29] Error Code 1: Cuda Driver (invalid device context)
[11/01/2022-10:12:50] [TRT] [E] 1: [cudaDriverHelpers.cpp::operator()::29] Error Code 1: Cuda Driver (context is destroyed)
[11/01/2022-10:12:50] [TRT] [E] 1: [cudaDriverHelpers.cpp::operator()::29] Error Code 1: Cuda Driver (invalid device context)
[11/01/2022-10:12:50] [TRT] [E] 1: [cudaDriverHelpers.cpp::operator()::29] Error Code 1: Cuda Driver (invalid device context)
[11/01/2022-12:06:59] [TRT] [E] 1: [cudaDriverHelpers.cpp::operator()::29] Error Code 1: Cuda Driver (context is destroyed)
 Segmentation fault (core dumped)
このエラーは、5,000 枚の画像からなる検証用データセットの最後の画像を実行し終えた後に発生するため、実験結果には影響しません。
同様のコマンドで、”Run evaluation on COCO17 validation dataset “セクションも試すことができます。ここでは 2 つのオプションがあり、1 つは「正方形推論評価」で、入力画像は縦横比を保ったまま 3 x INPUT_SIZE x INPUT_SIZEにリサイズされます。もう 1 つは「長方形の推論」である。YOLO におけるこれらの推論の詳細については、https://github.com/ultralytics/yolov3/issues/232 をご覧ください。
正方形推論評価
正方形推論評価の場合、実行するための構文は、上記の推論構文に「coco_anno」というフラグを 1 つ追加するだけで、次のようになります。
everest@ubuntu:~/working/yolov5$ python3 yolov5_trt_inference.py --input_images_folder=../datasets/coco/val2017 --output_images_folder=./coco_output_1 --onnx=./onnx_models/yolov5s.onnx --coco_anno=../datasets/coco/annotations/instances_val2017.json
...
loading annotations into memory...
Done (t=0.47s)
creating index...
index created!
Loading and preparing results...
DONE (t=8.85s)
creating index...
index created!
Running per image evaluation...
Evaluate annotation type *bbox*
DONE (t=81.27s).
Accumulating evaluation results...
DONE (t=20.24s).
Average Precision  (AP) @[ IoU=0.50:0.95 | area=   all | maxDets=100 ] = 0.374
Average Precision  (AP) @[ IoU=0.50      | area=   all | maxDets=100 ] = 0.568
Average Precision  (AP) @[ IoU=0.75      | area=   all | maxDets=100 ] = 0.402
Average Precision  (AP) @[ IoU=0.50:0.95 | area= small | maxDets=100 ] = 0.213
Average Precision  (AP) @[ IoU=0.50:0.95 | area=medium | maxDets=100 ] = 0.424
Average Precision  (AP) @[ IoU=0.50:0.95 | area= large | maxDets=100 ] = 0.490
Average Recall     (AR) @[ IoU=0.50:0.95 | area=   all | maxDets=  1 ] = 0.311
Average Recall     (AR) @[ IoU=0.50:0.95 | area=   all | maxDets= 10 ] = 0.518
Average Recall     (AR) @[ IoU=0.50:0.95 | area=   all | maxDets=100 ] = 0.572
Average Recall     (AR) @[ IoU=0.50:0.95 | area= small | maxDets=100 ] = 0.380
Average Recall     (AR) @[ IoU=0.50:0.95 | area=medium | maxDets=100 ] = 0.634
Average Recall     (AR) @[ IoU=0.50:0.95 | area= large | maxDets=100 ] = 0.726
長方形推論評価
このオプションでは、PyTorch のような本当の矩形推論にはならないので注意してください。Ultralytics の YOLOv5 オリジナル実装で pad=0, rect=False, imgsz=input_size + stride とするのと同じです。
実行する構文は、上記の推論構文に、以下のように「rect」というフラグを 1 つ追加したものです。なお、この種の評価では、各段階での NMS 操作の回数を画面ログで観察することができることに注意してください。
everest@ubuntu:~/working/yolov5$ python3 yolov5_trt_inference.py --input_images_folder=../datasets/coco/val2017 --output_images_folder=./coco_output_1 --onnx=./onnx_models/yolov5s.onnx --coco_anno=../datasets/coco/annotations/instances_val2017.json --rect
...
(1, 3, 672, 672)
(1, 3, 672, 672)
(1, 3, 672, 672)
images:(-1, 3, -1, -1)
Generating FP16 engine
images:1354752
BatchedNMS:1
BatchedNMS_1:1200
BatchedNMS_2:300
BatchedNMS_3:300
loading annotations into memory...
Done (t=0.47s)
creating index...
index created!
Loading and preparing results...
DONE (t=8.52s)
creating index...
index created!
Running per image evaluation...
Evaluate annotation type *bbox*
DONE (t=80.05s).
Accumulating evaluation results...
DONE (t=19.24s).
Average Precision  (AP) @[ IoU=0.50:0.95 | area=   all | maxDets=100 ] = 0.376
Average Precision  (AP) @[ IoU=0.50      | area=   all | maxDets=100 ] = 0.572
Average Precision  (AP) @[ IoU=0.75      | area=   all | maxDets=100 ] = 0.408
Average Precision  (AP) @[ IoU=0.50:0.95 | area= small | maxDets=100 ] = 0.216
Average Precision  (AP) @[ IoU=0.50:0.95 | area=medium | maxDets=100 ] = 0.426
Average Precision  (AP) @[ IoU=0.50:0.95 | area= large | maxDets=100 ] = 0.482
Average Recall     (AR) @[ IoU=0.50:0.95 | area=   all | maxDets=  1 ] = 0.311
Average Recall     (AR) @[ IoU=0.50:0.95 | area=   all | maxDets= 10 ] = 0.521
Average Recall     (AR) @[ IoU=0.50:0.95 | area=   all | maxDets=100 ] = 0.575
Average Recall     (AR) @[ IoU=0.50:0.95 | area= small | maxDets=100 ] = 0.383
Average Recall     (AR) @[ IoU=0.50:0.95 | area=medium | maxDets=100 ] = 0.640
Average Recall     (AR) @[ IoU=0.50:0.95 | area= large | maxDets=100 ] = 0.727
実際に長方形の推論を試してみたい場合は、以下の手順で行ってください。
https://github.com/NVIDIA-AI-IOT/yolov5_gpu_optimization/blob/main/tensorrt-sample/yolov5_trt_inference.py 317 行目から 336 行目のコードをアンコメントする必要があります。
for img_name in sorted(os.listdir(img_root)):
    img_path = os.path.join(img_root, img_name)
    img = cv2.imread(img_path)
    h, w, _ = img.shape
    ar = h / w
    r = [1, 1]
    if ar < 1:
        r = [ar, 1]
    elif ar > 1:
        r = [1, 1/ar]
    new_shape = np.ceil(np.array(r) * INPUT_SIZE / stride + pad).astype(int) * stride
    if new_shape[0] < min_h:
        min_h = new_shape[0]
    elif new_shape[0] > max_h:
        max_h = new_shape[0]
    if new_shape[1] < min_w:
        min_w = new_shape[1]
    elif new_shape[1] > max_w:
        max_w = new_shape[1]
    img_new_shapes[img_name]=new_shape
次に、min_w, min_h, max_w, max_h を修正のため 337 から 341 までの行を現在のコードに変更します。
max_w, max_h = 672, 672
INPUT_SIZE = max(max_w, max_h)
min_shape = (1, 3, INPUT_SIZE, INPUT_SIZE)
opt_shape = (1, 3, INPUT_SIZE, INPUT_SIZE)
max_shape = (max_bs, 3, INPUT_SIZE, INPUT_SIZE)
最後に 221 行目を次のように変更します。
new_shape = img_new_shapes[img_name]なお、この修正コードを実行するためには、Jetson デバイスに TensorRT 8.5 以上がインストールされている必要があります。
INT8 モードでの評価
INT8 モードで評価を実行するには、バージョン 8.4 以上の TensorRT が端末にインストールされている必要があります。JetPack 5.0.2 では、TensorRT 8.4.1 なので、問題ないです。構文は以下のような感じです。ここで、もう 6 つのフラグを追加する必要があります:
- data_type で精度モードを指定する
- save_engine TensorRT が作成した INT8 エンジンを保存するファイルを指す (このファイルは最後のセクションのステップでも必要となります)
- calib_img_dir キャリブレーション ステップで使用する画像の場所を指定します
- n_batches 推論で使用するバッチの数
- batch_size 推論で使用される各バッチのサイズ
なお、NMS の操作については、画面ログからより多くの情報を観察することができます。
everest@ubuntu:~/working/yolov5$ python3 yolov5_trt_inference.py --input_images_folder=../datasets/coco/val2017 --output_images_folder=./coco_output_2 --onnx=./onnx_models/yolov5s.onnx --coco_anno=../datasets/coco/annotations/instances_val2017.json --rect --data_type=int8 --save_engine=./yolov5s_int8_maxbs16.engine  --calib_img_dir=../datasets/coco/val2017 --calib_cache=yolov5s_bs16_n10.cache --n_batches=10 --batch_size=16
(1, 3, 672, 672)
(1, 3, 672, 672)
(16, 3, 672, 672)
...
images:(-1, 3, -1, -1)
Generating INT8 engine
...
images:21676032
[11/01/2022-11:59:25] [TRT] [W] The getMaxBatchSize() function should not be used with an engine built from a network created with NetworkDefinitionCreationFlag::kEXPLICIT_BATCH flag. This function will always return 1.
BatchedNMS:16
[11/01/2022-11:59:25] [TRT] [W] The getMaxBatchSize() function should not be used with an engine built from a network created with NetworkDefinitionCreationFlag::kEXPLICIT_BATCH flag. This function will always return 1.
[11/01/2022-11:59:25] [TRT] [W] The getMaxBatchSize() function should not be used with an engine built from a network created with NetworkDefinitionCreationFlag::kEXPLICIT_BATCH flag. This function will always return 1.
BatchedNMS_1:19200
[11/01/2022-11:59:25] [TRT] [W] The getMaxBatchSize() function should not be used with an engine built from a network created with NetworkDefinitionCreationFlag::kEXPLICIT_BATCH flag. This function will always return 1.
[11/01/2022-11:59:25] [TRT] [W] The getMaxBatchSize() function should not be used with an engine built from a network created with NetworkDefinitionCreationFlag::kEXPLICIT_BATCH flag. This function will always return 1.
BatchedNMS_2:4800
[11/01/2022-11:59:25] [TRT] [W] The getMaxBatchSize() function should not be used with an engine built from a network created with NetworkDefinitionCreationFlag::kEXPLICIT_BATCH flag. This function will always return 1.
[11/01/2022-11:59:25] [TRT] [W] The getMaxBatchSize() function should not be used with an engine built from a network created with NetworkDefinitionCreationFlag::kEXPLICIT_BATCH flag. This function will always return 1.
BatchedNMS_3:4800
[11/01/2022-11:59:25] [TRT] [W] The getMaxBatchSize() function should not be used with an engine built from a network created with NetworkDefinitionCreationFlag::kEXPLICIT_BATCH flag. This function will always return 1.
100%|█████████████████████████████████████████████████████████████████████████████████████████████████████████████████████████████████████████████████████████████████████| 5000/5000 [04:34<00:00, 18.19it/s]
loading annotations into memory...
Done (t=0.62s)
creating index...
index created!
Loading and preparing results...
DONE (t=13.66s)
creating index...
index created!
Running per image evaluation...
Evaluate annotation type *bbox*
DONE (t=108.18s).
Accumulating evaluation results...
DONE (t=26.79s).
Average Precision  (AP) @[ IoU=0.50:0.95 | area=   all | maxDets=100 ] = 0.358
Average Precision  (AP) @[ IoU=0.50      | area=   all | maxDets=100 ] = 0.560
Average Precision  (AP) @[ IoU=0.75      | area=   all | maxDets=100 ] = 0.389
Average Precision  (AP) @[ IoU=0.50:0.95 | area= small | maxDets=100 ] = 0.204
Average Precision  (AP) @[ IoU=0.50:0.95 | area=medium | maxDets=100 ] = 0.403
Average Precision  (AP) @[ IoU=0.50:0.95 | area= large | maxDets=100 ] = 0.461
Average Recall     (AR) @[ IoU=0.50:0.95 | area=   all | maxDets=  1 ] = 0.298
Average Recall     (AR) @[ IoU=0.50:0.95 | area=   all | maxDets= 10 ] = 0.505
Average Recall     (AR) @[ IoU=0.50:0.95 | area=   all | maxDets=100 ] = 0.559
Average Recall     (AR) @[ IoU=0.50:0.95 | area= small | maxDets=100 ] = 0.365
Average Recall     (AR) @[ IoU=0.50:0.95 | area=medium | maxDets=100 ] = 0.619
Average Recall     (AR) @[ IoU=0.50:0.95 | area= large | maxDets=100 ] = 0.711
オプションのタスク: キャリブレーション ステップは時間がかかるため、キャリブレーション キャッシュを使用することで、プロセスの繰り返しを避けることができます。そのためには、https://github.com/NVIDIA/TensorRT/tree/master/samples/sampleINT8 のガイダンスを参照して、キャリブレーション キャッシュの作成/使用方法について詳しく学んでください。また、YOLOv5 のキャリブレーション アルゴリズムは、IInt8EntropyCalibrator2 ではなく、IInt8MinMaxCalibrator であることにも注意が必要です (詳しくは、https://docs.nvidia.com/deeplearning/tensorrt/api/python_api/infer/Int8/Calibrator.html を参照)。したがって、保存したキャリブレーション キャッシュを使って trtexec で試し、複数の実験に対する評価プロセスを高速化したい場合は、上記のステップで保存したキャリブレーション ファイルを開き、テキスト ファイルの 1 行目を変更することで、キャッシュの 1 行目を MinMaxCalibration からEntropyCalibration2 へと変更しなければなりません。例えば、「TRT-8411-MinMaxCalibration」 を 「TRT-8411-EntropyCalibration2」 に置き換えることができます。これは、trtexec にキャリブレーション キャッシュを使用させるための回避策です。
DeepStream SDK と batchedNMS で GPU 最適化 YOLOv5 モデルを使用する
「TensorRT batchedNMS プラグイン (GPU NMS) による YOLOv5 モデルの実行」セクションで説明した batchedNMS プラグインを使用した YOLOv5 モデルを、「DeepStream および TensorRT デコードプラグインを使用した YOLOv5 モデルの実行 (CPU NMS)」セクションで説明した内蔵 CPU NMS の代わりに DeepStream SDK で使用したい場合、https://github.com/NVIDIA-AI-IOT/deepstream_tao_apps で実装されているアプローチに従うことができます。より便利にするために、このセクションでは、この目標を達成するための追加の手順を説明します。
DeepStream SDK を使用してこの展開を試したい場合、このガイダンスに基づいて Jetson への DeepStream SDK のインストールが完了したと仮定します:
https://docs.nvidia.com/metropolis/deepstream/dev-guide/text/DS_Quickstart.html#jetson-setup
また、「INT8 モードでの評価」を実行して、「yolov5」の同じフォルダーに 「yolov5s_int8_maxbs16.engine」という名前のファイルを用意しておく必要があります。
依存関係の問題なくアプリケーションを構築する最善の方法は、まず NVIDIA Github のコードをクローンすることです。
// SSH
git clone git@github.com:NVIDIA-AI-IOT/deepstream_tao_apps.git
// or HTTPS
git clone https://github.com/NVIDIA-AI-IOT/deepstream_tao_apps.git
それを /opt/nvidia/deepstream/deepstream/sources/apps/sample_apps にコピーしてください。
また、/opt/nvidia/deepstream/sources/app/sample_app/deepstream_tao_app/models に 「yolov5」というフォルダーを新規作成し、2 つのファイルをこのフォルダーにコピーする必要があります:
- 「yolov5s.onnx」: 3 項の TensorRT デコード プラグインまたは batchedNMS プラグインを用いた exporting process で取得
- 「yolov5s_int8_maxbs16.engine」: 「INT8 モードでの評価」において取得
適切な INT8 推論を行うために、/opt/nvidia/deepstream/sources/app/sample_app/deepstream_taoapps/config/yolov5_tao 内の 「pgie_yolov5_config.txt」 ファイルを以下のように修正する必要があります。
 #model-engine-file=../../models/yolov5/yolov5s.onnx_b1_gpu0_fp16.engine
 model-engine-file=../../models/yolov5/yolov5s_int8_maxbs16.engine
そして
## 0=FP32, 1=INT8, 2=FP16 mode
network-mode=1 ##(default is 2)
その後、次の「ビルド」セクションのガイダンスに従って「tao_detection」アプリケーションをビルドしてください。
https://github.com/NVIDIA-AI-IOT/deepstream_tao_apps#build
最後に、アプリケーションのビルドが終わったら、このコマンドラインで起動できます。
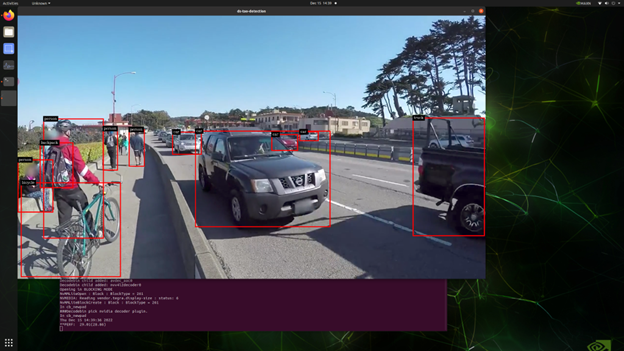
/opt/nvidia/deepstream/deepstream/sources/apps/sample_apps/deepstream_tao_apps/apps/tao_detection$ ./ds-tao-detection -c ../../configs/yolov5_tao/pgie_yolov5_config.txt -i file:///opt/nvidia/deepstream/deepstream/samples/streams/sample_1080p_h264.mp4 -dここで、ds-tao-detection はアプリケーション名、pgie_yolov5_config.txt は必要な設定ファイル、sample_1080p_h264.mp4 は入力ビデオ ソース ファイルであることを示しています。うまくいくと、「-d」 フラグで表示出力を許可しているため、下図のように検出結果 (バウンディング ボックス) が映像ソースに重なったアプリケーション ウィンドウを観察することができます。
この記事が、GPU 最適化を施した YOLOv5 ベースのアプリケーションの開発をすぐに始めるための一助となれば幸いです。
なお、最新の YOLOv7 向けの NVIDIA 最適化ソリューションについては、こちらのリポジトリ (https://github.com/NVIDIA-AI-IOT/yolo_deepstream) をご参照ください。
この記事は、JetPack 5.0.2 、TensorRT 8.4.1、DeepStream 6.1.1 で書かれています。しかし、最新の JetPack、TensorRT、DeepStream SDK ですべての例を試すと、より良いパフォーマンス向上が期待できます。
出典
[1]. R. Girshick, J. Donahue, T. Darrell and J. Malik, “Rich Feature Hierarchies for Accurate Object Detection and Semantic Segmentation,” in 2014 IEEE Conference on Computer Vision and Pattern Recognition (CVPR), Columbus, OH, USA, 2014 pp. 580-587.
[2] J. Redmon, S. Divvala, R. Girshick and A. Farhadi, “You Only Look Once: Unified, Real-Time Object Detection,” in 2016 IEEE Conference on Computer Vision and Pattern Recognition (CVPR), Las Vegas, NV, USA, 2016 pp. 779-788.