DRIVE Update V3#
DRIVE Update V3 provides the mechanism and user interface to perform the updates of DRIVE Thor and DRIVE AGX Orin storage from the Drive Update Service. This enables building Software Update Applications based on the DRIVE Update V3 interface to flash all QSPI, eMMC and UFS partitions of Drive Thor and Orin SoC on NVIDIA DRIVE™ AGX Orin Platform.
Terminology#
Name |
Description |
|---|---|
DU |
DRIVE Update |
DU plug-in |
A component to perform tasks in support of update operations. DU plug-ins are managed by DU Master. |
DU Master |
A DU plug-in which manages all the other DU plug-ins. A single DU Master can manage multiple Thors/Orins and runs in Guest OS on Orin A. The user can start an update by issuing the command to start deploying a package for update via DU Master interface. |
DU TII |
DRIVE Update Tegra Image Installer. A DU plug-in running in Guest OS to perform storage update of the Thor/Orin Soc that it is running on. It always updates partitions that belong to the Inactive Chain. |
Content Server |
A DU plug-in to export update payload and file-based content to be read by other plug-ins. Content Server runs in Guest OS on Orin A. The user can expose the package files to DU Master and DU TII via Content Server interface. |
DU Link |
The communication protocol among all DU plug-ins, which enables the distributed interconnection among DU plug-ins with file-system-like topology. |
DU Link Router |
The router to connect DU Link network for interconnection among customer OTA application and DU plug-ins. |
DUCC |
DRIVE Update Command and Control interface for the user to get DU status, to control and interact with customer OTA application in the user’s OTA solution. |
BHC |
Boot Health Check. BHC DU plug-in is a validator type plug-in to provide the user with the interface to perform boot health check on the newly updated packages after update. |
DU Boot Manager |
A DU plug-in that handles bootchain selection and board-level reset on GPIO based bootchain selection board. |
Persistent Context Store |
A DU plug-in that stores binary content persistent across reboots, including reboots to new bootchains. |
DU Authenticator |
A DU plug-in of file transform type that authenticates update payload content files. |
Metadata |
The data file that includes the payload information, a series of commands executed by DU plug-ins. |
Active bootchain |
The active bootchain is the bootchain from which Thor/Orin successfully boots the currently running system. |
Inactive bootchain |
The opposite to the active bootchain. This is the chain that is not in use by anything running at the time. |
Default bootchain |
The default bootchain is the bootchain from which Thor/Orin attempts first to boot up on cold boot. |
DU Decompressor |
A DU plug-in of file transform type that decompresses update payload content files. |
DUS |
DRIVE Update server. A native process that runs in HVRTOS to support DRIVE Update activities. |
Update Mechanism#
Below diagram shows the DRIVE Update architecture of Thor/Orin platform:
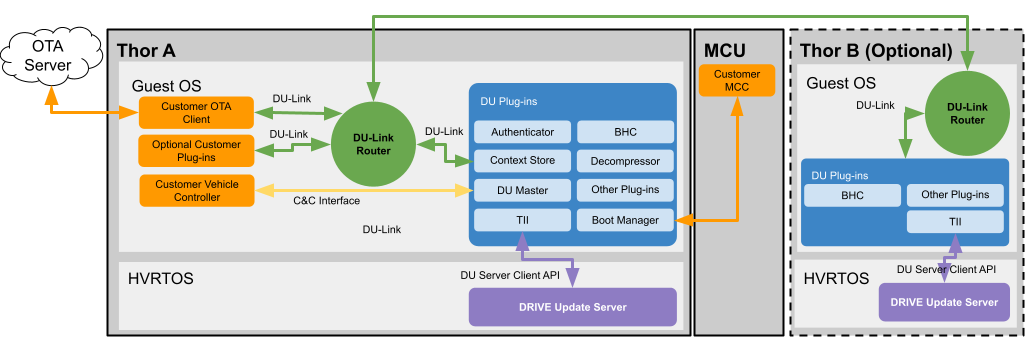
DRIVE Update Architecture#
DU Server Client API is only linked to TII and DRIVE Update Server in the schema. But DU Server Client API is possible to be called by user applications and we have CLI sample tool.
The user can use DUCC interface to control the update behavior, to allow or forbid specific update activities, such as checking the availability of update package, installing update package files. The update package files can be exported to DU Link network via Content Server. When update is allowed and user initiates the update via DU Master command interface, the DU installer plug-ins like DU TII starts to read package files from Content Server and write the update payload to the storage partitions.
Note
Content Server is provided as a sample application and is not packaged into the filesystem of Guest OS. User can use it for development purpose, or as a reference to implement his own content provider plug-in
Below diagram shows the DRIVE Update architecture of Thor/Orin platform when Drive Update Server Client API is directly used:

Drive Update Server#
Alternatively, Customer could develop their OTA App directly using Drive Update Server Client API. Such approach could be chosen in case additional features provided by Drive Update are not required.
Note
DU CLI tool is provided as a sample application to call Drive Update Server Client API directly. It’s not packaged into the filesystem of Guest OS. User can use it for development purpose, or as a reference to implement his own OTA app.
Storage Partitions#
The storage is divided into two bootchains (e.g. A and B) and persistent partitions outside the bootchains.
The size and configuration of these blocks is referred to as “first level” partitions (L1PT).
Each bootchain is further subdivided into smaller partitions referred to as “second level” partitions (L2PT).
The second level partition contains the Guest OS, file system and DRIVE Update partition.
The currently booted bootchain is referred to as the Active bootchain.
Persistent partitions are accessible by either bootchain while they are active and allows for persistent data (e.g. user info, vehicle configuration) to be accessible from either bootchain.
DRIVE Update provides the mechanism and user interface to update each bootchain. The typical update sequence is to update the inactive partition from the active partition followed by a reboot to the updated partition. This sequence allows for updating each bootchain without affecting the persistent partitions.
Note
In the event that the boothchains or persistent partitions needs to be resized, then a repartition is required.
Resizing of the first level partition is a destructive process and data in the storage is erased.
Resizing of the first level partition is not supported in safety builds.
DRIVE Update does not support updating the active boot-chain content or data partitions used by actively running software.
DRIVE Update can only update the storage used by Tegra SoC software on which it is running.
DRIVE Update does not support updating of non-Tegra software (e.g. MCU, VBIOS).
DRIVE Update Package#
DRIVE Update package consists of the following:
DU Master metadata
Content metadata
Authenticator metadata
Decompressor metadata
Boot Manager metadata
Payload of other DU plug-ins, including:
DU TII payload consists of TII metadata and image files of SoC storage partitions.
For the content and syntax of metadata, see DRIVE Update Metadata for more information.
DU TII image files can be generated with the create_bsp tool. For more information, see Generating Flashing Binaries Offline in this guide document.
The following figure shows the organization of DRIVE Update package files when using the sample Content Server:
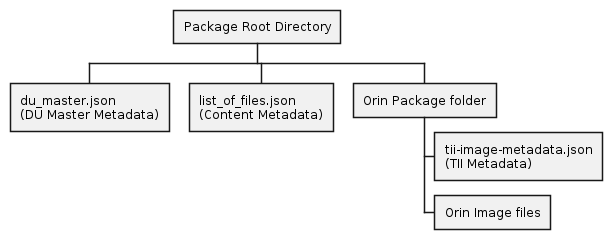
DRIVE Update Package Organization#
Note
The above diagram does not show the payload of Authenticator and Decompressor.
DRIVE Update Package Tool (DUPKG)#
DRIVE Update Packaging Tool (DUPKG) is a command line tool which can be used to generate DRIVE Update package.
Overview#
Below picture shows the design in action, for generating a DRIVE Update Package containing partition images.

DUPKG Generation Action#
Installing the DUPKG Tool#
Note
Dockers released by DRIVE Platform team have DUPKG Utility pre-installed in the docker’s root filesystem.
This step is needed only if you want to run DUPKG from outside the released/tested docker environment.
The tool is provided as a Python3 source code package that can run on the host machine
The Python3 source code package can then be installed with the following command:
cd /drive/drive-foundation/tools/driveupdate/dupkg
python3 setup.py build
sudo python3 setup.py install
Steps to Generate Package#
Note
If generating DU packages of PDK, then the images need to be generated prior to calling the DUPKG tool.
When generate the DU Package and found the error “ModuleNotFoundError: No module named ‘tabulate’”, try to install the ‘tabulate’ module with the command: sudo apt install python3-tabulate.
When generate the Authenticator DU Package and found the error “ImportError: cannot import name ‘pss’ “, try to install the pycryptodome with the command: pip3 install pycryptodome.
List all the installed templates (python3 dupkg.py lstemplate).
List all the required input variables to be provided for generating packages (python3 dupkg.py lsin).
Generate package (python3 dupkg.py gen).
List all the installed templates#
All the installed templates can be listed with the help of lstemplate command.
python3 dupkg.py lstemplate
lstemplate example
$ python3 dupkg.py lstemplate
DRIVE Update Packaging Tool
Version 1.5.0

List of installed templates are:

Some templates are hidden, use --all to show all templates.

 Template                        | Description
---------------------------------+--------------------------------------------------------------------------------------------------------------------------------
 dupkg_cli_update_template       | CLI Update in 7.0 release
 dupkg_clone_template            | Single Tegra update both chains with clone on GPIO based bootchain selection
 dupkg_dual_tegra_template       | Dual Tegra update with GPIO based bootchain selection
 dupkg_ducompressor_template     | Single Tegra GPIO update with compression
 dupkg_install_bch_template      | Delta update for Boot Component Header
 dupkg_l1pt_repartition_template | L1PT update with repartition and reboot
 dupkg_only_install_template     | Single Tegra install only for inactive chain and recovery chain, without others action such as reboot, set_default_chain, etc.
 dupkg_push_template             | Single Tegra update with PUSH mode on GPIO based bootchain selection
 dupkg_recovery_template         | Single Tegra GPIO update for chain C only, discard emmc is by default
 dupkg_revoke_key_template       | Single Tegra update for revoke key
 dupkg_sample_template           | Template for sample_installer plugin package generation
 dupkg_sign_template             | Sign the DUPKG with private key or tegrasign
 dupkg_single_tegra_template     | Single Tegra update with GPIO based bootchain selection
List the required input variables#
The required input variables are dependent on the template used. To list all the required input variables, pass the template by calling the following command.
python3 dupkg.py lsin --template TEMPLATE_NAME / path_to_TEMPLATE_NAME
- lsin arguments
–template TEMPLATE : Template name or path
Note
If only the template name is mentioned without any path, then the installed template is taken as input. If ‘./’ is mentioned prior to the template then the template in the path provided is considered.
User shall perform all applicable safety and security assessments for the DU Packages generated using external templates. DRIVE Update has no visibility on external templates. Therefore, user will be at a better position to assess the impact of using external templates in the term of safety and security.
lsin example
$ python3 dupkg.py lsin --template dupkg_single_tegra_template
DRIVE Update Packaging Tool
Version 1.5.0

List of all the variables that need to be provided as input while generating packages:

 Input Variable       | Req / Opt   | Description
----------------------+-------------+-----------------------------------------------------------------------------------------------
 TEGRA_A_SRC          | Required    | Path to folder containing Tegra images, filesToFlash.txt
 VALIDATE_OPTION      | Optional    | If enable validate command [True | False]
 ERASE_PADDING_FLAG   | Optional    | If enable erase padding [0 | 1]
 AUTHENTICATOR_OPTION | Optional    | Set "AuthPkg" if enable Authenticator, Default is NormalPkg
 PRIVATE_KEY_PATH     | Optional    | The path to private key file. Required if enable Authenticator
 TEGRASIGN_PATH       | Optional    | The path to the tegrasign_v3.py tool in the PDK. Required if enable Authenticator and use HSM
 SHA_ALG              | Optional    | The SHA algorithm using for validation. Default is SHA256
 CHAIN                | Optional    | The chain option for update, optional: recovery/A/B. Default is empty
 DISCARD_EMMC_FLAG    | Optional    | If erase the emmc chain [True | False]
 INSTALL_BRBCT        | Optional    | If install brbct [True | False]
 OS_VERSION           | Optional    | The OS version of images to generate DU package. Default is 6.0.8.0
Generate package#
Once all the required input variables are listed, generate the package by passing the path to all the input variable and template as follows:
python3 dupkg.py gen --template NAME/PATH_OF_TEMPLATE --in REQ_VAR1=/path/to/value1 REQ_VAR2=/path/to/value2 --out /path/to/output/
- gen arguments
–in VAR=VAL [VAR=VAL …] : Required input varaiables and its value (use python3 dupkg.py lsin to list the required input variables)
–out OUT : Output folder for package
–template TEMPLATE : Template name or path
gen example
$python3 dupkg.py gen --in TEGRA_A_SRC=./bsp_images/642-63960-0010-000_TS1/flash-images/ --template $TEMPLATE --out ./out_new

DRIVE Update Packaging Tool
Version 1.5.0

Generating packages... | (output size: 394874K)
Support HSM (Hardware Security Module)#
DUPKG Tool supports generating the Authenticator DU Package with HSM.
Check the input variables from dupkg templates, there are three variables to enable HSM:
AUTHENTICATOR_OPTION : Authenticator option, should be AuthPkg
Input the full path to the private key file to “PKC_KEY” in
/drive/drive-foundation/tools/flashtools/flash/tegrasign_v3_debug.yaml, for example:
{"HSM":
    {
        ....
        "PKC_KEY"     : "<PRIVATE_KEY_PATH>",
        ....
TEGRASIGN_PATH : Input the full path to the tegrasign_v3.py. Please find this file in the release PDK. for example:
/drive/drive-foundation/tools/flashtools/flash/tegrasign_v3.py.
Either PRIVATE_KEY_PATH or TEGRASIGN_PATH is required to sign the key. And AUTHENTICATOR_OPTION needs to be set as AuthPkg in general for authentication.
DUPKG templates that support HSM:
dupkg_clone_template
dupkg_compat_template
dupkg_dual_tegra_template
dupkg_ducompressor_template
dupkg_install_bch_template
dupkg_only_install_template
dupkg_push_template
dupkg_single_tegra_template
gen example
TEGRA_A_SRC=${BSP}/642-63960-0010-000_TS1/flash-images
AUTHENTICATOR_OPTION=AuthPkg
TEGRASIGN_PATH=/drive/drive-foundation/tools/flashtools/flash/tegrasign_v3.py
OUTPUT_FOLDER=${DU_PACKAGE}/hsm_gpio_pull_$(date '+%m%d')
TEMPLATE=dupkg_single_tegra_template

python3 dupkg.py gen --in VALIDATE_OPTION=True TEGRA_A_SRC=$TEGRA_A_SRC AUTHENTICATOR_OPTION=$AUTHENTICATOR_OPTION TEGRASIGN_PATH=$TEGRASIGN_PATH --template $TEMPLATE --out $OUTPUT_FOLDER
gen result
DRIVE Update Packaging Tool
Version 1.5.0

Generating packages...  Done
DRIVE Update Metadata#
Note
This section does not describe the Metadata of Authenticator. Please refer to Authenticator HOWTO for more information.
Content metadata#
The content metadata file is consumed by content provider plug-in, which is Content Server in this example. The file name must be list_of_files.json. It lists all the package files to be deployed. Each file or directory can be defined by a pair of keys in the following table:
Key |
Description |
|---|---|
name |
The relative path to the location of list_of_files.json file. |
type |
Use “file” for a normal file, and “dir” for a directory. |
The following is a sample list_of_files.json to list all the package files for the example package format in section DRIVE Update Package.
list_of_files.json
[
    {
        "name": "./",
        "type": "dir"
    },
    {
        "name":"./du_master.json",
        "type":"file"
    },
    {
        "name":"./list_of_files.json",
        "type":"file"
    },
    {
        "name":"./tii-a",
        "type":"dir"
    },
    {
        "name":"./tii-a/metadata.json",
        "type":"file"
    },
    {
        "name":"./tii-a/A_1_3_kernel_zerosign.img",
        "type":"file"
    },
    {
        "name":"./tii-a/A_bct_MEM_zerosign.bct",
        "type":"file"
    },
    {
        // other Thor/Orin-A package files
    },
    {
        "name":"./tii-b",
        "type":"dir"
    },
    {
        "name":"./tii-b/tii-image-metadata.json",
        "type":"file"
    },
    {
        "name":"./tii-b/B_bct_MEM_zerosign.bct",
        "type":"file"
    },
    {
        "name":"./tii-b/B_4_spe_zerosign.bin",
        "type":"file"
    },
    {
        // other Orin-B package files
    },
    {
        "name":"./reboot.json",
        "type":"file"
    },
    {
        "name":"./set_default_chain.json",
        "type":"file"
    },
]
Note
For a single Thor/Orin platform, please remove the ./tii-b directory and ./tii-b/* files from list_of_files.json
DU Master metadata#
DU Master metadata contains all required actions for an update. It is the input parameter of DU master “deploy” command. Each DU plug-in being managed by DU Master may in turn deploy its own metadata file using whatever format each plug-in itself requires via the “deploy” command.
Note
The metadata file must be manually composed with the specified syntax as defined in below sections.
Validate and ensure the correctness of the file.
Syntax#
DU Master metadata contains the following sections in the top level.
Key |
Description |
|---|---|
metaVersion |
Integer version number for the metadata file. It is used by DU Master to perform compatibility check. |
restoreSequence |
Define the context restoring sequence of DU plug-ins when a package deployment is resumed on system boot. This section is optional, and DU Master will use the pre-defined restore sequence if the section is not present. |
actions |
Array containing all default actions to be executed by DU Master. Each action must provide details for an action object as provided in the table below. |
Note
The value of metaVersion should be 3 for this release. The value of the version number may increase if additional features are added in future versions of the metadata.
Below is the syntax of an action object in the “actions” array.
Key |
Mandatory |
Description |
|---|---|---|
actionId |
Yes |
Unique integer index for an action starting from zero. |
description |
No |
Description of the action command being run, used for debugging purposes only. |
gatedBy |
No |
List of actions which gate this action from being executed. The action does not run until all actions in this list are complete. If array is empty or the field is omitted entirely then there are no actions gating the action. |
pluginType |
Yes |
Type of DU plug-in. It is “installer” for DU TII, and “validator” for BHC plug-in. |
pluginPath |
Yes |
DU Link path of DU plug-in root. |
cmd |
Yes |
Command string to send to worker DU plug-in. For example, “deploy metadata=</path/to/metadata_file>”. |
startOnState |
Yes |
List of possible states a plug-in may be in before deploying the action. |
exitOnStateTransitionTo |
Yes |
List of possible states a plug-in may transition to which will signal action is complete. |
failOnStateTransitionTo |
Yes |
List of possible states a plug-in may transition to which will signal action has failed and plug-in is in error state. |
onFail |
No |
Define the name of the set of actions to be executed on the failure of this action item. See Switch Back On Failure of Post Installation Check for more details. |
logOnStart |
No |
Optional logging field to provide more information on update, the string provided here would be logged once this action has been started. The log can be read from “/master/persistent_log.list” |
logOnExit |
No |
Optional logging field to provide more information on update, the string provided here would be logged once this action has been finished. The log can be read from “/master/persistent_log.list” |
logOnFail |
No |
Optional logging field to provide more information on update, the string provided here would be logged once this action has been failed. The log can be read from “/master/persistent_log.list” |
Note
There is no confidentiality in the Master supported logOn command logs.
In order to mitigate this, the user must not pass any information that is deemed to be sensitive/confidential, such as Critical Security Parameters, or Personally Identifiable Information.
Example#
The following is a simple example to demonstrate how to fill the value of keys in DU Master metadata:
du_master_metadata.json
{
    "metaVersion": 3,
    "restoreSequence": [
        "*/ddu",
        "*/du-client",
        "*/content",
        "/tii",
        "/bhc",
        "/bootmgr"
    ],
    "actions": [
        {
            "actionId": 0,
            "description": "Deploy images to TA",
            "gatedBy": [],
            "pluginType": "installer",
            "pluginPath": "/tii",
            "startOnState": [
                "IDLE"
            ],
            "exitOnStateTransitionTo": [
                "IDLE"
            ],
            "failOnStateTransitionTo": [
                "ERROR"
            ],
            "logOnStart": "Start Deploy images to TA",
            "logOnExit": "TA images updated",
            "logOnFail": "Failed to deploy images to TA",
            "cmd": "deploy metadata=$CONTENT_ROOT$/tii-a/metadata.json"
        }
    ]
}
Note
The above metadata file contains only one action object to install Thor/Orin-A images, and the update package files are exported via content_server.
The “pluginType” must be set correctly. It is “installer” for TII to install Thor images.
The “pluginPath” must be “/gos-b/tii” if the action object installs Thor/Orin-B images.
Always follow the above example to configure the key values of “startOnState”, “exitOnStateTransitionTo” and “failOnStateTransitionTo” for TII.
“logOnStart”, “logOnExit” and “logOnFail” show the log of each step respectively in /master/persistent_log.list.
The metadata path $CONTENT_ROOT$ is a variable that represents the value of “content_root” parameter of “deploy” command written to DU Master interface /master/cmd. Alternatively, you can use the path value directly according to your configuration. For instance, /content/files/ if content_server is used to export the package files. Note that it is the path in DU Link network, but not the actual location where the package files are in the physical file system.
The section “restoreSequence” defines a list of DU plug-ins which DU Master needs to wait until their context is restored in order before resuming the deployment. The “*” before the plug-in path means that the plug-in will be checked by DU master only if it is registered previously during the deployment.
The pre-defined restoreSequence is “/bhc”, “/tii”.
The following is the example du_master.json which contains multiple action objects to deploy Thor/Orin on the platform with Marker based bootchain selection mode.
du_master.json
{
    "metaVersion": 3,
    "restoreSequence": [
        "*/ddu",
        "*/du-client",
        "*/content",
        "/tii"
    ],
    "actions": [
        {
            "actionId": 0,
            "description": "Deploy images to TA",
            "gatedBy": [],
            "pluginType": "installer",
            "pluginPath": "/tii",
            "startOnState": ["IDLE"],
            "exitOnStateTransitionTo": ["IDLE"],
            "failOnStateTransitionTo": ["ERROR"],
            "logOnStart": "Start Deploy images to TA",
            "logOnExit": "TA images updated",
            "logOnFail": "Failed to deploy images to TA",
            "cmd" : "deploy metadata=$CONTENT_ROOT$/tii-a/metadata.json"
        },
        {
            "actionId": 1,
            "description": "Set default chain on TA",
            "gatedBy": [0],
            "pluginType": "installer",
            "pluginPath": "/tii",
            "startOnState": ["IDLE"],
            "exitOnStateTransitionTo": ["IDLE"],
            "failOnStateTransitionTo": ["ERROR"],
            "logOnStart": "Setting default chain to new image",
            "logOnExit": "Default chain is set, Please reboot manually",
            "cmd" : "deploy metadata=$CONTENT_ROOT$/tii-a/set_default_chain.json"
        }
    ]
}
Note
The action object to set_default_chain.json is gated by action objects to update Thor/Orin partitions. It is defined by “gatedBy” key value.
The Du master does not store the .json file deployed to it. Thus, if a reboot occurs, which is commonly done during an install, the details of the install will not be available on reboot. To rememdy this, the content server which provided the json must be available upon reboot in order for du master to continue or abort. Failure to provide the json will ultimately lead to driveupdate to time out after several minutes, requiring a deploy to be restarted. Until this timeout occurs, an abort cannot be issued without providing the json file
Du master supports maximum 65 actions written in .json
Boot Manager metadata#
There are two metadata files, which are composed of a series of commands executed by DU Boot Manager to perform bootchain selection or board reset.
Syntax#
DU Boot Manager metadata contains the following sections in the top level.
Key |
Description |
|---|---|
magic |
A string to identify the owner of the metadata. Must be “NVDU-BOOTMGR”. |
metaVersion |
Integer version number for the metadata file. The current supported version is 1. |
procedure |
The series of commands to be executed by DU Boot Manager. |
Below is the list of supported commands in the “procedure” section.
Command |
Description |
|---|---|
reboot |
This command reboots one Thor/Orin to the specified bootchain. The run level should be RL_FULL_APPLY and higher for this command. It’s not recommended to use this command on dual-Tegra hardware as this would potentially lead to bootchain insistency. Please use board_reset command on such system. |
set_default_chain |
This command sets the default bootchain of one certain Thor/Orin. |
board_reset |
This command triggers board level reset. It can specify a certain bootchain which Thor/Orin will boot into. The run level should be RL_FULL_APPLY for this command. |
The arguments for reboot are as follows:
Arguments |
Description |
|---|---|
cmd |
Command to reboot is “reboot”. |
chip_id |
Specify which Thor/Orin chip to reboot. 0 for Thor/Orin-A and 1 for Thor/Orin-B. It’s not recommended to use this command to reboot Thor/Orin-B only. |
target_bootchain |
Set the bootchain from which Tegra boots on reboot command:
This command does not change the default bootchain |
delay |
Optional parameter. Wait time before actual system reboot. The default delay is 2 seconds. This parameter, if set, should be at least 1 for DRIVE Update to save its context correctly. The maximum value for this parameter is 5 seconds. |
The arguments for set_default_chain are as follows:
Arguments |
Description |
|---|---|
cmd |
Command to set default chain is “set_default_chain”. |
chip_id |
By default in Thor/Orin there is one Tegra-a and the ID is 0. If on dual-Tegra hardware the ID could be 0 and 1. |
target_bootchain |
Set the current “active” or “inactive” bootchain as the default bootchain, from which Thor/Orin will boot on next cold boot. This command does not trigger board reset or Thor/Orin reboot. |
The arguments for board_reset are as follows:
Arguments |
Description |
|---|---|
cmd |
Command to board_reset is “board_reset”. |
target_bootchain |
The same semantics as that of reboot command. |
delay |
The same semantics as that of reboot command. |
Note
Boot Manager interface works only with GPIO bootchain selection mode. For the platforms with Marker based bootchain selection mode, please use the DU TII Metadata command set_default_chain.
It is assumed that the user of DRIVE Update will update which switch bootchain selection method (Marker based to GPIO based) to be deployed, independently of software updates and, at minimum, a version with working Boot Manager and a compatible MCU firmware must be flashed on both bootchains a priori.
Boot Manager is a plug-in of installer type. User can trigger the execution of Boot Manager Metadata by adding it as an action object into DU Master Metadata, as the following example:
The following is a sample metadata file to triggering board reset and Thor/Orin booting into the inactive bootchain:
reboot.json
{
    "magic": "NVDU-BOOTMGR",
    "metaVersion": 1,
    "procedure": [
        {
            "cmd": "board_reset",
            "target_bootchain": "inactive"
        }
    ]
}
Configuring Default Bootchain Example#
The following is a sample metadata file to configure the default bootchain:
set_default_bootchain.json
{
    "magic": "NVDU-BOOTMGR",
    "metaVersion": 1,
    "procedure": [
        {
            "cmd": "set_default_chain",
            "chip_id": 0,
            "target_bootchain": "active"
        }
    ]
}
DU TII metadata#
The metadata file is composed of a series of commands executed by DU TII to flash binaries into their respective partitions. The partition and binary information referred to can be found in FileToFlash.txt and (grouped_partitions.txt) generated by the create_bsp_images.sh script.
There are two types of partitions: grouped and ungrouped. All the partitions in the same group must be updated together. The grouped_partitions.txt file lists all the grouped and ungrouped partitions.
Syntax#
DU TII metadata contains the following sections in the top level.
Key |
Description |
|---|---|
metaVersion |
Integer version number for the metadata file. It is used by DU TII to perform compatibility check. The current version is 2. |
procedure |
A series of commands executed by DU TII. |
The supported commands in cmd field of procedure section are described in the following sections.
Bootchain Management Commands#
The following commands are for bootchain management.
Command |
Description |
|---|---|
install_lock |
This command locks the inactive bootchain. Mark a chain to invalid. |
install_unlock |
This command unlocks the inactive bootchain after update is completed. It must be used before switching to the inactive bootchain. When writing data to a chain’s partition, the chain will be disabled, install_unlock will check and enable a chain. Note that locking and unlocking is expected to be done for the entire update. |
discard |
This command enable to discard the partition. It should be used before the image deployment. |
set_default_chain |
Set the default bootchain in BRBCT which Tegra boots from on cold boot. It can be used to switch bootchain by specifying “inactive” as the value of “target_bootchain”. |
The arguments for install_lock are as follows:
Arguments |
Description |
|---|---|
chain |
Optional parameter. Identifies the chain of the partition, can be “A”, “B”, “recovery”. |
The arguments for install_unlock are as follows:
Arguments |
Description |
|---|---|
chain |
Optional parameter. Identifies the chain of the partition, can be “A”, “B”, “recovery”. if this argument is not specified, then will take it as inactive chain, if active chain is chain A, inactive chain is B, else inactive chain is A. |
The argument for discard is as follows:
Arguments |
Description |
|---|---|
partition_name |
The partition name to be discarded. |
Note
Discard only for EMMC/UFS partition in inactive chain.
Discard doesn’t erase all the content of the partition to 0.
Please update l2pt and l3pt before any install_*_images if you have discard full inactive chain or L3 container.
The arguments for set_default_chain are as follows:
Arguments |
Description |
|---|---|
target_bootchain |
Set the current “active” or “inactive” bootchain as the default bootchain in BR BCT, from which Tegra will boot on next cold boot. |
a_brbct_path |
Identifies the filename of the chain A BR BCT binary found in FileToFlash.txt. |
b_brbct_path |
Identifies the filename of the chain B BR BCT binary found in FileToFlash.txt. |
customer_data |
Optional parameter. Whether to update unsigned customer data. if this argument is not specified, take it as 0.
|
Note
The DU TII metadata commands set_default_chain should be used only on the platform with Marker based Bootchain selection mode.
customer_data parameter is only effective in standard build.
signed section of customer_data would always be updated.
Installation Commands#
The following commands are for installation of partitions.
Command |
Description |
|---|---|
install_l1_images |
Install the binaries for the partitions in the first level partition table except the following partitions:
|
install_l2_images |
Install the binaries for the partitions in the second level partition table except the PT partitions and L3 container partitions. |
install_l3_nvpt_images |
Install the binaries for the partitions in the third level partition table except the PT partitions. |
install_l3_gpt_images |
Install the binaries for the partitions in the third level partition table except the PT partitions. |
install_l1_pt |
Installs the first level PT binary. |
install_l2_pt |
Installs the second level PT binary. |
install_l3_nvpt |
Installs the third level PT binary of default DriveOS configuration. |
install_l3_gpt |
Install the third level GPT binary. |
install_brbct |
Update BRBCT partition. This command should be used only on the platform using GPIO bootchain selection mode. |
install_bch |
Update the bch of a partition. This command should be not used for the partitions in L1PT. |
The arguments for install_l1_images are as follows:
Arguments |
Description |
|---|---|
partition_type |
|
img_group |
Required only if partition_type is “group”. Identifies the grouped partitions to flash. All the groups are listed in grouped_partitions.txt. Each partition in this group is defined by the arguments partition_name and img_fname arguments, with erase_pad_flag and img_type arguments for advanced configurations. An example is provided in the Example Metadata File. |
erase_pad_flag |
A partition may not be fully filled with its image content when the image size is less than the partition size. This argument provides an option to pad the partition space which is not filled with its image.
|
img_type |
|
partition_name |
Identifies the name of the QSPI/eMMC/UFS partition to flash, For example, kernel.
|
img_fname |
Identifies the filename of the binary to flash found in FileToFlash.txt. |
Note
Only can use install_l1_images to update the L1 partition with write permission given to du server.
The arguments for install_l2_images are as follows:
Arguments |
Description |
|---|---|
partition_type |
The same semantics as that of install_l1_images command. |
img_group |
The same semantics as that of install_l1_images command. |
erase_pad_flag |
The same semantics as that of install_l1_images command. |
img_type |
The same semantics as that of install_l1_images command. |
partition_name |
The same semantics as that of install_l1_images command. |
img_fname |
The same semantics as that of install_l1_images command. |
chain |
Optional parameter. Identifies the chain of the partition. if this argument is not specified, then will take it as inactive chain, if active chain is chain A, inactive chain is B, else inactive chain is A.
|
Note
Please do not use install_l1_images command to update l2 container partitions, or use install_l2_images command to update l3 container partitions.
This may lead to unable to unlock inactive bootchain
Note
Only can use install_l1_images to update the L1 partition with write permission given to du server.
The arguments for install_l3_nvpt_images are as follows:
Arguments |
Description |
|---|---|
container_pname |
The container partition name of this level 3 partiion. Container name can be obtained in level 2 PCT config file boot_chain_storage_qspi.cfg. |
partition_type |
The same semantics as that of install_l1_images command. |
erase_pad_flag |
The same semantics as that of install_l1_images command. |
img_group |
The same semantics as that of install_l1_images command. |
img_type |
The same semantics as that of install_l1_images command. |
partition_name |
The same semantics as that of install_l1_images command. |
img_fname |
The same semantics as that of install_l1_images command. |
chain |
Optional parameter. Identifies the chain of the partition. if this argument is not specified, then will take it as inactive chain, if active chain is chain A, inactive chain is B, else inactive chain is A.
|
The arguments for install_l3_gpt_images are as follows:
Arguments |
Description |
|---|---|
container_pname |
The container partition name of this level 3 partiion. Container name can be obtained in level 2 PCT config file boot_chain_storage_qspi.cfg. |
partition_type |
The same semantics as that of install_l1_images command. |
erase_pad_flag |
The same semantics as that of install_l1_images command. |
img_group |
The same semantics as that of install_l1_images command. |
img_type |
The same semantics as that of install_l1_images command. |
partition_name |
The same semantics as that of install_l1_images command. |
img_fname |
The same semantics as that of install_l1_images command. |
Note
When add a new partition, please do not use a partition name end with “_pt”.
The arguments for install_l1_pt are as follows:
Arguments |
Description |
|---|---|
pt_path |
Identifies the filename of the first level PT binary found in FileToFlash.txt. |
copy_index_bch |
Optional parameter. The index of the source L1PT copy to be update its bch, should be 0 ~ 1, this will be used in revoke key in Thor and L1PT can be changed in this case. |
repartitioning |
|
Note
Repartitioning is required when resizing the overall bootchain size for A and B partitions.
When repartitioning is required, it must be started from bootchain C.
Please make sure Chain C can access Chain A and B after L1PT update that means.
Some essential information includes but not limited to ivc number for Chain A and B can not be changed.
Please do not use the
install_l1_ptcommand to update the first level PT unless the L1PT image is different from the current content in L1PT partition.Safety build does not support L1PT update.
L1PT is defined as per global_storage_qspi.cfg. L1PT needs to be updated if changes occur in global_storage_qspi.cfg. It would cause L1PT layout change if partition size changes, or any L2 partitions with “A_” or “B_” prefix in the name is removed or added in global_storage_qspi.cfg. L1PT layout won’t change if only some of the attributes are changed.
It is the user’s responsibility to set the correct value of “repartitioning” argument, otherwise it may lead to failure of update, or brick the device.
Repartitioning is not power fail safe and not safety compliant.
The arguments for install_l2_pt are as follows:
Arguments |
Description |
|---|---|
partition_name |
Identifies the name of the level 2 pt in FileToFlash.txt. Do NOT add chain label A_ or B_ as the prefix of the partition name. |
img_fname |
Identifies the filename of the second level PT binary found in FileToFlash.txt. |
chain |
Optional parameter. Identifies the chain of the partition. if this argument is not specified, then will take it as inactive chain, if active chain is chain A, inactive chain is B, else inactive chain is A.
|
The arguments for install_l3_nvpt are as follows:
Arguments |
Description |
|---|---|
container_pname |
Container partition name of default level 3 PT, defined in the level 2 PCT config file boot_chain_storage_qspi.cfg. |
img_fname |
Identifies the filename of the second level PT binary found in FileToFlash.txt. |
chain |
Optional parameter. Identifies the chain of the partition. if this argument is not specified, then will take it as inactive chain, if active chain is chain A, inactive chain is B, else inactive chain is A.
|
The arguments for install_l3_gpt are as follows:
Arguments |
Description |
|---|---|
container_pname |
Container partition name of GPT. |
prim_gpt_fname |
Identifies the filename of the image of primary partition table. |
sec_gpt_fname |
Identifies the filename of the image of secondary partition table. |
The arguments for install_brbct are as follows:
Arguments |
Description |
|---|---|
img_fname |
The filename of the image of BRBCT partition. |
customer_data |
Optional parameter. Whether to update unsigned customer data. if this argument is not specified, take it as 0.
|
Note
customer_data parameter is only effective in standard build.
signed section of customer_data would always be updated.
The arguments for install_bch are as follows:
Arguments |
Description |
|---|---|
img_fname |
The filename of the image of BRBCT partition. |
partition_name |
Identifies the name of the QSPI/eMMC/UFS partition to flash, For example, kernel. |
pre_hash |
The hex string of SHA-256 or SHA-512 (base on hash_algorithm) hash value before the bch updated. |
pos_hash |
The hex string of SHA-256 or SHA-512 (base on hash_algorithm) hash value after the bch updated. |
hash_algorithm |
The algorithm used to calculate hash. “sha256” and “sha512” are supported. |
Validation Commands#
The following commands are for partition validation after installation.
Command |
Description |
|---|---|
validate_l1_images |
Validate the partition in the first level PT. BR BCT cannot be validated with this command. |
validate_l2_images |
Validate the partition in the second level PT. |
validate_l3_nvpt_images |
Validate the partition in the third level PT of default DriveOS configuration. |
validate_l3_gpt_images |
Validate the partition in the third level GPT. |
validate_l2_pt |
Validate the second level PT. |
validate_l3_nvpt |
Validate the third level PT of default DriveOS configuration. |
validate_l3_gpt |
Validate the third level GPT. |
The arguments for validate_l1_images, validate_l2_images, validate_l3_nvpt_images, validate_l3_gpt_images, validate_l1_pt, validate_l2_pt and validate_l3_nvpt are as follows:
Arguments |
Description |
|---|---|
container_pname |
Container partition name of GPT. This argument is required by validate_l3_nvpt and validate_l3_gpt_images command only. |
partition_name |
The name of the partition to be validated. |
data_size |
DRIVE Update validates the partition as two parts:
Usually, the image size of the partition is used here to validate the update of the whole image. |
hash_algorithm |
The algorithm used to calculate hash. “sha256” and “sha512” are supported. |
hash |
The hex string of SHA-256 or SHA-512 (base on hash_algorithm) hash value. |
chain |
Not required by validate_l1_images, validate_l3_gpt_images and validate_l1_pt, optional parameter in validate_l2_images, validate_l3_nvpt_images, validate_l2_pt and validate_l3_nvpt. Identifies the chain of the partition. if this argument is not specified, then will take it as inactive chain, if active chain is chain A, inactive chain is B, else inactive chain is A.
|
The arguments for validate_l3_gpt are as follows:
Arguments |
Description |
|---|---|
container_pname |
Container partition name of GPT. |
hash_prim_gpt |
The hex string of SHA-256 or SHA-512 (base on hash_algorithm) hash value of the primary partition table. |
hash_sec_gpt |
The hex string of SHA-256 or SHA-512 (base on hash_algorithm) hash value of the secondary partition table. |
hash_algorithm |
The algorithm used to calculate hash. “sha256” and “sha512” are supported. |
Bootchain Clone Commands#
DRIVE Update supports cloning active partitions to inactive bootchain directly. Below table defines all the DU TII metadata commands for bootchain clone.
Command |
Description |
|---|---|
clone_bootchain |
Clone the entire active bootchain to the inactive bootchain. This command does not have any argument. |
clone_l2_pt |
Clone the second level PT from active chain to inactive chain. |
clone_l3_nvpt |
Clone the third level PT of default DriveOS configuration from active chain to inactive chain. |
clone_l3_gpt |
Clone the third level GPT from active chain to inactive chain. |
clone_l2_images |
Clone the partitions in the second level partition table except the PT partitions. |
clone_l3_nvpt_images |
Clone the partitions in the third level partition table. |
clone_l3_gpt_images |
Clone the partitions in the third level GPT. |
replicate_brbct |
In Orin, replicate a certain BRBCT copy to all the other copies (if the argument dst_bct_index is not exist) or to a special copy (if the argument dst_bct_index is exist). In Thor, this is to clone active brbct to inactive brbct. This command is used only when BRBCT copies are different in the case of asymmetric bootchain. |
Note
The clone commands are only guaranteed to work with read-only partitions.
Partitions in the first-level PT cannot be cloned.
The clone commands work only when the active chain is A or B:
When the active chain is A, it clones from A chain to B chain
When the active chain is B, it clones from B chain to A chain
The clone commands do not need validation commands to validate if the data is written correctly, as DRIVE Update will automatically perform read-back-verify during the clone operation.
Users should ensure no write operations occur on the read-write partitions during the clone procedure; otherwise, it could result in failures during partition validation.
The command clone_bootchain will clone the entire image from the active chain to the inactive chain. See the section Clone Bootchain for more details.
The arguments for clone_l2_pt are as follows:
Arguments |
Description |
|---|---|
partition_name |
Identifies the name of the level 2 pt in FileToFlash.txt. Do NOT add chain label A_ or B_ as the prefix of the partition name. |
The arguments for clone_l3_nvpt are as follows:
Arguments |
Description |
|---|---|
container_pname |
Container partition name of default level 3 PT, defined in the level 2 PCT config file boot_chain_storage_qspi.cfg. |
The arguments for clone_l3_gpt are as follows:
Arguments |
Description |
|---|---|
container_pname |
Container partition name of GPT. |
The arguments for clone_l2_images are as follows:
Arguments |
Description |
|---|---|
partition_type |
|
img_group |
Required only if partition_type is “group”. Identifies the grouped partitions to clone. All the groups are listed in grouped_partitions.txt. Each partition in this group is defined by the partition_name argument. Refer Sample metadata for example. |
partition_name |
Identifies the name of the QSPI/eMMC/UFS partition to flash. Do NOT add chain label A_ or B_ as the prefix of the partition name. |
The arguments for clone_l3_nvpt_images and clone_l3_gpt_images are as follows:
Arguments |
Description |
|---|---|
container_pname |
The container partition name of this level 3 partition. Container name can be obtained in level 2 PCT config file boot_chain_storage_qspi.cfg. |
partition_type |
The same semantics as that of clone_l2_images command. |
img_group |
The same semantics as that of clone_l2_images command. |
partition_name |
The same semantics as that of clone_l2_images command. |
The arguments for replicate_brbct are as follows (Only available for Orin):
Arguments |
Description |
|---|---|
src_bct_index |
The index of the source BRBCT copy to be replicated to other copies or to a special copy, should be 0 ~ 3. |
dst_bct_index |
Optional parameter. The index of the destination BRBCT copy, should be 0 ~ 3. This argument is only effective in standard build. |
Note
BRBCT include a key which is used by bootloader to authenticate the boot chain. so we should be careful when use install_brbct or replicate_brbct to update BRBCT:
The update should not change the key.
If users do need the update to change the key, then:
revoke_key command should be used (even if you don’t intend to revoke the old key).
L1PT and all the partitions in the inactive boot chain should be updated.
If error or reset happen during updating L1PT, then the system could be crashed need USB flashed to recover.
Push mode Commands#
The following command is for push mode.
Command |
Description |
|---|---|
start_push_update |
This command triggers DU TII to enter push mode. Once DU TII enters push mode, it will not execute the subsequent metadata commands until it exits from push mode as requested by the user. |
The arguments for start_push_update are as follows:
Arguments |
Description |
|---|---|
meta_only |
|
Rate Limiting Commands#
DRIVE Update provides the mechanism to limit the average data rate of requests to storage server accessing eMMC, UFS and QSPI partitions. The average data rate is configured by setting a certain storage bandwidth limit within a certain time window. It can be done by the following command:
Command |
Description |
|---|---|
set_storage_bw_limit |
This command enables the storage bandwidth limit. |
The arguments for set_storage_bw_limit are as follows:
Arguments |
Description |
|---|---|
storage_bw_limit_bytes |
Set the size limit in bytes of allowed storage operation in the time window specified by storage_bw_window_ms. |
storage_bw_window_ms |
Set the time window in milliseconds. The argument is optional, if it is not specified, DRIVE Update will use 100ms as the default time window. |
apply_to_rl |
Optional parameter. Specify the storage bw limit will be applied to which runlevel. If this is not specified, the storage bw limit will be applied to all runlevels. |
Storage bandwidth limit is disabled by default, and will be enabled by DU-TII on set_storage_bw_limit command. Once it is enabled, it will be effective through the end of the metadata JSON file in which set_storage_bw_limit command resides. DU-TII will limit the total size of storage operation within the bytes specified by storage_bw_limit_bytes in storage_bw_window_ms milliseconds. The storage operations include both reading and writing inactive partitions via Installation commands, Validation commands and Clone commands.
Storage bandwidth limit can be disabled by set storage_bw_window_ms = 0.
Note
Rate limiting commands are not applied to Push mode.
Note
if storage_bw_limit_bytes is not aligned to 256KB, then it will be aligned down to 256KB.
Revoke Key Commands#
DRIVE Update provides the mechanism to change the OEM public key in BRBCT or revoke an OEM public key. It can be done by the following command:
Command |
Description |
|---|---|
revoke_key |
Change the OEM public key in BRBCT or revoke an OEM public key, and Update the BCH of L1PT. |
The arguments for revoke_key are as follows:
Arguments |
Description |
|---|---|
brbct_path |
BRBCT image with a different OEM public key or revoke an OEM publick key. |
pt_path |
L1PT image signed with the new OEM public key. |
bch_partitions_list |
A partition list that contains all partitions that would be checked as part of secure boot. |
Note
User should provide completed list for bch_partitions_list.
Note
Revoke Key will check if L1PT BCH and the inactive chain (when active chain is A, then inactive chain is B, otherwise inactive chain is A.) partitions’ BCH are matched the BRBCT’s OEM key.
If new BRBCT image does not change OEM public key and does not cause new OEM public key to be revoked, then the command revoke_key will be rejected.
If the L1PT image other than signature, then the revoke key will be rejected.
Revoke Key can only be used in authenticated du package.
User should ensure inactive chain, the new L1PT BCH and the new BRBCT are bootable, otherwise it may lead to brick the device.
Note
discard, set_default_chain are not supported.
Command Sequence#
Construct the metadata file so that each command builds on the next instruction in sequence from top to bottom. The inactive bootchain must be locked with install_lock command before updating any inactive partitions. Use the order of partitions in FileToFlash.txt as a reference to the partition update sequence. If partition needs to be discarded, discard command should be right after install_lock and before updating. When all the required partitions are updated, the inactive bootchain must be unlocked with install_unlock command before switching the active and default bootchain. The only exception is that the install_l1_pt command must be put just ahead of the set_default_chain command to update the partition pt of the first level partition table.
For Guest OS partition update:
The install_l2_pt command must be present to update the second level PT before any install_l2_images command to update the other partitions of this Guest OS.
The install_l3_nvpt or install_l3_gpt command must be present to update the third level PT before any install_l3_nvpt_images or install_l3_gpt_images command to update the other partitions of this Guest OS.
Warning
The first level partition table (l1_pt) must be updated after all the other partitions. Any attempt to update partitions after install_l1_pt command is rejected by DU TII.
A full system reboot is needed to reload partition table after install_l1_pt.
Once install_lock is successfully performed, user can issue multiple times of deployment before install_unlock.
If discard is required, it should be performed before image deployment.
Before a successful install_unlock command, do not switch to the inactive bootchain with reboot command or set inactive chain as default bootchain with set_default_chain command.
The command install_l1_pt should not be wrapped by install_lock and install_unlock because L1PT does not belong to any bootchain.
Installing Thor/Orin Images Example#
The following is a sample metadata file tii-image-metadata.json to install Thor/Orin images:
tii-image-metadata.json
{
    "metaVersion": 2,
    "procedure": [
        {
            "cmd": "install_lock"
        },
        {
            "cmd":"discard",
            "partition_name":"emmc_chain"
        },
        {
            "cmd":"install_l2_pt",
            "partition_name":"pt",
            "img_fname":"$CONTENT_ROOT$A_1_PT.bin"
        },
        {
            "cmd":"validate_l2_pt",
            "partition_name":"pt",
            "hash_algorithm":"sha256",
            "data_size":262144,
            "hash":"77866732cf1bb7a7e98a45380aae1ee37f182f5d507537a2cd6ee7a4be9ac073"
        },
        {
            "cmd":"install_l2_images",
            "partition_type":"single",
            "erase_pad_flag":"0",
            "partition_name":"mb1-bootloader",
            "img_type":"full",
            "img_fname":"$CONTENT_ROOT$A_2_mb1_t234_dev_zerosign.bin"
        },
        {
            "cmd":"validate_l2_images",
            "partition_name":"mb1-bootloader",
            "hash_algorithm":"sha256",
            "data_size":237200,
            "hash":"caf6aac5b24a93a720f2b8444d8137504a1b81bc79d7aeffaa1b9a834341b410"
        },
        {
            "cmd":"install_l3_nvpt",
            "container_pname":"qnx-gos0",
            "img_fname":"$CONTENT_ROOT$A_1_1_PT.bin"
        },
        {
            "cmd":"validate_l3_nvpt",
            "container_pname":"qnx-gos0",
            "hash_algorithm":"sha256",
            "data_size":261120,
            "hash":"b486ba962717aef76791e2ac0673dc4041117b8c229f0cc0b7f353d7237b3a42"
        },
        {
            "cmd":"install_l3_nvpt_images",
            "container_pname":"qnx-update",
            "partition_type":"single",
            "erase_pad_flag":"0",
            "img_type":"full",
            "partition_name":"2_kernel-dtb",
            "img_fname":"$CONTENT_ROOT$A_2_2_tegra_dtb_zerosign.dtb"
        },
        {
            "cmd":"validate_l3_nvpt_images",
            "partition_name":"2_kernel-dtb",
            "hash_algorithm":"sha256",
            "data_size":172032,
            "hash":"f6fabcf7d090dbc0d2ff4dfff74e8fe9cd590da7176690a521b7bc83becdb6d8"
        },
        {
            "cmd": "install_l2_images",
            "partition_type": "group",
            "img_group": [
                {
                    "partition_name": "mb1-bct",
                    "erase_pad_flag": "0",
                    "img_type": "full",
                    "img_fname": "A_2_bct_MB1_zerosign.bct"
                },
                {
                    "partition_name": "spe-fw",
                    "erase_pad_flag": "0",
                    "img_type": "full",
                    "img_fname": "A_4_spe_zerosign.bin"
                },
                {
                    "partition_name": "mb2-bootloader",
                    "erase_pad_flag": "0",
                    "img_type": "full",
                    "img_fname": "A_5_nvtboot_zerosign.bin"
                }
            ]
        },
        {
            "cmd": "validate_l2_images",
            "partition_type": "group",
            "img_group": [
                {
                    "partition_name":"mb1-bct",
                    "hash_algorithm":"sha256",
                    "data_size":20160,
                    "hash":"460c65bfb08f49242735accfdb712c5439339aafee6bcbf2d428371210ac43bd"
                },
                {
                    "partition_name":"spe-fw",
                    "hash_algorithm":"sha256",
                    "data_size":270336,
                    "hash":"7f99090f7e05008bedf453d3c4a95b651e65bf550cd440544ce5bf9513274d7d"
                },
                {
                    "partition_name":"mb2-bootloader",
                    "hash_algorithm":"sha256",
                    "data_size":437568,
                    "hash":"341e2e4815da3f245f5111fed0c0e5029976d6d719968ce58bb79e7bdbbdf03a"
                }
            ]
        },
        // Install other partitions
        {
            "cmd": "install_unlock"
        }
    ]
}
Note
The metadata file must be manually composed.
Validate and ensure the correctness of the file.
The value of metaVersion must be 2 for this release. The value of the version number may increase if additional features are added in future versions of the metadata.
Spaces and tabs may be used to improve usability but are not required.
Configuring Default Bootchain Example#
The following is a sample metadata file to configure the default bootchain:
set_default_bootchain.json
{
    "metaVersion":2,
    "procedure":[
        {
            "cmd":"set_default_chain",
            "target_bootchain":"inactive",
            "a_brbct_path":"A_bct_BR_zerosign.bct",
            "b_brbct_path":"B_bct_BR_zerosign.bct"
        }
    ]
}
Note
The recommended normal update workflow is:
Update all image data to the partitions, with TII metadata similar as the example of installing Thor/Orin images.
Switch to the inactive chain temporarily and perform boot health check.
Configure the default bootchain based on the boot health check result.
See Switch Back On Failure of Post Installation Check for more details.
Note
The max partitions number in TII metadata is about 150.
The max size of TII metadata is 1MB.
Perform Updates#
This section introduces how to use DRIVE Update to perform updates.
Before You Begin#
The first thing is to prepare the DRIVE Update package files. See DRIVE Update Package and DRIVE Update Metadata for more information.
DRIVE Update assumes that the user provides the update content in a decrypted format to perform the update because DRIVE Update does not have decryption functionality.
All the package files shall be downloaded into the same directory of the local file system of Guest OS on Thor/Orin A if the user uses Content Server to export the package files. All the files must be read-accessible by customer OTA application and DU Content Server.
Note
The user must mark the exported files by Client OTA Application/Content Server as globally read only [* R!W] to ensure there is no undefined behavior if a malicious actor tries to write to the exported files.
Note
SC7 is not supported when DRIVE Update is in a deployment.
Note
REINIT is not supported when DRIVE Update is in a deployment.
Note
DUS needs at least 2% local CPU resource to accomplish deployment without starving of CPU to failure. For more information how to yield CPU to DUS, see the “Timed VCPU Yield” section.
Security Hardening for IPC Parameters#
To access the IPC channel on Linux, the OTA application must config the UID for IPC endpoint nvdu_gos_ipc_xx_1, nvdu_gos_ipc_xx_0.
/drive-linux/lib-target/nvsciipc_t26x.cfg
Example of configuration file entries:
# INTER_PROCESS  <Endpoint-name1> <Endpoint-name2> <backend-specific-info> <UID of Endpoint-name1 owner process: UID1> <UID of Endpoint-name2 owner process: UID2>
# INTER_VM       <Endpoint-name> <backend-specific-info> <UID of Endpoint-name owner process>
INTER_PROCESS   nvmcc_du_ipc_0         nvmcc_du_ipc_1   16     4096   2423 2430
INTER_PROCESS   nvdu_gos_ipc_d_0       nvdu_gos_ipc_d_1 5      262656 2426 2909
INTER_PROCESS   nvdu_gos_ipc_e_0       nvdu_gos_ipc_e_1 5      262656 2426 2910
INTER_PROCESS   nvdu_gos_ipc_g_0       nvdu_gos_ipc_g_1 5      262656 2426 2912
INTER_PROCESS   nvdu_gos_ipc_i_0       nvdu_gos_ipc_i_1 5      262656 2427 2909
INTER_VM        nvdriveupdate_ivc_1    407 2433
For the INTER_PROCESS backend, two UIDs must be defined, one for each communicating process. The second process must include the GID of the first UID in its supplementary group list.
Group membership can be updated following NV UID and GID Reservation Tool.
For example, DU Master appliaction with predefined UID 2427 owns nvdu_gos_ipc_i_0 IPC endpoint and DU sample_driveupdate sample application with predefined UID 2909 owns nvdu_gos_ipc_i_1 IPC endpoint, then the process sample_driveupdate with UID 2909 must be added to the group DU Master associated with UID 2427. This additional group assignment is required only for channels using the INTER_PROCESS backend.
nvmcc_du_ipc_0/1is used by mcc_daemon with UID 2423 and DU bootmgr application with predefined UID 2430.nvdu_gos_ipc_d_0/1is used by dulink_router with UID 2426 and sample_driveupdate sample application with UID predefined 2909.nvdu_gos_ipc_e_0/1is used by dulink_router with UID 2426 and content_server sample application with UID predefined 2910.nvdu_gos_ipc_g_0/1is used by dulink_router with UID 2426 and sample_duinstaller sample application with predefined UID 2912.nvdu_gos_ipc_i_0/1is used by dumaster with UID 24267 and sample_driveupdate sample application with predefined UID 2909.nvdriveupdate_ivc_1is used by dutii with predefined UID 2433 currently and need to change to customer UID if customer develop their own apllication that use dus_client library.
Update Workflow#
Note
In this section, it describes the update workflow of normal updates with DU TII install_* commands. The update workflow of push mode and bootchain clone is similar, please refer to Application Note for more details.
The following is a typical workflow of the customer OTA application to perform the update with DRIVE Update APIs.
- Initialize DUCC and start monitoring update state via DUCC interface.
DUCC can be initialized by the following sample code:
static PDUCC     gpDucc = NULL;
static DUTR_SEC_NONE_PARAM     dutrCCSecParams;;
static DUTR_NVSCI_PARAM        dutrCCParams = \
    { .ep[0] = "nvdu_gos_ipc_i_1", .ep[1] = "nvdu_gos_ipc_i_0"};

duRet = DUCC_Init(DUTR_TR_TYPE_NVSCI, DUTR_SEC_TYPE_NONE,
                    &dutrCCParams, &dutrCCSecParams, &gpDucc);
Parameters of DUCC_Init are shown below:
trType(DUTR_TR_TYPE): Type of back-end transport protocol used. For example, “DUTR_TR_TYPE_NVSCI” in type DUTR_TR_TYPE.
seType(DUTR_SEC_TYPE): Type of security protocol. For example, “DUTR_SEC_TYPE_NONE” in type DUTR_SEC_TYPE.
pTrParam(const_PDUTR_TR_PARAM): Pointer to the argument of selected transport protocol. For example, struct DUTR_NVSCI_PARAM with value { .ep[0] = “nvdu_gos_ipc_i_1”, .ep[1] = “nvdu_gos_ipc_i_0”};.
pSeParam(const_PDUTR_SEC_PARAM): Pointer to the argument of selected security protocol. For example, struct DUTR_SEC_NONE_PARAM.
ppDucc(PDUCC*): Pointer to initialized DUCC handle. For example, DUCC pointer.
Note
As dumaster is now in Guest OS, DUTR_NVSCI_PARAM shall use IPC not IVC channel to access DUCC interface.
DUCC interface relies on IPC channel to connect DU Master. Must use the IPC channel name
nvdu_gos_ipc_i_1, nvdu_gos_ipc_i_0for DUCC_Init(). For Linux, see Security Hardening IPC Parameters.In this release, only DUTR_SEC_TYPE_NONE is supported which must be used together with DUTR_SEC_NONE_PARAM.
For QNX, In order to access to this IPC channel, the OTA application must be started with iolauncher, with security tag “nvdriveupdate_cc_service”.
To open both DUCC and du-client IPC channels, use security tag “nvdriveupdate_guest_vm_client”
DUCC interfaces should be called after DUCC_Init is successfully returned
See DUCC API for more information.
The update state can be polled periodically with the following DUCC API:
DUCC_Status status;
DUCC_Get_Current_Status(pDucc, &status);
The caller can get the current update state from status.state, and the pending action from status.pendingAction, see DUCC API for more information. The initiate run level is RL_DORMANT and initiate state is STATE_DORMANT. Update activity requires a higher run level, and the caller can get the required run level of DU Master from status.pendingActionArgs. The caller can forward the request of higher run level to the UI of customer OTA application, and set the run level as following to perform further update activity if the user accept the request:
DUCC_Request_RunLevel(pDucc, status.pendingActionArgs);
Normally the customer OTA application shall check whether any update package is available from OTA cloud server only if the run level is set higher than RL_DORMANT by the user.
Once the update procedure starts, the returned status.state is STATE_UPDATE_IN_PROGRESS, and it changes to STATE_UP_TO_DATE once the update completes successfully. Otherwise, STATE_UPDATE_FAILED or STATE_FATAL_ERROR is returned.
- The customer OTA application shall register itself to DU Link network and initialize the connection to DU Link Router in Guest OS on Orin A.
This can be done as follows:
DULINK_CONNECT_INFO duConnInfo = {0};
uint32_t gRefId = DULINK_CLOSE_ALL;

getPluginConnInfo("du-client", &duConnInfo);
dulinkInit("du-client", duConnInfo.remotePath);
dulinkOpen(duConnInfo.remotePath, duConnInfo.trType, duConnInfo.seType,
          (PDUTR_TR_PARAM) &duConnInfo.trParamBuf,
          (PDUTR_SEC_PARAM) &duConnInfo.secParamBuf,
          duConnInfo.connType, &gRefId);
Parameters of dulinkInit are shown below:
pName(const_char*): name of the element ot open dulink. For example, “du-client”.
pParentPath(const_char*): Parent path of this element.
Parameters of dulinkOpen are shown below:
pRemotePath(const_char*): Absolute path of node being connected.
trType(DUTR_TR_TYPE): Type of back-end transport protocol used.
seType(DUTR_SEC_TYPE): Type of security protocol.
pTrParam(const_void*): Pointer to the argument of selected transport protocol. For example, “nvdu_gos_ipc_d_0”, “nvdu_gos_ipc_d_1”.
pSeParam(const_void*): Pointer to the argument of selected security protocol.
connType(DULINK_CONNECTION_TYPE): Type of connection. For example, “DOWNLINK”.
pConnRefId(uint32_t*): Reference ID can be used to close connection.
Note
The DU Link element name must be “du-client” and its parent path must be “/”, so that OTA application can connect to DU Link Router and access DU Master and Content Server interfaces.
OTA application connects to DU Link Router via IPC channel, hence NVSCI shall be used for DUTR_TR_TYPE, and “nvdu_gos_ipc_d_0”, “nvdu_gos_ipc_d_1” can be used as parameters. It is recommended for OTA application to use a configuration file to define the parameters for flexibility. For Linux, see Security Hardening IPC Parameters.
dulink interfaces should be called only dulinkInit is successfully returned
The user shall make sure that the connection to DU Link Router is setup before performing any further update activity, by doing similar checking as follows:
DULINK_ATTR attr;
uint32_t    retries = USER_DEFINED_RETRY_COUNT;
while (dulinkGetAttribute("/", &attr) != DU_OK)
{
    if (retries == 0)
    {
        printf("Failed connect to router\n");
        return ERROR_CODE;
    }
    retries--;
    sleep(USER_DEFINED_RETRY_INTERVAL);
}
Export package files to DU Link network
char cmd[] = "serve local_path=/absolute/directory/path/of/package/files";
dulinkWrite("/content/cmd", 0, strlen(cmd), cmd, &len);
Note
On success, the package files are accessible by DU plug-ins via DU Link APIs.
See Content Server Interface for more information.
Trigger the actual update procedure via DU Master command interface
char cmd[] = "deploy metadata=/content/files/du_master.json content_root=/content/files";
dulinkWrite("/master/cmd", 0, strlen(cmd), cmd, &len);
Note
The name du_master.json is an example, which can be replaced by the user. However, the path must be /content/files if Content Server is used to export package files.
The deploy command is written to DU Master interface /master/cmd. See DU Master Interface for more information.
Keep monitoring the update status via DUCC interface until the end of update. When update procedure ends up, user shall stop serving package files by writing “stop_serving” command to Content Server interface.
Context Management#
System may reboot for multiple time during the full update procedure, which can be initiated by DRIVE Update itself or by accidental power failure. The customer OTA application should manage its own context across reboot, to distinguish and handle various conditions properly.
User can use Persistent Context Store Interface to manage the context.
On register to DU Master, the Plugin would be written to the path to persistent context storage in persistent_ctx_path node. Customer OTA application should read its context first once the run level is not DORMANT, to check if it is a new update or whether it needs to resume the updates in progress. Refer the following code example in sample_driveupdate.c to read context:
dulinkRead(persistent_ctx_path, 0, sizeof(context), context, &retLen);
Once OTA application triggered the update procedure via DU Master interface, it should record the current deployment into persistent context, so that it can read the stored context on next startup. The context can be updated as the following example code:
static DU_RCODE updateContext(char *pLocalPath)
{
    char     context[DU_PATH_MAX] = {0};
    uint64_t retLen;
    if (pLocalPath != NULL)
    {
        (void)strncpy(context, pLocalPath, DU_PATH_MAX);
    }

    if (dulinkWrite(persistent_ctx_path, 0,
                    strlen(context), context, &retLen) != DU_OK)
    {
        LOG("Error Updating context\n");
        return DUCOMMON_ERR_GENERIC;
    }
    return DU_OK;
}
Note
The above example just demonstrates how to store a simple string to the context. User can define his own context format, of binary type or JSON strings.
The context should be updated when there is a status change of the updates, for example, error on updates, abort from updates, or success on updates.
Switch Back On Failure of Post Installation Check#
DRIVE Update provides the mechanism for user to do post installation check and switch back to the previous bootchain on failure of post installation check.
Firstly user should implement his own boot health check functionality with the BHC skeleton plug-in. See BHC Interface for details.
Secondly user can define and enable the workflow with boot health check in DU Master metadata as the following example:
du_bhc_metadata.json
{
    "metaVersion": 3,
    "restoreSequence": [
        "*/du-client",
        "*/content",
        "/tii",
        "/bhc",
        "/bootmgr"
    ],
    "actions": [
        {
            "actionId": 0,
            "description": "Deploy images to TA",
            "gatedBy": [],
            "pluginType": "installer",
            "pluginPath": "/tii",
            "startOnState": [
                "IDLE"
            ],
            "exitOnStateTransitionTo": [
                "IDLE"
            ],
            "failOnStateTransitionTo": [
                "ERROR"
            ],
            "cmd": "deploy metadata=$CONTENT_ROOT$/tii-a/metadata.json"
        },
        {
            "actionId": 1,
            "description": "Reboot TA to new chain",
            "gatedBy": [
                0
            ],
            "pluginType": "installer",
            "pluginPath": "/bootmgr",
            "startOnState": [
                "IDLE"
            ],
            "exitOnStateTransitionTo": [
                "IDLE"
            ],
            "failOnStateTransitionTo": [
                "ERROR"
            ],
            "cmd": "deploy metadata=$CONTENT_ROOT$/reboot.json"
        },
        {
            "actionId": 2,
            "description": "Invoke boot health check on TA",
            "gatedBy": [
                1
            ],
            "pluginType": "validator",
            "pluginPath": "/bhc",
            "startOnState": [
                "IDLE"
            ],
            "exitOnStateTransitionTo": [
                "IDLE"
            ],
            "failOnStateTransitionTo": [
                "ERROR"
            ],
            "cmd": "validate",
            "onFail": "bhc_fail"
        },
        {
            "actionId": 3,
            "description": "Set default chain on TA",
            "gatedBy": [
                2
            ],
            "pluginType": "installer",
            "pluginPath": "/bootmgr",
            "startOnState": [
                "IDLE"
            ],
            "exitOnStateTransitionTo": [
                "IDLE"
            ],
            "failOnStateTransitionTo": [
                "ERROR"
            ],
            "cmd": "deploy metadata=$CONTENT_ROOT$/set_default_chain.json"
        }
    ],
    "bhc_fail": [
        {
            "actionId": 0,
            "description": "Switch back to old chain on TA",
            "gatedBy": [],
            "pluginType": "installer",
            "pluginPath": "/bootmgr",
            "startOnState": [
                "IDLE"
            ],
            "exitOnStateTransitionTo": [
                "IDLE"
            ],
            "failOnStateTransitionTo": [
                "ERROR"
            ],
            "cmd": "deploy metadata=$CONTENT_ROOT$/reboot.json"
        }
    ]
}
Note
In the default actions section of the above example, action 0 performs the partition updates, and actionId 1 reboots Tegra into the other bootchain. Once DU Master boots up to the new chain, it performs actionId 2 to do boot health check, and performs actionId 3 to set the new chain as the default bootchain on success of boot health check. See BHC Interface for instructions how to enable the user defined boot health check.
The above metadata file defines a set of actions named “bhc_fail” to be executed on failure of “actionId” 2 in the default action set “actions”, specified with “onFail” key word. In the “bhc_fail” action set, actionId 0 switches back to the previous bootchain.
It’s needed to update MCU firmware prior to above process. If any reboot happens when system booting in the updated chain but before execution of set default bootchain, DRIVE Update would think this new chain as unstable and return update failure. DriveOS may automatic update MCU firmware and reboot before set default chain if MCU firmware is not updated prior to Tegra.
The above example is for the target platform with GPIO bootchain selection mode, therefore Boot Manager is used to reboot and configure the default bootchain. Refer DU Master Metadata Example For BRBCT Mode for the target platform with Marker based bootchain selection mode.
Note
Deployment resumption: If reboot occurs when it is deploying via DRIVE Update, then deployment resumes after system bootup. - The section “restoreSequence” in du_master.json defines a list of DU plug-ins which DU Master needs to wait until their context is restored in order before resuming the deployment. The “*” before the plug-in path means that the plug-in will be checked by DU master only if it is registered previously during the deployment. - When restoring, DU Master will wait for the plug-ins connected one by one, and each one will wait for 4 minutes. - User uses content_server + du-client or DDU to serve files and trigger deployment, so to resume a previous deployment, they should start up content_server + du-client or DDU.
Note
STATE_UPDATE_FAILED: When deployment is failed or aborted, DU Master will go to IDLE state, if runlevel is not RL_DORMANT, then user will get STATE_UPDATE_FAILED. STATE_FATAL_ERROR: The system is now in an undetermined state, possibly bootable but should be assumed unsafe to use. The system has to be manually re-flashed or restored in order to exit this state.
Note
“failOnStateTransitionTo” in each action in du_master.json list a state, if related plug-in switches to the state, then if will cause the deployment to fail.
Deployment resume#
When DU Master bootup, it will try to load stored context data via DU Persistent Context Store, then it will goto “RESTORE_CTX” state (DU is In STATE_UPDATE_IN_PROGRESS status (with 0% progress)) to try to resume deployment if .
if there is deployment in the previous bootup, then DU Master tries to resume the previous deployment. The following are the steps of the deployment resume:
Resume the previous plugins based on the “restoreSequence” in du_master.json. See DU Master metadata for more information about restoreSequence. DU Master will wait for approximately 4 minutes for each plugin to connect to the dulink space and another 4 minutes for each plugin to transition out of the RESTORE_CTX state (i.e. until fail to get the state of the plugin or the state is not RESTORE_CTX).
After all the plugins resumed, the previous deployment is continued.
Mostly, the user own the plugins “/du-client,” “/content,” or “/ddu,” which are included in the DU Master’s restored plugins list upon deployment resumption. Therefore, the user needs to resume “/du-client,” “/content,” or “/ddu” to ensure the deployment resumed successful.
The following are the steps of the user to resume the deployment:
Wait for system DVMS INIT_DONE (QNX only).
Start up content_server to export du package to dulink space.
Start up sample_driveupdate to resume the deployment, the following are the step of sample_driveupdate:
Dulink related initialized.
Register to DU Master.
Ducc related initialized.
Monite the deployment status.
DU-TII deployment resume, DU-TII will resume the executing metadata command, and if it is installing partition:
For full update, when DU-TII update an image to a partition with full type, DU-TII will save deployment context with the index of metadata command in metadata.json, the offset of image and the offset of partition in every writing 100MB data to partition. so DU-TII will try to continue the update with the index of progress, offset of image and offset of partition.
For delta update, when DU-TII update an image to a partition with delta type, DU-TII will read nvdiffOffsets block by block (1MB), and then handle nvdiffOffsets one by one, and then read/write data one by one (1MB each time), DU-TII save deployment context with the index of metadata command in metadata.json, the offset of the total nvdiffOffsets, the offset of the 1MB nvdiffOffsets, the offset of the delta data after every 100MB data written. DU-TII will try to continue the update with the index of metadata command in metadata.json, the offset of the total nvdiffOffsets, the offset of the 1MB nvdiffOffsets, the offset of the delta data.
DU deployment resume flow#
Example code about Dulink related initialized in sample_driveupdate.c:
if (dulinkInit(CLIENT_NAME, duConnInfo.remotePath) != DU_OK)
{
    DU_ERR("Failed to init DULINK\n");
    return CONTENT_ERR_GENERIC;
}

if (exportDULinkNodes(NULL, 0, DULINK_FILES_TABLE, DULINK_FILES_TABLE_MAX,
        DULINK_NOTIFY_TABLE, DULINK_NOTIFY_TABLE_MAX) != DU_OK)
{
    DU_ERR("Failed to export all DU Link nodes\n");
    return CONTENT_ERR_GENERIC;
}

initContentProvider(&content_provider);

if (dulinkOpen(duConnInfo.remotePath, duConnInfo.trType, duConnInfo.seType,
                (PDUTR_TR_PARAM) &duConnInfo.trParamBuf,
                (PDUTR_SEC_PARAM) &duConnInfo.secParamBuf,
                duConnInfo.connType, &gRefId) != DU_OK)
{
    DU_ERR("Failed to connect DULINK\n");
    return CONTENT_ERR_GENERIC;
}
Example code about Register to DU Master in sample_driveupdate.c:
duRet = registerToMaster(DUMASTER_PATH)
if (duRet != DU_OK)
{
    DU_ERR("Error %#x to register to DU Master\n", duRet);
    return CONTENT_ERR_GENERIC;
}
Example code about Ducc related initialized in sample_driveupdate.c:
duRet = DUCC_Init(DUTR_TR_TYPE_NVSCI, DUTR_SEC_TYPE_NONE,
                  &dutrCCParams, &dutrCCSecParams, &gpDucc);
if (duRet != DU_OK)
{
    DU_ERR("Error initialize C&C, err:%#x\n", duRet);
    goto end;
}

for (retry = 1U; retry <= DUCC_MAX_RETRY; retry++)
{
    duRet = DUCC_Get_Current_RunLevel(gpDucc, &runlevel);
    if (duRet == DU_OK)
    {
        break;
    }
    else
    {
        DU_INFO("ret:%#x on DUCC_Get_Current_RunLevel()\n", duRet);
        if (retry < DUCC_MAX_RETRY)
        {
            DU_INFO("DUCC is not ready, sleep %us and retry\n", sleepSec);
            (void) sleep(sleepSec);
        }
        else
        {
            DU_ERR("Error fetching runlevel, make sure sample is running"
                " on master Tegra!\n");
            duRet = CONTENT_ERR_GENERIC;
        }
    }
}
Example code about Monite the deployment status in sample_driveupdate.c:
for (;;)
{
    if (DUCC_Get_Current_Status(gpDucc, &status) != DU_OK)
    {
        DU_ERR("Failed to fetch current status!\n");
        goto fail;
    }
    switch (status.state)
    {

        case STATE_DORMANT:
        case STATE_NO_CONNECTIVITY:
        case STATE_UPDATE_AVAILABLE:
            if (bPrintStatus)
            {
                DU_LOG("Current state: %s\n", DUCC_STATE_TABLE[status.state]);
            }
            break;
        case STATE_UPDATE_IN_PROGRESS:
            if (bPrintStatus)
            {
                DU_LOG("Current state: %s, progress %d%%\n",
                        DUCC_STATE_TABLE[status.state], status.progress);
            }
            break;
        case STATE_UPDATE_FAILED:
        case STATE_FATAL_ERROR:
            bUpdateError = true;
            DU_LOG("Current state: %s, exit sample app\n",
                    DUCC_STATE_TABLE[status.state]);
            goto done;
        case STATE_UP_TO_DATE:
            DU_LOG("Current state: %s, exit sample app\n",
                    DUCC_STATE_TABLE[status.state]);
            goto done;
        default:
            DU_ERR("Invalid state %d\n", status.state);
            goto fail;
    }
    switch (status.pendingAction)
    {
        case PA_NONE:
            break;
        case PA_RUNLEVEL:
            DUCC_Request_RunLevel(gpDucc, status.pendingActionArgs);
            break;
        case PA_USERACTION:
        default:
            DU_ERR("Invalid pending action %d\n", status.pendingAction);
            goto fail;
    }
    sleep(INTERVAL_PROGRESS);
}
DRIVE Update APIs#
The DRIVE Update provides the following APIs for the customer OTA application to implement the complete OTA solution for NVIDIA DRIVE™ AGX Orin Platform.
DU Master Interface#
DU Master provides user the following interface via DU Link network.
Interface Path |
Command String |
Description |
|---|---|---|
/master/cmd |
deploy metadata={metadata_file} content_root={content_root} |
This command tells DU Master to begin update installation. {metadata_file} points to a DU Link path where the top level metadata file is to be read from. {content_root} points to a DU Link path where the package files are to be read from. |
/master/cmd |
abort |
This command tells DU to abort from the current update procedure in progress. |
Note
The “abort” command is used to abort from the current update procedure in progress. If there is no deployment issued by “deploy” command, “abort” command would result in errors.
User can query current DUCC state via DUCC_Get_Current_Status() API before sending “abort” command. It is optional. If the current state is STATE_UPDATE_IN_PROGRESS, the state would change to STATE_UPDATE_FAILED on success of “abort” command. If the current state is not STATE_UPDATE_IN_PROGRESS, the state after “abort” is not predictable.
After “abort”, user can request content provider plug-in to stop serving package files in DU-Link. The user can set the runlevel back to RL_DORMANT. These two operations are optional, depending on the use case designed by the user.
Once a deployment is aborted, it cannot be resumed.
Aborting an update procedure may leave inactive bootchain in dirty state because DRIVE Update does not reset the inactive bootchain to the original status on “abort” command. It is the users’ responsibility to make sure not switching to a dirty bootchain.
Persistent Context Store Interface#
Persistent Context Store plug-in provides the interface to store context to the persistent storage so that the context can be persistent across reboots even if bootchain is switched.
Interface Path |
Operations |
Description |
|---|---|---|
/ctx_store/context |
Read/Write |
Read the path to retrieve the context stored last time, and write the path to update the context content. |
BHC Interface#
BHC plug-in provides user the following command interface via DU Link network.
Interface Path |
Operations |
Description |
|---|---|---|
/bhc/cmd |
Write only |
Write “validate” command to start the validation by executing the user implemented functions with the API of BHC plug-in skeleton. Write “clear_error” command to clear the error state of the result for the last boot health check operation. |
/bhc/result |
Read only |
Read it to query the validation result string “PASS” or “FAIL”. |
The default BHC API shared library libnvdubhc_api.so packaged in the Guest OS filesystem is an empty implementation which always returns true as the validation result. The source code files dubhc_api.c are released as sample program for the user to implement his own function to perform the validation for his own requirements. The program interface in dubhc_api.c as following:
dubhc_api.c
/*!
 * User defined Boot Health Check callback function.
 *
 * @return true
 *          Success on boot health check.
 * @return false
 *          Failure on boot health check.
 */
bool duBootHealthCheckUserCallback(void)
{
    // Fill your tests here, default returns success
#ifndef DU_BHC_FAILURE
    return true;
#else
    return false;
#endif
}
The user needs to build his own libnvdubhc_api.so and replace the original one before creating images or flashing the target board.
DU Link API#
DU Link interface provides C function APIs for the user to access the exposed DU Link file node interfaces like that of DU Master and Content Server. It is provided by libnvdulink.so shared library. C APIs are declared in dulink.h header file.
Note
For Linux, see Security Hardening IPC Parameters to develop customer application that use the IPC Channel.
DUCC API#
DUCC is the Command and Control (C&C) interface used to interact and control the complete stack of Drive OTA solution. It is delivered in a form of a client library implementing C&C API’s to be used by OTA applications. Through DUCC API, which is declared in the ducc.h, OTA is able to inform OTA when it is safe or desirable to perform operations which may impact functionality and/or performance of the vehicle. It can also query for update availability or installation progress status, as well as version info and release notes associated with the installed or pending updates. In the end DUCC allows the end-user to interact with the update installation. Client can controll the update with runlevel and learn about the status of update.
Note
For Linux, see Security Hardening IPC Parameters to develop customer application that use the IPC Channel.
Runlevel#
Runlevels define the maximum performance and functionality that Drive OTA is allowed to impact on the vehicle in order to complete its operations. Runlevels are cumulative, meaning each runlevel allows an increase in potential system functionality and/or performance impact. RL_DORMANT is the lowest runlevel, and RL_UNRESTRICTED is the highest. Each runlevel is described explictly in the ducommon.h.
Runlevel transition do not have to be requested in any particular order and it is possible to transit from any runlevel to any others.
Status#
DUCC allows the OTA applications to query for current DRIVE Update status, which includes information such as whether the system is up to date with software updates, whether there are updates available, or whether the updates are in the process of being installed. DUCC status contains 3 component: State, Progress and Pending Action. Details are declared in the ducc.h.
The transition of DUCC state is automatically according to it’s runlevel and software availability.
DUCC state transition#
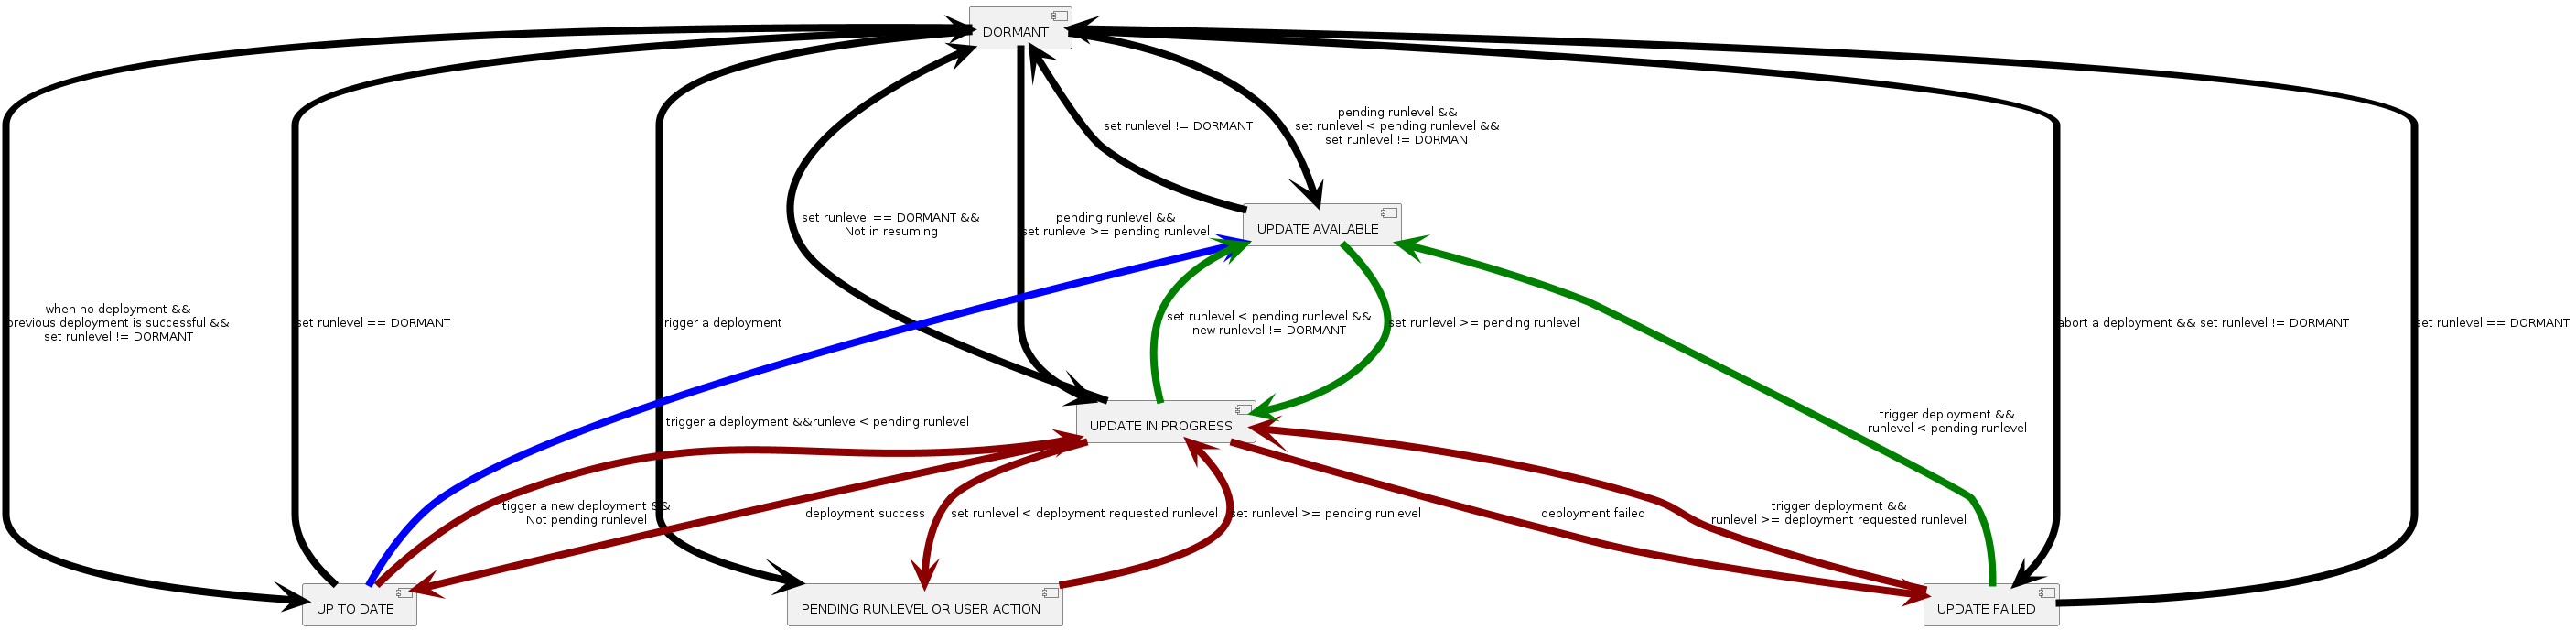
DUCC state transition with condition#
DU Plug-in API#
DU Plug-in APIs are declared in duplugin.h which helps user to development his own DU plug-ins. Please refer DU Plug-ins Interface Specification for more information.
Other Interfaces#
DRIVE Update provides the interfaces to use Authenticator plug-in, Decompressor plug-in, please refer Authenticator HOWTO and Decompressor HOWTO, respectively, for more details.
Application Note#
DU Plug-ins Interface Specification#
This section describes the interfaces used by Drive Update Plug-ins to allow it to add features and expand functionality of Drive Update. All of the required and some optional exported DU-Link nodes are listed, their functionality is described, supported commands and states are provided.
Note
Only the minimum interface requirements for each plug-in type are defined, and specific plug-ins can have extended interfaces.
Common Plug-in Interface#
The common interface is required to be implemented by all plug-ins. It allows DU framework to utilize new plug-ins using a standardized interface.
Exported DU-Link Nodes#
This section describes all the nodes exported by all plug-ins and their functionality.
Common nodes exported by each DU plug-in are shown in Table 1. All the nodes in this table, except for the persistent_ctx_path are required for every DU plug-in except for Controller Type Plug-in.
Each plug-in type may be required to export and implement an additional set of DU-Link nodes, as per subsequent sections of this document.
Optionally, each plug-in can export more nodes to facilitate interactions with custom plug-ins. Note that only the nodes described in this specification document will be utilized by the Drive Update.
Additionally, each plug-in may expose DU-Link nodes exposing debug information or functionality. All such nodes shall be exported under a subdirectory of the plug-in element called “debug”. The entire “debug” subdirectory and its nodes must be disabled at compile time in safety builds.
Node Name |
Type (D/F) |
Permissions ACL |
Description |
|---|---|---|---|
parent_path |
F |
* \[R,!W\] |
Read only file node which contains the complete path of the parent node. This node is automatically exported by the DU-Link library. |
name |
F |
* \[R,!W\] |
Read only file node which contains the path name of the local node (parent_path + name = full path to local node). This node is automatically exported by the DU-Link library. |
du-link_ver |
F |
* \[R,!W\] |
Read only file node which contains DU-Link protocol version. This node is automatically exported by the DU-Link library. |
plugin-type |
F |
* \[R,!W\] |
Read only file node which specifies the plug-in type. A list of valid installer types is shown in Table 2. |
requested_rl |
F |
* \[-,-\]
/master \[R,W\]
|
Contains a requested runlevel (as per DUCC definitions) for the local element plug-in, e.g. “RL_DORMANT” |
current_rl |
F |
* \[R,!W\] |
Read only file node which contains the current runlevel (as per DUCC definitions) of the local element plug-in, e.g. “RL_UNRESTRICTED” |
current_rl.notify |
F |
* \[R,W\] |
Reading this node lists all DU-Link nodes to be notified of new current_rl (one path listed per line). Writing “+PATH” will add a new node path to be notified, “-PATH” will remove the path from the list. |
persistent_ctx_path |
F |
*\[R,-\]
/master \[R,W\]
|
This optional node contains a path to a file element used to store/retrieve persistent context. This node can only be written in RL_DORMANT. Writing this node in any other runlevel will return an error. The plug-in will load/restore its context from this path on successful write of this node. |
pending_rl |
F |
* \[R,!W\] |
Read only file node containing the current pending runlevel, or empty file node (size 0) if the is no pending runlevel. When set, pending_rl must always be higher than current_rl. |
pending_rl.notify |
F |
* \[R,W\] |
Reading this node lists all DU-Link nodes to be notified of new pending runlevel (one path listed per line). Writing “+PATH” will add a new node path to be notified, “-PATH” will remove the path from the list. |
state |
F |
* \[R,!W\] |
Read only file node containing the current installer state. |
state.list |
F |
* \[R,!W\] |
Read only file node containing a list of supported states. A list of required and optional states is provided in following sections for each plug-in type. At minimum, each plug in must support the IDLE state. |
state.notify |
F |
* \[R,W\] |
Reading this node lists all DU-Link nodes to be notified of new state (one path listed per line). Writing “+PATH” will add a new node path to be notified, “-PATH” will remove the path from the list. |
Plug-in Type String |
Description |
|---|---|
controller |
This plug-in type is reserved for /master provided by Drive Update. |
content-provider |
Content provider plug-in. This type of plug in provides file based content to be consumed by other plug-ins. An example of content provider would be OTA application or local filesystem Content Server. |
installer |
Installer plug-in. This type of plug in consumes content provided by content-provider or file-transform plug-ins and performs required software and/or firmware installations. |
file-transform |
File transform plug-in. This type of plug in transforms the content provided by content-provider plug-ins. |
persistent-ctx-store |
Persistent context storage plug-in. This plug-in stores binary context for other plug-ins so that it can be retrieved by those same plug-in after system restart. |
metadata-provider |
Metadata provider plug-in. This type of plug-in provides metadata which can be read via DU-Link and used by other plug-ins. An example of metadata-provider plug-in is Vehicle Info plug-in which makes all vehicle-specific metadata (such as VIN, hardware revisions, etc) available to customer’s OTA application. |
validator |
This plug-in type performs some tests and returns a binary pass of fail result. Example of validator plug-in is Boot Health Check. |
Plug-in |
Runlevel |
Commands |
|---|---|---|
Boot Manager |
>= RL_BG_APPLY |
deploy (set_default_chain) |
Boot Manager |
>= RL_FULL_APPLY |
reboot/board_reset |
Boot Health Checker |
All run levels |
validate |
DU Master |
>= RL_BG_APPLY |
deploy |
Tegra Image Installer |
>= RL_BG_APPLY |
deploy (commands apart from reboot) |
Tegra Image Installer |
>= RL_FULL_APPLY |
reboot |
Authenticator |
>= RL_BG_APPLY |
configure |
Plug-in Power Up Sequence#
Each plug-in runs in its own context. On startup, each plug-in must conform to the following sequence:
Plug-in must powerup at RL_DORMANT runlevel
Plug-in must register with the DU-Master upon successful DU-Link connection, as described in section Plug-in Registration.
Plug-in state must be set to “INIT” until its initialization is complete, at which point the state will change to “IDLE”.
If plug-in supports context restore, it must restore its context when instructed by DU-Master as per section Plug-in Context Save and Restore Operations.
Plug-in Registration#
All plug-ins must register with DU Master via registerToMaster() API declared in duplugin.h upon successful connection to DU-Link.
Plug-in Context Save and Restore Operations#
Since software/firmware installations often require system reboots as part of the update process, each plug-in has an option to support context persistence over reboot. DU framework facilitates context persistence by providing a DU-Link path where a plugin can store its context and retrieve it back after reboot (including reboots to a new bootchain).
Plug-in context is stored in a binary form in a plugin specific format. Saving context is a simple operation of writing a DU-Link node path specified in the plugin’s persistent_ctx_path node. If context persistence is supported, DU Master will write an appropriate path to persistent_ctx_path on initialization while plug-in is still in RL_DORMANT, which should trigger the plugin to re-initialize using the context read from the provided path. Plug-in may save a new copy of its context to the provided path at any time deemed appropriate. The Persistent Context Store plug-in takes care of storing it and making it available for restore.
Note
Context storage must be performed using a single DU-Link write in order to make it an atomic operation for power-fail-safe functionality.
Controller Type Plug-in#
There will only be one controller plug-in in the system and it is always provided by Drive Update as the DU-Master.
Installer Plug-ins#
This section describes the interface which is required for all Installer plug-ins, in addition to the common plug-in interface described in the Common Plug-in Interface section.
Installer Plug-in Overview#
An Installer plug-in is a Drive Update plug-in which allows Drive Update to apply software or firmware updates. Installer plug-in interface is DU-Link based interface, which exposes a file-system-like set of nodes which can be read from and/or written to. Drive Update interacts with installers solely through this interface by writing to and reading from the exported DU-Link nodes.
An Installer plug-in typically depends on and interacts with two other DU-Link plug-ins: a Controller and a Content Provider. The Controller (DU Master) issues commands to the Installer and monitors its state/status, while the installer accesses content of the updates by reading from a Content Provider plug-in path provided as part of the “deploy” command. A high level block diagram of a typical installer deployment is shown in the figure below.
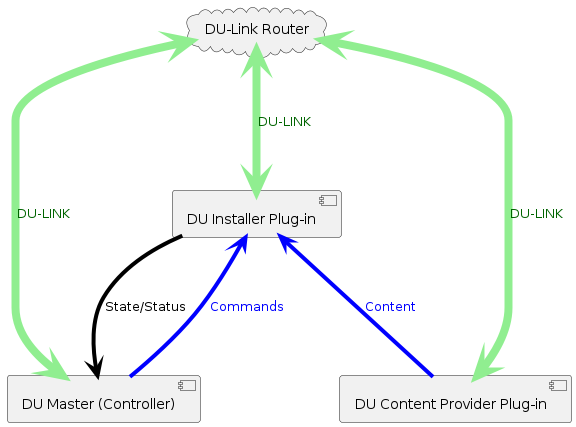
Typical Installer Deployment#
The principle of operation of an installer is to:
Receive installation commands from the controller, including the DU-Link path for update content.
Perform the required installation commands as per the update content retrieved from the Content Provider using the DU-Link path provided as part of installation command.
While installing, provide the controller with status/progress updates, any required runlevel increases, and current installation state information.
An Installer exports a number of DU-Link nodes which serve as the installer’s sole interface to interact with Drive Update. The following sections describe all the nodes exported by an Installer and their functionality.
Command Interface#
Installer Command Interface nodes are shown in Table 4. All of the nodes listed in Table 4 are required.
Node Name |
Type (D/F) |
Permissions ACL |
Description |
|---|---|---|---|
cmd |
F |
* \[R,-\]
/master \[R,W\]
|
Reading this node shows the current command being executed. Writing to this node tells the installer to execute a command. |
cmd.list |
F |
* \[R,!W\] |
Read only file node containing a list of supported commands. A list of required and optional commands is given in Table 8. |
progress |
F |
* \[R,!W\] |
Read only file node containing the current installation progress percentage (integer, range 0-100). |
progress.notify |
F |
* \[R,W\] |
Reading this node lists all DU-Link nodes to be notified of new progress value(one path listed per line). Writing “+PATH” will add a new node path to be notified, “-PATH” will remove the path from the list. |
Supported Installer commands are shown in the following table. Only “deploy” command is required, however “abort” command is strongly recommended (if not supported, the installer can only proceed with installation in RL_UNRESTRICTED). “commit” and “revert” commands are optional, depending on installer capabilities, however they should either both be supported or neither.
Command String |
Description |
|---|---|
deploy metadata={metadata_file} |
This command tells the installer to begin update installation. {metadata_file} points to a du-link path where the top level metadata file is to be read from (from a content provider). Additional parameters may be passed by name in the same command, for example “content_root={path}”. |
commit |
This command commits the newly installed payload. The commit step is defined in the payload metadata. This command can only be issued when state is PENDING_COMMIT. |
revert |
This command instructs the installer to discard a newly deployed but uncommitted image. This command can only be issues when the installer state is PENDING_COMMIT |
abort |
This command instructs the installer to abort current installation. This command cannot be issued when state is IDLE or REVERTING |
clear_error |
This command instructs the plugin to clear the error state, and to proceed to the next valid state (most often IDLE, but up to individual plugin) |
Available Installer states are defined in the following table. Only IDLE and INSTALLING are required, remaining states are optional. A list of supported states should always be exposed via “state.list” node.
Installer State |
Description |
|---|---|
INIT |
This is an optional state which indicated that an installer is initializing and/or loading context. |
IDLE |
In this state, Installer is not doing anything - it’s idle/paused. |
PENDING_RL |
In this state, Installer is in the process of installing an update, however the current runlevel is preventing progress of the installation. Current progress percentage can be read from “progress” node. |
PENDING_RESTART |
In this state, Installer is in the process of installing an update, however the installer requires a system restart to continue. Current progress percentage can be read from “progress” node. |
PENDING_COMMIT |
In this state, the installation of new image is complete, but a commit command is required to activate it, or a revert command to discard the newly deployed image |
INSTALLING |
In this state, Installer is installing the update and its progress percentage can be read from “progress’ node. |
REVERTING |
In this state, Installer is performing a revert operation. Its progress percentage can be read from “progress’ node. |
ERROR |
The plugin enters this state is the command fails after a successful write of a said command to cmd node. The plug-in stays in this state until a “clear_error” command is written to the cmd node. |
There are two way a command can fail:
Synchronously – a write callback for the cmd node returns a failure. This failure mode should be used for errors which can be determined quickly and in a well bound time limit, for example syntax checking, or argument checking. Write callback should never be gating for a long time while the command executes.
Asynchronously – enter the ERROR state. This failure mode should be used when a command fails after the cmd node write callback successfully returns, for example an installer “deploy” command fails during the installation.
Version Information Interface#
Every Installer exports versioning information in a DU-Link subfolder names “ver”. The exported version nodes are shown in the following table. Inactive payload nodes are optional if dual boot configuration is not supported. The ver/cmp subfolder houses all .cmp nodes.
Node Name |
Type (D/F) |
Permissions ACL |
Description |
|---|---|---|---|
ver |
D |
* \[R,-\] |
This is a directory containing all versioning data exposed by the installer |
ver/installer |
F |
* \[R,!W\] |
Current installer version |
ver/installer.cmp |
F |
* \[-,-\]
/master \[R,W\]
|
A version comparison node for current installer version. To compare, write a version string to compare to this node and read this node back to see whether the written version is newer, equal, or older than current version. For example, if installer version is “1.0”, writing “2.0” would cause the read to return “2.0>1.0”, writing “1.0.0” would read back “1.0.0=1.0” |
ver/payload |
F |
* \[R,!W\] |
Currently installed payload version. |
ver/cmp/payload.cmp |
F |
* \[-,-\]
/master \[R,W\]
|
A version comparison node for currently installed payload version. To compare, write the version string to compare to this node and read this node back to see whether the written version is newer, equal, or older than current version. For example, if installer version is “1.0”, writing “2.0” would cause the read to return “2.0>1.0”, writing “1.0.0” would read back “1.0.0=1.0”. Non numerical versions work the same way. |
ver/inactive_payload |
F |
* \[R,!W\] |
Currently installed inactive payload version. Inactive payload is defined as payload installed in the inactive bootchain. During installation to inactive bootchain, this version reads “INVALID”. This node is only present in systems with A/B boot systems, which have an active and inactive boot partition. |
ver/cmp/inactive_payload.cmp |
F |
* \[-,-\]
/master \[R,W\]
|
A version comparison node for currently installed inactive payload version. To compare, write the version string to compare to this node and read this node back to see whether the written version is newer, equal, or older than current version. For example, if inactive_payload is “1.0”, writing “2.0” would cause the read to return “2.0>1.0”, writing “1.0.0” would read back “1.0.0=1.0”. Non numerical versions work the same way. This node is only present in systems with A/B boot systems, which have an active and inactive boot partition. |
Last Deployment Information Interface#
In order to communicate the success or failure of last attempted deployment, each installer exports the “last_deployed” set of read only nodes shows in the following table. The content of these nodes is only updated when a deploy command completes (and state returns to IDLE).
Node Name |
Type (D/F) |
Permissions ACL |
Description |
|---|---|---|---|
last_deployed |
D |
* \[R,-\] |
This directory contains information on most recent completed deployment attempt (not the currently being deployed payload). |
last_deployed/metadata |
F |
* \[R,!W\] |
This node contains the metadata file name used in last completed deploy command |
last_deployed/payload |
F |
* \[R,!W\] |
This node contains the payload version of last deployment attempt |
last_deployed/payload.cmp |
F |
* \[R,!W\] |
A version comparison node for last attempted deployment payload version. To compare, write the version string to compare to this node and read this node back to see whether the written version is newer, equal, or older than current version. For example, if last_deployed/payload is “1.0”, writing “2.0” would cause the read to return “2.0>1.0”, writing “1.0.0” would read back “1.0.0=1.0”. Non numerical versions work the same way, for example if current installed payload version is “Ferrari” and you write “RedBull” to the .cmp node, it could read back “RedBull>Ferrari”. |
last_deployed/result |
F |
* \[R,!W\] |
This node contains the result of last attempted payload deployment. Possible values are SUCCESS, FAILED, ABORTED. Value ABORTED is used for reverted installations. |
Content Provider Type Plug-ins#
Content provider plug-ins are responsible for exporting update payload, file based content by exporting those files to be read via DU Link by other plug-ins. All content provider plug-ins must provide common plug-in interface as per the Common Plug-in Interface section. Content provider plug-in supported states are shown in the following table.
In addition to the required nodes, content provider shall export content on demand, exporting the files as read-only file nodes when available and unlinking them when content is no longer needed or available. It is recommended that the content should be exported in a subdirectory of the content provider plugin.
Note that content providers may export additional nodes to facilitate interactions with other plug-ins, but those are all optional and will not be used by the DU Master as part of DU framework operation.
Content Provider State |
Description |
|---|---|
INIT |
This is an optional state which indicated that the plug-in is initializing and/or loading context. |
IDLE |
This state indicates the content provider is online but not serving any content. |
CONFIGURED |
This state indicated the content provider is online and serving content. |
File Transform Type Plug-ins#
File transform plug-ins serve a similar role as content provider plug-ins, except that rather than providing original content, they provide transformed content from the actual content providers.
Theory of operation for file transform plug in is shown in the figure below. The installer in this case is reading content from the file transform plug-in, instead of the content provider.
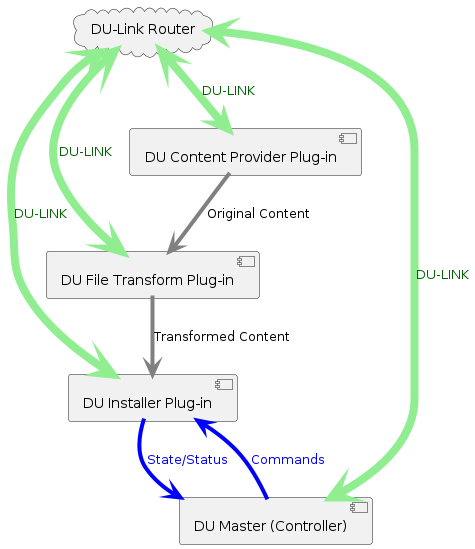
File Transform Plugin Operation#
Example file transfer plug-ins are:
Decryptor – decrypts original content and provides decrypted version of the file to the consumer plug-in.
Decompressor - applies decompression algorithm to the original content and provides uncompressed content to the consumer plug-in.
Authenticator – while technically not modifying the content, authenticator passes through the original content but only if it passes authentication. Reading content from the authenticator will fail if the content itself fails authentication.
File transform plug-ins offer the same interface as the content-provider, with an additional cmd nodes shown in the following table. The purpose for the cmd node is to allow the file transform plug-in to be configured via a Master payload action command, while content providers plug-ins typically are configured externally by client applications such as OTA (not via DU Master). File Transform Plug-in states are listed in Table 12.
Node Name |
Type (D/F) |
Permissions ACL |
Description |
|---|---|---|---|
cmd |
F |
* \[R,-\]
/master \[R,W\]
|
Reading this node shows the current command being executed. Writing to this node tells the plugin to execute a command. |
cmd.list |
F |
* \[R,!W\] |
Read only file node containing a list of supported commands. A list of required and optional commands is given in Table 11. |
Command String |
Description |
|---|---|
configure metadata={metadata_file} |
This command tells the file transform plugin to configure itself to serve content as per specified {metadata_file}. The metadata file should list all content to be served, its source location, and any required transforms. Additional parameters may be passed by name in the same command, for example “content_root={path}”. File transform plugin will transition to CONFIGURED state after this command and stay in this state until configuration is cleared. This command may only be written if the plug-in state is IDLE. |
clear_config |
This command tells the file transform plugin to clear its configuration and to stop serving any transformed content (unlink all served files). File transform plugin will transition to IDLE state after this command. |
clear_error |
This command instructs the plugin to clear the error state, and to proceed to the next valid state (most often IDLE, but up to individual plugin) |
File Transform Provider State |
Description |
|---|---|
INIT |
This is an optional state which indicated that the plug-in is initializing and/or loading context. |
IDLE |
This state indicates the content provider is online but not serving any content. |
PENDING_RL |
This state indicates that the file-transform plug-in has unsatisfied requests pending (e.g. du-link read requests) but it’s unable to satisfy them at the current runlevel. pending_rl node should indicate the minimum runlevel required to proceed. |
CONFIGURING |
This state indicated that the plugin is configuring (not yet serving content). Once configured, the state shall change to CONFIGURED. |
CONFIGURED |
This state indicates the file transform plugin is online and serving content. |
ERROR |
The plugin enters this state is the command fails after a successful write of a said command to cmd node. The plug-in stays in this state until a “clear_error” command is written to the cmd node. |
There are two way a command can fail:
Synchronously – a write callback for the cmd node returns a failure. This failure mode should be used for errors which can be determined quickly and in a well bound time limit, for example syntax checking, or argument checking. Write callback should never be gating for a long time while the command executes.
Asynchronously – enter the ERROR state. This failure mode should be used when a command fails after the cmd node write callback successfully returns.
Metadata Provider Type Plug-ins#
Metadata provider plugs in export read only medatata information. All metadata provider plug-ins must provide common plug-in interface as per Common Plug-in Interface. In addition to the required nodes, metadata providers may expose any number of nodes. An example of metadata provider would be Vehicle Info plug in which would expose nodes such as VIN, model & year, etc.
Validator Type Plug-ins#
A validator type plug-in exposes a PASS/FAIL type test functionality to other plug-ins. Example of validator type plug-ins include Boot Health Check.
All validator plug-ins must export all common plug-in interface nodes as per Common Plug-in Interface. Additionally, validator plug-ins must export nodes shown in Table 13. Validator type plug-in states are shown in Table 15.
Node Name |
Type (D/F) |
Permissions ACL |
Description |
|---|---|---|---|
cmd |
F |
* \[R,-\]
/master \[R,W\]
|
Reading this node shows the current command being executed. Writing to this node tells the plugin to execute a command. |
cmd.list |
F |
* \[R,!W\] |
Read only file node containing a list of supported commands. A list of required and optional commands is given in Table 14. |
result |
F |
* \[R,!W\] |
This node contains the result of last validation test in a format:
Where {id} is the value of the “id” parameter passed with the validate command (see Table 14). If no id is passed, the format is simply “PASS” or “FAIL”. |
result.notify |
F |
* \[R,-\]
/master \[R,W\]
|
Reading this node lists all DU-Link nodes to be notified of new result content (one path listed per line). Writing “+PATH” will add a new node path to be notified, “-PATH” will remove the path from the list. |
Command String |
Description |
|---|---|
validate metadata={metadata_file} id={string} |
This command tells the validator plugin to perform any validation tests as described in the metadata file (or built-in default tests is metadata parameter is skipped). Optional parameter “id” is used to identify test results. Additional parameters may be passed by name in the same command, for example “content_root={path}”. Validator plugin will transition to VALIDATING state after this command and stay in this state until validation is completed. |
clear_error |
This command instructs the plugin to clear the error state, and to proceed to the next valid state (most often IDLE, but up to individual plugin) |
Content Provider State |
Description |
|---|---|
INIT |
This is an optional state which indicated that the plug-in is initializing and/or loading context. |
IDLE |
This state indicates the validator plug-in is ready to run validation tests. |
VALIDATING |
This state indicated the validator plug-in is running validation tests |
ERROR |
The plugin enters this state is the command fails after a successful write of a said command to cmd node. The plug-in stays in this state until a “clear_error” command is written to the cmd node. |
There are two way a command can fail:
Synchronously – a write callback for the cmd node returns a failure. This failure mode should be used for errors which can be determined quickly and in a well bound time limit, for example syntax checking, or argument checking. Write callback should never be gating for a long time while the command executes.
Asynchronously – enter the ERROR state. This failure mode should be used when a command fails after the cmd node write callback successfully returns, for example if “validate” command fails after running tests.
Persistent Context Store Type Plug-ins#
The function of a persistent context store type plug-in is to store binary content persistent across reboots, including reboots to new bootchains. This functionality is used by Drive Update plug-ins to save context necessary to persist after scheduled reboot or after an unexpected power failure.
DU Link Conventions#
DU-Link Access Control List (ACL) conventions#
DU-Link uses ACL to determine whether read or write access is granted to the DU-Link requestor. Each ACL entry contains fields shown as below.
Requestor path (may include wildcards)
Read Access Allow Bit |
Read Access Deny Bit |
Write Access Allow Bit |
Write Access Deny Bit |
|---|---|---|---|
0 / 1 |
0 / 1 |
0 / 1 |
0 / 1 |
The way access is determined for a particular destination node:
Find all ACL entries where the source path matches the requestor path.
Read access is granted if any of the Read Access Allow Bits is set and none of the Read Access Deny Bits is set.
Write access is granted if any of the Write Access Allow Bits is set and none of the Write Access Deny Bits is set
The convention notation is as follows:
src_path \[Read Access, Write Access\]
where Read Access and Write Access notations are shown in the following tables.
Read Access Allow Bit |
Read Access Deny Bit |
Notation |
|---|---|---|
0 |
0 |
|
0 |
1 |
!R |
1 |
0 |
R |
1 |
1 |
Invalid (would have same effect as !R) |
Write Access Allow Bit |
Write Access Deny Bit |
Notation |
|---|---|---|
0 |
0 |
|
0 |
1 |
!W |
1 |
0 |
W |
1 |
1 |
Invalid (would have same effect as !W) |
DU-Link Node Naming Conventions#
There are some conventional extensions used in du-link node naming which are shown in below table.
Extension |
Description |
|---|---|
.bin |
This extension is used for binary content. |
.cmp |
This extension is used to provide >,=, or < comparison function. To compare, write a version string to compare to this node and read this node back to see whether the written version is newer, equal, or lower than the node with the same name without the .cmp extension, and then read it back. For example, if a node called my_version is “1.0”, writing “2.0” to my_version.cmd and reading it back would read “2.0>1.0”, writing “1.0.0” would read back “1.0.0=1.0”, and writing “0.9” would read back “0.9<1.0”. |
.list |
This extension is used for nodes which return a list of supported commands or other content which can be written to the same name node without the .list extension. For example, if we had a node called “color”, where writing the color name string would change a color of an LED controlled by that node, the content of “color.list” would be a list of valid colors to use, one per line. |
.notify |
This extension is used to provide asynchronous notifications of node value changes. When read, this node contains a list of all nodes which would like a real-time copy of the content of the same name node but without .notify written to. For example, if we had a node called “temperature” which could be read to yield current temperature, the temperature.node would contain a list of other nodes which should be written with new temperature whenever a new temperature is available. To add a new path to be notified, a “+path” string should be written to the .notify node, and to remove a path from the list, “-path” should be written to the .notify node |
Command Nodes and Syntax Errors#
DU-Link utilizes command nodes, which are file nodes to which commands can be written to. Typically, each command node would have a corresponding command.list node, which would list all supported commands. Commands are always written in text format, and arguments are passed by name and separated by spaces, for example:
"delete_file path=/mydir/myfile"
All commands are asynchronous. Writing a command commences its execution, but no results are returned on write action, except when an invalid command is written to a command node. In such event, the callback function associated with that node should return a failure, which would in turn return a failure to DU-Link write. This means that writing invalid commands will always fail on write.
Authenticator HOWTO#
Authenticator is a plug-in of file transform type, which can be used to authenticate the signed update package with the OEM public key which is normally stored in secure NOR flash.
Note
Authenticator is enforced for all builds (Linux and QNX). Each DU package for all builds must be signed with a private key before deployment.
Authentication enforcement may be disabled via disable-auth-enforcement setting in device tree.
Note
There is no way to disable the authenticator. What can be disabled is authentication enforcement in most scenarios. Disabling the authentication enforcement means that Drive OS no longer enforces the DRIVE Update package authentication for most scenarios, however the package signature would still be checked if the package contains a signature. Any signature that exists in a package must be a valid signature. Additionally, any package that revokes a public key must be signed.
Package type |
Standard |
Safety |
Disable Authentication Enforcement |
|---|---|---|---|
Package with no signature and no revoke command |
Auth Pass |
Auth Fail |
Auth Pass |
Package with no signature and revoke command |
Auth Fail |
Auth Fail |
Auth Fail |
Package with correct signature (regardless of revoke command) |
Auth Pass |
Auth Pass |
Auth Pass |
Package with incorrect signature (regardless of revoke command) |
Auth Fail |
Auth Fail |
Auth Fail |
How to Disable Authentication Enforcement#
Edit tegra264-driveupdate.dtsi file (Thor) or tegra234-driveupdate.dtsi (Orin) to add this setting corresponding to your board in PDK, then re-bind and re-flash the board.
For example:
/drive/drive-foundation/platform-config/hardware/nvidia/platform/t264/automotive/kernel-dts/common/tegra264-driveupdate.dtsi  // Thor
/drive-foundation/platform-config/hardware/nvidia/platform/t23x/automotive/kernel-dts/common/qnx/tegra234-driveupdate.dtsi    // Orin (QNX)
/drive-foundation/platform-config/hardware/nvidia/platform/t23x/automotive/kernel-dts/common/linux/tegra234-driveupdate.dtsi  // Orin (Linux)
Find drive update section:
driveupdate {
    auth-key = ...
Add a new line if “disable-auth-enforcement” is not presented, or change its value to “1”.
disable-auth-enforcement = "1";
The end result would be like this
driveupdate {
    disable-auth-enforcement = "1";
    auth-key = ...
After the modification, re-bind and flash the device.
Note
DRIVE Update Package Authentication Enforcement feature shall not be disabled via the disable-auth-enforcement Device Tree key entry, unless the customer identifies and mitigates, or assumes all risks associated with all safety and security threats which would otherwise be mitigated by DU package authentication enforcement. Examples of such threats include, but are not limited to:
Deployment of maliciously constructed updates, for example an update which will instruct DU to perform a denial of service by entering an infinite reboot loop. Such update can be deployed by any compromised process running on Guest OS without special permissions.
Tampering with the update content during a deployment, resulting in a partial or modified update flow and/or content
Deploying a mix-and-match update which includes some partitions from older releases, and some partitions from newer releases. Such combination would still boot as all partitions would contain a valid signature, but since the partition combination is not a valid one, the resulting system cannot be considered validates and/or safe.
Any compromised process within Guest OS can issue arbitrary commands to DRIVE Update, including platform reset requests. This can be used to disrupt operation of the system, or it can be used by an attacker who temporarily compromised a process to gain permanence by embedding itself within Tegra attached storage(s).
All security threat modeling performed by NVIDIA for DriveOS assumes DU authentication is enabled and enforced, meaning only updates which are securely signed outside of the vehicle environment would be accepted/executed by DRIVE Update.
Signed DRIVE Update Package#
The signed DU package contains all the files that need to be installed as listed in section DRIVE Update Package, along with their corresponding hash files and an Authenticator Configuration Metadata File.
The chain of trust starts from the Authenticator Configuration Metadata File, which is signed and contains authentication method to authenticate all the files in DRIVE Update package, as shown in the following figure.
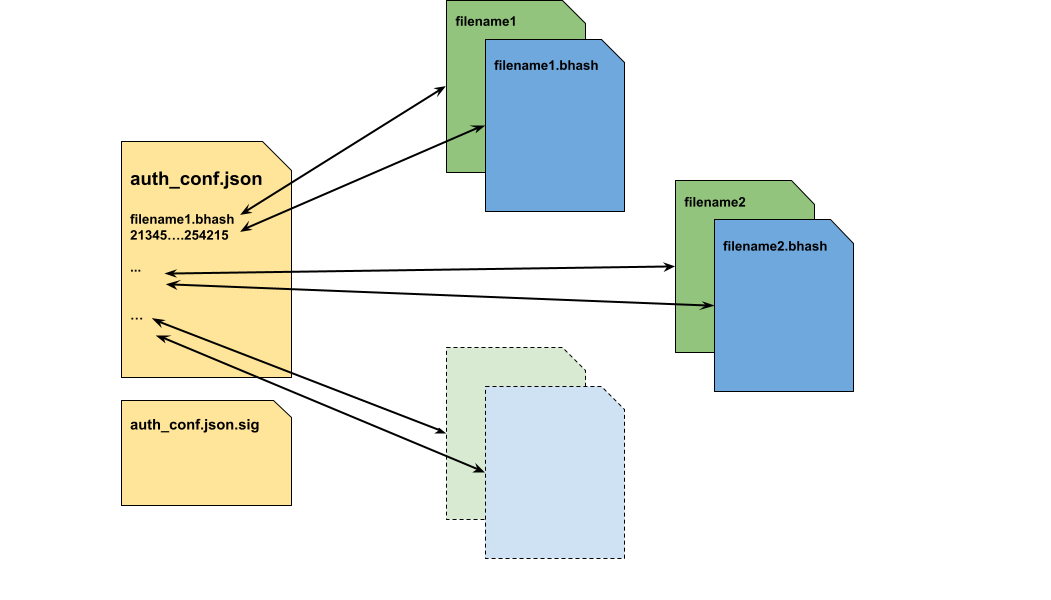
Authenticator Configuration Metadata#
Authenticator Configuration Metadata#
Authenticator Configuration metadata contains the following sections in the top level:
Key |
Description |
|---|---|
metaVersion |
Integer version number for the metadata file. It is 1 at present. |
Files |
A list of files signed by authenticator. |
Below is the syntax of each file item in the “Files” section.
Key |
Description |
|---|---|
src |
The path of the source file to be signed by Authenticator. It is a DU-Link path of the original package file served by content provider plug-in. |
dst |
The destination file that Authenticator will transform the source file to. It contains the following two sub attributes:
Please refer Example of Signed DRIVE Update Package for more information. |
auth_alg |
Authentication algorithm, which can be one of the following:
|
alg_data |
The hash data of the corresponding authentication algorithm. If auth_alg is SHA256, then it is the value of the hash value of the whole file. If auth_alg is BLK_BHASH, it is the DU-Link path of the .bhash file of the original file, which contains a list of SHA256 hash values of the file block by block. Please refer Example of Signed DRIVE Update Package for more information. |
BHASH Metadata#
BHASH Metadata contains the following sections in the top level:
Key |
Description |
|---|---|
metaVersion |
Integer version number for the metadata file. It is 1 at present. |
blk_size |
The block size in bytes used to generate the block hash values. |
auth_alg |
The authentication algorithm used to calculate the hash. “SHA256” and “SHA512” are supported. |
no_of_blks |
Total number of the blocks that the file is divided into. |
list_of_hashes |
A list of the hash values of all blocks in sequence. |
Please refer Example of Signed DRIVE Update Package for more information.
Authenticator Signature File#
Authenticator Configuration Metadata file auth_conf.json will be signed with OEM private key and Authenticator Signature file auth_conf.json.sig will be generated.
When generating the signature, auth_conf.json file will be prepended with the magic buffer of 20 bytes long as shown below:
6 bytes magic string (“NVDU-AUTH-CONFIG”)
4 bytes of 0xFF
The structure of the signed file auth_conf.json.sig is as following:
The magic number (“NVDU-SIG” + NULL)
Version information in uint_8 size
Signature Algorithm in uint_8 size. It should be 0x01 which stands for RSA3K.
Length of the signature in bytes represented in network order uint_16. It is 384(0x0180)
Signature of auth_conf.json file represented in uint_8[]
The following is an example of a python function how to sign auth_conf.json:
'''
If import from Crypto failed, try the following command to install the dependence

* pip3 uninstall pycrypto && pip3 install pycryptodome
'''
from Crypto.PublicKey import RSA
from Crypto.Signature import pss
from Crypto.Hash import SHA256

# magic buffer before the auth config file (auth_conf.json)
SIGNER_MAGIC = b"NVDU-AUTH-CONFIG" + b"\xFF"*4
# magic number before the signature
NVIDIA_MAGIC = b"NVDU-SIG\x00"
# signer version, uint8_t type, range: 0~255
SIGNER_VERSION = 1
# signature algorithm indicator, uint8_t type, range: 0~255
ALGORITHM_TABLE = {
    "RSA3K" : 1,
}

def RSA_sign(file_name, input_key_file):
    key = RSA.importKey(open(input_key_file).read())
    with open(file_name, 'rb') as f:
        block = f.read()
        block = SIGNER_MAGIC + block
    hash_obj = SHA256.new(block)
    signature = pss.new(key).sign(hash_obj)
    with open(file_name+'.sig', 'wb+') as f:
        f.write(NVIDIA_MAGIC)
        f.write(SIGNER_VERSION.to_bytes(1, 'big'))
        f.write(ALGORITHM_TABLE['RSA3K'].to_bytes(1, 'big'))
        f.write(len(signature).to_bytes(2, 'big'))
        f.write(signature)
in which the input file_name is auth_conf.json and input_key_file is the OEM private key.
Example of Signed DRIVE Update Package#
Here is a simple example of signed DRIVE Update package. Assuming the original package contains the following files:
du_master.json
list_of_files.json
tii-a [directory]
small_image.img (48KiB)
large_image.img (5.12MiB)
And blk_size of 1048576 bytes (1MiB) is used for BLK_HASH algorithm.
The signed package generated from the above will contain the following files:
du_master.json
list_of_files.json
auth_conf.json
auth_conf.json.sig
tii-a [directory]
small_image.img (48KiB)
large_image.img (5.12MiB)
large_image.img.bhash
The auth_conf.json is Authenticator Configuration Metadata file, and it will look like the following:
{
    "metaVersion": 1,
    "Files": [
        {
            "src": "$CONTENT_ROOT$/du_master.json",
            "dst": {
                "filename": "/auth/content/du_master.json",
                "read_acl": [
                    "/master"
                ]
            },
            "auth_alg": "SHA256",
            "alg_data": {
                "HASH": "dd2d5161ac9d17289bb86825f5d2b772b12fe4c393ea906b6cde01e43f5391cf"
            }
        },
        {
            "src": "$CONTENT_ROOT$/tii-a/small_image.img",
            "dst": {
                "filename": "/auth/content/tii-a/small_image.img",
                "read_acl": [
                    "/tii"
                ]
            },
            "auth_alg": "SHA256",
            "alg_data": {
                "HASH": "77a087d323ee5497fb102001c60ffb01bdbbb5932340a215c7a85664e9d4bf81"
            }
        },
        {
            "src": "$CONTENT_ROOT$/tii-a/large_image.img",
            "dst": {
                "filename": "/auth/content/tii-a/large_image.img",
                "read_acl": [
                    "/tii"
                ]
            },
            "auth_alg": "BLK_HASH",
            "alg_data": {
                "HASH": "/auth/content/tii-a/large_image.img.bhash"
            }
        },
        {
            "src": "$CONTENT_ROOT$/tii-a/ large_image.img.bhash",
            "dst": {
                "filename": "/auth/content/tii-a/ large_image.img.bhash",
                "read_acl": [
                    "/auth"
                ]
            },
            "auth_alg": "SHA256",
            "alg_data": {
                "HASH": "acfa424ee18dda3693213e37f31af5c5eb280dd338be79eda2d31dbe1a4cb5ca"
            }
        }
    ]
}
The maximum number of files supported in auth_conf.json is 300.
The maximum size of auth_conf.json supported is 64KB.
In the above example:
The “read_acl” of small_image.img and large_image.img is [“tii-a”], which indicates that these two files can be read by DU TII only. The “read_acl” of large_image.img.bhash is [“/auth”] because BHASH file only needs to be read by Authenticator.
The “auth_alg” of small_image.img is “SHA256” because the file size is smaller than the block size of 1MiB.
The “auth_alg” of large_image.img is “BLK_HASH” because the file size is larger than the block size. The BHASH file large_image.img.bhash should be verified with SHA256 algorithm too.
The following is an example of BHASH file large_image.img.bhash:
{
    "metaVersion": 1,
    "blk_size": 1048576,
    "auth_alg": "SHA256",
    "no_of_blks": 6,
    "list_of_hashes": [
        "7d019de69e4489b5586d00672695bf4d8a15679464d5ee470555898c88bf141b",
        "955fc0756b5ba34a94ed5b513be11265b426d1ac4d19521ab99530b1235bd599",
        "65d557df9b2dd118859b12bb3f087a63950f610c567501feb9e946c4e1a8ca94",
        "9700344482a974c290d6860626dc7c59182a87505c983987654485f47666ff99",
        "e4d1926f7e4e72f337bfbb1f1fdc73fbfd278f2074e2d568b9dbdad8b1a47c9b",
        "58e2ee691a7de401833d3e20586b9024802fbeb521f4e11b2af706f4eb003611"
    ]
}
There are 6 blocks in total because large_image.img is of 5.12MiB size which contains five 1MiB blocks and one 0.12MiB block.
The maximum supported BHASHes in a file is limited to 32768 OR the maximum supported size of a BHASH file is 1MB.
Note
With the “blk_size” of 1048576 and the BHASH file size limit of 1MB, the maximum size of an image that is supported is 13.46GB.
Authenticator should be configured in du_master.json. Refer Update Workflow With Authenticator for more information.
Update Workflow With Authenticator#
The update workflow in OTA application can be implemented similarly as section Update Workflow.
Note
OTA application must input the path to auth_conf.json file by adding the “auth=$ROOT/auth_conf.json” parameter to the deploy command. for example: “deploy metadata=$ROOT/du_master.json auth=$ROOT/auth_conf.json content_root=$ROOT”
Please refer to DUPKG_Authentication_HOWTO for how to generate a valid Authentication DU Package.
The difference mainly resides in du_master.json. The following is an example du_master.json file with Authenticator enabled. File root content will be changed to /auth/content in Authenticator DU Package.
{
    "metaVersion": 3,
    "restoreSequence": [
        "*/ddu",
        "*/du-client",
        "*/content",
        "/auth",
        "/tii",
        "/bhc",
        "/bootmgr"
    ],
    "actions": [
        {
            "actionId": 0,
            "description": "Deploy images to TA",
            "gatedBy": [],
            "pluginType": "installer",
            "pluginPath": "/tii",
            "startOnState": ["IDLE"],
            "exitOnStateTransitionTo": ["IDLE"],
            "failOnStateTransitionTo": ["ERROR"],
            "logOnStart": "Start Deploy images to TA",
            "logOnExit": "TA images updated",
            "logOnFail": "Failed to deploy images to TA",
            "cmd" : "deploy metadata=/auth/content/tii-a/metadata.json"
        },
        {
            "actionId": 1,
            "description": "Reboot TA to new chain",
            "gatedBy": [0],
            "pluginType": "installer",
            "pluginPath": "/bootmgr",
            "startOnState": ["IDLE"],
            "exitOnStateTransitionTo": ["IDLE"],
            "failOnStateTransitionTo": ["ERROR"],
            "logOnStart": "Start reboot TA to new chain",
            "logOnExit": "TA rebooted",
            "logOnFail": "Failed to reboot TA to new chain",
            "cmd" : "deploy metadata=/auth/content/reboot.json"
        },
        {
            "actionId": 2,
            "description": "Invoke boot health check on TA",
            "gatedBy": [1],
            "pluginType": "validator",
            "pluginPath": "/bhc",
            "startOnState": ["IDLE"],
            "exitOnStateTransitionTo": ["IDLE"],
            "failOnStateTransitionTo": ["ERROR"],
            "logOnStart": "Start TA boot health check",
            "logOnExit": "Passed TA boot health check",
            "logOnFail": "Failed to pass TA boot health check",
            "cmd" : "validate",
            "onFail": "bhc_fail"
        },
        {
            "actionId": 3,
            "description": "Set default chain on TA",
            "gatedBy": [2],
            "pluginType": "installer",
            "pluginPath": "/bootmgr",
            "startOnState": ["IDLE"],
            "exitOnStateTransitionTo": ["IDLE"],
            "failOnStateTransitionTo": ["ERROR"],
            "cmd" : "deploy metadata=/auth/content/set_default_chain.json"
        }
    ],
    "bhc_fail": [
        {
            "actionId": 0,
            "description": "Switch back to old chain on TA",
            "gatedBy": [],
            "pluginType": "installer",
            "pluginPath": "/bootmgr",
            "startOnState": ["IDLE"],
            "exitOnStateTransitionTo": ["IDLE"],
            "failOnStateTransitionTo": ["ERROR"],
            "cmd" : "deploy metadata=/auth/content/reboot.json"
        }
    ]
}
DUPKG Authentication HOWTO#
DUPKG Tool with Authentication template use to package the images and sign the whole package with the RSA private key. Update VM on the target device will validate the package before deployment to ensure package is not damaged after release.
Generate Authentication DU Package#
Create SSH Key Pair for Authentication#
Note
If you already have a SSH key, skip this section
If you don’t have a SSH key, you can follow this section to generate a new SSH key to use for authentication.
RSA public key will convert and update to the DTS file
RSA private key will transfer to DUPKG Tool for signing the package
Create a new SSH RSA key pair
ssh-keygen -t rsa -b 3072
Update Public Key to Device Tree#
Convert the public key to auth-key format for DTS
use the following Python3 script to convert the RSA public key to hex string for device tree
from Crypto.PublicKey import RSA
pem = "id_rsa.pub" # change to your rsa public key
key = RSA.importKey(open(pem, "r").read())
s = "{0:X}{1:08X}".format(key.n, key.e)
dts_auth_key = " ".join(["0x"+s[i:i+2] for i in range(0, len(s), 2)])
print(dts_auth_key)
Update the auth-key array to DTS file in SDK
find the tegra264-driveupdate.dtsi (Thor) / tegra234-driveupdate.dtsi (Orin) from SDK and replace the auth-key data use the output from last step,the dts file is located in
/drive/drive-foundation/platform-config/hardware/nvidia/platform/t264/automotive/kernel-dts/common/tegra264-driveupdate.dtsi  // Thor
/drive-foundation/platform-config/hardware/nvidia/platform/t23x/automotive/kernel-dts/common/qnx/tegra234-driveupdate.dtsi    // Orin (QNX)
/drive-foundation/platform-config/hardware/nvidia/platform/t23x/automotive/kernel-dts/common/linux/tegra234-driveupdate.dtsi  // Orin (Linux)
Find drive update section, “auth-key”
driveupdate {
    auth-key = <0xBF 0xCC ... 0x00 0x01 0x00 0x01>;
    ...
}
Generate Package#
Make sure you have built the SDK image successfully, then running the following command to generate DU Package with Authentication.
Generate Authentication DU Package for QNX
# DUPKG Version: 1.6.0
TEGRA_A_SRC=<path_to_qnx_source_image>
PRIVATE_KEY_PATH=<path_to_authenticator>/id_rsa
OUTPUT_FOLDER=<path_to_empty_folder>
TEMPLATE=dupkg_single_tegra_template

python3 dupkg.py gen --in TII_META_VER=metav2 VALIDATE_OPTION=True TEGRA_A_SRC=$TEGRA_A_SRC AUTHENTICATOR_OPTION=AuthPkg PRIVATE_KEY_PATH=$PRIVATE_KEY_PATH --template $TEMPLATE --out $OUTPUT_FOLDER
Generate Authentication DU Package for Linux
# DUPKG Version: 1.6.0
TEGRA_A_SRC=<path_to_linux_source_image>
PRIVATE_KEY_PATH=<path_to_authenticator>/id_rsa
OUTPUT_FOLDER=<path_to_empty_folder>
TEMPLATE=dupkg_single_tegra_template

python3 dupkg.py gen --in TII_META_VER=metav2 VALIDATE_OPTION=True TEGRA_A_SRC=$TEGRA_A_SRC AUTHENTICATOR_OPTION=AuthPkg PRIVATE_KEY_PATH=$PRIVATE_KEY_PATH --template $TEMPLATE --out $OUTPUT_FOLDER
Apart from directly generating authenticated DU package DUPKG also supports sign or re-sign an existing DU package with dupkg_sign_template. By listing the input argument there are extra variables which can be configured for DU packaged generated with different templates.
 Input Variable   | Req / Opt   | Description
------------------+-------------+-----------------------------------------------------------------------------------------------
 DUPKG_DIR        | Required    | Path to DUPKG folder to be signed containing Tegra images, du_master.json and etc
 SIGN_TEMPLATE    | Required    | Template used for the unsigned DUPKG generation
 PRIVATE_KEY_PATH | Optional    | The path to private key file. Required if enable Authenticator
 TEGRASIGN_PATH   | Optional    | The path to the tegrasign_v3.py tool in the PDK. Required if enable Authenticator and use HSM

 Extra Variable        | Req / Opt   | Description
-----------------------+-------------+-----------------------------------------------------------------------------------------------------------------------------------------------------
 UPDATE_RECOVERY_CHAIN | Optional    | If update the recovery chain [True | False]. Default is True. This is an option for DU package generated with dupkg_only_install_template
For example to sign a DU package generated with dupkg_only_install_template:
DUPKG_DIR=<path_to_DU_package> SIGN_TEMPLATE=dupkg_only_install_template PRIVATE_KEY_PATH=<path_to_authenticator>/id_rsa OUTPUT_FOLDER=<path_to_empty_folder>
python3 dupkg.py gen –in DUPKG_DIR=$DUPKG_DIR SIGN_TEMPLATE=$SIGN_TEMPLATE PRIVATE_KEY_PATH=$PRIVATE_KEY_PATH UPDATE_RECOVERY_CHAIN=False –template dupkg_sign_template –out $OUTPUT_FOLDER
Deploy Authentication DU Package#
Deploy Process#
Deploy the DU Package use sample_driveupdate tool on the target GuestOS, the package files will trigger the DU-Auth plugin to validate the package with the public key from device tree. Package files will actually deploy to the target only when validate pass, otherwise, DU-Auth plugin will reject the deploy.
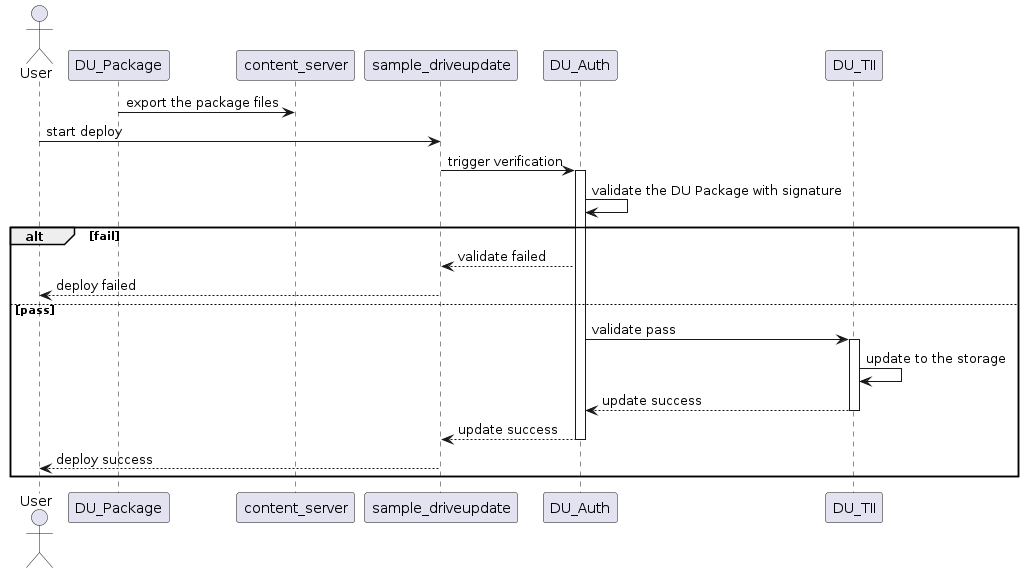
Deploy DU Package with Authentication#
Deploy to Target#
copy the sample_driveupdate, content_server and DU package to target
deploy on target use the following commands
./content_server <path_to_package> &
./sample_driveupdate -p /content/files --auth
Example Deploy Log
# ./content_server <path_to_package> &
# ./sample_driveupdate -p /content/files --auth
Deploy mode is pull
Current state: STATE_DORMANT
Update is waiting for higher run level 3
Current state: STATE_UPDATE_IN_PROGRESS, progress 33%
Update is waiting for higher run level 4
Current state: STATE_UPDATE_IN_PROGRESS, progress 33%
...
Current state: STATE_UP_TO_DATE, exit sample app
[Result]Deploy OK!
Bootchain Clone HOWTO#
User can use bootchain clone method to either recover inactive chain or update the second bootchain for dual bootchain updates, by cloning active partitions to inactive bootchain. This can be done with Bootchain Clone Commands in DU TII metadata. The update steps are described at Perform Updates.
Clone Bootchain#
Clone Bootchain only works when the active chain is A or B:
When active chain is A, it clones from A chain to B chain
When active chain is B, it clones from B chain to A chain
DRIVE Update can clone the whole images from active bootchain to inactive bootchain with clone_bootchain command, this command does not have any arguments and it will clone following partitions:
clone active chain qspi_chain to inactive chain qspi_chain (about 9MB)
clone active chain emmc_chain to inactive chain emmc_chain(about 28GB)
clone active chain ufs_chain to inactive chain ufs_chain (if device have one, about 52GB)
The metadata to perform clone bootchain is simple as bellow:
{
    "metaVersion": 2,
    "procedure": [
        {
            "cmd": "clone_bootchain"
        }
    ]
}
Note
The clone_bootchain command is only guaranteed to work when all bootchain partitions are read-only.
Users should ensure no write operations occur on the read-write partitions during the clone procedure. This includes but not limited to rw_overlay and nvlog.
Users could unmount read-write partitions during the clone procedure, and mount it back after clone is done.
Clone Partitions#
The following is an example to clone some of active partitions to inactive bootchain.
{
    "metaVersion":2,
    "procedure":[
        {
            "cmd":"install_lock"
        },
        {
            "cmd":"clone_l2_pt",
            "partition_name":"pt"
        },
        {
            "cmd":"clone_l2_images",
            "partition_type":"single",
            "partition_name":"mb1-bootloader"
        },
        {
            "cmd":"clone_l2_images",
            "partition_type":"single",
            "partition_name":"psc-bl"
        },
        {
            "cmd":"clone_l2_images",
            "partition_type":"single",
            "partition_name":"mb1-bct"
        },
        {
            "cmd":"clone_l2_images",
            "partition_type":"single",
            "partition_name":"mem-bct"
        },
        {
            "cmd":"clone_l2_images",
            "partition_type":"single",
            "partition_name":"mb2-bootloader"
        },
        {
            "cmd":"clone_l2_images",
            "partition_type":"single",
            "partition_name":"spe-fw"
        },
        {
            "cmd":"clone_l2_images",
            "partition_type":"single",
            "partition_name":"tsec-fw"
        },
        {
            "cmd":"clone_l2_images",
            "partition_type":"single",
            "partition_name":"psc-fw"
        },
        {
            "cmd":"clone_l2_images",
            "partition_type":"single",
            "partition_name":"mts-mce"
        },
        {
            "cmd":"clone_l2_images",
            "partition_type":"single",
            "partition_name":"bpmp-fw"
        },
        {
            "cmd":"clone_l2_images",
            "partition_type":"single",
            "partition_name":"sc7-fw"
        },
        {
            "cmd":"clone_l2_images",
            "partition_type":"single",
            "partition_name":"psc-rf"
        },
        {
            "cmd":"clone_l2_images",
            "partition_type":"single",
            "partition_name":"mb2-rf"
        },
        {
            "cmd":"clone_l2_images",
            "partition_type":"single",
            "partition_name":"bpmp-fw-dtb"
        },
        {
            "cmd":"clone_l2_images",
            "partition_type":"single",
            "partition_name":"rce-fw"
        },
        {
            "cmd":"clone_l2_images",
            "partition_type":"single",
            "partition_name":"ist-ucode"
        },
        {
            "cmd":"clone_l2_images",
            "partition_type":"single",
            "partition_name":"bpmp-ist"
        },
        {
            "cmd":"clone_l2_images",
            "partition_type":"single",
            "partition_name":"ist-config"
        },
        {
            "cmd":"clone_l2_images",
            "partition_type":"single",
            "partition_name":"ist-testimg"
        },
        {
            "cmd":"clone_l2_images",
            "partition_type":"single",
            "partition_name":"ist-runtimeinfo"
        },
        {
            "cmd":"clone_l2_images",
            "partition_type":"single",
            "partition_name":"ist-resultdata"
        },
        {
            "cmd":"clone_l3_gpt",
            "container_pname":"custom"
        },
        {
            "cmd":"clone_l2_images",
            "partition_type":"single",
            "partition_name":"secure-os"
        },
        {
            "cmd":"clone_l2_images",
            "partition_type":"single",
            "partition_name":"fsi-fw"
        },
        {
            "cmd":"clone_l2_images",
            "partition_type":"single",
            "partition_name":"pvit"
        },
        {
            "cmd":"clone_l2_images",
            "partition_type":"single",
            "partition_name":"pva-fw"
        },
        {
            "cmd":"clone_l2_images",
            "partition_type":"single",
            "partition_name":"kernel"
        },
        {
            "cmd":"clone_l3_nvpt",
            "container_pname":"qnx-gos0"
        },
        {
            "cmd":"clone_l3_nvpt_images",
            "container_pname":"qnx-gos0",
            "partition_type":"single",
            "partition_name":"1_kernel-dtb"
        },
        {
            "cmd":"clone_l3_nvpt_images",
            "container_pname":"qnx-gos0",
            "partition_type":"single",
            "partition_name":"1_kernel"
        },
        {
            "cmd":"clone_l2_images",
            "partition_type":"single",
            "partition_name":"usr-fs"
        },
        {
            "cmd":"clone_l2_images",
            "partition_type":"single",
            "partition_name":"gos0-ifs2"
        },
        {
            "cmd":"clone_l2_images",
            "partition_type":"single",
            "partition_name":"debug_overlay"
        },
        {
            "cmd":"clone_l3_nvpt",
            "container_pname":"qnx-update"
        },
        {
            "cmd":"clone_l3_nvpt_images",
            "container_pname":"qnx-update",
            "partition_type":"single",
            "partition_name":"2_kernel-dtb"
        },
        {
            "cmd":"clone_l3_nvpt_images",
            "container_pname":"qnx-update",
            "partition_type":"single",
            "partition_name":"2_kernel"
        },
        {
            "cmd":"install_unlock"
        }
    ]
}
Delta Update HOWTO#
Delta updates is a Drive Update feature that allow users to update images using the delta of the original and new image. This reduces the update time as the delta image size is much smaller than that of the full image.
Most images released as part of DriveOS are small except the QNX6 FS image which is 4 GB. The tool is optimal to be used with images of bigger sizes like QNX6 FS images.
Following sections list the steps need to be followed to generate a delta image and perform delta updates.
Note
For security reasons, PVIT update needs to be included in the metadata.json.
To include PVIT, please add below example section to metadata.json and update list_of_files.json to include A_PVIT_Image_zerosign.bin as well.
{
    "cmd":"install_l2_images",
    "partition_type":"single",
    "erase_pad_flag":"1",
    "partition_name":"pvit",
    "img_type":"full",
    "img_fname":"$CONTENT_ROOT$A_PVIT_Image_zerosign.bin"
},
{
    "cmd":"validate_l2_images",
    "partition_name":"pvit",
    "hash_algorithm":"sha512",
    "data_size":12848,
    "hash":"<updated the hash of this file>"
},
If you don’t want to include PVIT, it shall be disabled. To disable PVIT, please include “ENABLE_PVIT=n” when binding the partition prior to flashing.
Note
Delta update does not support for Mb1 partition.
Delta Generator#
The delta image is generated using “nvdiff” binary which is provided for x86 Linux host. The binary can be run as:
$ nvdiff <old_fs>.img <new_fs>.img delta_fs.img 4m
The delta_fs.img is the image generated which can be applied on the <old_fs>.img. “4m” is the block size parameter, this command set the block size to 4MB, default block size is “8m”.
Note
The <old_fs> and <new_fs> used in this file are just referring to old and new fs images and the tool does not expect the files to be named this way. These will need to be replaced by the files you pass to generate the delta.
DU TII Metadata Commands#
DU TII metadata commands of install_l{*}_images are used for Delta update. The “img_type” parameter should be “delta” to indicate delta update.
Note that the data_size should be the <new_fs>.img full size and the hash should be the <new_fs>.img sha256 or sha512 string
The following is an example metadata to perform delta update on gos0-fs image.
{
    "metaVersion": 2,
    "procedure": [
        {
            "cmd": "install_lock"
        },
        {
            "cmd": "install_l2_images",
            "erase_pad_flag": "0",
            "img_type": "delta",
            "partition_type": "single",
            "partition_name": "gos0-fs",
            "img_fname": "delta_fs.img"
        },
        {
            "cmd": "validate_l2_images",
            "partition_name": "gos0-fs",
            "data_size": 4294967296,
            "hash_algorithm": "sha256",
            "hash": "271030c74635cc3b08ddb34362506075b3065859dc03524440bb8a62b80db49e"
        },
        {
            "cmd":"install_l2_images",
            "partition_type":"single",
            "erase_pad_flag":"1",
            "partition_name":"pvit",
            "img_type":"full",
            "img_fname":"$CONTENT_ROOT$A_PVIT_Image_zerosign.bin"
        },
        {
            "cmd":"validate_l2_images",
            "partition_name":"pvit",
            "hash_algorithm":"sha512",
            "data_size":12848,
            "hash":"<updated the hash of this file>"
        },
        {
            "cmd": "install_unlock"
        }
    ]
}
Please make sure that the delta is applied on the right version of the image. If you flash the device using bootburn and generate delta on images generated using create_bsp tools then delta is not generated on a right image. Two FS images generated from the same directory at different time stamps will not be the same.
If you are unsure, better way to test is using the metadata file below:
{
    "metaVersion": 2,
    "procedure": [
        {
            "cmd": "install_lock"
        },
        {
            "cmd": "install_l2_images",
            "erase_pad_flag": "1",
            "img_type": "full",
            "partition_type": "single",
            "partition_name": "gos0-fs",
            "img_fname": "<old_fs>.img"
        },
        {
            "cmd": "install_l2_images",
            "erase_pad_flag": "0",
            "img_type": "delta",
            "partition_type": "single",
            "partition_name": "gos0-fs",
            "img_fname": "delta_fs.img"
        },
        {
            "cmd": "validate_l2_images",
            "partition_name": "gos0-fs",
            "data_size": 4294967296,
            "hash_algorithm": "sha256",
            "hash": "271030c74635cc3b08ddb34362506075b3065859dc03524440bb8a62b80db49e"
        },
        {
            "cmd":"install_l2_images",
            "partition_type":"single",
            "erase_pad_flag":"1",
            "partition_name":"pvit",
            "img_type":"full",
            "img_fname":"$CONTENT_ROOT$A_PVIT_Image_zerosign.bin"
        },
        {
            "cmd":"validate_l2_images",
            "partition_name":"pvit",
            "hash_algorithm":"sha512",
            "data_size":12848,
            "hash":"<updated the hash of this file>"
        },
        {
            "cmd": "install_unlock"
        }
    ]
}
Here the <old_fs> image is flashed first to make sure the partition matches the image we are using to generate the delta.
Note
User should make sure the partition content is same as <olds_fs>.img before applying the delta, so if a deployment makes the layout change, User should be careful to use delta update or avoid to use delta update.
Generate Optimal FS Delta (Linux image only)#
Note
The nvdiff_fsimg.sh script used in this section is released as reference only and not safety certified.
EXT4 FS allocates super blocks, inodes etc differently every time. The nvdiff_fsimg.sh script is provided as a sample script for generating the optimal delta image on host for Linux. The command line utility readlink is required.
The nvdiff_fsimg.sh script generates delta_fs.img and <orig_fs.img>_mod.img as the output.
nvdiff_fsimg.sh script is part of the SDK release at
drive-linux/samples/driveupdate/delta_tools
nvdiff tool is part of the SDK release at
drive-foundation/tools/driveupdate/delta_tools
Step 1: Copy over the tools nvdiff_script.sh, nvdiff, old_fs.img, new_fs.img to your host PATH. Make sure that the binary “nvdiff” is in your PATH.
Step 2: Run the nvdiff_fsimg.sh script on the host with the following command:
$ sudo sh nvdiff_fsimg.sh <old_fs>.img <new_fs>.img ext4
Step 3: Generate the SHA256/SHA512 of the <orig_fs.img>_mod.img image
# for SHA256
sha256 <orig_fs.img>_mod.img
# for SHA512
sha512 <orig_fs.img>_mod.img
Step 4: Create the metadata file and perform a delta update. Make sure to update the partition_name, img_fname, data_size, hash value etc as per your images.
Note
To make sure EXT4 root filesystem partition remain unchange after booting.
Set root filesystem partition permission to read-only. Add
OS_ARGS_ROOT_MOUNT_PER=roinbind_partitioncommand.In PCT storage configurations, turn-off EXT4 resizing for root filesystem by adding
resize=no[partition] name=gos0-fs allocation_policy=sequential filesystem_type=ext4 size=LINUX_ROOTFS_SIZE partition_attribute=<GID_GUEST0_VM+1> filename=<PDK_TOP>/drive-linux/filesystem/targetfs.img resize=no ...
Push Mode HOWTO#
Description#
Automotive customers traditionally use UDS to flash ECU’s, and they require this ability for Tegra based system. UDS requires a “push model” where the UDS programmer pushes update data to the system (UDS writes to DU), where DU does not have the full control over what order the data will be written in.
Note
The partitions (except BRBCT) in the first level PT cannot be updated in Push mode. These partitions need to be updated with install_* DU TII commands when Push mode is disabled.
The partitions in the first level PT cannot be validated in Push mode.
Note
When Update BRBCT, we should write a whole copy of BRBCT (8KB) at once. In Orin, the copy cannot have OEM public key changed and cannot contain revoke bits.
Note
DU only handle one write or validate at a time on push mode.
Note
For gpt, DU will export dulink nodes “primary-gpt.bin” and “second-gpt.bin” node to map primary gpt and second gpt.
Push Mode Deployment Flow#
The following diagram shows the DU package deployment flow using the Push client as the OTA application.
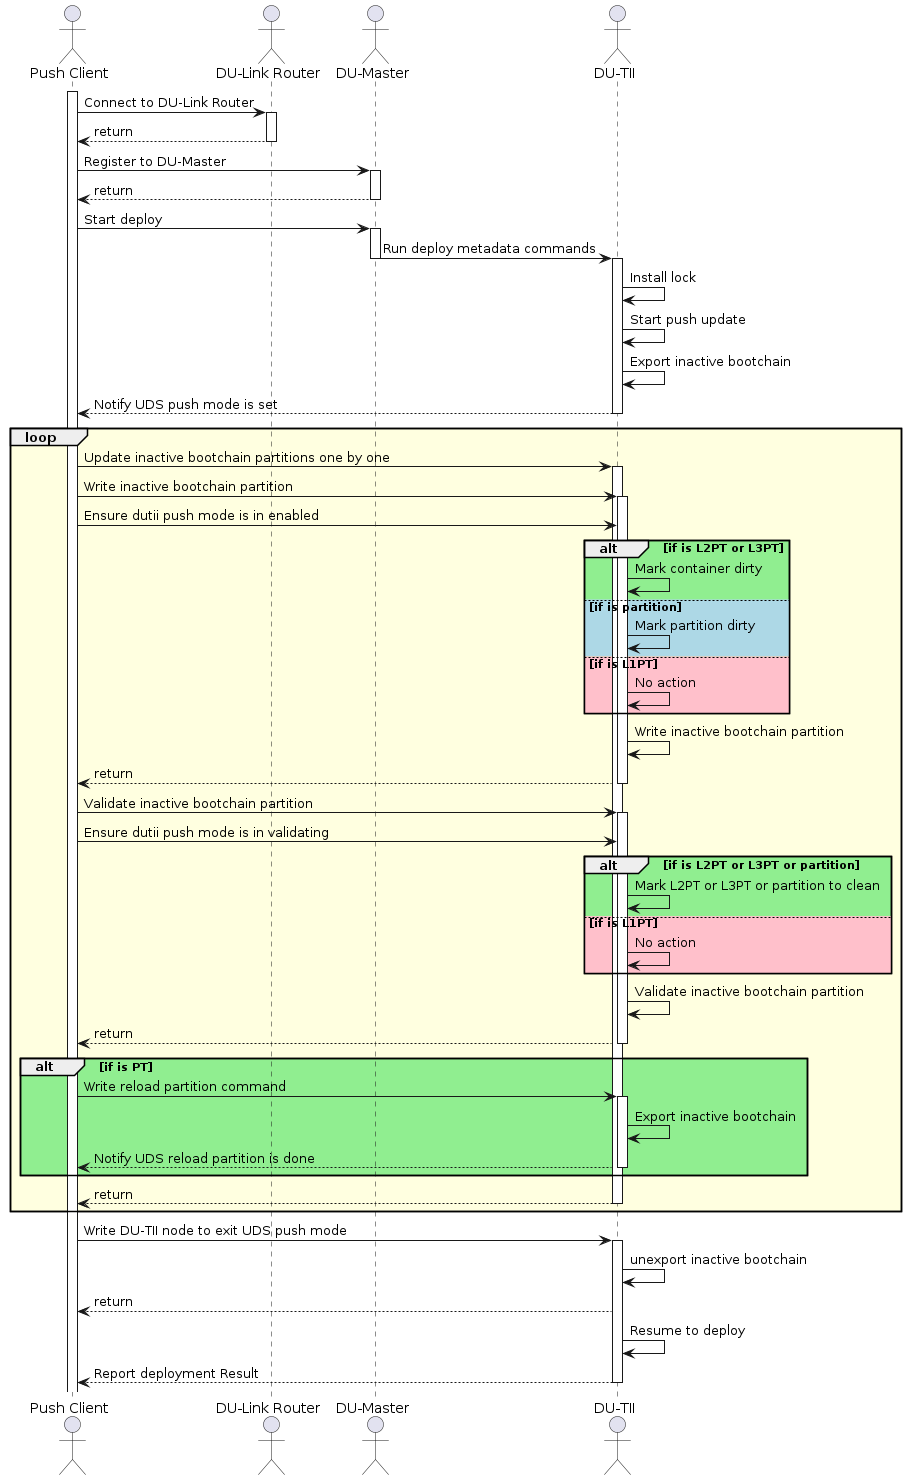
Diagram#
To implement the Push client compliant to the above workflow:
Follow the steps 1, 2, 3, and 4 in section Update Workflow to initialize and configure DUCC and DU Link connection, export package files to DU Link, and trigger DU Master to start deploy.
TII will enable push mode on “start_push_update” metadata command. Push client needs to wait until TII enable push mode, and this can be done as the following Pseudocode code:
#define CLIENT_NAME          "du-client"
#define EXPORT_PUSH_CB       "push_cb"
#define TA_PUSH_MODE_NOTIFY  "/tii/push_mode.notify"

/*!
 * @brief Deploy function need to register the push_cb to "/tii/push_mode.notify" node
 */
static DU_RCODE deployPackage
(
    char *pPkgPath,
    bool  bExportNeeded,
    bool  bPushMode,
    bool  bControlledMode
)
{
    // ...

    DU_LOG("Deploy mode is %s\n", bPushMode ? "push" : "pull");
    if (bPushMode)
    {
        duRet = dulinkExportFile(EXPORT_PUSH_CB, &cbAttr, pushCB, (void *)pkgLinkPath);
        if (duRet != DU_OK)
        {
            DU_ERR("Error on export %s\n", EXPORT_PUSH_CB);
            goto fail;
        }

        len = snprintf(cbPath, sizeof(cbPath), "+%s/%s/%s", parentPath, CLIENT_NAME, EXPORT_PUSH_CB);
        if (len >= (int32_t)sizeof(cbPath))
        {
            DU_ERR("%s is truncated to %d\n", cbPath, len);
            duRet = DULINK_ERR_BUFFER_TOO_SMALL;
            goto fail;
        }

        duRet = dulinkWrite(TA_PUSH_MODE_NOTIFY, 0, strlen(cbPath), cbPath, &retLen);
        if (duRet != DU_OK)
        {
            DU_ERR("Error on register %s to %s\n", cbPath, TA_PUSH_MODE_NOTIFY);
            goto fail;
        }
        bRmCbPath = true;
    }
    // ...
fail:
    // ...
    return duRet;
}


/*!
 * @brief Callback to be triggered when push mode is enabled
 */
static DU_RCODE pushCB
(
    const char          *pRequestPath,
    const char          *pOriginPath,
    void                *pCtx,
    uint64_t             offset,
    uint64_t             length,
    void                *pBuf,
    DULINK_CB_OPERATION  operation,
    uint64_t            *pRetVal
)
{
    DU_RCODE   duRet = DU_OK;
    char      *pPkgPath = (char *) pCtx;
    pthread_t  threadId;

    if (offset != 0)
    {
        DU_ERR("Invalid offset to cmd\n");
        duRet = DULINK_CB_ERR_INVALID_ARGUMENT;
        goto bailout;
    }

    switch (operation)
    {
        case DULINK_CB_WRITE:
        {
            if (strcmp(pBuf, "enabled") == 0)
            {
                DU_INFO("Start push update!\n");
                if (pthread_create(&threadId, NULL, performPush, pPkgPath) != 0)
                {
                    DU_ERR("Error on pthread_create\n");
                }
                (void) pthread_detach(threadId);
            }
            break;
        }
        case DULINK_CB_READ:
        case DULINK_CB_SIZE:
        default:
        {
            duRet = DULINK_CB_ERR_INVALID_ARGUMENT;
            break;
        }
    }

bailout:
    return duRet;
}
Once DU TII enables push mode successfully, Push client can write the image data to the partition storage via DU Link nodes. The DU Link nodes are exported by DU TII, mapping to corresponding inactive partition storages. The name convention of the DU Link nodes are:
/tii/content/<partition_name>.bin for L1 partitions, for example, /tii/content/bct.bin.
/tii/content/<inactive_bootchain>/<partition_name>.bin for L2 partitions, for example, /tii/content/A-chain/A_mem-bct.bin.
/tii/content/<inactive_bootchain>/<container_name>/<partition_name>.bin for L3 partitions, for example, /tii/content/A-chain/A_qnx-gos0/A_1_kernel-dtb.bin.
Push client should manage the mapping between partitions and image files by itself to ensure that the partition is updated with the correct image file.
Updating a PT partition may result in partition layout change, therefore Push client must request DU TII to reload PT as soon as it finishes the update of the PT partition before it updates any later partitions. This can be done as the following:
dulinkWrite("/tii/push_mode", 0, sizeof("reload"), "reload", &retLen);
When Push client complete the partition updates, it should disable DU TII push mode, so that DU TII can resume execution of subsequent metadata commands. This can be done as the following:
dulinkWrite("/tii/push_mode", 0, sizeof("disabled"), "disabled", &retLen);
Follow the Step 5 in section Update Workflow to wait until the deployment is completed.
Example DU TII Metadata#
The following is an example of DU TII Metadata for Push mode.
{
    "metaVersion": 2,
    "procedure": [
        {
            "cmd": "install_lock"
        },
        {
            "cmd": "start_push_update"
        },
        {
            "cmd": "install_unlock"
        }
    ]
}
The workflow of the above metadata file is as the followings:
Lock inactive bootchain with install_lock command. Inactive chain will not be able to boot up after lock.
DU TII enables push mode on start_push_mode metadata command.
TII stops executing the subsequent validation commands
TII mounts all inactive chain partitions and expose the partition storage as DU Link file nodes with write only permission.
The user updates inactive partitions by writing to the DU Link file nodes mapped to corresponding inactive partition storages. Any written partitions are marked as dirty and will be marked as clean once it is validated by user.
An image update map with validation information is provided by users. A sample of push_image_map.json is shown as below.
{
    "L1-partitions":[],
    "A-chain":[
        {
            "partition":"/tii/content/bct.bin",
            "image":"tii-a/A_bct_BR_zerosign.bct"
        },
        {
            "partition":"/tii/content/A_qspi_chain.bin",
            "image":"tii-a/A_1_PT.bin"
        },
        {
            "validate_p":"/tii/content/A_qspi_chain.bin",
            "hash_algorithm":"sha256",
            "data_size":262144,
            "hash":"186e1206dcb8ac26f773d27e602b5a8dcf7358be4176970e2a9fe168af37a4e4"
        },
        {
            "reload":"/tii/push_mode"
        },
        {
            "partition":"/tii/content/A-chain/A_mb1-bootloader.bin",
            "image":"tii-a/A_2_mb1_t234_dev_zerosign.bin"
        },
        {
            "validate_p":"/tii/content/A-chain/A_mb1-bootloader.bin",
            "hash_algorithm":"sha256",
            "data_size":246272,
            "hash":"93d79f65f52610f1abb268e2bb56828ba173167bf1289d42859bb5a217b011a8"
        }
    ],
    "B-chain":[
        {
            "partition":"/tii/content/bct.bin",
            "image":"tii-a/A_bct_BR_zerosign.bct"
        },
        {
            "partition":"/tii/content/B_qspi_chain.bin",
            "image":"tii-a/A_1_PT.bin"
        },
        {
            "validate_p":"/tii/content/B_qspi_chain.bin",
            "hash_algorithm":"sha256",
            "data_size":262144,
            "hash":"186e1206dcb8ac26f773d27e602b5a8dcf7358be4176970e2a9fe168af37a4e4"
        },
        {
            "reload":"/tii/push_mode"
        },
        {
            "partition":"/tii/content/B-chain/B_mb1-bootloader.bin",
            "image":"tii-a/A_2_mb1_t234_dev_zerosign.bin"
        },
        {
            "validate_p":"/tii/content/B-chain/B_mb1-bootloader.bin",
            "hash_algorithm":"sha256",
            "data_size":246272,
            "hash":"93d79f65f52610f1abb268e2bb56828ba173167bf1289d42859bb5a217b011a8"
        }
    ]
}
The workflow of on demand validation is as the followings:
When TII enables push mode successfully, Push client should set TII enter validating mode with below command.
dulinkWrite("/tii/push_mode", 0, sizeof("validating"), "validating", &retLen);
Once TII enter validating mode, Push client can validate partitions by writing the validation informations include hash_algorithm, data_size and hash to partithon node via DU LINK. An example would be to send the following JSON file like: { “validate_p”:”/tii/content/A_qspi_chain.bin”, “hash_algorithm”:”sha256”, “data_size”:262144, “hash”:”fde0fd6bf5d9fd6271be30546effa52fba87a83dc2de02be76708e9af5c1eeac” },
Note
“validate_p” indicates the partition want to validate, this JSON element is needed only for push client. TII requires the remaining three elements: “hash_algorithm”, “data_size”, and “hash”.
After validation succeed, Push client should set TII into enable mode with below command to update next partition.
dulinkWrite("/tii/push_mode", 0, sizeof("enabled"), "enabled", &retLen);
Note
Push client must set TII to validating mode each time when want to do a validation, and set TII back to enable mode after validation succeed. Push client can ony set TII enter validating mode from enable mode and switch back to enable mode from validating mode, set TII into enable mode from disable mode is not allowed.
Note
When Push mode is enabled, the progress of deployment is not updated because Drive Update is not aware of the total size of the payload to be updated by the user.
The user disables push mode by writing “disabled” to TII /tii/push_mode DU Link file node. TII unmounts all of the DU Link nodes of inactive partitions, and then complete command “start_push_update” with success.
DU TII validates updated partitions according to the validation information in image update map. All validated partitions are marked as clean.
Note
When write/validate/read partitions failed in push mode, if user doesn’t want to write/validate/read partitions in push mode, user is recommended to abort the deployment to let the deployment failed but not disable push mode to complete the command “start_push_update” and let the deployment continue.
DUPKG for Push Mode#
Generate Push Mode DU Package#
Make sure you have built the SDK image successfully, then running the following command to generate DU Package with validation.
Generate Push Mode DU Package for QNX
# DUPKG Version: 1.6.0
TEGRA_A_SRC=<path_to_source_image>
OUTPUT_FOLDER=<path_to_empty_folder>
TEMPLATE=dupkg_push_template

python3 dupkg.py gen --in TII_META_VER=metav2 VALIDATE_OPTION=True TEGRA_A_SRC=$TEGRA_A_SRC --template $TEMPLATE --out $OUTPUT_FOLDER
Generate Push Mode DU Package for Linux
# DUPKG Version: 1.6.0
TEGRA_A_SRC=<path_to_source_image>
OUTPUT_FOLDER=<path_to_empty_folder>
TEMPLATE=dupkg_push_template

python3 dupkg.py gen --in TII_META_VER=metav2 VALIDATE_OPTION=True TEGRA_A_SRC=$TEGRA_A_SRC --template $TEMPLATE --out $OUTPUT_FOLDER
Deploy to Target#
copy the sample_driveupdate, content_server and DU package to target
deploy on target use the following commands
./content_server <path_to_package> &
./sample_driveupdate -p /content/files --push
Example Deploy Log
# ./content_server <path_to_package> &
# ./sample_driveupdate -p /content/files --push
Deploy mode is push
Current state: STATE_DORMANT
Update is waiting for higher run level 4
Current state: STATE_UPDATE_IN_PROGRESS, progress 0%
Reading image mapping from /content/files/tii-a/push_image_map.json
Image    0: /content/files/tii-a/A_2_1_PT.bin, partition: /tii/content/B-chain/B_qnx-update.bin
Current state: STATE_UPDATE_IN_PROGRESS, progress 100%
Current state: STATE_UP_TO_DATE, exit sample app
[Result]Deploy OK!
Push Mode HOWTO Dtb#
Description#
User can use push mode with meta_only == 1 to request DRIVE Update to export partitions content configured in device tree.
Configure device tree before flashing the board#
Configure the nodes info to the dts tegra264-driveupdate.dtsi (Thor) / tegra234-driveupdate.dtsi (Orin) to “/chosen/driveupdate/”.
Below is the example of Thor:
export_nodes_list {
        node1 {
                partition = "qspi_chain";
                size = "1024";
                offset = "1024";
        };
        node2 {
                partition = "ufs_chain";
                size = "1024";
                offset = "1024";
        };
};
node1 will be related to partition qspi_chain in inactive chain offset == 1024, size == 1024.
node2 will be related to partition ufs_chain in inactive chain offset == 1024, size == 1024.
Below is the example of Orin:
export_nodes_list {
        node1 {
                partition = "emmc_chain";
                size = "1024";
                offset = "1024";
        };
        node2 {
                partition = "emmc_chain";
                size = "1024";
                offset = "1024";
        };
        node3 {
                partition = "ufs_chain";
                size = "1024";
                offset = "1024";
        };
};
node1 will be related to partition emmc_chain in inactive chain offset == 1024, size == 1024.
node2 will be related to partition emmc_chain in inactive chain offset == 1024, size == 1024.
node3 will be related to partition ufs_chain in inactive chain offset == 1024, size == 1024.
This is the location of device tree
/drive/drive-foundation/platform-config/hardware/nvidia/platform/t264/automotive/kernel-dts/common/tegra264-driveupdate.dtsi  // Thor
/drive-foundation/platform-config/hardware/nvidia/platform/t23x/automotive/kernel-dts/common/qnx/tegra234-driveupdate.dtsi    // Orin (QNX)
/drive-foundation/platform-config/hardware/nvidia/platform/t23x/automotive/kernel-dts/common/linux/tegra234-driveupdate.dtsi  // Orin (Linux)
Note
Only export the partition in inactive chain in this push mode.
Note
The partition doesn’t include the chain label, DRIVE Update will add inactive chain label to the partition.
Note
The max number of exported nodes is 64.
Note
Export gpt partition in this push mode is not supported.
Note
When export a node related to mb1, data read would be incorrect.
Note
The offet + size of node can’t exceed the size of partition.
Note
The nodes’ offset and size can overlay each other.
Request DU to export the nodes configured in dtb#
User should send a deployment request to DU to export the nodes configured in DTB. The following is an example of metadata.json:
{
    "metaVersion":2,
    "procedure":[
        {
            "cmd":"install_lock"
        },
        {
            "cmd":"start_push_update",
            "meta_only": 1
        },
        {
            "cmd":"install_unlock"
        }
    ]
}
Read the partition content#
During deployment, if DRIVE Update successes to go to push mode, the deployment will be blocked, the value of dulink node “/tii/push_mode” will become “enabled”, and then we can see the nodes “node1”, “node2”, “node3” in /tii/content/.
For example, if we dulinkRead /tii/content/node1 with offset == 0, size == 512, then we will get the content of inactive chain partition “emmc_chain” with offset == 1024, size == 512.
Disable the push_mode and unblock the deployment#
When Push client complete the partition reads, it should disable DU TII push mode, so that DU TII can resume execution of subsequent metadata commands. This can be done as the following:
dulinkWrite("/tii/push_mode", 0, sizeof("disabled"), "disabled", &retLen);
Note
Push Mode with meta_only == 1 is not supported in 7.0.1.0.
DUS Client HOWTO#
DUS_Client HOWTO#
DUS Client provides a lib(libnvdusclient.so) for users to communicate with driveupdate server in HV RTOS. For Linux, see Security Hardening IPC Parameters to develop customer application that use the IPC Channel.
Note
As DU TII uses DUS client API with pre-defined IVC channe by default at boot, if user need to use DUS client, they can disable DU TII. User can define below macro to disable all the units (include DU TII) in Guest OS.
ENABLE_GUEST_OS_DU_APP := n
If user uses above macro to disable Guest OS units, they will lose the security feature in all the Guest OS drive update units, such as dutii, etc.
If user needs to use DUCC interface, please make sure this macro is set to “y”. It’s set “y” by default.
ENABLE_GUEST_OS_DU_APP := y
APIs and Data Structures definitions#
Please refer dus_common_data.h and dus_client.h.
Initialize the dusclient config#
duscInit will help to initialize the IVC channel by name(“nvdriveupdate_ivc_1”) and reserve the Mempool by ID(73).
It is thread-safe as the dependent nvsciipc will guarantee only 1 thread can access the IVC channel.
duscInit();
Deinitialize the dusclient config#
duscDeinit should be called when the users need to stop or quit the communication with DUS
It will release the IVC channel and Mempool.
duscDeinit();
Execute the IVC command#
duscExecute will send and receive IVC/Mempool data to/from DU server.
It will also help to parse the input from caller and output from the DU server.
*DUSCLIENT_ERROR duscExecute(uint32_t cmd, uint8_t targetBootchain, uint8_t *pPayload, uint32_t payloadLen, uint8_t *pBuf, uint32_t *pBufLen);
cmd: IVC command ID, required for running IVC command.
targetBootchain: Target bootchain, required for Apply Payload Command.
pPayload: Payload address, required for the Apply Payload Command.
payloadLen: Payload length, required for the Apply Payload Command.
pBuf: Buffer for receiving data from DU Server, optional, provided if user need to receive data from DU Server.
pBufLen: The size of pBuf, optional, provided if user need to receive data from DU Server.
duscExecute(CMD_GET_PT_LOG, CHAIN_INVALID, NULL, 0, (uint8_t *)pt, &ptLength);
...
duscExecute(CMD_APPLY_PAYLOAD, targetBootchain, payloadBuf, payloadFileLen, NULL, NULL);
Update GPT Partitions#
DRIVE Update provides DU TII metadata commands for GPT partition updates, please refer DU TII metadata Syntax for more information.
Except for push mode, the DU TII metadata commands for GPT images would be included by default in metadata.json generated by dupkg tool.
{
    "metaVersion":2,
    "procedure": [
        {
            "cmd": "install_lock"
        },
        {
            "cmd": "install_l3_gpt",
            "container_pname": "custom",
            "prim_gpt_fname": "A_1_customGPT_pri00_03.bin",
            "sec_gpt_fname": "A_1_customGPT_bak00_03.bin"
        },
        {
            "cmd": "install_l3_gpt_images",
            "container_pname": "custom",
            "partition_type": "group",
            "img_group": [
                {
                    "partition_name": "samplep1",
                    "img_type": "full",
                    "img_fname": "samplep1.img",
                    "erase_pad_flag": "1"
                },
                {
                    "partition_name": "samplep2",
                    "img_type": "full",
                    "img_fname": "samplep2.img",
                    "erase_pad_flag": "1"
                },
                {
                    "partition_name": "samplep3",
                    "img_type": "full",
                    "img_fname": "samplep3.img",
                    "erase_pad_flag": "1"
                }
            ]
        },
        {
            "cmd":"validate_l3_gpt_images",
            "container_pname": "custom",
            "partition_name":"samplep1",
            "hash_algorithm":"sha256",
            "data_size":2888,
            "hash":"a4e2a83b57d57558fcb250f0f7d37cbdb232df6ea5d197fdc5b16fc2c3808670"
        },
        {
            "cmd":"validate_l3_gpt_images",
            "container_pname": "custom",
            "partition_name":"samplep2",
            "hash_algorithm":"sha256",
            "data_size":2888,
            "hash":"a4e2a83b57d57558fcb250f0f7d37cbdb232df6ea5d197fdc5b16fc2c3808670"
        },
        {
            "cmd":"validate_l3_gpt_images",
            "container_pname": "custom",
            "partition_name":"samplep3",
            "hash_algorithm":"sha256",
            "data_size":2888,
            "hash":"a4e2a83b57d57558fcb250f0f7d37cbdb232df6ea5d197fdc5b16fc2c3808670"
        },
        {
            "cmd": "install_unlock"
        }
    ]
}
Make sure the GPT partition table is flashed before attempting to run install_l3_gpt_images; otherwise, the command fails with “partition not found” errors.
Note
For how to add GPT L3 partitions, please refer “GPT L3 Support” section in NVIDIA DriveOS QNX SDK API Reference. (NVIDIA DriveOS QNX SDK API Reference → Virtualization Guide → Supported Platform Configurations → AV PCT Configuration → Storage Layout for Update VM → GPT L3 Support)
Revoke Key HOWTO#
Users can revoke the key flashed on the target by updating the inactive chain, L1PT partition boot component header and the BRBCT partition.
Revoke Key Update#
User can use the Drive Update Package generated with dupkg_revoke_key_template and then deploy the Drive Update Package to the target.
Use ‘dupkg lsin –template dupkg_revoke_key_template’ to see input arguments:
 Input Variable       | Req / Opt   | Description
----------------------+-------------+-----------------------------------------------------------------------------------------------
 TEGRA_A_SRC          | Required    | Path to folder containing Tegra images, filesToFlash.txt
 VALIDATE_OPTION      | Optional    | If enable validate command [True | False]
 ERASE_PADDING_FLAG   | Optional    | If enable erase padding [0 | 1]
 AUTHENTICATOR_OPTION | Optional    | Set "AuthPkg" if enable Authenticator, Default is NormalPkg
 PRIVATE_KEY_PATH     | Optional    | The path to private key file. Required if enable Authenticator
 TEGRASIGN_PATH       | Optional    | The path to the tegrasign_v3.py tool in the PDK. Required if enable Authenticator and use HSM
 SHA_ALG              | Optional    | The SHA algorithm using for validation. Default is SHA256
 OS_VERSION           | Optional    | The OS version of images to generate DU package. Default is 6.0.8.0
Deploy the Drive Update Package generated with dupkg_revoke_key_template include the follow:
Update images signed by new OEM public key to inactive chain.
For Orin, Update the L1PT BCH and BRBCT. For Thor, update the inactive chain BRBCT and update one L1PT copy BCH.
Reboot to inactive chain.
Invoke boot health check.
Set default chain to inactive.
For Thor, update the other L1PT copy BCH.
Note
In Thor, the Revoke key cannot revoke the OEM key used in active chain and the OEM key used in the brbct image. So, if the user wants to revoke the OEM key used in active chain, then the user should switch to other OEM key in active chain and then try to revoke the OEM key.
Streaming From External Device#
The default Content Server released by DRIVE Update always exports the files from the local filesystem of Guest OS, as per the list_of_files.json file. If the user wants to perform updates by streaming DU package files from external device via network, instead of from Guest OS, then the Remote Content Provider plug-in should be implemented to support exports the files to DU Link from network locations.
The Remote Content Provider is running in Guest OS. The sample implementation is packaged in the DriveOS release build in the ${NV_WORKSPACE}/samples/driveupdate/remote_content_provider folder. Refer to the README.txt for information about how to build and use it.
Sample Applications#
DRIVE Update provides sample applications to help users to develop their own applications.
Note
None of the sample source code is safety certified. The sample applications should not be used in production but only provide a demonstration for user to implement his own applications. For Linux, see Security Hardening IPC Parameters to develop customer application that use the IPC Channel.
sample_driveupdate#
It is a sample DRIVE Update client application which can be used as a reference to implement the basic Update Workflow in OTA application.
It works together with the sample Content Server or Remote Content Provider.
sample_driveupdate provides interaction mode, this is specifically useful for the safety environment.
Typical deployment steps in safety environment are:
Start sample_driveupdate in interaction mode in DVMS init state.
(Optional) Set DVMS to operational mode.
Start deploy by typing: package /content/files –auth.
(Optional) User can do abort and re-deploy.
(Optional) If reboot, repeat step 1, 2 to continue previous deployment.
Set DVMS to deinit, now user can exit sample_driveupdate.
Currently support operations in sample_driveupdate.
help(--help, -h)
        Print this help info

shell <cmdline>
        Execute shell command

package(--package, -p) <DUPKG> [options]
        Trigger installation of particular DUPKG
        The DUPKG should be already present in DULINK space
        By DUPKG specification, du_master.json should be present directly under given dulink path
        This parameter can be used with remote_content_privoder to use their functionality to host DUPKG
        Example usage: package /content/files
    -t, --auth
        Force check authenticate packages
    -u, --push
        This flag indicates this update would run in push mode
        In push mode, sample_driveupdate would actively write to storage
        [NOTE]sample_driveupdate only support push updates for TA
    -c, --target-controlled
        This flag indicates this update would interact with user
        User will explicitly type "y" to raise run level

abort(-a)
        Force abort any on-going installation

query_bootchain(-q)
        Query which bootchain either Tegra is on
        A is Chain-A and B is Chain-B

part_ver(--part_ver, -g)
        Print all the partitions version in PVIT

set_runlevel(--set_runlevel, -s) <runlevel>
        Set Runlevel from 0 to 6
        Example usage: set_runlevel 3

print_status(--print_status, -d) on/off
        Enable/Disable regular deployment status print
        [NOTE] Command only be supported in interaction mode
        Example usage: print_status on

du_read(--du_read, -r) src dst(optional)
        dulinkRead a node to a local file(dst)
        Example usage: du_read /content/node
        Example usage: du_read /content/node /home/nvidia/file

du_write(--du_write, -w) data dst
        dulinkWrite data to node(dst)
        Example usage: du_write abc /content/node

du_list(--du_list, -l) directory
        List the nodes in directory
        Example usage: du_list /content

exit
        Exit sample
Content Server#
A sample application of content provider plug-in which serves local package files to DU-Link.
Content Server provides user the following interface via DU Link network.
Interface Path |
Command String |
Description |
|---|---|---|
/content/cmd |
serve local_path={local_ path} |
This command tells Content Server to export files located at {local_path} under “content” subdirectory of the Content Server. Only files listed in list_of_files.json are exported. Content Server transitions to CONFIGURED state after this command and stay in this state until configuration is cleared. This command may only be written if the plug-in state is IDLE. |
/content/cmd |
stop_serving |
This command tells the Content Server to stop serving any content (unlink all served files under “content” subdirectory). Content Server transitions to IDLE state after this command. |
The examples of update package organization, metadata and sample source code in this document, are all based on the sample Content Server.
Note in safety build, content server can only start in DVMS init phase.
Remote Content Provider#
It is a sample content provider plug-in which can serve files based on URL to DU-Link. Refer Streaming From External Device for more information.
Note in safety build, remote content server can only start in DVMS init phase.
Sample Installer#
Sample Installer is intended to be an example for developers writing installer plugins for Drive Update. It exports all DU Link nodes required in the Drive Update installer plugin spec, and can perform a simple mock installation which installs a file to the local directory where the sample is being run.
Note
In safety build, Sample Installer can only start in DVMS init phase.
In safety build, we need enable dulink port for Sample Installer, for example:
drive-foundation-safety/platform-config/hardware/nvidia/platform/t23x/automotive/kernel-dts/common/qnx/tegra234-driveupdate.dtsi
plugin {
        remote-path = "/plugin";
        compatible = "nvidia,dulink-connection";
        type = "DOWNLINK";
        tr-type = "NVSCI";
        tr-params = "nvdu_gos_ipc_g_0", "nvdu_gos_ipc_g_1";
};
BHC User Test Function#
It is an example of BHC interface usage. Refer BHC Interface for more information.
Delta Update Tools#
These are sample application tools for Delta Update. Please refer Delta Update HOWTO for more information.
Decompressor HOWTO#
Decompressor is a file transformer type plug-in. To support streaming services, the files are compressed and decompressed at block level.
Decompressor Configuration JSON (decomp_config.json)#
The configuration file contain the following information,
metaVersion: Version of this metadata file
Files: Contains information on a list of files that needs to be decompressed
Each file inside the list of Files, will contain the following information,
src: Path to source file
dst: Information of the exported file under decompressor
filename: Path of the exported file under decompressor
read_acl: ACL permission of the destination fileThe decompressor configuration file will look as below
{
    "metaVersion": 1,
    "metaId": "NV-DU-DECOMPRESSOR-CONFIG",
    "Files": [
        {
            "src": "$CONTENT_ROOT$/file1.zip",
            "dst": {
                "filename": "/decomp/content/file1",
                "read_acl": ["/auth"]
            }
        },
        {
            "src": "$CONTENT_ROOT$/file2.zip",
            "dst": {
                "filename": "/decomp/content/file2",
                "read_acl": ["/tii"]
            }
        },
        {
            "src": "$CONTENT_ROOT$/file3.zip",
            "dst": {
                "filename": "/decomp/content/file3",
                "read_acl": ["/tii"]
            }
        }
    ]
}
The maximum number of files supported in decomp_config.json is 150.
The maximum size of decomp_config.json supported is 64KB.
Note
The destination file exported by Decompressor is not writeable
Decompressor will always read from Authenticator (except when authentication is disabled, see How to Disable Authentication). Following are the possibilities in the data flow,
For all files other than L2 & L3 images, either:
CONTENT_SERVER→AUTHENTICATOR→DECOMPRESSOR→AUTHENTICATOR→READING_PLUG_IN
CONTENT_SERVER→AUTHENTICATOR→READING_PLUG_IN
For L2 & L3 images, either:
CONTENT_SERVER→AUTHENTICATOR→DECOMPRESSOR→TII
CONTENT_SERVER→TII
Compressed File Header Structure#
Each compressed file will have a header at the start of the file and will be constructed in “Little” endian format. Header contains the following information,
Byte(s) |
Name |
Description |
|---|---|---|
11 |
Magic Field |
Schema identifier. Always set to value ”NVDU-DECOMP”. |
1 |
Version |
Schema version of header file. Currently 0x01. |
1 |
Compression method |
Compression method used. Supported compression methods are
|
8 |
Uncompressed size |
Uncompressed size of the file |
8 |
Offset |
Address to start of Data OR size of the header |
4 |
Block size |
Size of the blocks considered for compression |
4 |
No. of blocks |
Total number of blocks compressed in this file |
8 |
Block1 compressed size |
Compressed size of Block 1 |
8 |
∑(Block1,Block2) compressed size |
Compressed size of sum of Block 1 and Block 2 |
8 |
∑(Block1,Block3) compressed size |
Compressed size of sum of (Block 1 to Block 3) |
8 |
. |
. |
8 |
. |
. |
8 |
. |
. |
8 |
∑(Block1,BlockN) compressed size |
Compressed size of sum of (Block 1 to Block N) |
Data |
Note
The size of the header varies depending on the number of blocks compressed.
DDU Tools HOWTO#
Direct Drive Update(DDU) Tools is a python script tool which can run under Linux Host to update the target system remotely over the Internet. It also can run under Linux Target to update local system.
Generate DU package by DUPKG Tool#
Please refer DUPKG Authentication HOWTO.
Figure out Target IP#
If you running DDU tool on host PC. Be sure you have already noted down you remote target’s IP. Following commands are examples to run on target terminal.
Get remote target IP under Linux
$ ip a show eth0 | grep -oP '(?<=inet\s)\d+(\.\d+){3}'
# example: 10.190.1.50
Get remote target IP under QNX
$ ifconfig eq0 | grep 'inet '
inet 10.110.30.105 netmask 0xfffffe00 broadcast 10.190.1.50
# example: 10.190.1.50
Install DDU Tools to local#
DDU Tools could be installed from Release SDK.
# example: Extract DDU Tools to Linux Host
# DDU Tools should be already available with SDK installation. If the DDU Tools is not available, find the specific debian package
# example: A debian package named with this format "nv-driveos-foundation-release-sdk-core-flash-tools*.deb"
$ cp <path_to_your_deb> <your_workspace>
# Export Install dir
$ export NV_WORKSPACE=<your_workspace>
$ sudo -E dpkg -i <your_deb>
# Note: this is an example to install single deb, you could use your own way to install
After install SDK to local enviroment
# Go to the SDK installation path
$ cd <path to>/drive-foundation/tools/driveupdate/directdu
Use DDU Tools to Install DUPKG to Remote Target#
If you perform DDU while OTA is in progress. It will fail.
Install DUPKG to Remote Target
# We recommmand to use python3
$ python3 direct_driveupdate.py -v -p <path to DUPKG> -t <Target Ip> -l log
# example: python3 direct_driveupdate.py -v -p ./out_dupkg -t 10.190.1.50 -l log
Update finish.
$ python3 direct_driveupdate.py -v -p ./out_dupkg -t 10.190.1.50 -l log
Progress: [****************************************] 100 %
Recovery Mode HOWTO#
Users can update L1PT and non-L1PT partitions independently in recovery mode by using the L1PT Repartition Template and Only Install Template. In recovery mode, chain C is active, and chain A should remain inactive.
Note
For a description of the update procedure, see Perform Updates.
For details on how to use the templates:
Only Install Template
When generating the template, add the
UPDATE_RECOVERY_CHAIN=Falseparameter:$ python3 dupkg.py gen --in \ TII_META_VER=metav2 \ VALIDATE_OPTION=True \ TEGRA_A_SRC=$TEGRA_A_SRC \ AUTHENTICATOR_OPTION=AuthPkg \ PRIVATE_KEY_PATH=$PRIVATE_KEY_PATH \ UPDATE_RECOVERY_CHAIN=False \ --template dupkg_only_install_template \ --out $OUTPUT_FOLDER
After updating using the template, manually reboot to the new chain.
L1PT Repartition Template
This template does not support Auth enforcement. If you need to use this template, disable Auth enforcement.
Customizing Chain C for DRIVE Update#
Because the default chain C image does not include DRIVE Update plug-ins, additional customization is required to package and launch the required components.
The following steps outline how to customize the chain C image for DRIVE Update:
Add the required DRIVE Update components to the chain C image.
By default, the chain C image does not include DRIVE Update binaries to allow for flexibility during development. To enable update functionality in chain C, copy the following plug-ins to
/usr/bin:dulink_routerdumasterctx_storebootmgrdutii(dutii.t26xordutii.t23x)du_authnvpkcs11_kat
These binaries are available in the release Docker image at the following location:
/drive/drive-linux/filesystem/contents/bin
Flash and boot into chain C.
After flashing the system and booting into chain C, start the Security Service and DRIVE Update plug-ins in the following sequence, which assumes the plug-ins were placed in
/usr/bin:/usr/bin/nvpkcs11_kat & sleep 0.5 /usr/bin/dulink_router & sleep 0.5 /usr/bin/dumaster & sleep 0.5 /usr/bin/ctx_store & sleep 0.5 /usr/bin/dubhc_plugin & sleep 0.5 /usr/bin/bootmgr & sleep 0.5 /usr/bin/mcc_daemon & sleep 0.5 /usr/bin/dutii & sleep 0.5 /usr/bin/du_auth & sleep 0.5
Perform the DRIVE Update.
After all plug-ins are running, complete the DRIVE Update process by following the instructions in Perform Updates.
Update L1PT partition#
In recovery mode it could update partition of level 1 partition table (L1PT) and the layout could be changed. The target is to be repartitioned for the update and the repartition action is indicated by the argument “repartitioning = 1” in metadata. User could also manually set the repartitioning to 0 not to repartition the target for the update.
The following is an example of metadata to update L1PT partition with repartition in recovery mode:
{
    "metaVersion":2,
    "procedure":[
        {
            "cmd":"install_l1_pt",
            "partition_name":"pt",
            "pt_path":"$CONTENT_ROOT$2_PT.bin",
            "repartitioning":"1"
        },
        {
            "cmd":"validate_l1_pt",
            "partition_name":"pt",
            "hash_algorithm":"sha256",
            "data_size":524288,
            "hash":"84ae40cd43a8aa36c42f92c3b2207946d2abd165c420b68a21f82de76d4532a5"
        }
    ]
}
Update Non-L1PT partitions#
After the L1PT update the rest of parititons can be updated, which is chain A in recovery mode. By default emmc will be discarded. Later it set default chain to chain A and reboot to it.
Get Partition Version HOWTO#
Partition version is a Drive Update feature that allow users to get the partition version stored in Partitions Version Info Table (PVIT).
Following sections list the steps about how to parse PVIT to get partition version.
Format of PVIT#
The following is a overview of PVIT’s format.
Format of PVIT#
PVIT BCH: 8192 bytes, the header as PVIT is a NV partition.
Table Identifier: 100 bytes, unique number to identify a package.
num_entries: 1 byte, number of partition entried in the table.
Table version, 4 bytes, version of the table.
the following is the format of each entry:
Uniqu Name: 26 bytes, the follow is the detail of Uniqu Name
The first byte is Ptlevel.
The second byte is partition GuestID.
The rest bytes is partition name including null termination.
Pad1: 2 bytes, must be set to 0x00.
Version: 4 bytes, partition version.
Attributes: 1 byte, partition attributes, bit 0 set specify NV partition and bit 1 set specify has BCH.
bin_size: 8 bytes.
Pad2: 3 bytes, must be set to 0x00.
SHA512: 64 bytes, SHA of final binary excluding header(BCH) if any.
Note
L2 partition GuestID are 0xFF or 0x32.
MAX 150 partitions version entries in PVIT.
Note
Currently, PVIT only includes L2 and L3 partition version.
How to read the PVIT#
DU-TII exports the PVIT in A, B, C chain to dulink space: “/tii/A_pvit”, “/tii/B_pvit”, “/tii/C_pvit”, if partition not existed, then DU-TII will not export the related node. we can read all the content of PVIT via dulinkRead these nodes (total size if 256KB).
Example to parse PVIT to get partition#
Following is sample code to define struct to parse PVIT:
#define PVIT_MAX_ENTRIES    150U
#define PVIT_LOAD_OFFSET    (24UL * 1024UL)
#define UNIQUE_NAME_SIZE    26U
#define VERSION_SIZE        4U
#define SHA_SIZE            64U
#define PAD_1_SIZE          2U
#define PAD_2_SIZE          3U
#define BIN_SIZE            8U
#define TABLE_ID_SIZE       100U
#define RESERVED_SIZE       3U
#define TABLE_VERSION_SIZE  4U

struct __attribute__((__packed__)) pvit_rec {
    uint8_t unique_name[UNIQUE_NAME_SIZE];
    uint8_t pad1[PAD_1_SIZE];
    uint8_t version[VERSION_SIZE];
    uint8_t attributes;
    uint8_t pad2[PAD_2_SIZE];
    uint8_t bin_size[BIN_SIZE];
    uint8_t sha[SHA_SIZE];
};

struct __attribute__((__packed__)) pvit_header {
    uint8_t table_identifier[TABLE_ID_SIZE];
    uint8_t number_of_entries;
    uint8_t reserved[RESERVED_SIZE];
    uint8_t table_version[TABLE_VERSION_SIZE];
};
struct __attribute__((__packed__)) tegrabl_partition_version_info_table {
    struct pvit_header pvit_table_info;
    struct pvit_rec pvit_entry[PVIT_MAX_ENTRIES];
};
Following is sample code to parse PVIT:
Read PVIT:
dulinkRead("/tii/A_pvit", 0, sizeof(pvitBuf), pvitBuf, &retLen);
Skip BCH:
pvit_t  *pPvit;
pPvit = (pvit_t *) (pvitBuf + 8192);
Parse the entries to get partition version one by one:
for (i = 0U; i < pPvit->pvit_table_info.number_of_entries; i++)
{
    (void) memset(partName, 0, UNIQUE_NAME_SIZE);
    ptLevel = pPvit->pvit_entry[i].unique_name[0];

    if (ptLevel == 2U)
    {
        (void) memcpy(partName, (char *) (pPvit->pvit_entry[i].unique_name) + 2,
                        UNIQUE_NAME_SIZE - 2U);
    }
    else if (ptLevel == 3U)
    {
        partName[0] = pPvit->pvit_entry[i].unique_name[1] + '0';
        partName[1] = '_';
        (void) memcpy(partName + 2, (char *) (pPvit->pvit_entry[i].unique_name) + 2,
                        UNIQUE_NAME_SIZE - 2U);
    }

    DU_LOG("%u. partition name: %s, version: 0x%x-0x%x-0x%x-0x%x\n", i,
            partName,
            pPvit->pvit_entry[i].version[0],
            pPvit->pvit_entry[i].version[1],
            pPvit->pvit_entry[i].version[2],
            pPvit->pvit_entry[i].version[3]);
}
Dual Tegra Configuration#
Description#
This document shows how to configurate Dual Thor to allow automotive customers to perform DU update. This is assuming that Dual Thor is A and B, which communicate via switch.
Note
The Guest OS of Thor A and B needs some changes in the dts file for the Dual Thor DU update to work.
Thor Guest OS Device Tree#
Thor A: Please refer to
tegra264-driveupdate-A.dtsias an example.Thor B: Please refer to
tegra264-driveupdate-A.dtsias an example.
/drive/drive-foundation/platform-config/hardware/nvidia/platform/t264/automotive/kernel-dts/common/tegra264-driveupdate-A.dtsi  // Thor A
/drive/drive-foundation/platform-config/hardware/nvidia/platform/t264/automotive/kernel-dts/common/tegra264-driveupdate-B.dtsi  // Thor B
tegra264-driveupdate-A.dtsi is included in tegra264-p3960-0030-sw01-t1-av-l-linux-gos.dts and tegra264-p3960-0030-sw01-numa-t1-av-l-linux-gos.dts.
tegra264-driveupdate-B.dtsi is included in tegra264-p3960-0030-sw01-t2-av-l-linux-gos.dts and tegra264-p3960-0030-sw01-numa-t2-av-l-linux-gos.dts.
/drive/drive-foundation/platform-config/hardware/nvidia/platform/t264/automotive/kernel-dts/p3960/tegra264-p3960-0030-sw01-t1-av-l-linux-gos.dts
/drive/drive-foundation/platform-config/hardware/nvidia/platform/t264/automotive/kernel-dts/p3960/tegra264-p3960-0030-sw01-numa-t1-av-l-linux-gos.dts
/drive/drive-foundation/platform-config/hardware/nvidia/platform/t264/automotive/kernel-dts/p3960/tegra264-p3960-0030-sw01-t2-av-l-linux-gos.dts
/drive/drive-foundation/platform-config/hardware/nvidia/platform/t264/automotive/kernel-dts/p3960/tegra264-p3960-0030-sw01-numa-t2-av-l-linux-gos.dts
Update Steps#
The update steps are described at Perform Updates.
Configure DU_MCC HOWTO#
Currently DRIVE Update bootmgr uses an MCU library to communicate with MCU to request for board reset, set next bootchain, set default bootchain. MCU library’s location is defined in MCC_LOCATION, when bootmgr boots up, bootmgr will load the MCU library via MCC_LOCATION. So, the user can define their own MCU library and then move the library to “/usr/lib/libdu_mcc.so” in Guest OS VM fs. For Linux, see Security Hardening IPC Parameters to develop customer application that use the IPC Channel.
Note
If there is a libdu_mcc.so in the path, then replace it. If there is not a libdu_mcc.so in the path, then move the library there.
Security Control HOWTO#
This section describes security enforcement and how to disable security enforcement in the device tree. The device tree is in the tegra264-driveupdate.dtsi` file (Thor) or tegra234-driveupdate.dtsi file (Orin).
For example:
/drive/drive-foundation/platform-config/hardware/nvidia/platform/t264/automotive/kernel-dts/common/tegra264-driveupdate.dtsi  // Thor
/drive-foundation/platform-config/hardware/nvidia/platform/t23x/automotive/kernel-dts/common/qnx/tegra234-driveupdate.dtsi    // Orin (QNX)
/drive-foundation/platform-config/hardware/nvidia/platform/t23x/automotive/kernel-dts/common/linux/tegra234-driveupdate.dtsi  // Orin (Linux)
Note
If users choose to disable security enforcement by disabling the device tree node, they must accept the security risk caused by it.
Enforce DRIVE Update Package Digital Signature#
Users can disable enforcement by changing the “disable-auth-enforcement” value to “1” in the device tree. If “disable-auth-enforcement” is not present in the device tree, users can add it and set the value to “1”.
The following example shows how to disable this enforcement in the device tree:
driveupdate {
    disable-auth-enforcement = "1";
User Is Not Allowed to Access the Active Bootchain in Push Mode#
Users can disable this enforcement to access active bootchain in push mode by changing the “allow-read-activechain” value to “1” in the device tree. If “allow-read-activechain” is not present in the device tree, add the parameter and set the value to “1”.
The following example shows how to disable this enforcement in the device tree:
driveupdate {
    allow-read-activechain = "1";
User Is Not Allowed to Access the Inactive Bootchain in Push Mode#
Users can disable this enforcement to access inactive bootchain in push mode by changing the “allow-read-inactivechain” value to “1” in the device tree. If “allow-read-inactivechain” is not present in the device tree, add the parameter and set the value to “1”.
The following example shows how to disable this enforcement in the device tree:
driveupdate {
    allow-read-inactivechain = "1";
User Is Not Allowed to Update Unsigned BR-BRBCT#
Users can disable this enforcement to update unsigned BR-BRBCT by changing the “allow-update-unsigned-customer-data” value to “1” in the device tree. If “allow-update-unsigned-customer-data” is not present in the device tree, add the parameter and set the value to “1”.
The following example shows how to disable this enforcement in the device tree:
driveupdate {
    allow-update-unsigned-customer-data = "1";