Lens Matched Shading and Unreal Engine 4 Integration Part 2
Engine Integration
This section of the post will focus on integrating Lens Matched Shading into Unreal Engine 4. We hope that this will serve as an example and provide guidance for developers who are interested in integrating LMS into their own engines. We will first provide an overview of how LMS works within the deferred shading framework before taking a more in-depth look at some specific rendering features and explaining the nitty-gritty details of making them work with LMS.
The source code is available to all registered UE4 developers at https://github.com/NvPhysX/UnrealEngine/tree/VRWorks-Graphics-4.13. Note that this branch actually includes all the Simultaneous Multi-Projection techniques (Lens Matched Shading, Multi-Res as well as Single Pass Stereo). However this blog post will focus solely on Lens Matched Shading.
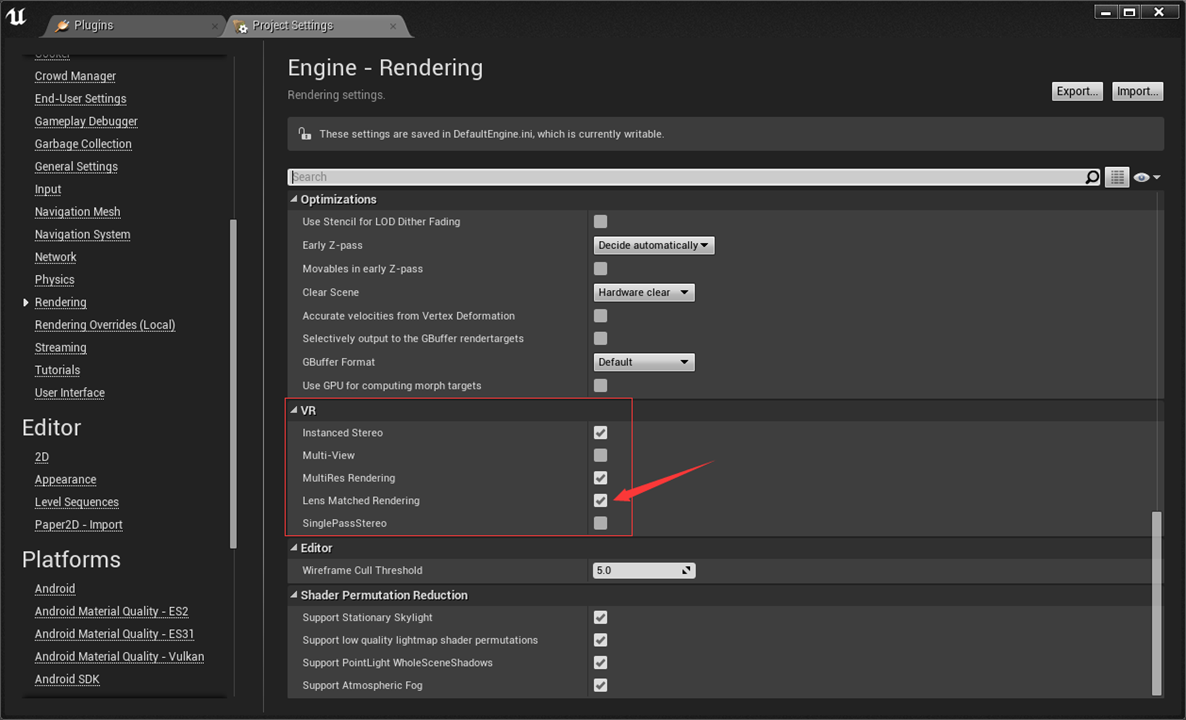
Lens Matched Shading is exposed in UE4 via a renderer property that you will need to enable within your project in order to make it available in the game.. You can find the property setting in the editor menu by following Edit->Project Settings->Engine->Rendering->VR and checking “Lens Matched Rendering”, as shown in the figure below. Beware that enabling this property will force you to restart the engine and recompile many of the shaders to enable the new support. Once the render property is enabled, you can switch the LMS configuration at any time using the console variable “vr.LensMatchedShadingRendering” and 1, 2 and 3 select from the Quality, Conservative and Aggressive presets described above.
Integration Overview
The renderer in Unreal Engine 4 uses deferred shading (note : the new forward shading path added in release 4.14 is out of the scope of this post, though the general strategy of integration stays the same). Integrating LMS into a deferred renderer is fairly simple : w scaling is applied during the GBuffer base pass, which turns all the layers into an octagon shape. Then all shading, lighting, screen space effects (SSAO, SSR) and post processing should ideally be done within the octagon shaped region. Finally, at the end of the rendering pipeline, after all passes have been completed, a full screen resampling operation is performed to unwarp the shaded octagon buffer back to a rectangle for display.
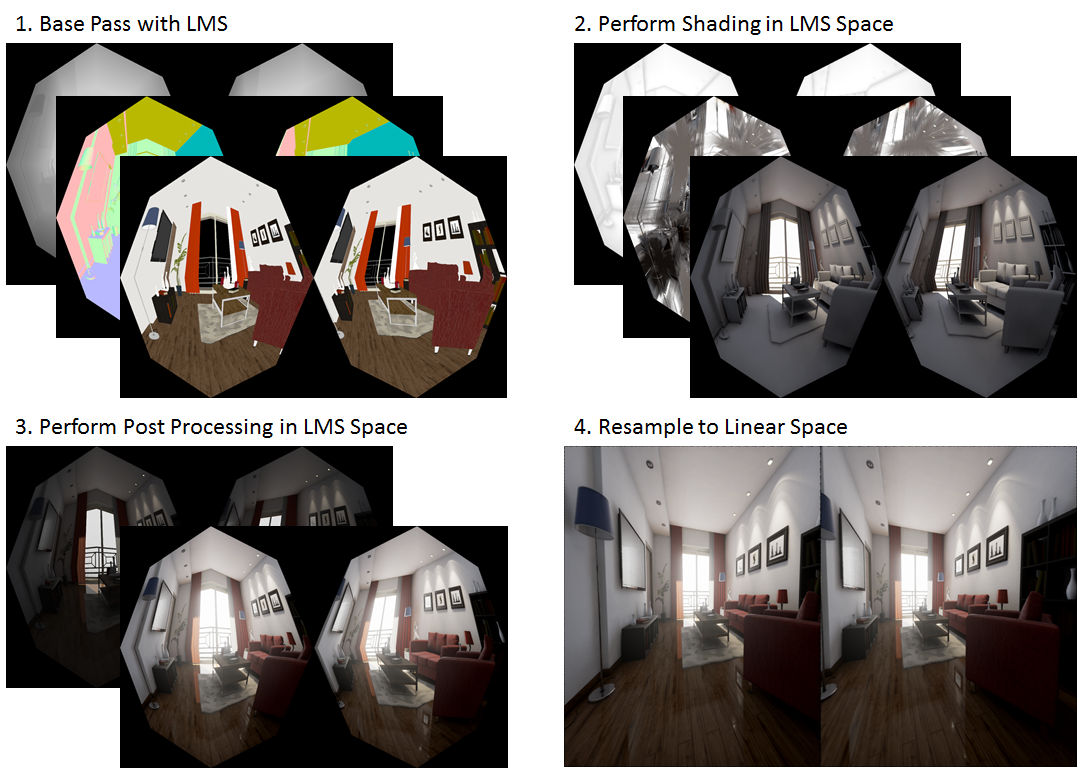
This way most of the shading and pixel processing is done in the area of the octagon, which is much smaller than the full rectangle, as explained in the pre-set configuration section.
Because working in an octagon-shaped clip space introduces an additional coordinate space, existing shaders must be carefully adjusted. Because LMS changes the definition of the screen-space coordinate system and vertex positions, we have to be really careful with determining whether a given coordinate is in the original linear space, or the octagon-shaped LMS space when accessing them in the shaders. When LMS is combined with stereo rendering there is an additional layer of complexity to coordinate conversion since we also need to convert between view space and render target space.
Lastly, in LMS coordinate space, the depth value of each fragment needs to be adjusted because the w is modified before perspective division. Whenever we need to fetch depth from the depth buffer for things like reconstructing world space position, we also need to remap the Z value fetched to get the depth in linear space. We’ve implemented a helper function that remap Z value from LMS space to linear space called LensMatchedCorrectDeviceZ in VRProjection.usf.
In order to facilitate future integrations, we have defined a generic set of coordinate remapping functions in VRProjection.usf to handle all kinds of circumstances. Because coordinate remapping can be delicate, we have dedicated several subsections below on how to handle certain render passes and practical applications.
Linear and LMS Coordinate System
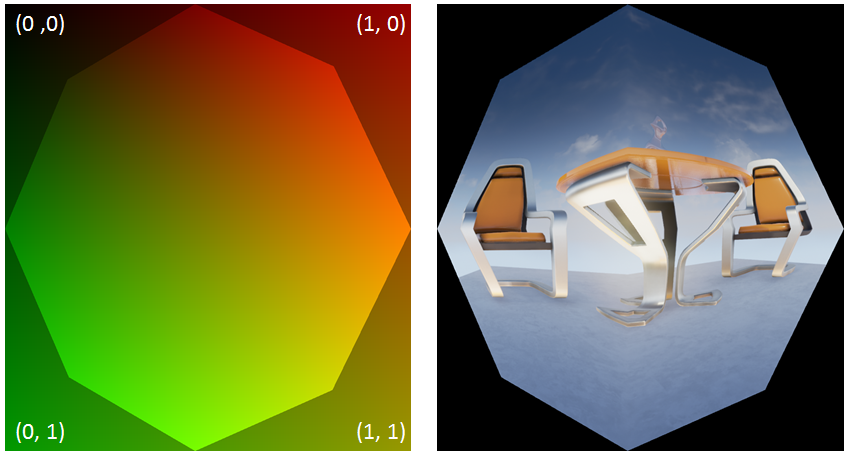
The following figure demonstrates the remapped screen space uv coordinates with modified w. The black regions outside of those octagons will be outside of the render target after resampling to linear space.
In the later text, I will refer to coordinate space as linear space if the space fills the entire rectangularly shaped buffer. And I will refer it as LMS space if it fills only an octagon (or two, in the case of stereo), like shown below.

Infrastructure Support
VRWorks Utilities
Our implementation of all VRWorks features into UE4 strives to adhere strictly to the native code-base style for a seamless integration. LMS functionalities have been distributed in the following files:
- VRProjection.h / .cpp: All LMS utility functions such as viewport size calculation based on warp coefficients and calculating the required constant buffer data.
- VRProjection.usf: All the LMS related shader code, which includes FastGS implementation and coordinate remap
Multiple Viewports and Modified W
Clip-space w modification requires several technologies built into Pascal GPUs, namely Fast Geometry Shaders to broadcast geometry into multiple viewports and obviously the ability to modify w in clip space. On the engine RHI level, it also needs the ability to bind multiple viewports and scissor rects simultaneously. The following sub-sections detail the requisite D3D11 RHI functions. Note most of these functions were only implemented in D3D11.
The following two RHI functions are used for setting up multiple viewports and scissor rects.
 virtual void RHISetMultipleViewports(uint32 Count, const FViewportBounds* Data);
 virtual void RHISetMultipleScissorRects(bool bEnable, uint32 Num, const FIntRect* Rects);
The next two functions are for enabling the clip space w modification, the first one is used for single view rendering and the second one is used for stereo rendering such as in Instanced Stereo. The Conf variable includes warp coefficients A and B for all the viewports. They both call NvAPI_D3D_SetModifiedWMode underneath to enable modified w mode. The interested reader can look at their implementations in D3D11Commands.cpp, and refer to the VRWorks SDK for detailed explanation of the modified w mode.
 virtual void RHISetModifiedWMode(const FLensMatchedShading::Configuration& Conf,
       const bool bWarpForward, const bool bEnable);
 virtual void RHISetModifiedWModeStereo(const FLensMatchedShading::StereoConfiguration&
       Conf, const bool bWarpForward, const bool bEnable);
Fast Geometry Shaders
Support for FastGS is another critica part in implementing LMS in UE4 and it needs to be applied to every types of geometric primitive used in rendering
The following is the RHI function creates a Fast Geometry Shader, which invokes NvAPI_D3D11_CreateGeometryShaderEx_2 underneath.
 virtual FGeometryShaderRHIRef RHICreateFastGeometryShader_2(const TArray<uint8> & Code,
             uint32 Usage);
Implementing a Fast Geometry Shader on the C++ side is similar to shaders in UE4. We added a static const boolean called IsFastGeometryShader to all shader classes, with a default value set to false. When the value is set to true, the D3D shader compilation process will invoke RHICreateFastGeometryShader_2 to create a Fast Geometry Shader for us. The following is an example FastGS implementation for base pass geometry. Notice the highlighted line that explicitly specifies FastGS type.
 // BasePassRendering.h
 template<typename LightMapPolicyType>
 class TBasePassFastGS : public TBasePassFastGeometryShaderPolicyParamType<typename
 LightMapPolicyType::VertexParametersType	> <
 {
   	 DECLARE_SHADER_TYPE(TBasePassFastGS, MeshMaterial);

 /*
   		 Skipped…
 */
    	 static const bool IsFastGeometryShader = true;
 };
We have created helper marcos in order to facilitate the implementation of FastGS in shader files. The following is an example FastGS implemetation for base pass rendering and it should be put into the vertex shader files of the corresponding geometry types.
 // BasePassVertexShader.usf
 VRPROJECT_CREATE_FASTGS(VRProjectFastGS,      // Name of fast gs entry point
   	 FBasePassVSToPS,              	      // Input struct
   	 Position) 	                      // name of position attribute
The FastGS calculates the viewport mask of a given triangle based on the positions of its vertices, before passing it through the pipeline. For reference, you can find the instantiated macro in VRProjection.usf.
Finally we need to hookup the FastGS to all drawing policies and other relevant places. Please refer to the source code for details.
SceneView and Constant Buffer Setup
We’ve added a few new members to FSceneView in order to keep track of numerous LMS related states, like its configurations, multiple viewports and scissors. A really important function of FSceneView is:
void FSceneView::SetupVRProjection(int32 ViewportGap);
It performs all the necessary setup for Lens Matched Shading, including calculating the multiple viewports and scissor sizes based on the configuration currently selected.
The following two helper functions enable and disable LMS mode before and after a draw call. EndVRProjectionStates must be called after each renderpass in order to restore the state of the scissors and w. Incorrect LMS render-state results in very distorted images.
 void FSceneView::BeginVRProjectionStates(FRHICommandList& RHICmdList) const;
 void FSceneView::EndVRProjectionStates(FRHICommandList& RHICmdList) const;
Finally, we have added a number of new members to the view constant buffer, which are necessary for both the FastGS and coordinate remap functions in VRProjection.usf. They are initialized along with the other members in FViewInfo::CreateUniformBuffer(). Please refer to the source code for details.
Full View Octagon (instead of Rectangle)
In additional to physically based shading and lighting, the UE4 renderer relies heavily on all sorts post processing effects to enhance the final rendered results. Originally, these post processing passes were mostly full screen pixel shader passes that are initiated by rendering a quad that covers the entire view. However, since all we have are black pixels outside of the octagon in all buffers, for all full screen passes we only need to operate on pixels that are inside the octagon.
A naive way to do this is to still render a full view quad, but use either the depth or stencil buffer to kill pixels that are outside of the octagon. The downside to this approach is that we would need to bind the depth buffer for a lot of the passes which originally did not have it bound. Similarly, other passes already rely on the stencil buffer for other purposes, preventing us from using it. What we did instead, is directly render an octagon that covers the same area of pixels in the GBuffer directly.
It’s worth noting that the vertex data that we draw with the octagon is actually in linear space, which means the octagon does not cover the entire UV space. It might sound counter-intuitive at first, but it makes perfect sense, since we need linear space UV to access the GBuffer which is still stored and indexed in a linear buffer! The data stored in the GBuffer, though, is in LMS space.
Render Passes
Broadly speaking, there are two types of rendering passes.
-
Geometry passes that draws actual geometric primitives to the screen, like the base pass, depth pre-pass, deferred lighting, shadow projection, decals, velocities and so on. For these passes, the general flow is to set up the multiple viewports and scissors as well as enabling modified w mode before invoking the draw call, and restoring those states afterwards. The drawing policy should also be modified to hook up the FastGS properly. Since all these tasks have been encapsulated in helper functions, in practice all that remains to be done looks like this:
View.BeginVRProjectionStates(RHICmdList); // Invoke draw calls.. View.EndVRProjectionStates(RHICmdList); - Screen space passes such as screen space reflections, screen space ambient occlusion and all the other post processing passes. As previously mentioned, instead of rendering a fullscreen quad, we only cover the smaller octagonal area. For full screen passes that use compute shaders like tiled-based lighting and environmental reflections, we also need to kill threads that work on pixels outside of the octagon.
For both types of render passes, shaders need to be aware of LMS space and remap coordinates accordingly.
Base Pass
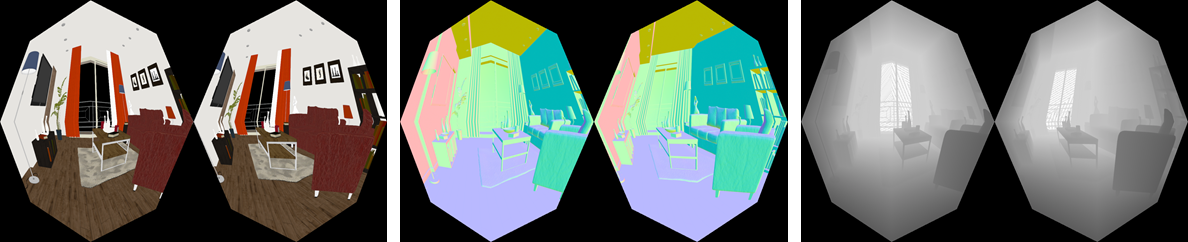
Getting modified w mode to work in the base pass is quite straightforward. With the infrastructure and RHI support we’ve built, all that needs to be done is modify the SetupBasePassView to set up the multiple viewports and scissors as well as calling RHISetModifiedWMode, as mentioned previously. The resulting GBuffers should look like the following.
On the shader side, base pass pixel shaders execute code generated from the material graph in the material editor, in which the artists are free to use any information, including pixel depth. The depth in LMS is no longer linear due to w being modified, therefore we had to modify the material graph code generator to generate code that remaps the depth value to linear as well. See the implementation of FHLSLMaterialTranslator::PixelDepth() for details.
One caveat here is that the FastGS occupies the geometry shader slot to perform viewport mask calculation in order to broadcast triangles into multiple viewports. FastGS derives its much improved performance from the restriction imposed on the topology of the geometry: vertices cannot be modified in any way.Therefore, LMS cannot be applied to objects that rely on the functionality of a regular geometry shader. As a workaround, these objects can still be rendered into a linear render target and warped back into the GBuffer.
Instanced Stereo
The Instanced Stereo feature operates by rendering into a single viewport that encompasses both the left and the right views. In the vertex shader, vertices are transformed to clip space with either the left or right view matrices, before being shifted in the x direction to the left or right half of the viewport based on their instance IDs. However, shifting vertices in clip space breaks the modified w calculation since it assumes the clip space spans [-1, 1] in x direction. And shifting changes the clip space span of the left eye to [-1, 0] and the right eye to [0, 1].
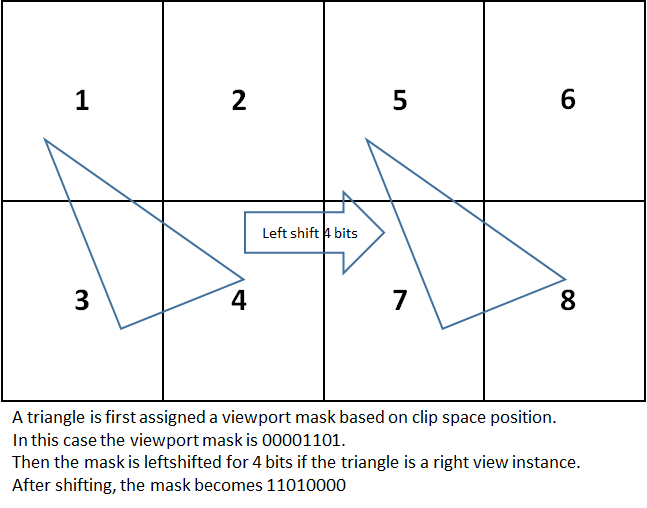
Therefore In order to combine both the LMS and Instanced Stereo techniques we do not shift vertices in the vertex shader and instead use the FastGS to directly broadcast vertices to their appropriate viewports by calculating viewport masks based on their clip space position and instance IDs. Similar to regular instanced stereo which sets a viewport that encompasses both the left and the right view, with LMS we set 8 viewports and 8 scissors simultaneously with the aforementioned RHI functions, with the first 4 viewports belong to the left view and the second 4 belonging to the right. In FastGS, the viewport mask of the first 4 viewports is first computed based on the input vertices’ clip space positions to determine which quadrant(s) of the view the triangle falls into, before being left shifted for 4 bits if the instance belongs to the right view. The following figure demonstrates the process.
Lighting
As previously mentioned, we should perform lighting calculations in LMS space to get the benefit of the flexible shading rate.
In the context of UE4's engine, LMS only requires changes to 2 types of light sources, fullscreen directional lights and lights with finite shape such as spherical lights and spot lights.
- Full screen directional lights, we can just render a fullscreen octagon without using FastGS. In the pixel shader however, we need to recalculate the ScreenVector variable per pixel since we need to remap it to the LMS coordinate space.
-
Spherical lights or spot lights, all that’s needed is to call
FSceneView::Begin/EndVRProjectionStatesbefore and after the draw call to apply w modification to the geometry being rendered.
For tile-based lighting with compute shaders, we can improve performance by culling early the compute groups that do not overlap with the octagon. We will also need to remap the tile scale and bias which are used to calculate the tile frustum to the LMS coordinate space. The same process needs to be applied to other full screen compute shader passes, such as environmental reflections.
Shadows
Since LMS is not applied to the viewports used for shadow map generation, no changes are required to these passes. For shadow projections, we will need to again hook up FastGS for shadow frustum and set up multiple viewports and scissors as well as enabling modified w mode by calling FSceneView::BeginVRProjectionStates.
In the shadow projection shaders, the only thing worth noting is to make sure to remap screen space position from linear space to LMS space before transforming it to get coordinates in the shadow map.
HZB Construction
In UE4 Hierarchical Z Buffer is used to improve the performance of both SSR ray tracing and depth comparison in SSAO. Since both SSR and SSAO require sampling HZB multiple times per pixel, it could cause LMS to incur severe performance costs as each sample would require a remapping of the depth value fetched. Instead, we store the depth values in linear space when creating the HZB, in order to avoid per-sample corrections later.
SSR and SSAO
For both Screen Space Reflections and Screen Space Ambient Occlusion, a full-screen octagon should be drawn to ignore the pixels falling outside of the octagon
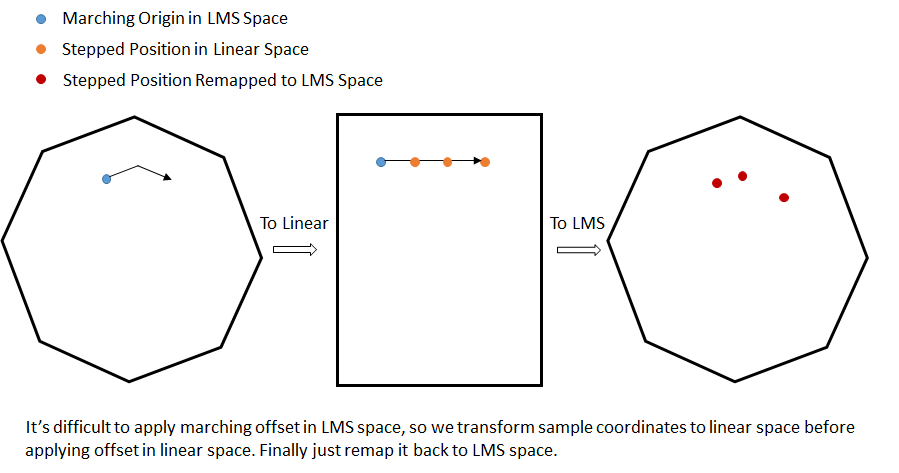
SSR perform screen space ray tracing by marching steps into the HZB along given offsets. However, while sample locations need to be computed in linear space, we are rendering in LMS space. For correct results, we need to remap the marching origin to linear space and apply all the marching offset in linear space. Finally, we need to map the coordinates back to LMS space when fetching values from HZB.
The following figure demonstrates this process.
SSAO sampling is similarly corrected. For each pixel it samples the HZB value around with a certain offset. Here we also need to remap each sample coordinate from linear space to LMS space before accessing the HZB.
Because the HZB depth values have already been remapped at creation time, the values fetched do not need to be corrected at every sample tap.
Other Passes
Adding LMS to all other full screen passes like temporal AA, tone mapping and so on should generally follow similar principles with SSR and SSAO:
- Fullscreen octagon should be rendered instead of a rectangle to avoid processing pixels outside of the LMS octagon
- Any texture coordinate offset should be applied in linear space and then converted back to LMS space.
- Z value fetched from depth buffer (but not HZB) should be remapped from LMS space back to linear space, for example when reconstructing world space position from depth.
- All data passed in from the octagon vertex shader is in linear space! So pixel shader input parameters like SvPosition and ScreenPos needs to be remapped to LMS space before using them with other data in the GBuffer which is also in LMS space. On the other hand, they don’t need to be remapped if used to fetch data from the GBuffer, which is stored and indexed in linear space. Concisely, use linear space coordinates to fetch from texture, use LMS space coordinates to do calculations.
For other passes that render geometric primitives, just make sure to set up the viewports, scissors, and FastGS and enable modified w mode.
Bloom
Blooms and blurs are a different type of screen-space effects that require a dedicated section. UE4 does bloom by blurring several textures with different mip scale. The numerical errors introduced by coordinate remapping are compounded for each mip scaled added, which will make the final bloom skewed.
The solution is that we first resample the bloom setup texture back to linear space and perform all blurring and downsampling in linear space instead. It will be slightly more expensive, but considering bloom is typically computed at quarter resolution to begin with, it should not be cause for too much concern
Linear Resampling
We leverage and modify the existing PostProcessUpscale pass to perform the final resampling back to linear space. All that’s needed is to remap texture coordinates from linear space to LMS space before fetching from the render target.
Continue to Part 3