
Vulkan SC#
Introduction#
This feature demonstrates how to integrate Vulkan SC with NvSciStream, including importing NvSciBuf / NvSciSync objects as VkImage / VkFence, or VkSemaphore, which is used as a render target / synchronization primitive in the rendering task.
Data Flow#
The data flow involves four modules:
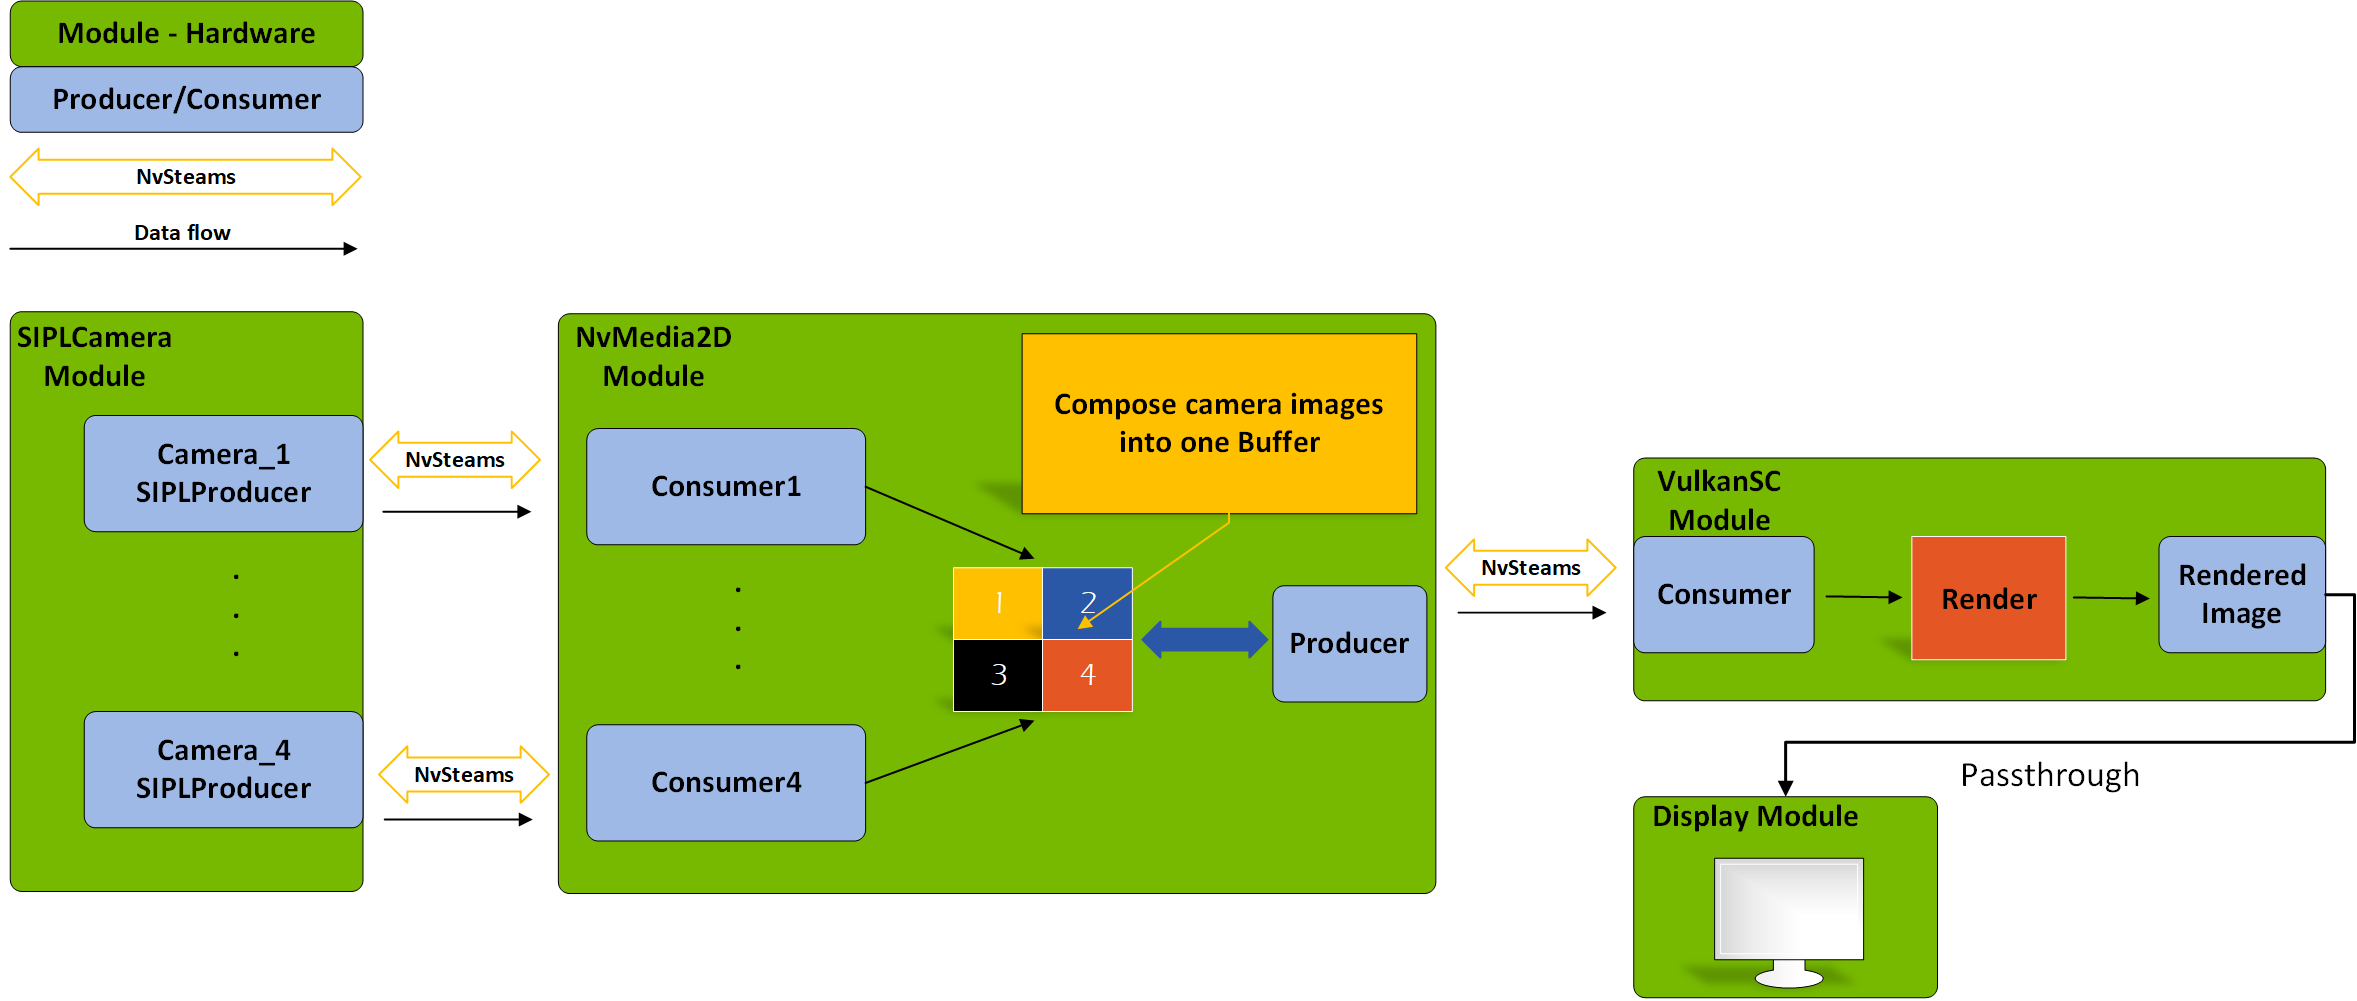
The image is captured from the
SIPLCameramodule in YUV BL/PL format.The
NvMedia2Dmodule then converts or stitches the image format to the ABGR/ARGB BL format image.Next, the image is imported to the
VulkanSCmodule as aVkImageobject. Rendering tasks occur with the importedVkImageobject. The timestamp renders to the bottom right of the image and the 3D car model to the center of the image.Finally, the rendered image is displayed by the
Displaymodule.
Workflow#
Vulkan SC applications can be developed from Vulkan applications by creating a Vulkan application with similar functionality and then extracting the offline state (saved as pipeline cache binary) necessary for the Vulkan SC application.
To run and develop Vulkan SC applications, refer to the following Vulkan SC development workflow:

For details on the Vulkan SC workflow, see Running the Vulkan Samples.
The .spv and .json files are located in the features/vksc_scenes/data/ folder and generate the pipeline cache file for multicast. Compile multicast with the provided Makefile.sdk file, and the pipeline cache file pipeline_cache.bin is generated in the features/vksc_scenes/data/ folder.
Next, copy all .json and .bin files under the features/vksc_scenes/data/ folder to the folder where the application will run.
To follow the Vulkan SC development workflow for generating pipline cache files, complete the following steps:
Build
nvsipl_multicastwith theNV_USE_VULKANmacro enabled by settingNV_USE_VULKAN = 1in the Makefile and rebuilding the application.Use
glslcto compile vertex and fragment shaders on the host:glslc shader.vert -o shader.vert.spv glslc shader.frag -o shader.frag.spv glslc timestamp.shader.vert -o timestamp.shader.vert.spv glslc timestamp.shader.frag -o timestamp.shader.frag.spv glslc carmodel.shader.vert -o carmodel.shader.vert.spv glslc carmodel.shader.frag -o carmodel.shader.frag.spv glslc carmodel_notexture.shader.frag -o carmodel_notexture.shader.frag.spv
Generate the JSON file by running the nvsipl_multicast built in the previous step on the target machine:
Set the environment variables on the target machine:
export VK_LAYER_PATH=/etc/vulkansc/icd.d
export VK_JSON_FILE_PATH=$PWD/
Copy the compiled shaders from the previous step to the folder where the application runs on the target machine.
Copy all binaries in the
features/vksc_scenes/data/folder to the target folder where the application runs.Run
nvsipl_multicastwith the pipeline configuration:-p "SIPL, *Nvm2, *VulkanSC=width=1920:height=1080"
The following files are generated in the current folder:
* nvsipl_multicast_pipeline_0.json
* nvsipl_multicast_pipeline_0.vert.spv
* nvsipl_multicast_pipeline_0.frag.spv
...
* nvsipl_multicast_pipeline_12.json
* nvsipl_multicast_pipeline_12.vert.spv
* nvsipl_multicast_pipeline_12.vert.spv
Generate the pipeline cache by running the PCC tool on the host:
Copy the files generated in step 3d to the folder where PCC runs on the Linux host machine.
The PCC tool provided in the SDK is an x86_64 binary; therefore, only run the tool on an x86_64 Linux host machine in the folder where the
.spvand.jsonfiles are located:${NV_WORKSPACE}/drive-qnx/vulkansc/pcc/Linux_x86-64/pcc -chip [gb10b|ga10b] -path ./ -out pipeline_cache.bin
Rebuild
nvsipl_multicastwith theNV_USE_VULKANmacro off by settingNV_USE_VULKAN = 0in the Makefile and rebuilding the application.Run the Vulkan SC version of
nvsipl_multicaston the target machine:Rename
nvsipl_multicast_pipeline_0.jsontotimestamp_render_pipeline.json.Rename
nvsipl_multicast_pipeline_1.jsontocar_model_render_pipeline.json.Rename
nvsipl_multicast_pipeline_9.jsontocar_model_notexture_render_pipeline.json.Replace the
.binand.jsonfiles in thefeatures/vksc_scenes/data/folder with the files generated in steps 3 and 4.Copy all binaries in the
features/vksc_scenes/data/folder to the target folder where the application will run.Run
nvsipl_multicastwithout display:-p "SIPL, *Nvm2d, *VulkanSC=width=1920:height=1080"
Run
nvsipl_multicastwith display. You must plug in the display, and the width and height must be adjusted to the actual conditions:-p "SIPL,*Nvm2d, *VulkanSC=width=1920:height=1080:colortype=ABGR:passthrough=1,*Display=width=1920:height=1080:colortype=ABGR"
Result#
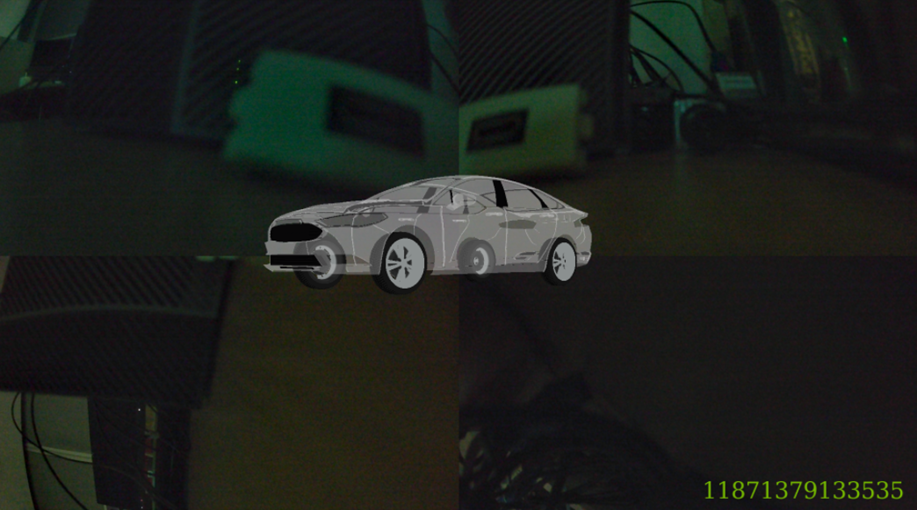
Four images from different cameras are stitched and color-converted by the NvMedia2D module. The timestamp is rendered to the bottom right of the image, and the 3D car model is rendered to the center of the image.
Constraints#
Vulkan SC only supports importing
NvSciBufwith the color format ofNvSciColor_A8B8G8R8/NvSciColor_A8R8G8B8asVkImage(zero copy). If the input color format does not match, theNvMedia2Dmodule might be necessary for color conversion.Vulkan SC only supports importing
NvSciSyncObjasVkFencewhenNvMedia2D/Displaymodules are involved in the pipeline. Otherwise, the reconciliation of sync attributes will fail.The JSON-generated layer of Vulkan SC is currently only supported on Drive OS Linux or Desktop Vulkan (version 1.2 or later) SDK with NVIDIA drivers installed. It is not supported in QNX, therefore step 1 must be executed in Linux.