NVIDIA 运营商简化了 Kubernetes 上的 GPU 和 SmartNIC 管理。这篇文章展示了如何使用预装的驱动程序将 NVIDIA 运营商集成到新的 edge AI 平台中。这是一个由两部分组成的系列文章的第一篇。下一篇文章将介绍如何使用自定义驱动程序容器集成 NVIDIA 操作符。
面向未来的边缘人工智能平台
如今,每个行业都在使用 edge AI 。部署在飞机、商店和工厂中的服务器实时响应物联网传感器。它们分别是 天气预测 、 阻止盗窃 和 保证制造质量 。
人工智能使传感器数据可操作。经过训练的人工智能模型能够识别模式并触发响应。经过训练的人工智能模型代表公司的商业智能。正如原油提炼成石油后变得有价值一样,人工智能将传感器数据转化为洞察力。
但与石油不同, 物联网传感器数据量呈指数增长 。在边缘生成的大量数据可能会压倒边缘服务器处理数据的能力。
这就是为什么 边缘人工智能需要加速 。 NVIDIA GPU 和 SmartNICs 是一个面向未来的边缘 AI 平台,可抵御指数级数据增长。
Edge AI 是云本地的
这篇文章描述了如何将 NVIDIA 加速器与 Kubernetes 集成。为什么要关注库伯内特斯?因为 edge AI 是云本地的 。大多数人工智能应用程序都是基于容器的微服务。 Kubernetes 是容器编排的非官方标准。
Edge AI 平台基于 Kubernetes 的灵活性而构建。 Kubernetes API 支持声明式自动化,并可通过自定义资源定义进行扩展。强健的软件生态系统支持 Kubernetes 的第一天和第二天操作。
NVIDIA Fleet Command 是基于 Kubernetes 的 Edge AI 平台的一个示例。 Fleet Command 是一种为安全性和性能而设计的混合云服务。它管理裸机边缘节点上的 AI 应用程序生命周期。 Fleet Command 还与 NGC 集成,后者是 NVIDIA 管理的 700 多个 GPU 优化应用程序的注册中心。
虽然 Fleet Command 支持 NVIDIA GPU 和 SmartNIC ,但许多边缘平台不支持。对于这些, NVIDIA 提供了开源 Kubernetes operators 来启用 GPU 和 SmartNIC 加速。有两个运营商:NVIDIA GPU Operator 及 英伟达网络运营商 。
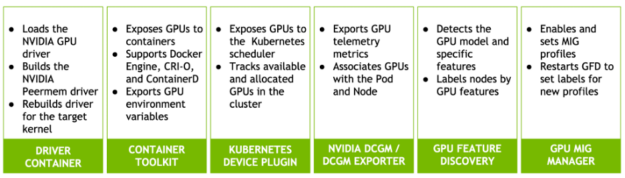
英伟达 GPU 运营商自动化 GPU 部署和管理上的 KubNeNETs 。 NGC 上有 GPU 操作员舵图。它包括几个组成部分:
- 这个NVIDIA GPU 驱动程序容器自动安装 GPU 驱动程序。
- NVIDIA 容器工具 允许用户构建和运行支持 GPU 的容器。
- NVIDIA K8s 设备插件 向吊舱和 Kubernetes 调度程序公开 GPU 。
- NVIDIA DCGM 和 NVIDIA DCGM 导出器 自动执行 GPU 遥测采集和管理。
- NVIDIA GPU 功能发现根据 GPU 特征标记 Kubernetes 工人。
- NVIDIA MIG 管理器监视器多实例 GPU( MIG )用于配置更改并应用它们。
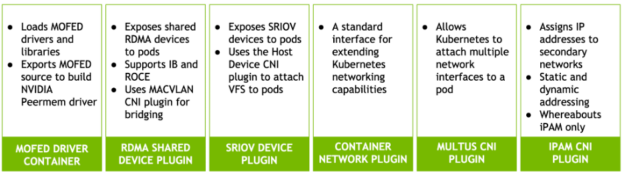
英伟达网络运营商为 Kubernetes PODs 实现了需要快速联网的 CONTROX 智能配置。它也作为舵图交付。网络运营商使用 Multus CNI 插件 向 pod 添加第二个网络接口。它支持远程直接内存访问( RDMA )和共享根 I / O 虚拟化( SRIOV )。
英伟达网络运营商包括以下组件:
- NVIDIA OFED 驱动程序容器 可自动安装网络驱动程序和库。
- Kubernetes RDMA 共享设备插件 将 RDMA 设备连接到 POD 。它支持 Infiniband 和基于聚合以太网( RoCE )的 RDMA 。
- SRIOV 设备插件将 SRIOV 虚拟功能( VF )连接到 POD 。
- Containernetworking CNI 插件是扩展 Kubernetes 网络功能的标准接口。
- 下落 CNI 插件管理集群范围的自动 IP 地址创建和分配。
- MACVLAN CNI 用作虚拟交换机,将 POD 连接到网络功能。
- Multus CNI 插件可将多个网络设备连接到 Kubernetes 吊舱。
- 主机设备 CNI 插件将现有设备(如 SRIOV VF )从主机移动到 pod 的网络名称空间。
两个操作员都使用 节点特征发现 。此服务标识哪些群集节点具有 GPU 和 SmartNIC 。
操作员一起工作或单独工作。将它们部署在一起可启用 GPUDirect RDMA 。此功能绕过主机缓冲以提高 NIC 和 GPU 之间的吞吐量。
英伟达运营商是开源软件。它们已经支持在 NVIDIA 认证服务器 上运行的流行 Kubernetes 发行版。但许多边缘平台运行运营商不支持的定制 Linux 发行版。这篇文章解释了如何将 NVIDIA 运营商与这些平台集成。
两条路,一条路
可移植性是云本地软件的主要优点之一。容器将应用程序与其依赖项捆绑在一起。这使它们能够在不同的平台上运行、扩展和迁移,而不会产生摩擦。
NVIDIA 运营商是基于容器的云本地应用程序。大多数运营商服务不需要任何集成就可以在新平台上运行。但这两个操作符都包含驱动程序容器,驱动程序是例外。驱动程序依赖于内核。将 NVIDIA 运营商与新平台集成需要重建目标内核的驱动程序容器。该平台可能正在运行不受支持的 Linux 发行版或自定义编译内核。
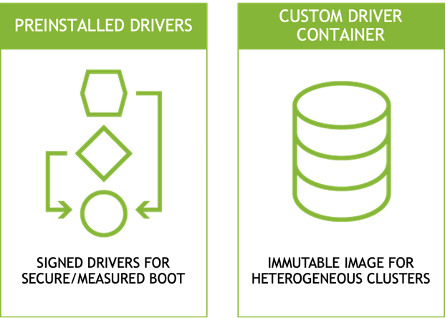
提供自定义驱动程序有两种方法:
首先,在安装操作员之前将驱动程序安装到主机上。许多边缘平台在其基本操作系统映像中提供签名驱动程序,以支持 安全和有尺寸的靴子 。需要签名驱动程序的平台不能使用操作员部署的驱动程序容器。英伟达舰队司令部遵循这种模式。网络和 GPU 运营商都通过禁用自己的驱动程序容器来支持预装驱动程序。
第二种方法是将操作员的驱动程序容器替换为自定义容器。具有不可变文件系统的边缘平台更喜欢这种方法。边缘服务器通常作为设备运行。他们使用只读文件系统来提高安全性并防止配置漂移。在内存中运行驱动程序和应用程序容器,而不是将它们添加到不可变映像中,可以减少其大小和复杂性。这还允许同一映像在具有不同硬件配置文件的节点上运行。
这篇文章解释了如何设置这两种模式。本文的第一部分介绍了驱动程序的预安装。第二部分介绍如何构建和安装自定义驱动程序容器。
除了驱动程序容器外,其余的运营商服务通常在新平台上运行,无需修改。 NVIDIA 在 主要容器运行时 上测试这两个操作符,例如 Docker Engine 、 CRI-O 和 Containerd 。 GPU 运算符还支持 运行时类资源 进行每吊舱运行时选择。
预装驱动程序集成
本文的其余部分将展示如何将 NVIDIA 运营商与自定义边缘平台集成。它包括驱动程序预安装和驱动程序容器方法的逐步过程。
表 1 描述了用于演示这些程序的测试系统。
表 1 :测试系统说明
| Linux Distribution | Centos 7.9.2009 | GPU Operator | v1.8.2 |
| Kernel version | 3.10.0-1160.45.1.el7.custom | GPU Driver (operator) | 470.74 |
| Container runtime | Crio-21.3 | Network Operator | v1.0.0 |
| Kubernetes | 1.21.3-0 | MOFED (operator) | 5.4-1.0.3.0 |
| Helm | v3.3.3 | CUDA | 11.4 |
| Cluster network | Calico v3.20.2 | GPU Driver (local) | 470.57.02 |
| Compiler | GCC 4.8.5 2015062 | MOFED (local) | 5.4-1.0.3.0 |
| Developer tools | Elfutils 0.176-5 | Node Feature Discovery | v0.8.0 |
| Server | NVIDIA DRIVE Constellation | GPU | A100-PCIE-40GB |
| Server BIOS | v5.12 | SmartNIC | ConnectX-6 Dx MT2892 |
| CPU | (2) Intel Xeon Gold 6148 | SmartNIC Firmware | 22.31.1014 |
两个操作员都不支持测试系统上的操作系统、 Linux 内核和容器运行时组合。 Linux 内核是自定义编译的,因此预编译驱动程序不可用。测试系统还使用 Cri-o 容器运行时,这比 Containerd 和 Docker Engine 等替代方案更不常见。
准备系统
- 首先,验证 CONNECTX SmartNIC 和 NVIDIA GPU 在测试系统上是否可见。
$ lspci | egrep 'nox|NVI'
23:00.0 3D controller: NVIDIA Corporation Device 20f1 (rev a1)
49:00.0 Ethernet controller: Mellanox Technologies MT2892 Family [ConnectX-6 Dx]
49:00.1 Ethernet controller: Mellanox Technologies MT2892 Family [ConnectX-6 Dx]
5e:00.0 Ethernet controller: Mellanox Technologies MT27710 Family [ConnectX-4 Lx]
e3:00.0 Ethernet controller: Mellanox Technologies MT2892 Family [ConnectX-6 Dx]
e3:00.1 Ethernet controller: Mellanox Technologies MT2892 Family [ConnectX-6 Dx]
e6:00.0 3D controller: NVIDIA Corporation Device 20f1 (rev a1)
2 .查看操作系统和 Linux 内核版本。在本例中, Centos 7 3 . 10 . 0-1160 . 45 . 1 内核被重新编译为 3 . 10 . 0-1160 . 45 . 1 . el7 . custom . x86 _ 64 。
$ cat /etc/redhat-release CentOS Linux release 7.9.2009 (Core) $ uname -r
3.10.0-1160.45.1.el7.custom.x86_64
3 .查看 Kubernetes 版本、网络配置和群集节点。此输出显示了单节点集群,这是边缘 AI 部署的典型模式。该节点正在运行 Kubernetes 1 . 21 版。
$ kubectl get nodes
NAME STATUS ROLES AGE VERSION
cgx-20 Ready control-plane 23d v1.21.3
4 .查看已安装的容器运行时。此示例显示了 cri-o 容器运行时。
$ kubectl get node cgx-20 -o yaml | grep containerRuntime containerRuntimeVersion: cri-o://1.21.3
5 . NVIDIA 通过头盔图表为操作员提供服务。查看已安装的舵机版本。
$ helm version
version.BuildInfo{Version:"v3.3.3", GitCommit:"55e3ca022e40fe200fbc855938995f40b2a68ce0", GitTreeState:"clean", GoVersion:"go1.14.9"}
使用预装的驱动程序安装网络运营商
Mellanox OpenFabrics Linux 企业发行版 为高性能网络安装开源驱动程序和库。 NVIDIA 网络操作员可选地安装一个 MOFE 容器,将这些驱动程序和库加载到 Kubernetes 上。本节介绍在无法使用附带的驱动程序容器的情况下在主机上预安装 MOFED 驱动程序的过程。
- 安装先决条件。
$ yum install -y perl numactl-libs gtk2 atk cairo gcc-gfortran tcsh libnl3 tcl tk python-devel pciutils make lsof redhat-rpm-config rpm-build libxml2-python ethtool iproute net-tools openssh-clients git openssh-server wget fuse-libs
2 .下载并解压缩 Linux 发行版的 MOFED 归档文件。
$ wget https://www.mellanox.com/downloads/ofed/MLNX_OFED-5.4-1.0.3.0/MLNX_OFED_LINUX-5.4-1.0.3.0-rhel7.9-x86_64.tgz $ tar zxf MLNX_OFED_LINUX-5.4-1.0.3.0-rhel7.9-x86_64.tgz3 .使用 mlnxofedinstall 安装内核空间驱动程序。安装脚本可能会自动更新 CONNECTX SmartNIC 固件。
$ cd MLNX_OFED_LINUX-5.4-1.0.3.0-rhel7.9-x86_64 $ ./mlnxofedinstall --without-rshim-dkms --without-iser-dkms --without-isert-dkms --without-srp-dkms --without-kernel-mft-dkms --without-mlnx-rdma-rxe-dkms 4 .重新启动以加载新的驱动程序。
$ sudo shutdown -r now5 .重新启动后,确保已加载驱动程序。
$ /etc/init.d/openibd status HCA driver loaded Configured Mellanox EN devices:
enp94s0
ens13f0
ens13f1
ens22f0
ens22f1 Currently active Mellanox devices:
enp94s0
ens13f0
ens13f1
ens22f0
ens22f1 The following OFED modules are loaded: rdma_ucm rdma_cm ib_ipoib mlx5_core mlx5_ib ib_uverbs ib_umad ib_cm ib_core mlxfw
一旦成功安装 MOFED 并加载驱动程序,就开始安装英伟达网络运营商。
6 .标识辅助网络设备名称。这将是作为辅助网络接口插入 pod 的一个或多个设备。
$ ibdev2netdev
mlx5_0 port 1 ==> ens13f0 (Up)
mlx5_1 port 1 ==> ens13f1 (Down)
mlx5_2 port 1 ==> enp94s0 (Up)
mlx5_3 port 1 ==> ens22f0 (Up)
mlx5_4 port 1 ==> ens22f1 (Down)
7 .默认情况下,网络运营商不会部署到 Kubernetes 主机。从节点中删除主标签以适应一体式集群部署。
$ kubectl label nodes --all node-role.kubernetes.io/master- --overwrite
注意:这是一个临时解决方案,允许网络运营商将 POD 调度到单节点群集中的主节点。网络运营商的未来版本将增加容忍度和节点亲和性,以避免这种解决方法。
8 .添加 Mellanox Helm 图表存储库。
$ helm repo add mellanox https://mellanox.github.io/network-operator
$ helm repo update
$ helm repo ls
NAME URL mellanox https://mellanox.github.io/network-operator
9 创建 values . yaml 以指定网络运营商配置。本例部署 RDMA 共享设备插件,并将 ens13f0 指定为支持 RDMA 的接口。
$ cat roce_shared_values.yaml nfd: enabled: true
deployCR: true
sriovDevicePlugin: deploy: false
rdmaSharedDevicePlugin: deploy: true resources: - name: rdma_shared_device_a vendors: [15b3] deviceIDs: [101d] ifNames: [ens13f0]
10 安装网络运营商 Helm 图表,使用新配置文件覆盖 default values . yaml 。
$ helm install -f ./roce_shared_values.yaml -n network-operator --create-namespace --wait network-operator mellanox/network-operator11 验证所有网络运营商吊舱是否处于运行状态。
$ kubectl get pods -n nvidia-network-operator-resources
NAME READY STATUS RESTARTS AGE
cni-plugins-ds-fcrsq 1/1 Running 0 3m44s
kube-multus-ds-4n526 1/1 Running 0 3m44s
rdma-shared-dp-ds-5rq4x 1/1 Running 0 3m44s
whereabouts-9njxm 1/1 Running 0 3m44s
请注意,某些版本的印花布与某些 Multus CNI 版本不兼容。在 Multus 守护程序启动后更改 Multus API 版本。
$ sed -i 's/0.4.0/0.3.1/' /etc/cni/net.d/00-multus.conf
12Helm 图表创建一个 configMap ,用于使用 values . yaml 文件中定义的选择器标记节点。验证 NFD 是否正确标记了节点,以及是否创建了 RDMA 共享设备。
$ kubectl describe cm -n nvidia-network-operator-resources rdma-devices | grep 15b3
{ "configList": [ { "resourceName": "rdma_shared_device_a", "rdmaHcaMax": 1000, "selectors": { "vendors": ["15b3"], "deviceIDs": ["101d"], "drivers": [], "ifNames": ["ens13f0"], "linkTypes": [] } } ] } $ kubectl describe node cgx-20 | egrep '15b3|rdma_shared' feature.node.kubernetes.io/pci-15b3.present=true feature.node.kubernetes.io/pci-15b3.sriov.capable=true rdma/rdma_shared_device_a: 1k rdma/rdma_shared_device_a: 1k rdma/rdma_shared_device_a 0 0
使用预装的驱动程序安装 GPU 操作器
按照相同的过程安装带有预编译驱动程序的 GPU 操作符。
- 首先,禁用 nouveau GPU 驱动程序,将其从加载中列入黑名单,并重建初始 RAMdisk 。
$ cat << EOF | sudo tee /etc/modprobe.d/blacklist-nouveau.conf
blacklist nouveau
options nouveau modeset=0
EOF $ sudo dracut --force
2 .下载 Linux 的英伟达 GPU 驱动程序安装脚本。在本例中,我们使用的是驱动程序版本 470 . 57 . 02 。
$ wget https://us.download.nvidia.com/tesla/470.57.02/NVIDIA-Linux-x86_64-470.57.02.run3 .运行安装脚本。该脚本自动编译目标操作系统内核的驱动程序。
$ sh NVIDIA-Linux-x86_64-470.57.02.run -q -a -n -X -s4 .验证驱动程序是否已成功加载。
$ modinfo -F version nvidia
470.57.02
5 .在 Cri-o 容器运行时配置中禁用 SELinux 并重新启动服务。
请注意, SELinux 在测试系统上处于允许模式。当 SELinux 处于强制模式时,需要执行其他步骤。
$ cat << EOF | sudo tee /etc/crio/crio.conf
[crio]
[crio.runtime]
selinux = false
hooks_dir = [ "/usr/share/containers/oci/hooks.d", "/run/containers/oci/hooks.d",
]
[crio.network]
plugin_dirs = [ "/opt/cni/bin", "/usr/libexec/cni",
]
[crio.metrics]
enable_metrics = true
metrics_port = 9537
EOF $ systemctl restart crio.service
6 .删除调度到主节点时的污点。
$ kubectl taint nodes --all node-role.kubernetes.io/master-
node/cgx-20 untainted
7 .安装 GPU 操作员舵图存储库。
$ helm repo add nvidia https://nvidia.github.io/gpu-operator $ helm repo update # helm repo ls
NAME URL nvidia https://nvidia.github.io/gpu-operator mellanox	https://mellanox.github.io/network-operator
8 .安装 GPU 操作员舵图。将 driver . enabled 参数重写为 false 将禁用驱动程序容器安装。还指定 crio 作为容器运行时。
$ helm install --generate-name nvidia/gpu-operator --set driver.enabled=false --set toolkit.version=1.7.1-centos7 --set operator.defaultRuntime=crio $ helm ls
NAME NAMESPACE	REVISION	UPDATED STATUS CHART APP VERSION
gpu-operator-1635194696	default 1 2021-10-25 16:44:57.237363636 -0400 EDT	deployed	gpu-operator-v1.8.2	v1.8.2
9 查看 GPU 操作员资源。所有吊舱应处于运行或完成状态。
$ kubectl get pods -n gpu-operator-resources
NAME READY STATUS RESTARTS AGE
gpu-feature-discovery-6kpxt 1/1 Running 0 114s
nvidia-container-toolkit-daemonset-sprjb 1/1 Running 0 114s
nvidia-cuda-validator-ndc78 0/1 Completed 0 90s
nvidia-dcgm-exporter-n9xnp 1/1 Running 0 114s
nvidia-dcgm-pfknx 1/1 Running 0 114s
nvidia-device-plugin-daemonset-4qnh6 1/1 Running 0 114s
nvidia-device-plugin-validator-845pw 0/1 Completed 0 84s
nvidia-mig-manager-rf7vz 1/1 Running 0 114s
nvidia-operator-validator-5ngbk 1/1 Running 0 114s
10 查看验证 pod 日志以验证验证测试是否已完成。
$ kubectl logs -n gpu-operator-resources nvidia-device-plugin-validator-845pw
device-plugin workload validation is successful $ kubectl logs -n gpu-operator-resources nvidia-cuda-validator-ndc78 cuda workload validation is successful
11 从验证器容器中运行 nvidia smi 以显示 GPU 、驱动程序和 CUDA 版本。这还验证了容器运行时预启动挂钩是否按预期工作。
$ kubectl exec -n gpu-operator-resources -i -t nvidia-operator-validator-5ngbk --container nvidia-operator-validator -- nvidia-smi
Mon Oct 25 20:57:28 2021 +-----------------------------------------------------------------------------+
| NVIDIA-SMI 470.57.02 Driver Version: 470.57.02 CUDA Version: 11.4 |
|-------------------------------+----------------------+----------------------+
| GPU Name Persistence-M| Bus-Id Disp.A | Volatile Uncorr. ECC |
| Fan Temp Perf Pwr:Usage/Cap| Memory-Usage | GPU-Util Compute M. |
| | | MIG M. |
|===============================+======================+======================|
| 0 NVIDIA A100-PCI... Off | 00000000:23:00.0 Off | 0 |
| N/A 26C P0 32W / 250W | 0MiB / 40536MiB | 0% Default |
| | | Disabled |
+-------------------------------+----------------------+----------------------+
| 1 NVIDIA A100-PCI... Off | 00000000:E6:00.0 Off | 0 |
| N/A 26C P0 32W / 250W | 0MiB / 40536MiB | 0% Default |
| | | Disabled |
+-------------------------------+----------------------+----------------------+ +-----------------------------------------------------------------------------+
| Processes: |
| GPU GI CI PID Type Process name GPU Memory |
| ID ID Usage |
|=============================================================================|
| No running processes found |
+-----------------------------------------------------------------------------+
测试预安装的驱动程序集成
通过创建测试吊舱来测试预装的驱动程序集成。
1 .创建网络附件定义。网络连接定义是一种自定义资源,允许 POD 连接到一个或多个网络。此网络连接定义定义了一个 MAC VLAN 网络,用于跨辅助接口桥接多个 POD 。下落 CNI 自动为连接到辅助网络的 POD 分配 IP 地址。
$ cat << EOF | sudo tee rdma_shared_macvlan_net.yaml
apiVersion: mellanox.com/v1alpha1
kind: MacvlanNetwork
metadata: name: roce-shared-macvlan-network
spec: networkNamespace: "default" master: "ens13f0" mode: "bridge" mtu: 1500 ipam: | { "type": "whereabouts", "datastore": "kubernetes", "kubernetes": { "kubeconfig": "/etc/cni/net.d/whereabouts.d/whereabouts.kubeconfig" }, "range": "192.168.2.225/28", "exclude": [ "192.168.2.229/30", "192.168.2.236/32" ], "log_file" : "/var/log/whereabouts.log", "log_level" : "info", "gateway": "192.168.2.1" }
EOF
2 .应用网络附件定义。
$ kubectl create -f roce_shared_macvlan_net.yaml $ kubectl describe network-attachment-definition roce-shared-macvlan-network | grep Config Config: { "cniVersion":"0.4.0", "name":"roce-shared-macvlan-network", "type":"macvlan","master": "ens13f0","mode" : "bridge","mtu" : 1500,"ipam":{"type":"whereabouts","datastore":"kubernetes","kubernetes":{"kubeconfig":"/etc/cni/net.d/whereabouts.d/whereabouts.kubeconfig"},"range":"192.168.2.225/28","exclude":["192.168.2.229/30","192.168.2.236/32"],"log_file":"/var/log/whereabouts.log","log_level":"info","gateway":"192.168.2.1"} }3 .创建测试吊舱规范文件。 spec 文件应包括 RDMA 设备的网络附件和资源限制的注释。
$ cat << EOF | sudo tee roce_shared_macvlan_pod.yaml apiVersion: v1
kind: Pod
metadata: name: roce-shared-pod annotations: k8s.v1.cni.cncf.io/networks: roce-shared-macvlan-network
spec: restartPolicy: OnFailure containers: - image: mellanox/rping-test name: mofed-test-ctr securityContext: capabilities: add: [ "IPC_LOCK","NET_RAW" ] resources: requests: rdma/rdma_shared_device_a: 1 limits: rdma/rdma_shared_device_a: 1 command: - sh - -c - | ls -l /dev/infiniband /sys/class/net sleep 1000000
EOF
4 .创建测试吊舱。
$ kubectl create -f roce_shared_pod.yaml $ kubectl get pods | grep roce
roce-shared-pod 1/1 Running 0 6m46s
5 .查看测试盒日志以验证网络连接。本例中的辅助接口名为 net1 。
$ kubectl describe pod roce-shared-pod | grep -B1 rdma Limits: rdma/rdma_shared_device_a: 1 Requests: rdma/rdma_shared_device_a: 1 $ kubectl logs roce-shared-pod
/dev/infiniband:
total 0
crw-rw-rw-. 1 root root 231, 64 Oct 13 22:48 issm0
crw-rw-rw-. 1 root root 10, 56 Oct 13 22:48 rdma_cm
crw-rw-rw-. 1 root root 231, 0 Oct 13 22:48 umad0
crw-rw-rw-. 1 root root 231, 192 Oct 13 22:48 uverbs0 /sys/class/net:
total 0
lrwxrwxrwx. 1 root root 0 Oct 13 22:48 eth0 -> ../../devices/virtual/net/eth0
lrwxrwxrwx. 1 root root 0 Oct 13 22:48 lo -> ../../devices/virtual/net/lo
lrwxrwxrwx. 1 root root 0 Oct 13 22:48 net1 -> ../../devices/virtual/net/net1
lrwxrwxrwx. 1 root root 0 Oct 13 22:48 tunl0 -> ../../devices/virtual/net/tunl0
6 .查看 net1 上的地址分配。
$ kubectl exec -ti roce-shared-pod -- ifconfig net1
<UP,BROADCAST,RUNNING,MULTICAST> mtu 1500 inet 192.168.2.225 netmask 255.255.255.240 broadcast 192.168.2.239 inet6 fe80::6871:9cff:fe1b:afe4 prefixlen 64 scopeid 0x20<link> ether 6a:71:9c:1b:af:e4 txqueuelen 0 (Ethernet) RX packets 405 bytes 24300 (23.7 KiB) RX errors 0 dropped 0 overruns 0 frame 0 TX packets 9 bytes 698 (698.0 B) TX errors 0 dropped 0 overruns 0 carrier 0 collisions 0
7 . GPU 操作员创建 POD 以验证驱动程序、容器运行时和 Kubernetes 设备插件。创建一个额外的 GPU 测试盒。
$ cat << EOF | kubectl create -f -
apiVersion: v1
kind: Pod
metadata: name: cuda-vectoradd
spec: restartPolicy: OnFailure containers: - name: cuda-vectoradd image: "nvidia/samples:vectoradd-cuda11.2.1" resources: limits: nvidia.com/gpu: 1
EOF
8 .查看结果。
$ kubectl get pod cuda-vectoradd
NAME READY STATUS RESTARTS AGE
cuda-vectoradd 0/1 Completed 0 34s $ kubectl logs cuda-vectoradd
[Vector addition of 50000 elements]
Copy input data from the host memory to the CUDA device
CUDA kernel launch with 196 blocks of 256 threads
Copy output data from the CUDA device to the host memory
Test PASSED
Done
9 加载 nvidia peermem 驱动程序。它为 CONNECTX SmartNIC 提供 GPUDirect RDMA 。该驱动程序包含在 NVIDIA Linux GPU 驱动程序版本 470 及更高版本中。如果系统上同时存在 ib _ core 和 NVIDIA GPU 驱动程序源,则在 Linux 驱动程序安装过程中会自动编译该文件。这意味着 MOFED 驱动程序应该在 GPU 驱动程序之前安装,以便 MOFED 源代码可用于构建 nvidia peermem 驱动程序。
$ modprobe nvidia-peermem $ lsmod | grep nvidia_peermem
nvidia_peermem 13163 0 nvidia 35224507 113 nvidia_modeset,nvidia_peermem,nvidia_uvm
ib_core 357959 9 rdma_cm,ib_cm,iw_cm,mlx5_ib,ib_umad,nvidia_peermem,ib_uverbs,rdma_ucm,ib_ipoib
了解有关集成 使用自定义驱动程序容器的 NVIDIA 加速器 过程的更多信息。
本系列的第 2 部分将于 11 月 22 日出版。它将描述如何将英伟达 GPU 和网络运营商与定制驱动程序容器集成。