从 TensorRT 7 . 0 开始, Universal Framework Format( UFF )被弃用。在本文中,您将学习如何使用新的 TensorFlow -ONNX- TensorRT 工作流部署经过 TensorFlow 培训的深度学习模型。图 1 显示了 TensorRT 的高级工作流。

首先,使用任何框架训练网络。网络训练后,批量大小和精度是固定的(精度为 FP32 、 FP16 或 INT8 )。训练好的模型被传递给 TensorRT 优化器,优化器输出一个优化的运行时(也称为计划)。. plan 文件是 TensorRT 引擎的序列化文件格式。计划文件需要反序列化才能使用 TensorRT 运行时运行推断。
要优化在 TensorFlow 中实现的模型,只需将模型转换为 ONNX 格式,并使用 TensorRT 中的 ONNX 解析器解析模型并构建 TensorRT 引擎。图 2 显示了高级 ONNX 工作流。

在本文中,我们将讨论如何使用 ONNX 工作流创建一个 TensorRT 引擎,以及如何从 TensorRT 引擎运行推理。更具体地说,我们演示了从 Keras 或 TensorFlow 中的模型到 ONNX 的端到端推理,以及使用 ResNet-50 、语义分段和 U-Net 网络的 TensorRT 引擎。最后,我们将解释如何在其他网络上使用此工作流。
下载本文中的代码示例。 下载 TensorFlow -onnx- TensorRT 后 – 代码 tar . gz 文件,您还应该从 Cityscapes dataset scripts repo 下载 labels.py ,并将其与其他脚本放在同一个文件夹中。
ONNX 概述
ONNX 是机器学习和深度学习模型的开放格式。它允许您将不同框架(如 TensorFlow 、 PyTorch 、 MATLAB 、 Caffe 和 Keras )的深度学习和机器学习模型转换为单一格式。
它定义了一组通用的运算符、深入学习的通用构建块集和通用文件格式。它提供计算图的定义以及内置运算符。可能有一个或多个输入或输出的 ONNX 节点列表形成一个无环图。
ResNet ONNX 工作流示例
在这个例子中,我们展示了如何在两个不同的网络上使用 ONNX 工作流并创建一个 TensorRT 引擎。第一个网络是 ResNet-50 。
工作流包括以下步骤:
- 将 TensorFlow / Keras 模型转换为. pb 文件。
- 将. pb 文件转换为 ONNX 格式。
- 创建 TensorRT 引擎。
- 从 TensorRT 引擎运行推断。
将模型转换为. pb
第一步是将模型转换为. pb 文件。以下代码示例将 ResNet-50 模型转换为. pb 文件:
import tensorflow as tf
import keras
from tensorflow.keras.models import Model
import keras.backend as K
K.set_learning_phase(0)

def keras_to_pb(model, output_filename, output_node_names):

   """
   This is the function to convert the Keras model to pb.

   Args:
      model: The Keras model.
      output_filename: The output .pb file name.
      output_node_names: The output nodes of the network. If None, then
      the function gets the last layer name as the output node.
   """

   # Get the names of the input and output nodes.
   in_name = model.layers[0].get_output_at(0).name.split(':')[0]

   if output_node_names is None:
       output_node_names = [model.layers[-1].get_output_at(0).name.split(':')[0]]

   sess = keras.backend.get_session()

   # The TensorFlow freeze_graph expects a comma-separated string of output node names.
   output_node_names_tf = ','.join(output_node_names)

   frozen_graph_def = tf.graph_util.convert_variables_to_constants(
       sess,
       sess.graph_def,
       output_node_names)

   sess.close()
   wkdir = ''
   tf.train.write_graph(frozen_graph_def, wkdir, output_filename, as_text=False)

   return in_name, output_node_names

# load the ResNet-50 model pretrained on imagenet
model = keras.applications.resnet.ResNet50(include_top=True, weights='imagenet', input_tensor=None, input_shape=None, pooling=None, classes=1000)

# Convert the Keras ResNet-50 model to a .pb file
in_tensor_name, out_tensor_names = keras_to_pb(model, "models/resnet50.pb", None)
除了 Keras ,您还可以从以下位置下载 ResNet-50 :
- 深度学习示例 GitHub 存储库:提供最新的深度学习示例网络。您还可以看到 ResNet-50 分支,它包含一个脚本和方法来训练 ResNet-50v1 . 5 模型。
- NVIDIA NGC 型号 :它有预训练模型的检查点列表。例如,在 ResNet-50v1 . 5 上搜索 TensorFlow ,并从 Download 页面获取最新的检查点。
将. pb 文件转换为 ONNX
第二步是将. pb 模型转换为 ONNX 格式。为此,首先安装 tf2onnx 。
安装 tf2onnx 后,有两种方法可以将模型从. pb 文件转换为 ONNX 格式。第二种方法是使用命令行。运行以下命令:
python -m tf2onnx.convert --input /Path/to/resnet50.pb --inputs input_1:0 --outputs probs/Softmax:0 --output resnet50.onnx
从 ONNX 创建 TensorRT 引擎
要从 ONNX 文件创建 TensorRT 引擎,请运行以下命令:
import tensorrt as trt

TRT_LOGGER = trt.Logger(trt.Logger.WARNING)
trt_runtime = trt.Runtime(TRT_LOGGER)
def build_engine(onnx_path, shape = [1,224,224,3]):

   """
   This is the function to create the TensorRT engine
   Args:
      onnx_path : Path to onnx_file.
      shape : Shape of the input of the ONNX file.
  """
   with trt.Builder(TRT_LOGGER) as builder, builder.create_network(1) as network, trt.OnnxParser(network, TRT_LOGGER) as parser:
       builder.max_workspace_size = (256 << 20)
       with open(onnx_path, 'rb') as model:
           parser.parse(model.read())
       network.get_input(0).shape = shape
       engine = builder.build_cuda_engine(network)
       return engine

def save_engine(engine, file_name):
   buf = engine.serialize()
   with open(file_name, 'wb') as f:
       f.write(buf)
def load_engine(trt_runtime, plan_path):
   with open(engine_path, 'rb') as f:
       engine_data = f.read()
   engine = trt_runtime.deserialize_cuda_engine(engine_data)
   return engine
此代码应保存在引擎. py 文件,稍后在文章中使用。
此代码示例包含以下变量:
- 最大工作区大小: 在执行时
ICudaEngine可以使用的最大 GPU 临时内存。
构建器创建一个空网络( builder.create_network() ), ONNX 解析器将 ONNX 文件解析到网络( parser.parse(model.read()) )。您可以为网络( network.get_input(0).shape = shape )设置输入形状,然后生成器将创建引擎( engine = builder.build_cuda_engine(network) )。要创建引擎,请运行以下代码示例:
import engine as eng
import argparse
from onnx import ModelProto
import tensorrt as trt

 engine_name = “resnet50.plan”
 onnx_path = "/path/to/onnx/result/file/"
 batch_size = 1

 model = ModelProto()
 with open(onnx_path, "rb") as f:
    model.ParseFromString(f.read())

 d0 = model.graph.input[0].type.tensor_type.shape.dim[1].dim_value
 d1 = model.graph.input[0].type.tensor_type.shape.dim[2].dim_value
 d2 = model.graph.input[0].type.tensor_type.shape.dim[3].dim_value
 shape = [batch_size , d0, d1 ,d2]
 engine = eng.build_engine(onnx_path, shape= shape)
 eng.save_engine(engine, engine_name)
在这个代码示例中,首先从 ONNX 模型获取输入形状。接下来,创建引擎,然后将引擎保存在. plan 文件中。
运行来自 TensorRT 引擎的推理:
TensorRT 引擎在以下工作流中运行推理:
- 为 GPU 中的输入和输出分配缓冲区。
- 将数据从主机复制到 GPU 中分配的输入缓冲区。
- 在 GPU 中运行推理。
- 将结果从 GPU 复制到主机。
- 根据需要重塑结果。
下面的代码示例详细解释了这些步骤。此代码应保存在推理. py 文件,稍后将在本文中使用。
import tensorrt as trt
import pycuda.driver as cuda
import numpy as np
import pycuda.autoinit

def allocate_buffers(engine, batch_size, data_type):

   """
   This is the function to allocate buffers for input and output in the device
   Args:
      engine : The path to the TensorRT engine.
      batch_size : The batch size for execution time.
      data_type: The type of the data for input and output, for example trt.float32.

   Output:
      h_input_1: Input in the host.
      d_input_1: Input in the device.
      h_output_1: Output in the host.
      d_output_1: Output in the device.
      stream: CUDA stream.

   """

   # Determine dimensions and create page-locked memory buffers (which won't be swapped to disk) to hold host inputs/outputs.
   h_input_1 = cuda.pagelocked_empty(batch_size * trt.volume(engine.get_binding_shape(0)), dtype=trt.nptype(data_type))
   h_output = cuda.pagelocked_empty(batch_size * trt.volume(engine.get_binding_shape(1)), dtype=trt.nptype(data_type))
   # Allocate device memory for inputs and outputs.
   d_input_1 = cuda.mem_alloc(h_input_1.nbytes)

   d_output = cuda.mem_alloc(h_output.nbytes)
   # Create a stream in which to copy inputs/outputs and run inference.
   stream = cuda.Stream()
   return h_input_1, d_input_1, h_output, d_output, stream

def load_images_to_buffer(pics, pagelocked_buffer):
   preprocessed = np.asarray(pics).ravel()
   np.copyto(pagelocked_buffer, preprocessed)

def do_inference(engine, pics_1, h_input_1, d_input_1, h_output, d_output, stream, batch_size, height, width):
   """
   This is the function to run the inference
   Args:
      engine : Path to the TensorRT engine
      pics_1 : Input images to the model.
      h_input_1: Input in the host
      d_input_1: Input in the device
      h_output_1: Output in the host
      d_output_1: Output in the device
      stream: CUDA stream
      batch_size : Batch size for execution time
      height: Height of the output image
      width: Width of the output image

   Output:
      The list of output images

   """

   load_images_to_buffer(pics_1, h_input_1)

   with engine.create_execution_context() as context:
       # Transfer input data to the GPU.
       cuda.memcpy_htod_async(d_input_1, h_input_1, stream)

       # Run inference.

       context.profiler = trt.Profiler()
       context.execute(batch_size=1, bindings=[int(d_input_1), int(d_output)])

       # Transfer predictions back from the GPU.
       cuda.memcpy_dtoh_async(h_output, d_output, stream)
       # Synchronize the stream
       stream.synchronize()
       # Return the host output.
       out = h_output.reshape((batch_size,-1, height, width))
       return out
为第一个输入行和输出行确定两个维度。您可以在主机( h_input_1 、 h_output )中创建页锁定内存缓冲区。然后,为输入和输出分配与主机输入和输出相同大小的设备内存( d_input_1 , d_output )。下一步是创建 CUDA 流,用于在设备和主机分配的内存之间复制数据。
在这个代码示例中,在 do_inference 函数中,第一步是使用 load_images_to_buffer 函数将图像加载到主机中的缓冲区。然后将输入数据传输到 GPU ( cuda.memcpy_htod_async(d_input_1, h_input_1, stream) ),并使用 context.execute 运行推理。最后将结果从 GPU 复制到主机( cuda.memcpy_dtoh_async(h_output, d_output, stream) )。
ONNX 工作流语义分割实例
在本文 基于 TensorRT 3 的自主车辆快速 INT8 推理 中,作者介绍了一个语义分割模型的 UFF 工作流过程。
在本文中,您将使用类似的网络来运行 ONNX 工作流来进行语义分段。该网络由一个基于 VGG16 的编码器和三个使用反褶积层实现的上采样层组成。网络在 城市景观数据集 上经过大约 40000 次迭代训练
有多种方法可以将 TensorFlow 模型转换为 ONNX 文件。一种方法是 ResNet50 部分中解释的方法。 Keras 也有自己的 Keras 到 ONNX 文件转换器。有时, TensorFlow -to-ONNX 不支持某些层,但 Keras-to-ONNX 转换器支持这些层。根据 Keras 框架和使用的层类型,您可能需要在转换器之间进行选择。
在下面的代码示例中,使用 Keras-to-ONNX 转换器将 Keras 模型直接转换为 ONNX 。下载预先训练的语义分段文件 semantic_segmentation.hdf5 。
import keras
import tensorflow as tf
from keras2onnx import convert_keras

def keras_to_onnx(model, output_filename):
   onnx = convert_keras(model, output_filename)
   with open(output_filename, "wb") as f:
       f.write(onnx.SerializeToString())

semantic_model = keras.models.load_model('/path/to/semantic_segmentation.hdf5')
keras_to_onnx(semantic_model, 'semantic_segmentation.onnx')
图 3 显示了网络的体系结构。

与前面的示例一样,使用下面的代码示例创建语义分段引擎。
import engine as eng
from onnx import ModelProto
import tensorrt as trt


engine_name = 'semantic.plan'
onnx_path = "semantic.onnx"
batch_size = 1

model = ModelProto()
with open(onnx_path, "rb") as f:
  model.ParseFromString(f.read())

d0 = model.graph.input[0].type.tensor_type.shape.dim[1].dim_value
d1 = model.graph.input[0].type.tensor_type.shape.dim[2].dim_value
d2 = model.graph.input[0].type.tensor_type.shape.dim[3].dim_value
shape = [batch_size , d0, d1 ,d2]
engine = eng.build_engine(onnx_path, shape= shape)
eng.save_engine(engine, engine_name)
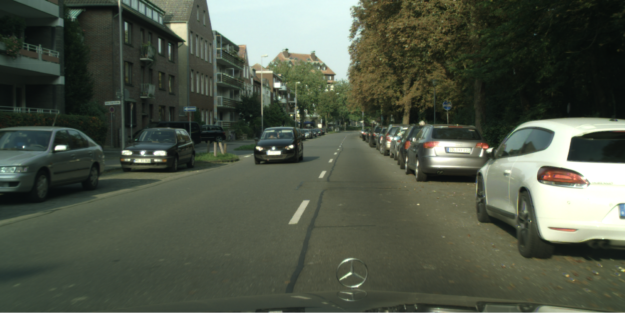
要测试模型的输出,请使用 城市景观数据集 。要使用城市景观,必须具有以下功能: sub_mean_chw 和 color_map 。这些函数也用于 post , 基于 TensorRT 3 的自主车辆快速 INT8 推理 .
在下面的代码示例中, sub_mean_chw 用于从图像中减去平均值作为预处理步骤, color_map 是从类 ID 到颜色的映射。后者用于可视化。
import numpy as np
from PIL import Image
import tensorrt as trt
import labels  # from cityscapes evaluation script
import skimage.transform

TRT_LOGGER = trt.Logger(trt.Logger.WARNING)
trt_runtime = trt.Runtime(TRT_LOGGER)

MEAN = (71.60167789, 82.09696889, 72.30508881)
CLASSES = 20
HEIGHT = 512
WIDTH = 1024

def sub_mean_chw(data):
   data = data.transpose((1, 2, 0))  # CHW -> HWC
   data -= np.array(MEAN)  # Broadcast subtract
   data = data.transpose((2, 0, 1))  # HWC -> CHW
   return data

def rescale_image(image, output_shape, order=1):
   image = skimage.transform.resize(image, output_shape,
               order=order, preserve_range=True, mode='reflect')
   return image

def color_map(output):
   output = output.reshape(CLASSES, HEIGHT, WIDTH)
   out_col = np.zeros(shape=(HEIGHT, WIDTH), dtype=(np.uint8, 3))
   for x in range(WIDTH):
       for y in range(HEIGHT):

           if (np.argmax(output[:, y, x] )== 19):
               out_col[y,x] = (0, 0, 0)
           else:
               out_col[y, x] = labels.id2label[labels.trainId2label[np.argmax(output[:, y, x])].id].color
   return out_col
下面的代码示例是上一个示例的其余代码。必须先运行上一个块,因为需要定义的函数。使用这个例子比较 Keras 模型和 TensorRT 引擎 semantic . plan 文件的输出,然后可视化这两个输出。根据需要替换占位符 /path/to/semantic_segmentation.hdf5 和 input_file_path 。
import engine as eng
import inference as inf
import keras
import tensorrt as trt

input_file_path = ‘munster_000172_000019_leftImg8bit.png’
onnx_file = "semantic.onnx"
serialized_plan_fp32 = "semantic.plan"
HEIGHT = 512
WIDTH = 1024

image = np.asarray(Image.open(input_file_path))
img = rescale_image(image, (512, 1024),order=1)
im = np.array(img, dtype=np.float32, order='C')
im = im.transpose((2, 0, 1))
im = sub_mean_chw(im)

engine = eng.load_engine(trt_runtime, serialized_plan_fp32)
h_input, d_input, h_output, d_output, stream = inf.allocate_buffers(engine, 1, trt.float32)
out = inf.do_inference(engine, im, h_input, d_input, h_output, d_output, stream, 1, HEIGHT, WIDTH)
out = color_map(out)

colorImage_trt = Image.fromarray(out.astype(np.uint8))
colorImage_trt.save(“trt_output.png”)

semantic_model = keras.models.load_model('/path/to/semantic_segmentation.hdf5')
out_keras= semantic_model.predict(im.reshape(-1, 3, HEIGHT, WIDTH))

out_keras = color_map(out_keras)
colorImage_k = Image.fromarray(out_keras.astype(np.uint8))
colorImage_k.save(“keras_output.png”)
图 4 显示了实际图像和实际情况,以及 Keras 的输出与 TensorRT 引擎的输出的对比。如您所见, TensorRT 发动机的输出与 Keras 的类似。


在其他网络上试试
现在您可以在其他网络上尝试 ONNX 工作流。有关分段网络的好例子的更多信息,请参阅 GitHub 上的 具有预训练主干的分割模型 。
作为一个例子,我们用一个 ONNX 网络来说明如何使用。本例中的网络是来自 segmentation_models 库的 U-Net 。在这里,我们只加载模型,而没有对其进行训练。您可能需要在首选数据集上训练这些模型。
关于这些网络的一个重要点是,当您加载这些网络时,它们的输入层大小如下所示:( None , None , None , 3 )。要创建一个 TensorRT 引擎,您需要一个输入大小已知的 ONNX 文件。在将此模型转换为 ONNX 之前,请通过为其输入指定大小来更改网络,然后将其转换为 ONNX 格式。
例如,从这个库( segmentation _ models )加载 U-Net 网络并为其输入指定大小( 244 、 244 、 3 )。在为推理创建了 TensorRT 引擎之后,做一个与语义分段类似的转换。根据应用程序和数据集的不同,可能需要使用不同的颜色映射。
import segmentation_models as sm
import keras
from keras2onnx import convert_keras
from engine import *
onnx_path = 'unet.onnx'
engine_name = 'unet.plan'
batch_size = 1
CHANNEL = 3
HEIGHT = 224
WIDTH = 224

model = sm.Unet()
model._layers[0].batch_input_shape = (None, 224,224,3)
model = keras.models.clone_model(model)

onx = convert_keras(model, onnx_path)
with open(onnx_path, "wb") as f:
  f.write(onx.SerializeToString())

shape = [batch_size , HEIGHT, WIDTH, CHANNEL]
engine = build_engine(onnx_path, shape= shape)
save_engine(engine, engine_name)
我们之前提到的另一种下载方式是从 vz6 下载。它有一个预先训练模型的检查点列表。例如,您可以在 TensorFlow 中搜索 UNet ,然后转到 Download 页面以获取最新的检查点。
总结
在这篇文章中,我们解释了如何使用 TensorFlow-to-ONNX-to-TensorRT 工作流来部署深度学习应用程序,并给出了几个示例。第一个例子是 ResNet-50 上的 ONNX- TensorRT ,第二个例子是在 Cityscapes 数据集上训练的基于 英伟达数据中心深度学习产品性能 的语义分割。在文章的最后,我们演示了如何在其他网络上应用这个工作流。