Download NVIDIA Streamline SDK
System Requirements
|
|
|
|---|---|
| Operating Systems | Win10 20H1 (version 2004 - 10.0.19041) or newer |
| Dependencies | Install the latest graphics driver. If using NVIDIA GPU, it must be 512.15 or newer. |
| Development Environment | VS Code or VS2017/VS2019 with SDK 10.0.19041+ |
| Engine Requirements | DirectX 11/DirectX 12* |
*DirectX 12 is required for DLSS Frame Generation
Download Streamline SDK 2.10.3
Access Github DocumentationRelease Notes
NVIDIA Streamline SDK 2.10.3 is now available for download for all developers.
- Vulkan Bug Fixes and Improvements
Integration Guide and FAQ
NVIDIA Streamline SDK FAQ
A: Follow the following guidance:
- Overlays in general must not make assumptions about swap-chain and command queues. When DLSS Frame Generation is active, there could be multiple command queues and multiple asynchronous presents.
- Overlays should intercept “IDXGIFactory::CreateSwapChainXXX” to obtain the correct swap-chain and command queue used to present frames.
- If integrated in engine, overlays should initialize before “slInit” is called
- There is an optional flag, “sl::PreferenceFlags::eUseDXGIFactoryProxy,” which can be used to avoid injecting SL hooks in DXGI factory v-table. This might help resolve some issues with overlays.
A: Yes. Streamline is an open-source SDK developed by NVIDIA, it supports multiple features that work across all hardware vendors. These features include NVIDIA Image Scaling (NIS), NVIDIA Real-Time Denoiser (NRD), and NVIDIA Reflex.
A: Please provide the correct state when tagging Streamline resources.
A: Please double check that you are not linking dxgi.lib/d3d12.lib with the sl.interposer.dll. If the issue persists, please view the Streamline logs for further guidance on what the cause could be.
DLSS Super Resolution Integration Checklist
Learn more with How to Successfully Integrate DLSS 3. Detailed information can also be found in the Streamline DLSS Programming Guide or the Complete DLSS Programming Guide.
1. Game-specific application ID is used during initialization.
i. Future hardware support, bug fixes, and over-the-air updates for DLSS Super Resolution may not work in the absence of this.
2. DLSS Super Resolution is integrated as close to the start of post-processing as possible.
i. Integrating DLSS SR after post-processing can lead to image-quality artifacts or other visual issues with post-processing effects like Bloom, etc
3. Mip-map bias set when DLSS is enabled.
i. Without this, textures will look blurry, smudgy, or low resolution.
4. Motion vectors for all scenes, materials, and objects are accurate.
i. Incorrect mvecs can lead to increased ghosting and other IQ issues.
5. Static scenes resolve and compatible jitter confirmed (see section 8.3).
i. Incorrect or missing jitter can lead to poor anti-aliasing and increased flickering.
6. Exposure value is properly sent each frame (or auto-exposure is enabled).
i. Improper exposure can cause increased ghosting, flickering, and other IQ issues.
7. DLSS modes are queried and user selectable in the UI, and/or dynamic resolution support is active and tested.
i. The modes allow end users better control over the perf vs. IQ tradeoff. If all modes are not queried and shown, end users will not get that choice.
8. Full production non-watermarked DLSS library (nvngx_dlss.dll) is packaged in the release build.
i. Don’t ship an NVIDIA-confidential watermark in your game.
9. Pass in Camera Reset Flag on scene changes, view changes (first person to third person), or during camera jumps in cutscenes.
10. Perform NGX cleanup / shutdown procedures when DLSS is no longer needed.
i. Otherwise, resources and memory will be leaked.
IMPORTANT: DLSS should only replace the primary upscale pass on the main render target, and should not be used on secondary buffers like shadows, reflections, etc.
DLSS Super Resolution Integration FAQ
A: If the DLSS output doesn’t look right (e.g., instability when moving the camera) please check the following items, or review section 8 of the DLSS Super Resolution Programming Guide for detailed troubleshooting information:
- If your motion vectors are in pixel space, scaling factors sl::Constants::mvecScale should be {1 / render width, 1 / render height}.
- If your motion vectors are in normalized -1,1 space, scaling factors sl::Constants::mvecScale should be {1, 1}.
- Make sure that jitter offset values are in pixel space.
- NVSDK_NGX_Parameter_FreeMemOnRelease is replaced with slFreeResources.
- NVSDK_NGX_DLSS_Feature_Flags_MVLowRes is handled automatically based on tagged motion vector buffer’s size and extent.
A: Enable the DLSS on-screen indicator utility by running “ngx_driver_onscreenindicator.reg” before starting your application. Once DLSS Super Resolution is enabled, you’ll see confirmation on the in-game overlay.
Once finished, run “ngx_driver_onscreenindicator_off.reg” to disable the indicator.

A: DLSS 3.1.x adds the following features:
- Preset over-the-air updates (see section 2.4)
- Model selection API (see section 3.12)
- Querying for feature support requirements (see section 2.3)
- Querying for Vulkan extension requirements (see section 2.3.1)
- Deprecation of DLSS sharpening (see section 3.11)
A: The sharpening and softening pass provided in previous versions of the SDK are now deprecated. All developers are encouraged to use the Image Scaling SDK via the DLSS SDK or directly on GitHub.
DLSS Frame Generation Integration Checklist
Learn more with How to Successfully Integrate DLSS 3. Detailed information can also be found in the DLSS-G Programming Guide.
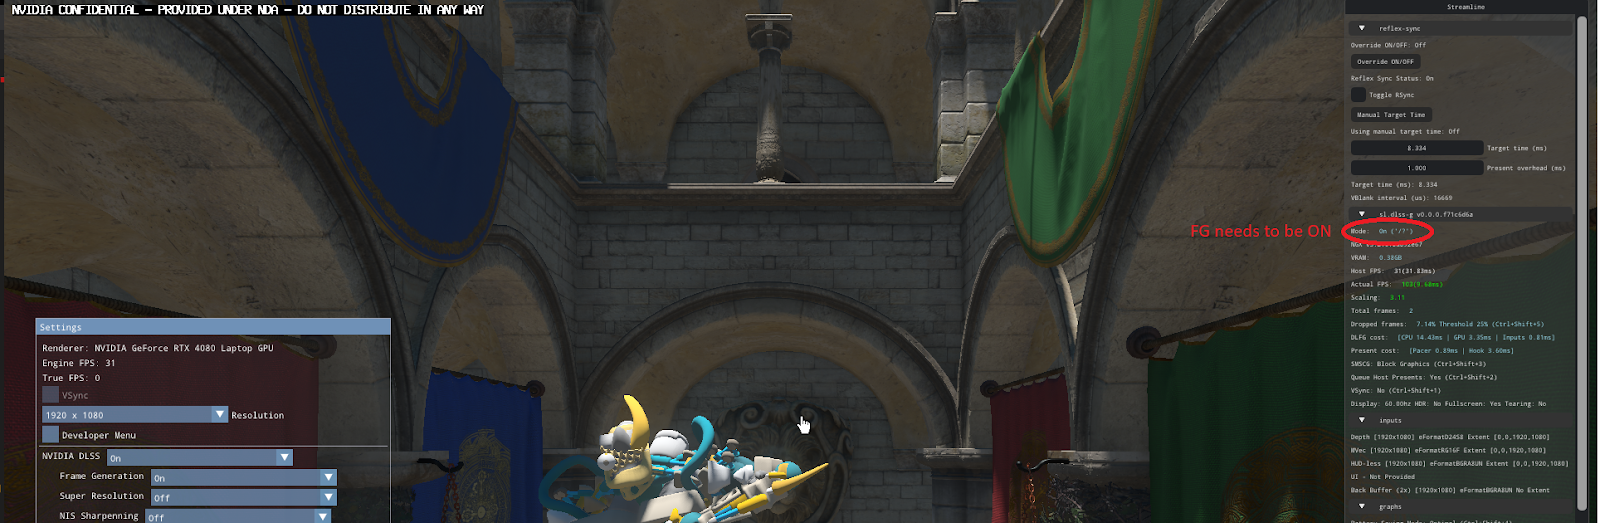
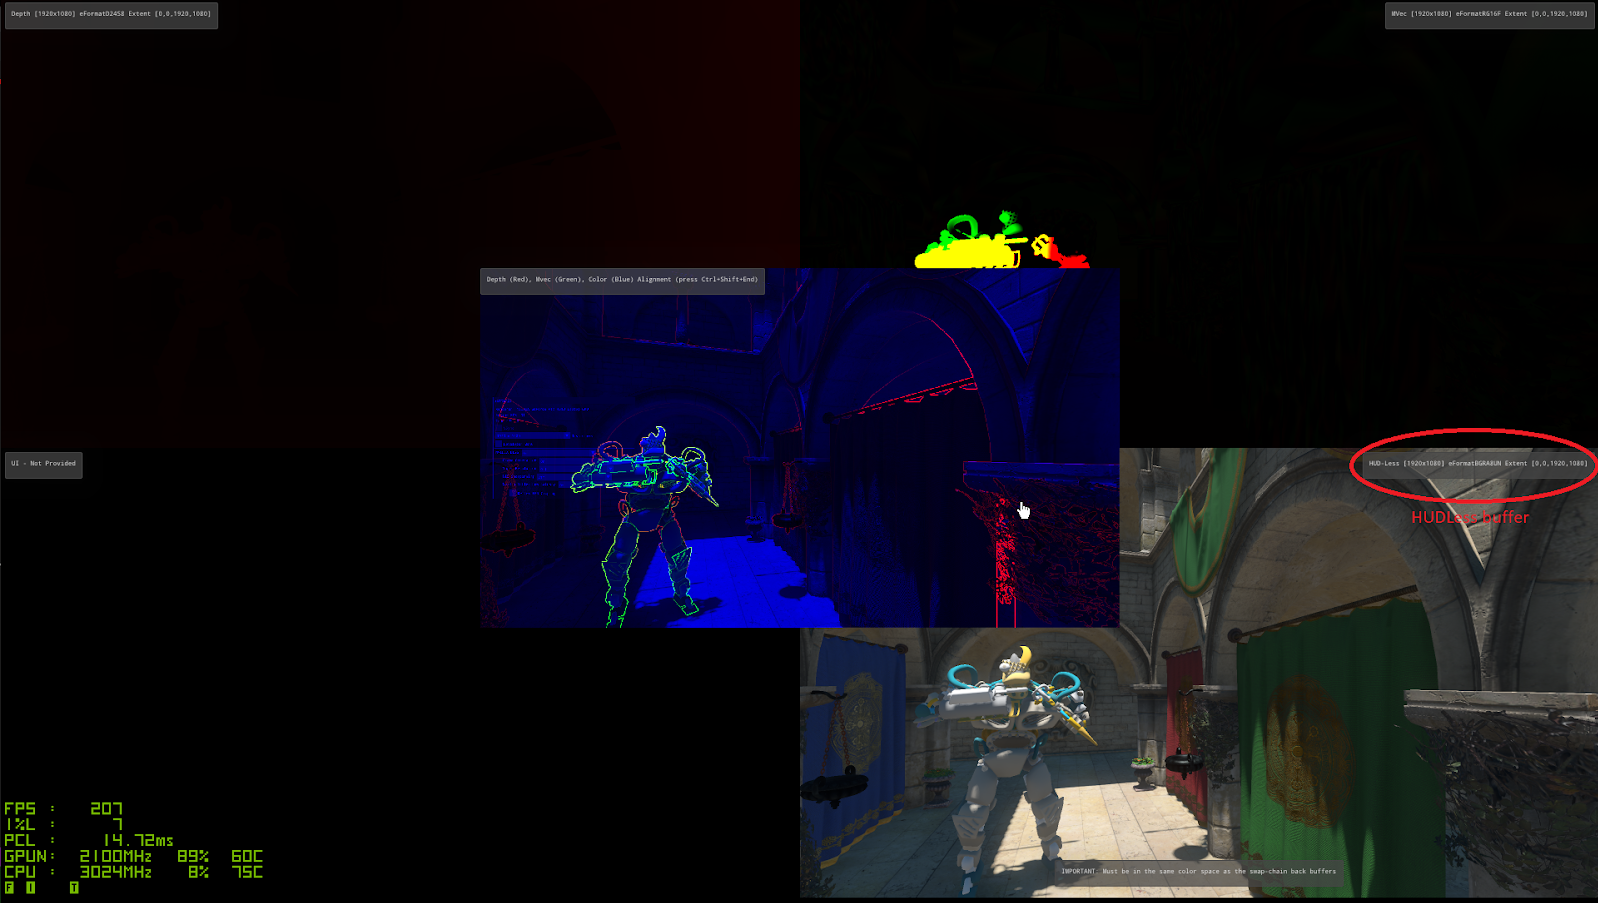
1. All the required inputs are passed to Streamline, including depth buffers, motion vectors, HUD-less color buffers, and UI color buffer.
i. Missing or incorrect input buffers will result in severe IQ artifacts such as blurry objects, broken or disjointed characters on screen, increased flickering, and instability in UI and HUD elements, etc.
ii. Use the debug visualization to check that (1) buffers are passed in and (2) they are frame-aligned.
2. Common constants and frame index are provided for each frame using slSetConstants and slSetFeatureConstants methods.
i. Incorrect values here will lead to a mismatch between FG and Reflex integration, and will cause magenta-tinted image or increased input latency and stutter.
3. All tagged buffers are valid at frame present time and not reused for other purposes.
i. Reusing tagged buffers before present time can lead to severe corruption in the entire image (or parts of it, depending on the amount of the resource that’s been reused).
ii. Reusing tagged buffers before present time can lead to severe corruption in the entire image (or parts of it, depending on the amount of the resource that’s been reused).
4. Buffers to be tagged with unique viewport ID 0.
i. DLSS-G requires depth, motion vectors, and HUD-less color buffers, which are used during the SwapChain::Present call, so if these buffers are going to be reused, destroyed, or changed in any way before the frame is presented, their lifecycle needs to be specified correctly.
ii. DLSS FG does not support multiple viewports (unlike DLSS Super Resolution and other features supported by the Streamline SDK), so all input buffers for DLSS Frame Generation must use a viewport ID of 0.
5. Make sure that the frame index provided with the common constants matches the presented frame.
i. Incorrect values here will lead to a mismatch between FG and Reflex integration, and will cause magenta-tinted image or increased input latency and stutter.
6. Inputs, camera matrices, and dynamic objects passed into Streamline look correct.
i. Incorrect inputs will lead to severe IQ issues such as blurry or smudgy objects, increased ghosting, disjointed characters, flickering UI, and generally garbled images.
ii. Dynamic motion should mark any object moving independently of the player camera motion. This heuristic helps identify a correct camera matrix format.
iii. The camera matrix should not have jitter information.
iv. If the MVECs are jittered, set the MVECJittered SL boolean or NGX Equivalent.
7. Application checks the signature of sl.interposer.dll to make sure it is a genuine NVIDIA library.
i. DLSS Frame Generation supports dynamic resolution of the MVec and Depth buffer extents. Dynamic resolution may be done via DLSS or an app-specific method.
8. Requirements for dynamic resolution are met, if supported by the game.
i. DLSS Frame Generation supports dynamic resolution of the MVec and Depth buffer extents. Dynamic resolution may be done via DLSS or an app-specific method.
ii. Since DLSS Frame Generation uses the final color buffer with all post-processing complete, the color buffer must be a fixed size—it cannot resize per frame.
iii. When DLSS Frame Generation dynamic resolution mode is enabled, the application can pass in a differently-sized extent for the MVec and Depth buffers on a per frame basis. This allows the application to dynamically change its rendering load smoothly.
9. Disable DLSS Frame Generation (by setting sl::DLSSGOptions::mode to eDLSSGModeOff) when the game is paused, loading, in menu, or generally not rendering game frames, as well as when modifying resolution and full-screen vs. windowed mode.
i. This will ensure the best overall gaming stability and experience.
10. Reduce the amount of motion blur. When DLSS Frame Generation is enabled, halve the distance or magnitude of motion blur.
i. Incorrect motion blur can lead to IQ artifacts where the motion blur is essentially doubled due to additional generated frames.
11. Reflex is properly integrated (see checklist in Reflex Programming Guide).
i. Proper integration of FG is dependent on a proper integration of Reflex. If the Reflex integration is incorrect, expect to see significant increases in input latency when FG is enabled, along with a magenta-tinted image.
12. In-game UI for enabling/disabling DLSS Frame Generation is implemented and follows RTX UI Guidelines.
i. Make operation intuitive and uniform for end users.
13. Only full-production, non-watermarked libraries are packaged in the release build.
i. Otherwise, a message on the top left of the screen will say, “NVIDIA CONFIDENTIAL - PROVIDED UNDER NDA - DO NOT DISTRIBUTE IN ANY WAY.”
14. No errors or unexpected warnings in Streamline and DLSS Frame Generation log files while running the feature.
i. Different errors and warnings can have various consequences, including the possibility of crashes, IQ artifacts, and performance slowdowns.
15. Pass in Camera Reset Flag on scene changes, view changes (first person to third person), or during camera jumps in cutscenes.
16. Semi-transparent objects require some care and attention; Check whether their motion or the motion of the objects seen through them require tracking. If it is their motion (e.g., a gun scope not raised to the eye), then mvecs and depth values should be provided for them. This may require extra coding not normally required for transparent objects.
17. When calculating in-game fps, always account for the extra frames generated by DLSS-G. This can be queried per frame and is returned by DLSSGState::numFramesActuallyPresented. This will either be 1 or 2 depending on whether DLSS-G was enabled for that given frame.
i. If calculating real-time fps by taking the time between present calls, then the time will need dividing by this value.
ii. If calculating average fps by dividing the total time by the number of game frames presented, then the DLSSGState::numFramesActuallyPresented will need to accumulate over the time period and will represent the total number of frames actually presented.
DLSS Frame Generation Integration FAQ
A: The following criteria must be met to enable DLSS Frame Generation:
- GeForce RTX 40 Series GPU (desktop or laptop)
- Minimum Windows OS version of Win10 20H1 (version 2004, build 19041 or higher)
- Windows Hardware-Accelerated GPU Scheduling (HWS) must be enabled via Settings > System > Display > Graphics > Change default graphics settings.
- Styles
A: For DLSS-G to work correctly, certain requirements regarding the OS, driver, and other settings on a user’s machine must be met. To obtain DLSS-G configuration and check if all requirements are met, use the following code snippet:
              sl::FeatureRequirements requirements{};
              if (SL_FAILED(result, slGetFeatureRequirements(sl::kFeatureDLSS_G, requirements)))
              {
                  // Feature is not requested on slInit or failed to load, check logs, handle error
              }
              else
              {
                  // Feature is loaded, we can check the requirements
                  requirements.flags & FeatureRequirementFlags::eD3D11Supported
                  requirements.flags & FeatureRequirementFlags::eD3D12Supported
                  requirements.flags & FeatureRequirementFlags::eVulkanSupported
                  requirements.maxNumViewports
                  // and so on ...
              }
A: If validity of tagged resources cannot be guaranteed (e.g., game is loading, paused, in menu, or playing a video cut scene), all tags should be set to null pointers to avoid stability or IQ issues.
For more information, please reference Section 5.0 of the DLSS FG Programming Guide .
A: If validity of tagged resources cannot be guaranteed (e.g., game is loading, paused, in menu, or playing a video cut scene), all tags should be set to null pointers to avoid stability or IQ issues.
For more information, please reference Section 5.0 of the DLSS FG Programming Guide.
A: Enable the DLSS on-screen indicator utility by running “ngx_driver_onscreenindicator.reg” before starting your application. Once DLSS Frame Generation is enabled, confirmation will appear on the in-game overlay.
Once finished, run “ngx_driver_onscreenindicator_off.reg” to disable the indicator.

Developers can also use the sl.imgui.dll overlay, which was introduced with Streamline 2.0.1.
A: Enable the DLSS on-screen indicator utility by running “ngx_driver_onscreenindicator.reg” before starting your application. Once DLSS Super Resolution is enabled, “Use Hudless: Yes” will appear in the overlay if hudless buffers are tagged.
Once finished, run “ngx_driver_onscreenindicator_off.reg” to disable the indicator.

Developers can also use the sl.imgui.dll, overlay which was introduced with Streamline 2.0.1.
1. Confirm DLSS FG is running.
2. Confirm DLSS Frame Generation is running.
3. Press Debug key (CTRL+SHIFT+INS).
4. Visualizes all buffers (allows dev to confirm hudless buffer is correct).
5. Confirm functionality on screen.
A: Yes, DLSS Frame Generation is compatible with HDR. However, DLSS Frame Generation currently does not support FP16 pixel format and scRGB color space.
A: DLSS Frame Generation has a finite cost to run. It provides an fps boost if the time taken to generate a frame is less than the time taken to render the same frame through the game engine. However, if the game renders really fast (typically >200 fps, but lower in some cases), then DLSS FG might not boost performance.
A: DLSS Frame Generation adds additional calls to Present(), which the game engine may not track by default.
In-game fps numbers as a result may not match with numbers reported from outside the app via tools like FrameView, Geforce Experience, CapFrameX, and Windows Game Bar.
The Streamline API provides information about the number of frames presented through DLSSGState::numFramesActuallyPresented , which should be hooked up to the engine’s fps reporting function. This will align with fps reported by external tools, as well as the game engine itself.
A: Developers can use the sl.imgui.dll overlay, which was introduced with Streamline 2.0.1.
1. Confirm DLSS FG is running.
2. Confirm DLSS Frame Generation is running.
3. Press Debug key (CTRL+SHIFT+INS).
4. Enter “Dynamic Objects” view (cycle through views with CTRL+SHIFT+END).
5. Confirm functionality on screen.

A: If you’re using Streamline 2.0.1, you now have DLSS Frame Generation support for V-SYNC (set within the NVIDIA Control Panel) without any requirement of having a G-SYNC compatible display. In-game V-SYNC setting support is not available and should remain disabled when DLSS Frame Generation is enabled.
| V-SYNC (NV Control Panel) |
G-SYNC (NV Control Panel) | Result | Required Streamline Version |
|---|---|---|---|
| Off | Off | Max FPS, Low Latency, Tearing | 1.3.3+ |
| Off | On | Max FPS, Low Latency, Tearing above Refresh Rate | 1.3.3+ |
| On | Off | No Tearing, Not Smooth, High Latency | < 2.0.1 |
| On | Off | No Tearing, Smooth, Lower Latency | 2.0.1+ |
| On | On | No Tearing, Smooth, Lowest Latency VSYNC ON option | 1.3.3+ |
Starting with driver version 526.98 and higher, DLSS Frame Generation is compatible with VSYNC on G-SYNC and G-SYNC Compatible monitors and TVs. To enable this feature:
- Enable G-SYNC: NVIDIA Control Panel --> Display --> Setup G-SYNC
- Turn VSYNC On: NVIDIA Control Panel --> 3D Settings --> Manage 3D Settings
Note:DLSS Frame Generation is currently not compatible with VSYNC on displays that are not G-SYNC or G-SYNC Compatible when using Streamline 2.0.0a or earlier.
Reflex Integration Checklist
Detailed information can be found in the Streamline Reflex Programming Guide.
1. Download Reflex verification tools.
2. Install FrameView SDK
i. Double click the FrameView SDK installer (FVSDKSetup.exe).
3. Run ReflexTestSetup.bat from an administrator mode command prompt.
ii. This will force the Reflex Flash Indicator to enable and set up the Reflex Test framework.
4. Run Reflex tests
i. Run game.
1. Make sure game is running in full-screen exclusive.
2. Make sure VSYNC is disabled.
3. Make sure DLSS Frame Generation is disabled.
4. Make sure MSHybrid mode is not enabled.
ii. Turn Reflex to “On.”
iii. Press Alt + T in game to start the test (two beeps).
iv. Analyze results after the test is done (three beeps).
1. Test should take approximately five minutes.
2. Look for "PASSED."
v. Turn Reflex to “On + Boost”
vi. Press Alt + T in game to start the test (two beeps).
vii. Analyze results after the test is done (three beeps).
1. Test should take approximately five minutes.
2. Look for "PASSED."
viii. Press Ctrl + C in the command prompt to exit ReflexTest.exe.
5. Test that markers are always sent even when Reflex is off.
i. Run PrintPCL.exe in administrator mode command prompt.
ii. Turn Reflex to “Off.”
iii. Press Alt + T in game.
1. Look at the PCL value in the command prompt. Check to make sure the PCL value is not 0.0 and it is not a very large number (> 200 ms).
iv. Press Ctrl + C in the command prompt to exit PrintPCL.exe.
6. Test the Reflex Flash Indicator.
i. Verify the Reflex Flash Indicator is showing.
1. Notice the gray square that flashes when the left mouse button is pressed.
7. Check UI.
i. Verify UI follows the guidelines.
ii. Check the keybinding menu to make sure F13 is not being automatically applied when selecting a key.
8. Run ReflexTestCleanUp.bat in administrator mode command prompt.
This disables the Reflex Flash Indicator and the Reflex Test framework.
9. Test on other IHV, if available.
i. Install other IHV hardware.
ii. Install FrameView SDK.
iii. Run PrintPCL.exe in administrator mode command prompt.
iv. Run game.
v. Press Alt + T in game.
1. Look at the PCL value in the command prompt. If the value is not 0.0, the PCL is working.
vi. Press Ctrl + C in the command prompt to exit PrintPCL.exe.
Check to make sure Reflex UI is not available.
10. Send NVIDIA Reflex Test report and checklist results.
i. Email results to NVIDIA producer or customer manager.
Reflex Verification Checklist
Steps to verify that Reflex is integrated optimally.
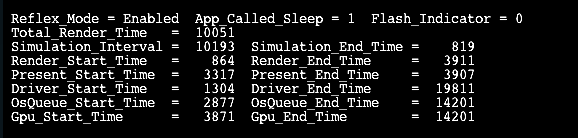
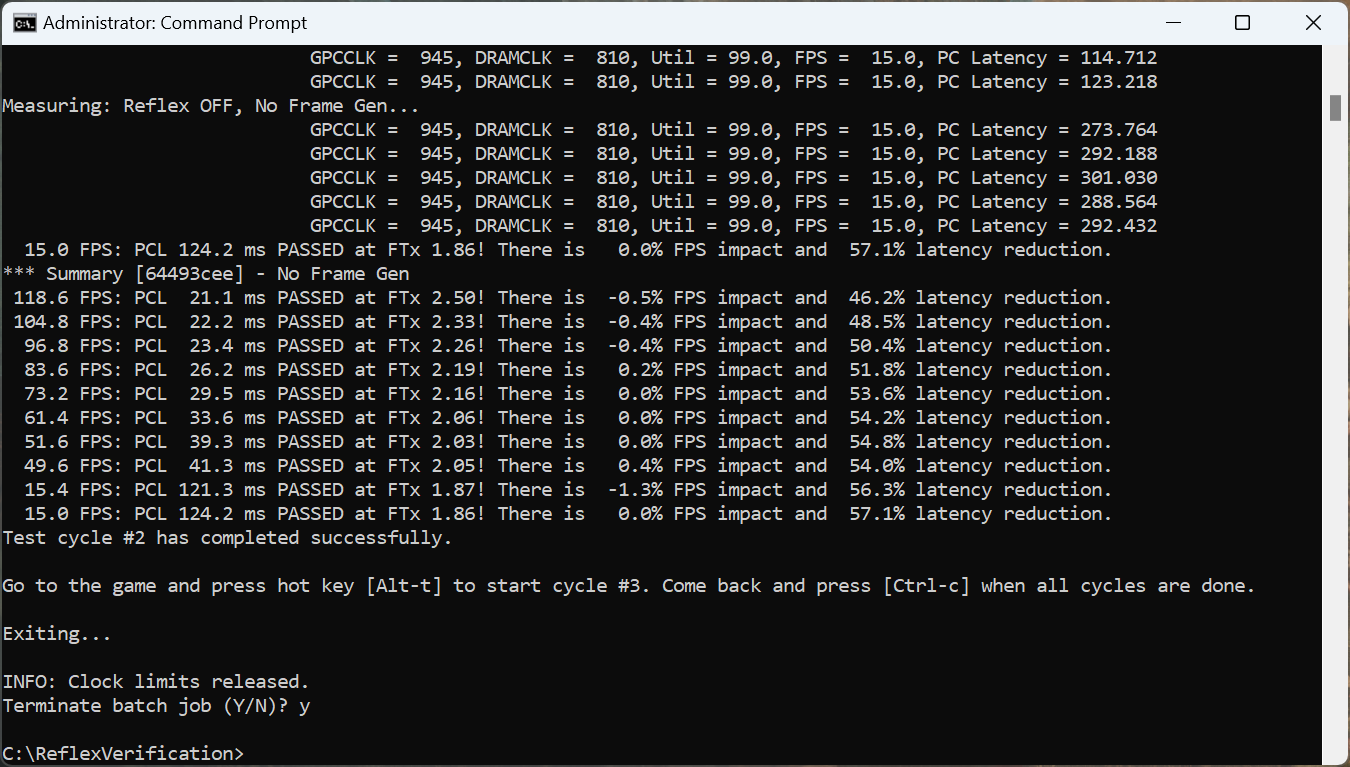
1. PC latency (PCL) in the Reflex Test Utility is higher than zero.
i. This means that some of the markers were not integrated correctly.
2. Reflex Test Utility Report has “PASSED” with Reflex on.
i. Indicates that Reflex worked correctly in ”on” or low-latency mode. Input latency should have gone down by at least 20%.
ii. Visualize marker placement in NSight Systems to help aid in debugging, including seeing the sim marker moving to JIT when Reflex is enabled vs. disabled.
3. Reflex does not significantly impact fps (more than 4%) when Reflex is on (On + Boost is expected to have some fps hit in exchange for the lowest latency).
i. Indicates your application might have a pacing mechanism blocking frame submission in addition to Reflex. Please ensure these waits are disabled when using Reflex.
4. Reflex Test Utility Report has “PASSED” with Reflex “On + Boost.”
Indicates that Reflex worked correctly in On + Boost or Low Latency + Boost mode. Input latency should have gone down by at least 20%.
5. Reflex markers are always sent regardless of Reflex Low Latency mode state.
i. In the absence of this, no PCL info will be given when Reflex is off (hence, it will be harder to compare latency savings from enabling Reflex). Do not disable Reflex when the feature is switched off in the UI. Instead, be sure to set Reflex to “Off” mode.
6. Reflex Flash Indicator appears when the left mouse button is pressed.
i. Flash Indicator + LDAT is the gold standard for measuring input latency. In the absence of the flash indicator, you’d have to rely on FrameView and other software methods only (which would not account for input latency of the mouse or the display latency of the monitor).
7. Reflex UI settings are following the UI guidelines.
i. Make operation intuitive and uniform for end users.
8. PCL is not 0.0 on other IHV hardware.
i. PCL, like fps, is a key metric for measuring the behavior or performance of an application. Allowing this metric to be reported across all GPU vendors or models allows all gamers to get accurate quantifiable data about their gaming experience.
9. Reflex UI settings are disabled or unavailable on other IHV hardware.
i. Reflex Low Latency Mode and Boost mode are only supported on NVIDIA GPUs. They will act as no-ops on other IHV hardware. Avoid confusing end users by disabling the UI in unsupported cases.
ii. Reflex plugin must be enabled on all GPU vendors. Only the low latency mode is exclusive to GeForce GPUs.
10. PC latency (PCL) in the Reflex Test Utility is higher than zero.
i. This means that some of the markers were not integrated correctly.
11. Reflex Test Utility Report has “PASSED” with Reflex on.
i. Indicates that Reflex worked correctly in ”on” or low-latency mode. Input latency should have gone down by at least 20%.
ii. Visualize marker placement in NSight Systems to help aid in debugging, including seeing the sim marker moving to JIT when Reflex is enabled vs. disabled.
12. Reflex does not significantly impact fps (more than 4%) when Reflex is on (On + Boost is expected to have some fps hit in exchange for the lowest latency).
i. Indicates your application might have a pacing mechanism blocking frame submission in addition to Reflex. Please ensure these waits are disabled when using Reflex.
13. Reflex Test Utility Report has “PASSED” with Reflex “On + Boost.”
i. Indicates that Reflex worked correctly in On + Boost or Low Latency + Boost mode. Input latency should have gone down by at least 20%.
14. Reflex markers are always sent regardless of Reflex Low Latency mode state.
i. In the absence of this, no PCL info will be given when Reflex is off (hence, it will be harder to compare latency savings from enabling Reflex). Do not disable Reflex when the feature is switched off in the UI. Instead, be sure to set Reflex to “Off” mode.
15. Reflex Flash Indicator appears when the left mouse button is pressed.
i. Flash Indicator + LDAT is the gold standard for measuring input latency. In the absence of the flash indicator, you’d have to rely on FrameView and other software methods only (which would not account for input latency of the mouse or the display latency of the monitor).
16. Reflex UI settings are following the UI guidelines.
i. Make operation intuitive and uniform for end users.
17. PCL is not 0.0 on other IHV hardware.
i. PCL, like fps, is a key metric for measuring the behavior or performance of an application. Allowing this metric to be reported across all GPU vendors or models allows all gamers to get accurate quantifiable data about their gaming experience.
18. Reflex UI settings are disabled or unavailable on other IHV hardware.
i. Reflex Low Latency Mode and Boost mode are only supported on NVIDIA GPUs. They will act as no-ops on other IHV hardware. Avoid confusing end users by disabling the UI in unsupported cases.
ii. Reflex plugin must be enabled on all GPU vendors. Only the low latency mode is exclusive to GeForce GPUs.
19. PC latency (PCL) in the Reflex Test Utility is higher than zero.
i. This means that some of the markers were not integrated correctly.
20. Reflex Test Utility Report has “PASSED” with Reflex on.
i. Indicates that Reflex worked correctly in ”on” or low-latency mode. Input latency should have gone down by at least 20%.
ii. Visualize marker placement in NSight Systems to help aid in debugging, including seeing the sim marker moving to JIT when Reflex is enabled vs. disabled.
21. Reflex does not significantly impact fps (more than 4%) when Reflex is on (On + Boost is expected to have some fps hit in exchange for the lowest latency).
i. Indicates your application might have a pacing mechanism blocking frame submission in addition to Reflex. Please ensure these waits are disabled when using Reflex.
22. Reflex Test Utility Report has “PASSED” with Reflex “On + Boost.”
i. Indicates that Reflex worked correctly in On + Boost or Low Latency + Boost mode. Input latency should have gone down by at least 20%.
23. Reflex markers are always sent regardless of Reflex Low Latency mode state.
i. In the absence of this, no PCL info will be given when Reflex is off (hence, it will be harder to compare latency savings from enabling Reflex). Do not disable Reflex when the feature is switched off in the UI. Instead, be sure to set Reflex to “Off” mode.
24. Reflex Flash Indicator appears when the left mouse button is pressed.
i. Flash Indicator + LDAT is the gold standard for measuring input latency. In the absence of the flash indicator, you’d have to rely on FrameView and other software methods only (which would not account for input latency of the mouse or the display latency of the monitor).
25. Reflex UI settings are following the UI guidelines.
i. Make operation intuitive and uniform for end users.
26. PCL is not 0.0 on other IHV hardware.
i. PCL, like fps, is a key metric for measuring the behavior or performance of an application. Allowing this metric to be reported across all GPU vendors or models allows all gamers to get accurate quantifiable data about their gaming experience.
27. Reflex UI settings are disabled or unavailable on other IHV hardware.
i. Reflex Low Latency Mode and Boost mode are only supported on NVIDIA GPUs. They will act as no-ops on other IHV hardware. Avoid confusing end users by disabling the UI in unsupported cases.
ii. Reflex plugin must be enabled on all GPU vendors. Only the low latency mode is exclusive to GeForce GPUs.
Reflex Integration FAQ
A: Do not do any GPU hardware, vendor, or driver version checks. As long as the Reflex plugin is supported, always make all set feature constants and evaluate feature calls to the Reflex Streamline plugin.
- The Reflex Streamline plugin handles all such abstractions. It is completely transparent to the game.
- PCL Stats requires the constants and the markers to properly measure PC latency. It works for all GPU hardware, vendors, and driver versions.
- Reflex Low Latency mode does not work for all GPU hardware, vendors, and drivers versions, but it is already abstracted by the Reflex Streamline plugin.
- The game only needs to disable/enable the Reflex Low Latency UI using the lowLatencyAvailable setting, as detailed below.
- It is important to measure latency, even without Reflex Low Latency.
A: At least one set feature constants call must be made for PCL Stats to initialize and start working.
- Sometimes, without the Reflex UI on non-NVIDIA GPUs (because lowLatencyAvailable == false), the game may not call set feature constants at all. That may be what’s missing.
A: Do not skip any Reflex calls when Reflex Low Latency mode is set to “Off.”
- The markers are also used to measure latency.
- It is important to measure latency, even when Reflex Low Latency mode is off.
A: The game should check lowLatencyAvailable to determine whether to show the Reflex Low Latency UI.
- Use lowLatencyAvailable for UI only. As long as the Reflex Streamline plugin is supported, the game should do everything else Reflex-related the same way, even when lowLatencyAvailable is false.
A: Having Reflex on should not impact more than 4% fps. Reflex On + Boost should not impact more than 7% fps.
- If the impact is slightly higher, please contact your producer or customer manager so they can file a bug and have the driver team investigate further.
- If the impact is significantly higher, please read on.
If it repros On + Boost only, the likely cause is render thread bound optimization (RTBO).
- Another symptom is that fps is capped at 30.
- Try setting bUseMarkersToOptimize = false to verify if the issue goes away.
- This can happen if the time within render submit start and render submit end/present end markers increases as Reflex sleep increases.
- The problem can usually be avoided by having better render submit and present start/end markers. But some games may not be compatible with RTBO and cannot set bUseMarkersTopOptimize = true.
If fps is capped at 15, it is likely a Reflex controller issue that the driver team should investigate.
Huge fps impact is likely caused by the game calling Reflex sleep more than once per frame.
- This can happen if the game—at some point after Reflex sleep and before simulation starts—decides to restart the frame from the beginning. In that case, the Reflex sleep might have been called twice or more, impacting the fps greatly.
- Without Reflex sleep, restarting the frame from the beginning and repeating the input message and other steps before the check would have no problem. But with Reflex sleep, restarting a frame would call it and sleep multiple times, which is problematic.
- A possible solution in this case is to make sure to not call Reflex sleep more than once before simulation starts.
A: Please refer to the following table:
| Feature | GPU IHV | GPU HW | Driver Version | Support Check | Key Setting / Marker |
| Reflex Low Latenc | NVIDIA Only | GeForce 900 Series and newer | 456.38 or higher | sl::ReflexSettings::lowLatencyAvailable | sl::ReflexConstants::mode |
| Auto-Configure Reflex Analyzer | NVIDIA Only | GeForce 900 Series and newer | 521.60 or higher | sl::ReflexSettings::flashIndicatorDriverControlled | sl::ReflexMarker::eReflexMarkerTriggerFlash |
| Frame Rate Limiter | NVIDIA Only | All | All | Always | sl::ReflexConstants::frameLimitUs |
| PC Latency Stats | All | All | All | Always | sl::ReflexMarker::eReflexMarkerPCLatencyPing |
NOTE: The sub-features are distinct to each other without any cross-dependencies. Everything is abstracted within the plugin and is transparent to the application. The application should not explicitly check for GPU hardware, vendor, and driver version. The application should do everything the same, regardless of sub-feature support and enablement. The only two exceptions are Reflex UI and Reflex Flash Indicator. The application must disable Reflex UI based on sl::ReflexSettings::lowLatencyAvailable. And the application must not send sl::ReflexMarker::eReflexMarkerTriggerFlash when sl::ReflexSettings::flashIndicatorDriverControlled is false.
A: Quickly and easily verify Reflex is enabled and functioning properly by running a simple test found within the NVIDIA Reflex SDK.
1. Browse to “Reflex_Verification” folder.
2. Open Command Prompt (run as Administrator) and run FVSKSetup.exe.
3. From Command Prompt (run as Administrator), run ReflexTestSetup.bat.
4. Start game. The Reflex Verification HUD in-game will show whether Reflex is enabled.
5. Press “ALT+T” to start test (two beeps).
6. After ~5min, test should be done (three beeps).
7. Reference the Command Prompt and ensure “passed.”
Resources
NVIDIA Developer Program
Access all the tools and training critical to accelerating applications on NVIDIA technology platforms.
Join TodayNVIDIA Developer Forums
Explore community conversations about using NVIDIA game development tools and SDKs.
Visit Forums