Jetson Orin Nano Developer Kit Getting Started Guide
Introduction
The NVIDIA® Jetson Orin Nano™ Developer Kit empowers the development of AI-powered robots, smart drones, and intelligent cameras built on the Jetson Orin series.
With the December 2024 software update, this advanced edge computer delivers up to 70% more performance, making it an even more powerful platform for the era of generative AI.
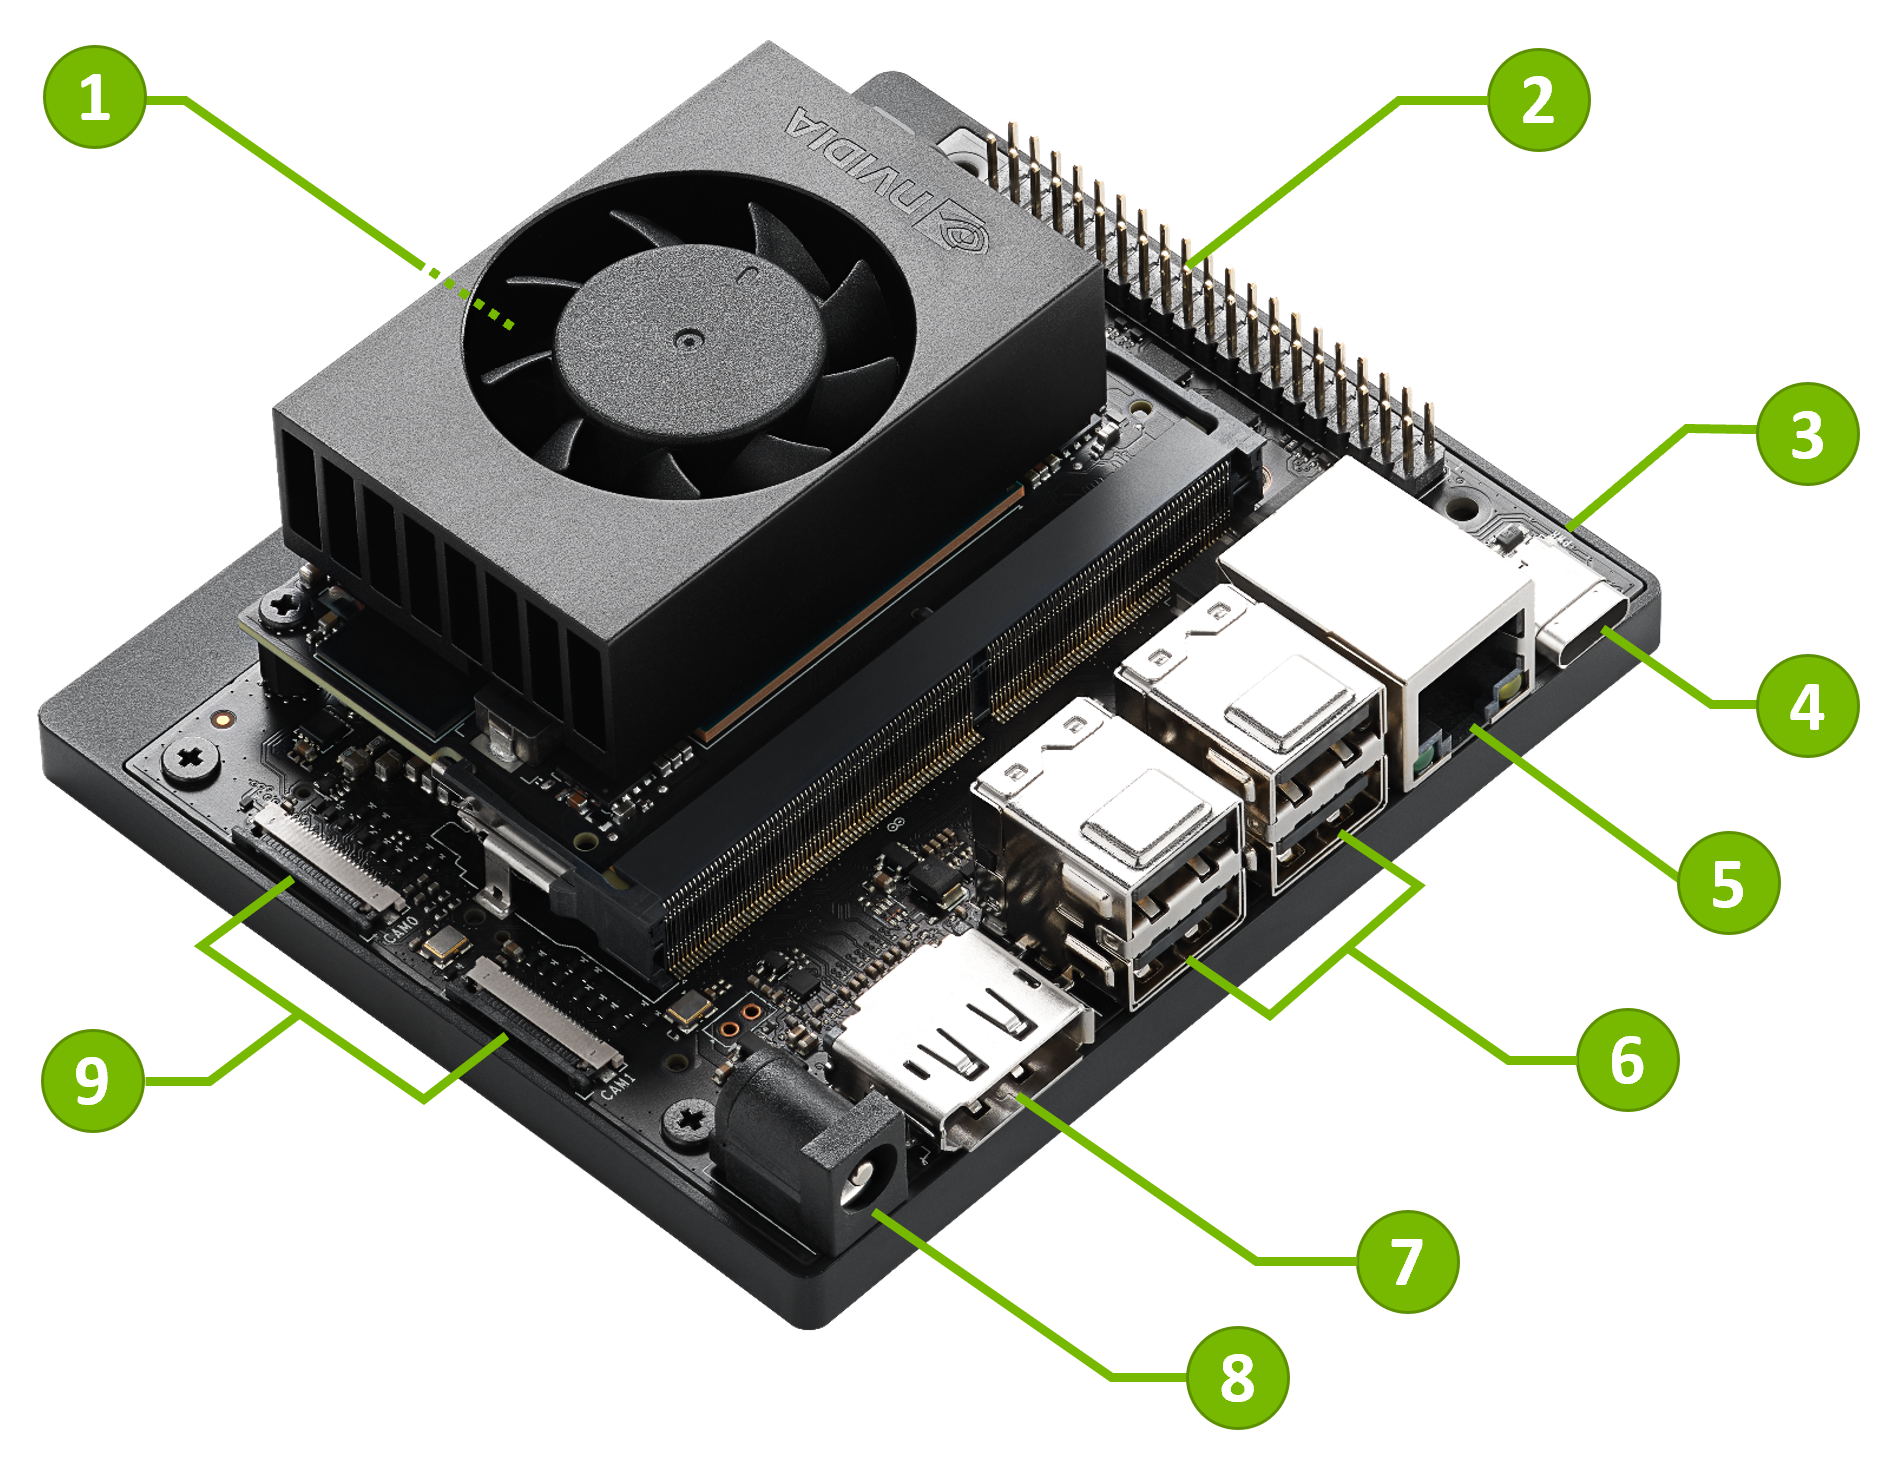
- microSD card slot for main storage
- 40-pin expansion header
- Power indicator LED
- USB-C port for data only
- Gigabit Ethernet port
- USB 3.1 Type A ports (x4)
- DisplayPort connector
- DC Barrel jack for 19V power input
- MIPI CSI camera connectors
Included in the Box
- Jetson Orin Nano module with microSD card slot
- Reference carrier board
(includes 802.11 plug-in WLAN & BT module preinstalled with antenna) - 19V power supply
- A small paper card with quick start and support information
Items not Included
- microSD card (64GB UHS-1 or bigger recommended)
- USB keyboard and mouse
- Computer display
- USB cable
Initially, a computer with Internet connection and the ability to flash your microSD card is also required.
⚠️ Update the Firmware [If Needed]
Your Jetson Orin Nano Developer Kit comes with an old firmware flashed at the factory, which is NOT compatible with JetPack 6.x.
Therefore, you must upgrade to the latest firmware, before inserting SD card flashed with JetPack 6.x image (unless the firmware previously updated).
Update your firmware using SD card
You can now upgrade your Jetson to the latest firmware without needing a host Ubuntu PC.
Follow the steps on this page
to update the firmware using JetPack 5.1.3 SD card.
Follow the instructions here >
Once you have confirmed that your Jetson Orin Nano Developer Kit is running the latest firmware compatible with JetPack 6.x, you can proceed to the next step.
Write Image to the microSD Card
To prepare your microSD card, you’ll need a computer with Internet connection and the ability to read and write SD cards, either via a built-in SD card slot or adapter.
- Download the Jetson Orin Nano Developer Kit SD Card image from JetPack SDK Page , and note where it was saved on the computer.
- Write the image to your microSD card by following the instructions below according to the type of computer you are using: Windows, Mac, or Linux.
Check
Format your microSD card using SD Memory Card Formatter from the SD Association.

- Download, install, and launch SD Memory Card Formatter for Windows.
- Select card drive
- Select “Quick format”
- Leave “Volume label” blank
- Click “Format” to start formatting, and “Yes” on the warning dialog
Use Etcher to write the SD card image to your microSD card
- Download, install, and launch Etcher.

- Click “Select image” and choose the zipped image file downloaded earlier.
- Insert your microSD card if not already inserted.
Click Cancel (per this explanation) if Windows prompts you with a dialog like this:
- Click “Select drive” and choose the correct device.

- Click “Flash!” It will take Etcher about 15 minutes to write and validate the image if your microSD card is connected via USB3.
- After Etcher finishes, Windows may let you know it doesn’t know how to read the SD Card. Just click Cancel and remove the microSD card.

After your microSD card is ready, proceed to set up your developer kit.
Check
You can either write the SD card image using a graphical program like Etcher, or via command line.
Etcher Instructions
- Do not insert your microSD card yet.
- Download, install, and launch Etcher.

- Click “Select image” and choose the zipped image file downloaded earlier.
- Insert your microSD card. Click Ignore if your Mac shows this window:

- If you have no other external drives attached, Etcher will automatically select the microSD card as target device. Otherwise, click “Select drive” and choose the correct device.
- Click “Flash!” Your Mac may prompt for your username and password before it allows Etcher to proceed
It will take Etcher about 10 minutes to write and validate the image if your microSD card is connected via USB3.

- After Etcher finishes, your Mac may let you know it doesn’t know how to read the SD Card. Just click Eject and remove the microSD card.
Command Line Instructions
- Do not insert your microSD card yet. Waiting will help you discover correct disk device name in steps below.
- Open the Terminal app:

-
Use this command to list any external disk devices already attached to your Mac:
diskutil list external | fgrep '/dev/disk'
For example, if you already have a USB drive attached to your Mac, the result will look similar to this:
- Insert your microSD card. Click Ignore if your Mac shows this window:
- Use the same command as before to list external disk devices. The newly listed disk device is the microSD card (/dev/disk2 in this example):

- Use this command to remove any existing partitions from the microSD card, ensuring MacOS will let you write to it. BE VERY CAREFUL to specify the correct disk device.
sudo diskutil partitionDisk /dev/disk<n> 1 GPT "Free Space" "%noformat%" 100%
For example:
- Use this command to write the zipped SD card image to the microSD card. Note the use of /dev/rdisk instead of /dev/disk:
/usr/bin/unzip -p ~/Downloads/jetson_nano_devkit_sd_card.zip | sudo /bin/dd of=/dev/rdisk<n> bs=1m
For example:
- There will be no indication of progress (unless you signal with CTRL-t). When the dd command finishes, your Mac will let you know it cannot read the microSD card. Just click Eject:
After your microSD card is ready, proceed to set up your developer kit.
Check
You can either write the SD card image using a graphical program like Etcher, or via command line.
Etcher Instructions
- Download, install, and launch Etcher.

- Click “Select image” and choose the zipped image file downloaded earlier.
- Insert your microSD card. If you have no other external drives attached, Etcher will automatically select the microSD card as target device. Otherwise, click “Change” and choose the correct device.

- Click “Flash!” Your OS may prompt for your username and password before it allows Etcher to proceed.
It will take Etcher 10-15 minutes to write and validate the image if your microSD card is connected via USB3.

- After Etcher finishes, eject the SD Card using Files application:

- Physically remove microSD card from the computer.
Command Line Instructions
- Open the Terminal application by pressing Ctrl + Alt + t.
- Insert your microSD card, then use a command like this to show which disk device was assigned to it:
In this example, we can see the 16GB microSD card was assigned /dev/sda:dmesg | tail | awk '$3 == "sd" {print}'
- Use this command to write the zipped SD card image to the microSD card:
For example:/usr/bin/unzip -p ~/Downloads/jetson_nano_devkit_sd_card.zip | sudo /bin/dd of=/dev/sd<x> bs=1M status=progressWhen the dd command finishes, eject the disk device from the command line:
sudo eject /dev/sd<x> - Physically remove microSD card from the computer.
After your microSD card is ready, proceed to Setup your developer kit.
After your microSD card is ready, proceed to set up your developer kit.
Setup and First Boot
Setup Steps
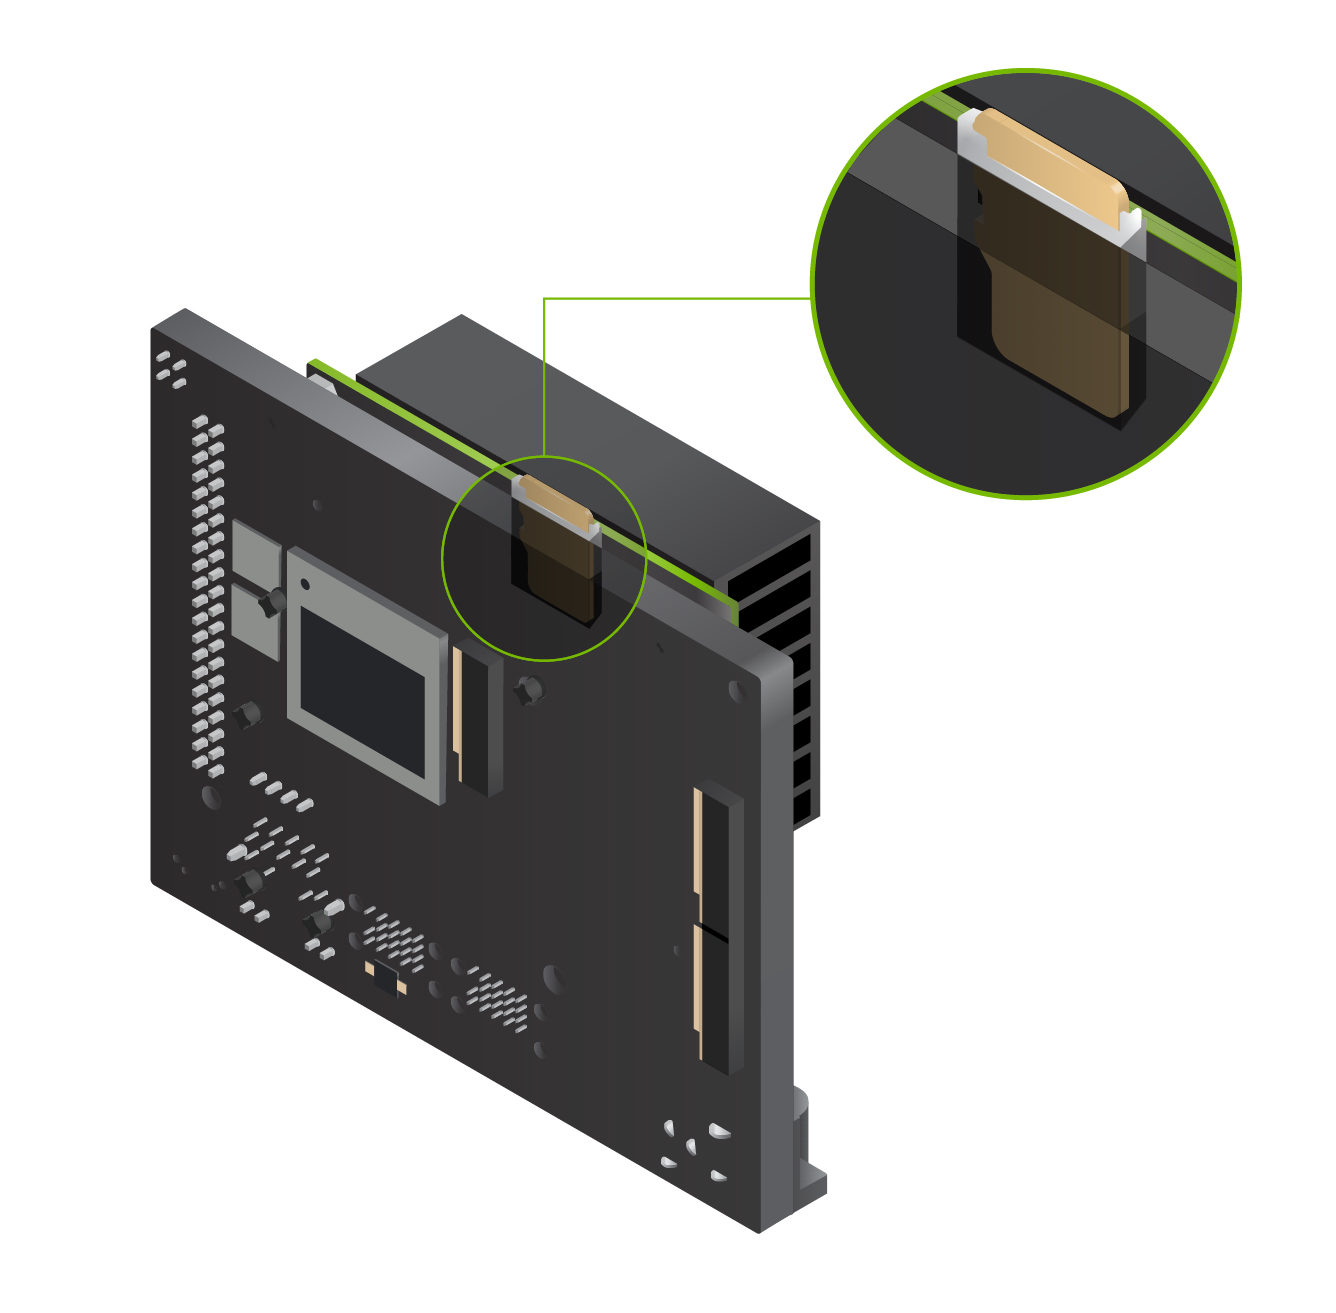
- Insert the microSD card (with system image already written to it) into the slot on the underside of the Jetson Orin Nano module.
- Power on your computer display and connect it.
- Connect the USB keyboard and mouse.
- Connect the provided power supply. The Jetson Orin Nano Developer Kit will power on and boot automatically.
First Boot
A green LED next to the USB-C connector will light as soon as the developer kit powers on. When you boot the first time, the Jetson Orin Nano Developer Kit will take you through some initial setup, including:
- Review and accept NVIDIA Jetson software EULA
- Select system language, keyboard layout, and time zone
- Connect to Wireless network
- Create username, password, and computer name
- Log in
After Logging In
You will see this screen. Congratulations!

Unlocking Super Performance
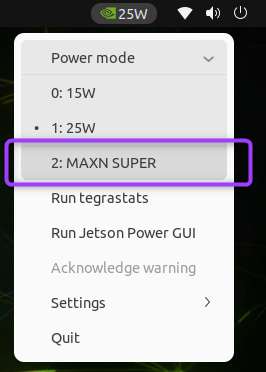
Switch to MAXN SUPER mode
Note that the default power mode is “25W”. To switch to the unregulated MAXN SUPER performance, refer below steps:
- Click on the current power mode (25W mode) by clicking the NVIDIA icon on the right side of the Ubuntu desktop’s top bar.
- Select Power Mode from the menu.
- Choose MAXN SUPER to enable maximum performance.
Next Steps
Find Your Way Around
- Read the Jetson Orin Nano Developer Kit User Guide, which includes:
- Many more details about the developer kit hardware
- Overview of NVIDIA JetPack, and ways to flash the developer kit
- Head to the NVIDIA Jetson Developer site for access to all Jetson platform information.
- Ask questions or share a project on the NVIDIA Jetson Forums.
Jetson AI Lab
- Discover exciting Generative AI applications and models on Jetson AI Lab!
Follow the tutorials to run them on your Jetson Orin Nano Developer Kit to experience.- Ollama with Open Web UI: Introductory LLM application example
- NanoOWL: Interactive demo with cutting-edge ViT model.
- LeRobot: Physical AI example with HuggingFace LeRobot