Fluid Simulation in Alice: Madness Returns
by Simon Green, Richard Tonge, Miguel Sainz, Dane Johnston, and David Schoemehl
Note: This is a technical article that complements our consumer-oriented article on GeForce.com, "Alice: Madness Returns PhysX Comparison."
A PDF version of the article can be found here.
Overview
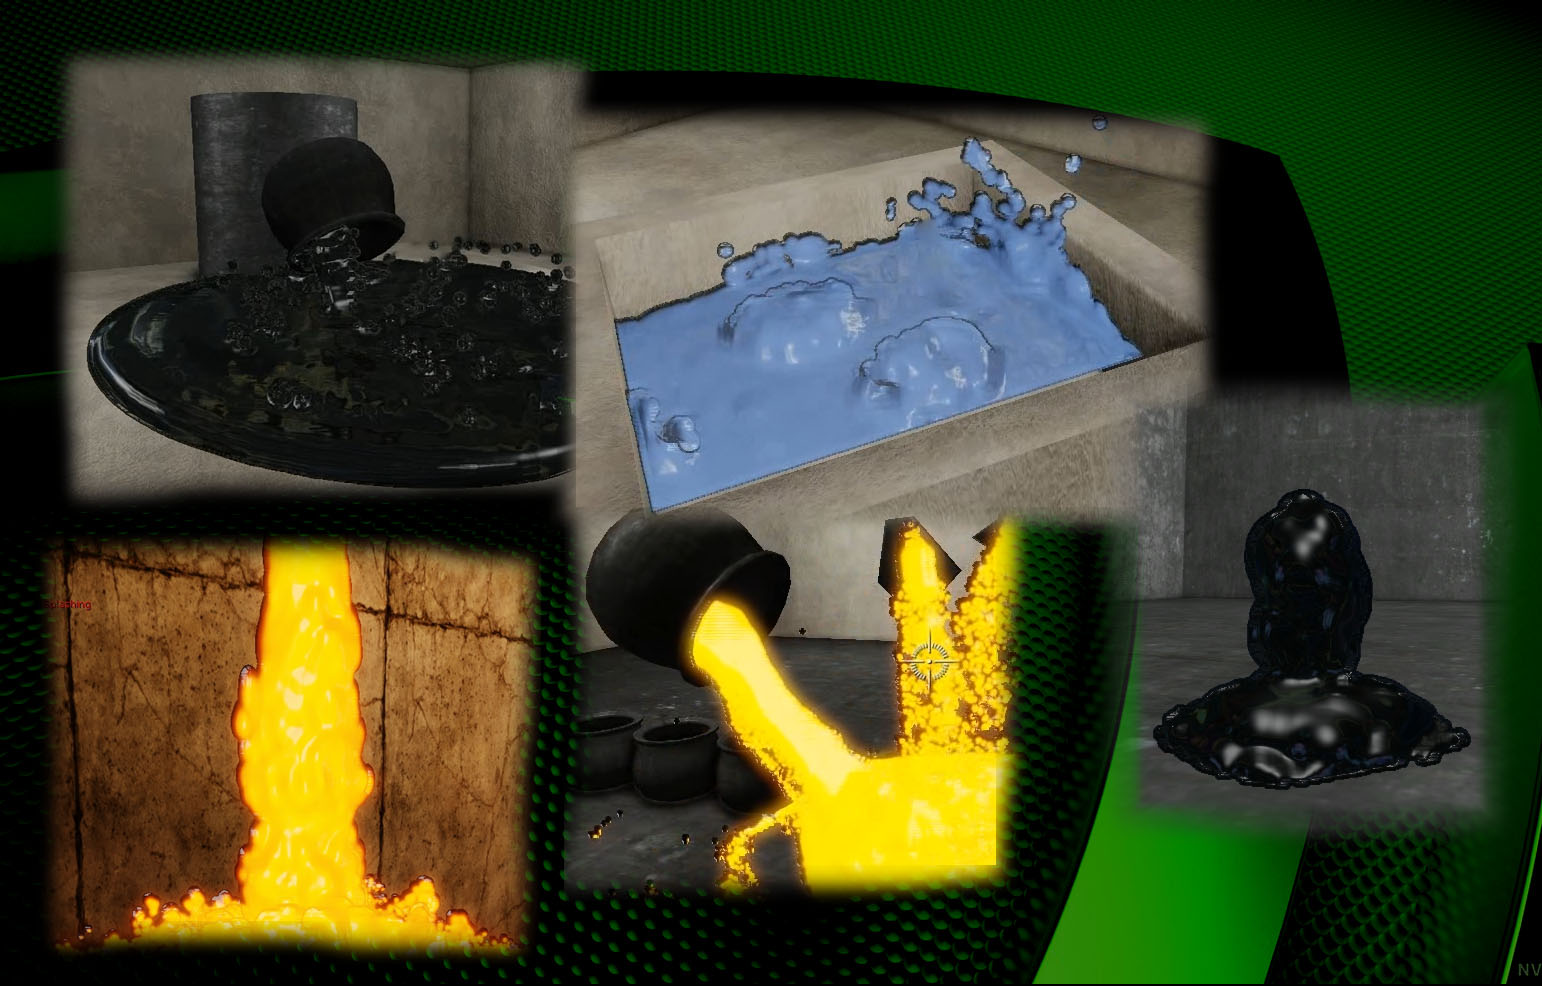
If you’ve had a chance to play “Alice: Madness Returns” with the high NVIDIA® PhysX® setting you’ve undoubtedly noticed the black goop oozing from the various Doom enemies. Developer Spicy Horse Games was originally working on such an effect for their game but struggling with a solution that provided both the look and performance needed on consoles and PC. By working with NVIDIA's Developer Technology (DevTech) team they were able to create a convincing fluid effect using a simulation technique called Smoothed Particle Hydrodynamics and an image based rendering technique both accelerated on the GPU. Simulating fluid as a set of particles that interact with each other, rather than moving independently as in other games, Smoothed Particle Hydrodynamics allows fluid to collide with and flow over the static environment and move realistically when a solid object or character interacts with it. The density of the fluid is constantly measured at each particle based on the number of neighboring particles within a certain radius. The particles move in such a way to keep the density constant. When an object or the ground interrupts the motion of the fluid, the shifted particles become temporarily denser than the main body of the liquid, resulting in a puddle or splash depending on the calculated forces. In Alice, a complex scene can have over 10,000 simultaneous particles being simulated and rendered in total. These kind of effects can only be achieved at interactive framerates by leveraging the massively parallel power of the GPU.
Explaining the difference between the fluid in Alice: Madness Returns and fluids in other games (such as Portal 2's gels, which impressed many a player and were achieved even on consoles), NVIDIA's David Schoemehl explains that, "the most noticeable difference with the fluid in Alice is that it does not become a decal when it hits the ground; it is constantly interacting with the ground, objects and player in order to provide the user with a truly immersive effect." Since these kind of PhysX effects can be taxing on a machine without proper GPU acceleration this effect was offered as a feature on the high PhysX setting.
Creating Content for the Fluid Effect
Creating the oil effect for Alice: Madness Returns was a multiple step process. The DevTech team started by getting the visual effect correct based on the artwork and assets that Spicy Horse had already created. The emphasis here is on getting the colors, the reflections, and the thickness all setup so that the oil will fit with the existing oil effects in the game. Once the visuals look correct, the physical fluid parameters are adjusted so that the fluid behaves correctly. This involves adjusting a small set of parameters on the fluid simulation so that you get proper viscosity, friction and density of the fluid. Changing these parameters can make the fluid feel thicker or change how quickly it flows over a surface. This will also have an impact on how it reacts when a player runs through it or when other objects come into contact with the fluid. Once everything is tuned, it is simply a matter of connecting it into the game so that the black oil will spawn at the appropriate times. This pattern can be easily replicated for fluids of other viscosity and stickiness.
Making Fluid Behave Like Fluid
Smoothed Particle Hydrodynamics(SPH) is a method for simulating a fluid as a set of moving particles. A YouTube video can be seen here that shows simulated water flow effects using SPH. Representing fluids as particles is quite convenient, as games have a long history of using particles for other types of effects. The kinds of fluids we like to simulate in games (such as water and goop) are almost incompressible in real life, but with a particle system it is natural to model them as compressible fluids that happen to be very stiff. The “nature” of an SPH fluid is determined by a so called equation of state and the equation of state used by PhysX is one that drives the particles towards a desired rest spacing, or rest density. Maintaining the target rest density gives the illusion that the fluid is incompressible.
In PhysX, fluids are simulated using the following 3 Stage process:
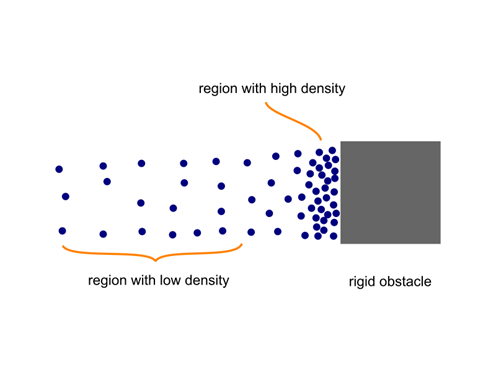
First, we check particles for collision against the static environment and if necessary move them out of solid objects. Responding to such collisions allows the fluid to interact with the terrain, objects and characters in the scene providing a more immersive experience for the user. In Alice: Madness Returns you can see this as the black goop hits the ground or characters walk through it.
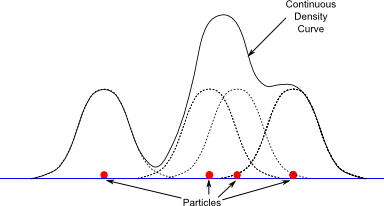
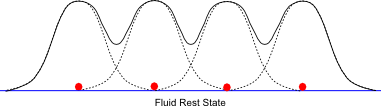
Second, while the previous step is common to other types of particle systems, this step is where the real SPH work happens. The goal is to drive the particles towards a desired rest density, so we must first define what we mean by density, and then calculate that at each particle position in the fluid. We want the density at each particle to be influenced by the number of neighboring particles within a certain radius. That is the closer a particle is to its neighbors, the higher we want the measured density to be. Also, we'd like this density to vary smoothly as the particles move around. In SPH, the density at each point (the density field) is calculated by placing a Gaussian shaped splat at each particle position and summing them together. The following graph shows how this works in 1D. The X axis is distance from the origin, and the Y axis is the density. Notice that the density is highest for the two particles in the center that are closest together.
Third, once we know the density at each particle, we apply the equation of state to calculate the pressure at each particle. In PhysX, the equation of state is simply the distance the density is from the rest density scaled by a constant. We then apply forces to move the particles from areas of high pressure to areas of low pressure.
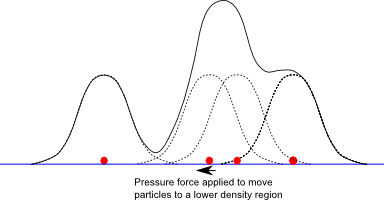
When particles hit a static object (stage 1), their densities become temporarily larger than the rest density (stage 2), so the only way to maintain the rest density (stage 3) is for this stage to move them sideways. This results in a puddle or splash, which shows the incompressible nature of the fluid and adds to the realism of the scene.
The PhysX SPH simulation is implemented on the GPU using the CUDA programming language, using a GPU thread for each individual particle. This enables tens of thousands of particles to be computed in parallel.
The amount of particles used to simulate the goop in Alice: Madness Returns can reach over 10,000. When running with NVIDIA GPUs this simulation is hardware accelerated, which provides a considerable performance boost. The hardware acceleration is what allows Alice: Madness Returns to maintain a smooth frame rate while running this complex simulation with this high number of particles.
The video below highlights the fluid effects we will discuss in detail below.
Rendering of Fluid Particles
Rendering particle based fluids is quite difficult, since the simulation does not naturally generate a surface. The focus of the simulation is on particle positions and density.
The traditional approach is to use marching cubes by generating a density field from the particles, and the extract a polygon mesh “iso surface”. This is a very expensive process that although can be done in the GPU, it will not produce the desired detail while keeping the frame rate at playable levels.
The approached followed in Alice is to use a screen space fluid rendering technique that will generate the surface closest to the point of view of the player.
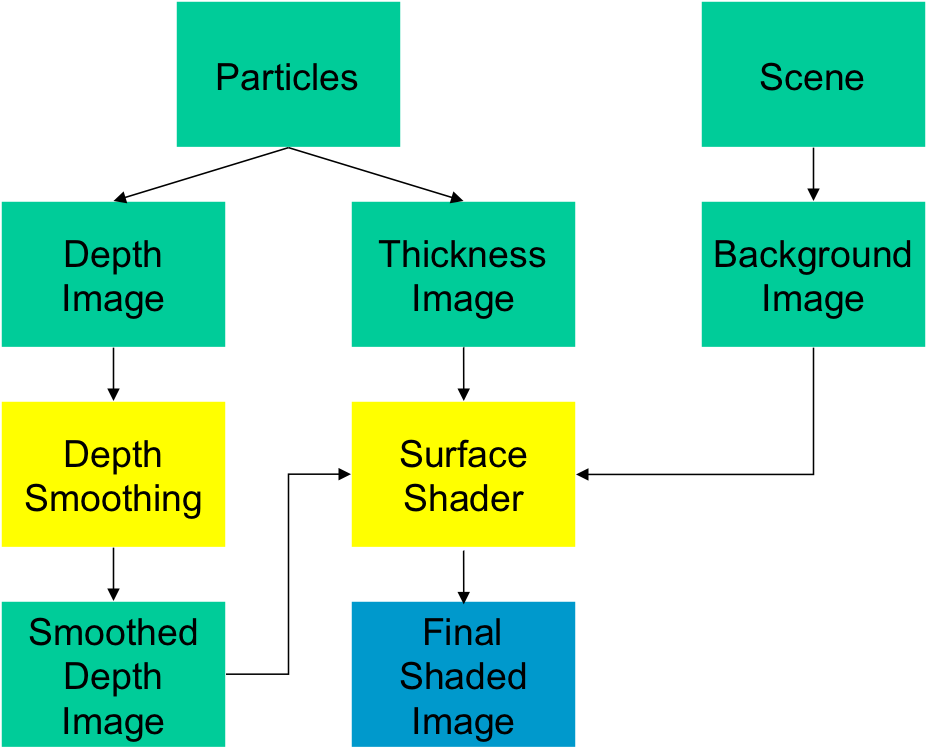
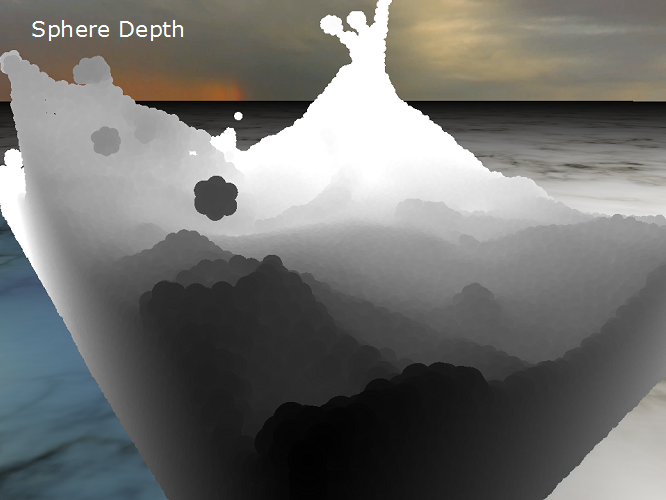
As illustrated in the figure, the first step of the algorithm is to generate a depth buffer that will contain the pixels of the surface of the fluid. This is achieved by rendering the particles as point sprites (quads) with a variable size in screen space (but constant in world space). In the pixel shader we compute the real depth of each pixel of the spheres and output it to a floating point render target.
![]()
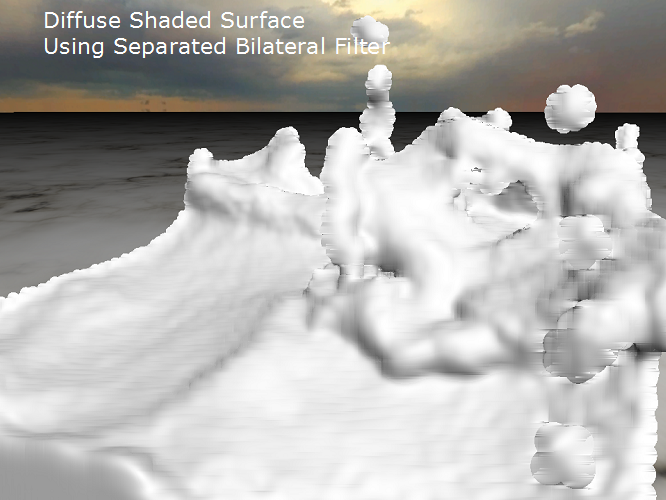
Once we have the depth buffer of the pixel on the surface of the fluid, we blur it to generate a smooth surface and remove the appearance of the individual spheres. We do this by applying a two pass bilateral filter that preserves sharp discontinuities in depth, while blurring the smoothly varying depth areas.
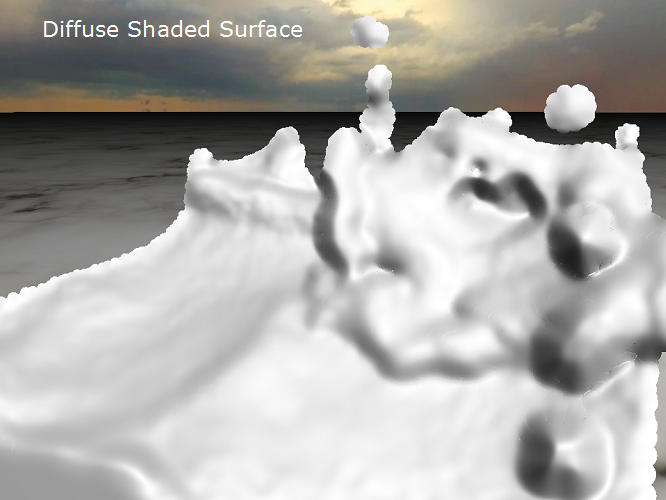
As we can see above, the result of a naïve blurring does produce a overall smoother image, but does blur the edges between overlapping layers of fluid, which is not desirable. The bilateral filter, does not smooth as strong but does preserve edges, hence this is the chosen solution. The effect can be seen in the diffuse shaded images below.
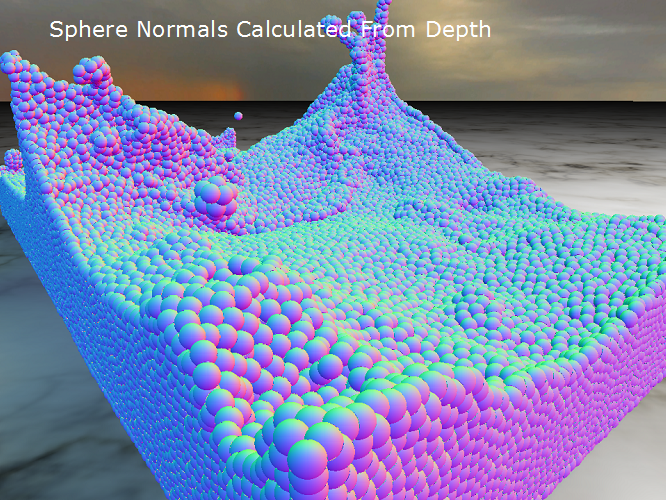
In order to shade fluid surface, we need a smooth surface normal, so in a second full screen pass, the normal of each pixel is computed from the depth and written to a separate render target. This normal is computed using partial differences of the depth, by looking at the depth values of neighboring pixels. Edges can be tricky and need to be treated separately.
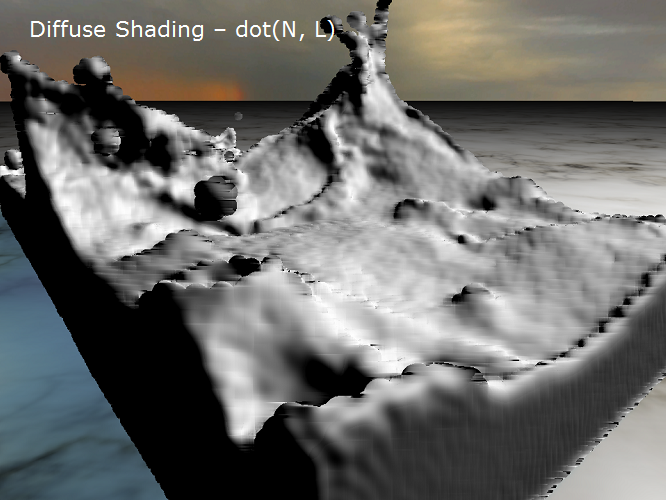
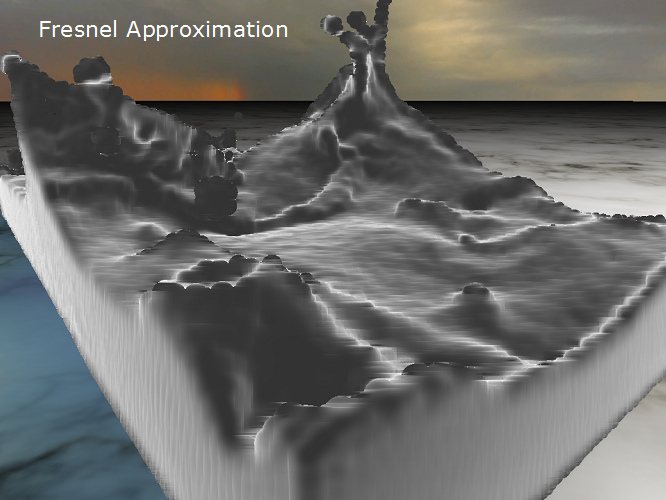
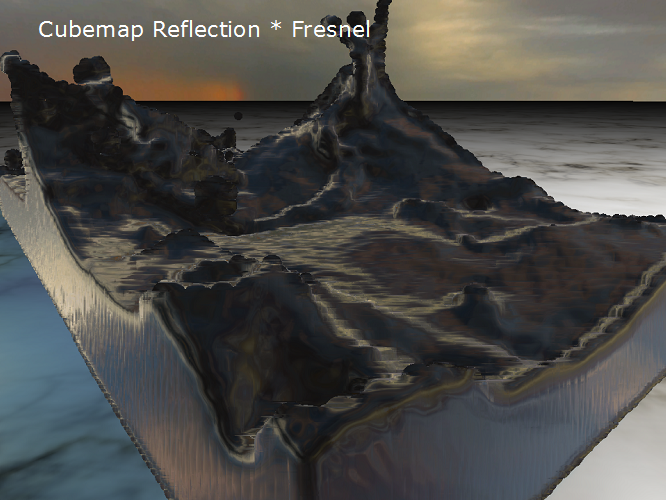
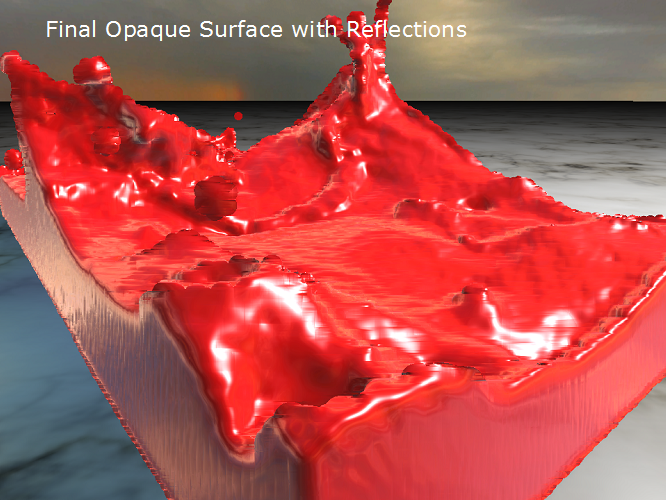
At this point we have a smooth surface position (calculated from the depth) and normal, and can proceed to shading the surface by rendering a full screen quad and computing fluid color per pixel. We can easily add effects like Fresnel and reflections on top of the diffuse pass
Original particle simulation rendered as spheres
![]()
Depth buffer of the particles
Normal buffer of the particles
Diffuse shading N dot L
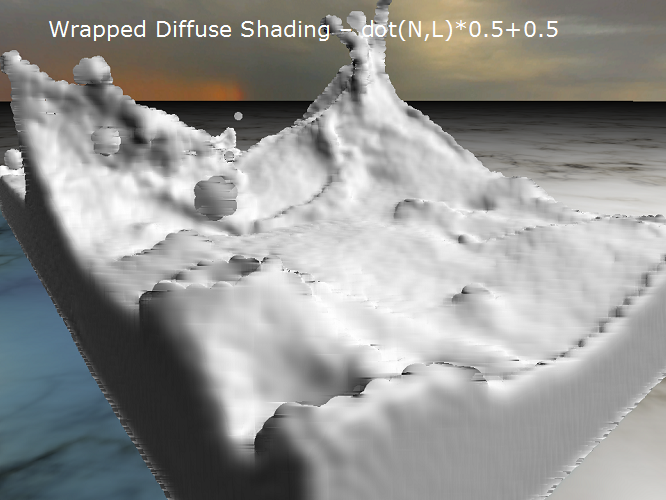
Wrapped diffuse shading (N dot L ) * 0.5 + 0.5
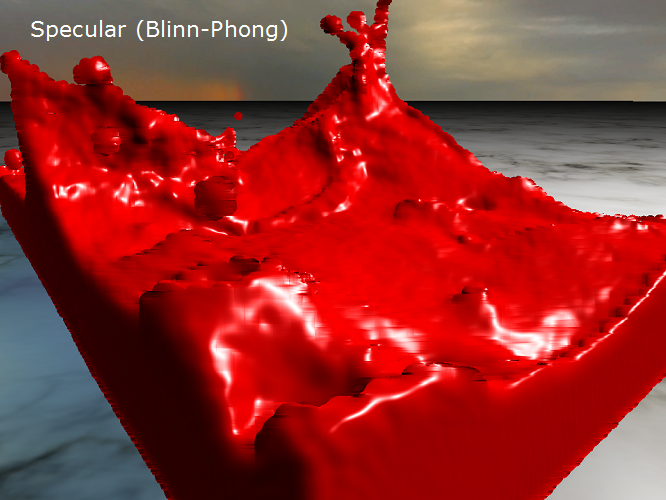
Specular
Fresnel
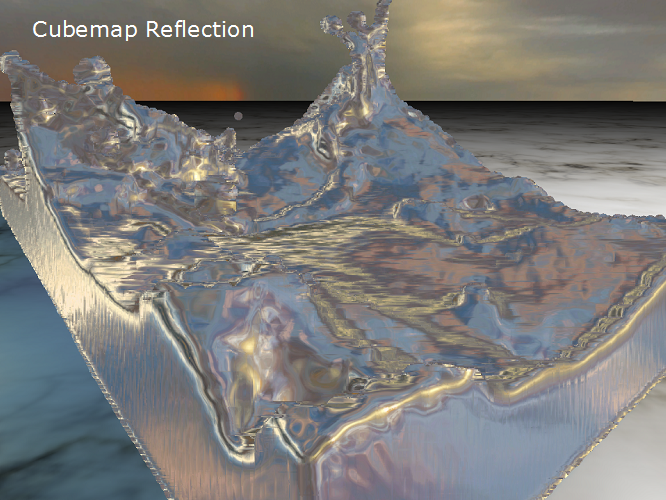
Cubemap reflection
Cubemap reflection * Fresnel
All together
Fluids are often transparent, but this rendering approach only generates the surface of the fluid closest to the camera, which can produce an unnatural look if transparency is enabled. The solution is to add an additional pass parallel to the generation of the depth surface to compute a thickness parameter for the fluid. Then we can render it as a semi-opaque surface using this thickness to attenuate the color.
To generate the thickness, we render all the particles using additive blending (no depth test). Particles are rendered as discs and the result is then blurred. We only need an approximation; so to make this very expensive pass we can even compute it at lower resolution.
![]()
![]()
![]()
![]()
Conclusion
Simulating and rendering fluids is a challenging problem which up until recently required minutes or hours per frame to compute. It is only thanks to the massive parallelism and performance of modern GPUs that it has become possible in real-time. NVIDIA has shown several real-time fluid demos over the years. However, it is one thing to produce a technical demo, but is much harder to integrate fluid simulation into a commercial game. NVIDIA was happy to work with Spicy Horse in order to enhance Alice: Madness Returns with this advanced effect and bring the final product closer to their original artistic vision.
Additional Reading
- Particle-Based Fluid Simulation for Interactive Applications, Matthias Müller, David Charypar and Markus Gross, Eurographics/SIGGRAPH Symposium on Computer Animation (2003)
- Screen Space Fluid Rendering for Games, Simon Green, Game Developers Conference (2010)